Page 152 of 400

152 Controls in detailGood visibilityRear window sunshade*
The switch is located in the center console.�
Turn the SmartKey to starter switch
position1 or2.
�
Press upper switch position1 briefly
to raise the sunshade.
�
Press lower switch position2 briefly
to lower the sunshade.
Always raise the sunshade fully for its sup-
port against the window frame.
Warning!
G
When operating the rear window sunshade,
make sure there is no danger of anyone be-
ing harmed by the raising or lowering proce-
dure.
The raising or lowering procedure can be im-
mediately halted by briefly pressing the up-
per or lower half of the switch.
Briefly press upper or lower half of the
switch again to raise or lower the rear win-
dow sunshade completely.
Warning!
G
When leaving the vehicle, always remove the
SmartKey from starter switch, and lock your
vehicle. Do not leave children unattended in
the vehicle, or with access to an unlocked
vehicle. Unsupervised use of vehicle equip-
ment can cause an accident and/or serious
personal injury.
Page 161 of 400
161 Controls in detail
Climate control
Opening the air vent�
Raise lever1.
Closing the air vent
�
Lower lever1.Rear passenger compartment
adjustable air vents
1Left center air vent
2Thumbwheel for air volume control for
center air vents
3Right center air ventTo open center air vents:
�
Turn thumbwheel2 upward.
iThe compartment can get very warm
due to its confined space. When storing
heat sensitive objects in the compart-
ment, close the air vent while heating
the passenger compartment.!Do not obstruct the air vent in the
storage compartment.
iThe temperature at the center air vents
for the rear passenger
compartment1 and3 i s t h e s a m e a s
at the dashboard center air vents.
Page 203 of 400

203 Controls in detail
Sliding/pop-up roof*
�Sliding/pop-up roof*
Opening and closing the sliding/pop-up roof
The sliding/pop-up roof can be opened
and closed electrically. The switch for the
sliding/pop-up roof is on the overhead
control panel.
1Push up to raise roof at rear
2Pull down to lower roof at rear
3Push forward to slide roof closed
4Push back to slide roof openWith the roof closed or tilted open, a
screen can be slid into the roof opening to
guard against sun rays. When sliding the
roof open, the screen will also retract.
Warning!
G
When closing the sliding/pop-up roof, make
sure there is no danger of anyone being
harmed by the closing procedure.
The closing procedure of the sliding/pop-up
roof can be immediately halted by releasing
the switch or, if the switch was moved past
the resistance point and released, by
moving the switch in any direction.
When leaving the vehicle, always remove the
SmartKey from starter switch, and lock your
vehicle. Do not leave children unattended in
the vehicle, or with access to an unlocked
vehicle. Unsupervised use of vehicle equip-
ment can cause an accident and/or serious
personal injury.
!To avoid damaging the seals, do not
transport any objects with sharp edges
which can stick out of the
sliding/pop-up roof.
Do not open the sliding/pop-up roof if
there is snow or ice on the roof, as this
could result in malfunctions.
The sliding/pop-up roof can be opened
or closed manually should an electrical
malfunction occur (
�page 309).
Page 204 of 400

204 Controls in detailSliding/pop-up roof*�
Turn SmartKey in the starter switch to
position1 or2.
Opening and closing the sliding/pop-up
roof
�
To open, close, raise or lower the
sliding/pop-up roof, move the switch
to resistance point in the required
direction1 to4.
Release the switch when the roof has
reached the desired position.Fully opening (Express-open) and
closing (Express-close) the
sliding/pop-up roof
�
To open, close, raise or lower the
sliding/pop-up roof, move the switch
past the resistance point in the
required direction1 to4 and
release.
The sliding/pop-up roof opens or
closes completely.
Stopping the sliding/pop-up roof
�
Move the switch in any direction.Opening and closing the sliding/pop-up
roof with the SmartKey
The power windows (
�page 202) will also
be opened or closed when you operate the
sliding/pop-up roof with the SmartKey .
�
Aim transmitter eye at the driver’s door
handle.
iYou can also open or close the
sliding/pop-up roof using the:�
SmartKey (summer opening/con-
venience feature) (
�page 204)
�
buttonO in the control panel of
the climate control (
�page 155) or
the automatic climate control*
(
�page 163)
�
buttone in the control panel of
the automatic climate control*
(�page 163)
iIf the movement of the sliding/pop-up
roof is blocked during the closing
procedure, the roof will stop and
reopen slightly.
Warning!
G
Never operate the windows or
sliding/pop-up roof* if there is the
possibility of anyone being harmed by the
opening or closing procedure.
In the event that the procedure causes
potential danger, the procedure can be
immediately halted by releasing the
transmit button on the SmartKey. To reverse
direction of movement, press buttonŒ
for opening or‹ for closing.
Page 219 of 400
219 Controls in detail
Useful features
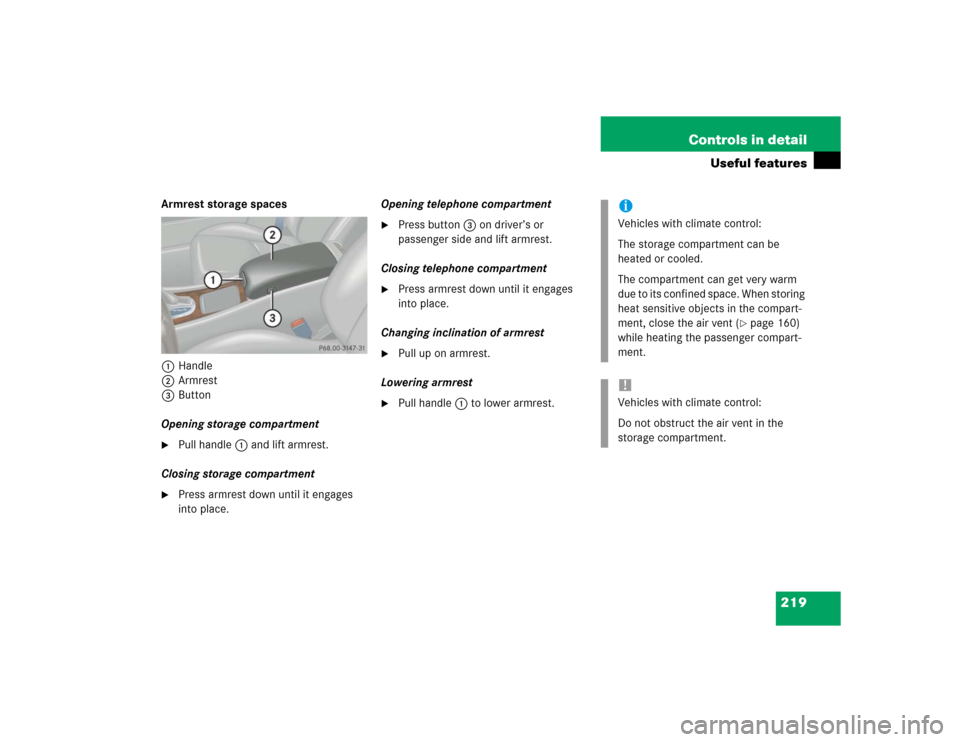
Armrest storage spaces
1Handle
2Armrest
3Button
Opening storage compartment�
Pull handle1 and lift armrest.
Closing storage compartment
�
Press armrest down until it engages
into place.Opening telephone compartment
�
Press button3 on driver’s or
passenger side and lift armrest.
Closing telephone compartment
�
Press armrest down until it engages
into place.
Changing inclination of armrest
�
Pull up on armrest.
Lowering armrest
�
Pull handle1 to lower armrest.
iVehicles with climate control:
The storage compartment can be
heated or cooled.
The compartment can get very warm
due to its confined space. When storing
heat sensitive objects in the compart-
ment, close the air vent (
�page 160)
while heating the passenger compart-
ment.
!Vehicles with climate control:
Do not obstruct the air vent in the
storage compartment.
Page 223 of 400

The Tele Aid system consists of three
types of response:�
automatic and manual eme")
223 Controls in detail
Useful features
Tele Aid* The Tele Aid system
(Tele
matic A
larm I
dentification on
D
emand)
The Tele Aid system consists of three
types of response:�
automatic and manual emergency
�
roadside assistance and
�
information
The Tele Aid system is operational provid-
ing that the vehicle’s battery is charged,
properly connected, not damaged and
cellular and GPS coverage is available.
The speaker volume of a Tele Aid call can
be adjusted when using the volume control
on the multifunction steering wheel. To
raise, press buttonæ and to lower,
press buttonç.
�
To activate, press the SOS button, the
Roadside Assistance button• or
the Information button¡, depend-
ing on the type of response required.Shortly after the completion of your Tele
Aid acquaintance call, you will receive a
user ID and password via first call mail. By
visiting www.mbusa.com and selecting
“Tele Aid” (USA only), you will have access
to account information, remote door
unlock, Info Services profile and more.
!The initial activation of the Tele Aid
system may only be performed by
completing the subscriber agreement
and placing an acquaintance call using
the SOS button. Failure to complete
either of these steps will result in a
system that is not activated. If the
system is not activated, the indicator
lamp in the SOS button stays on after
turning SmartKey in starter switch to
position2 and the message
TELE AID
EMERG. CALL – NOT ACTIVATED
will be
shown in the multifunction display for
approximately ten seconds.
If you have any questions regarding
activation, please call the Response
Center at 1-800-756-9018 (in the USA)
or 1-888-923-8367 (in Canada).
iThe SOS button is located above the
interior rear view mirror.
The Roadside Assistance button•
and the Information button¡ are
located below the center armrest
cover.!The Tele Aid system utilizes the cellular
network for communication and the
GPS (Global Positioning System) satel-
lites for vehicle location. If either of
these signals are unavailable, the
Tele Aid system may not function and if
this occurs, assistance must be sum-
moned by other means.