Page 271 of 400

271 Operation
Vehicle care
Steering wheel and gear selector lever
Wipe with a damp cloth and dry thoroughly
or clean with Mercedes-Benz approved
Leather Care.
Cup holder
Use a gentle dishwashing detergent or
mild detergent for delicate fabrics as a
washing solution. Wipe with a cloth moist-
ened in lukewarm solution. Do not use
scouring agents.
Hard plastic trim items
Pour Mercedes-Benz approved Interior
Care onto soft lint-free cloth and apply
with light pressure.Headliner and rear window shelf
Clean with soft bristle brush, or use a
dry-shampoo cleaner in case of excessive
dirt.
Seat belts
The webbing must not be treated with
chemical cleaning agents. Only use clear,
lukewarm water and soap. Do not dry the
webbing at temperatures above 176°F
(80°C) or in direct sunlight.Upholstery
Using aftermarket seat covers or wearing
clothing that have the tendency to give off
coloring (e.g. when wet, etc.) may cause
the upholstery to become permanently dis-
colored. By lining the seats with a proper
intermediate cover, contact-discoloration
will be prevented.
Leather upholstery
Wipe leather upholstery with a damp cloth
and dry thoroughly or clean with
Mercedes-Benz approved Leather Care.
Exercise particular care when cleaning
perforated leather as its underside should
not become wet.
Warning!
G
Do not bleach or dye seat belts as this may
severely weaken them. In a crash they may
not be able to provide adequate protection.
Page 294 of 400

294 Practical hintsWhat to do if …Display symbol
Display message
Possible cause
Possible solution
.
FRONT FOGLIGHT, L
CHECK LIGHT!
The left front fog lamp is malfunctioning.
�
Replace the bulb as soon as possible.
FRONT FOGLIGHT, R
CHECK LIGHT!
The right front fog lamp is malfunctioning.
�
Replace the bulb as soon as possible.
REAR FOGLIGHT
CHECK LIGHT!
The rear fog lamp is malfunctioning.
�
Replace the bulb as soon as possible.
HIGH BEAM, L
CHECK LIGHT!
The left high beam lamp is
malfunctioning.
�
Replace the bulb as soon as possible.
HIGH BEAM, R
CHECK LIGHT!
The right high beam lamp is
malfunctioning.
�
Replace the bulb as soon as possible.
LIGHT SENSOR
VISIT WORKSHOP!
The lamp sensor is malfunctioning. The
headlamps switch on automatically.
�
In the control system, set lamp
operation to manual (
�page 123).
�
Switch on headlamps using the
exterior lamp switch.
�
Visit an authorized Mercedes-Benz
Center as soon as possible.
LICENSE PLATE LIGHT, L
CHECK LIGHT!
The left license plate lamp is
malfunctioning.
�
Replace the bulb as soon as possible.
LICENSE PLATE LIGHT, R
CHECK LIGHT!
The right license plate lamp is
malfunctioning.
�
Replace the bulb as soon as possible.
Page 295 of 400

295 Practical hints
What to do if …
Display symbol
Display message
Possible cause
Possible solution
.
LIGHTS
TURN OFF LIGHTS!
This display appears if the driver’s door is
opened and no SmartKey in the starter
switch.
�
Insert SmartKey in the starter switch.
�
Switch off the headlights.
LOW BEAM, L
CHECK LIGHT!
The left low beam lamp is malfunctioning.
�
Visit an authorized Mercedes-Benz
Center as soon as possible.
LOW BEAM, R
CHECK LIGHT!
The right low beam lamp is
malfunctioning.
�
Visit an authorized Mercedes-Benz
Center as soon as possible.
REVERSE LIGHT, L
CHECK LIGHT!
The left backup lamp is malfunctioning.
�
Replace the bulb as soon as possible.
REVERSE LIGHT, R
CHECK LIGHT!
The right backup lamp is malfunctioning.
�
Replace the bulb as soon as possible.
MARKER LIGHT, FL
CHECK LIGHTS!
BACK-UP LIGHT ON!
The left parking lamps are
malfunctioning. A backup bulb is being
used.
�
Visit an authorized Mercedes-Benz
Center as soon as possible.
MARKER LIGHT, FR
CHECK LIGHTS!
BACK-UP LIGHT ON!
The right parking lamps are
malfunctioning. A backup bulb is being
used.
�
Visit an authorized Mercedes-Benz
Center as soon as possible.
TAIL LIGHT, L
CHECK LIGHTS!
BACK-UP LIGHT ON!
The left tail lamp is malfunctioning.
A backup bulb is being used.
�
Visit an authorized Mercedes-Benz
Center as soon as possible.
Page 306 of 400

306 Practical hintsUnlocking/locking in an emergencyUnlocking the trunk
A minimum height clearance of 5.71 ft
(1.74 m) is required to open the trunk lid.
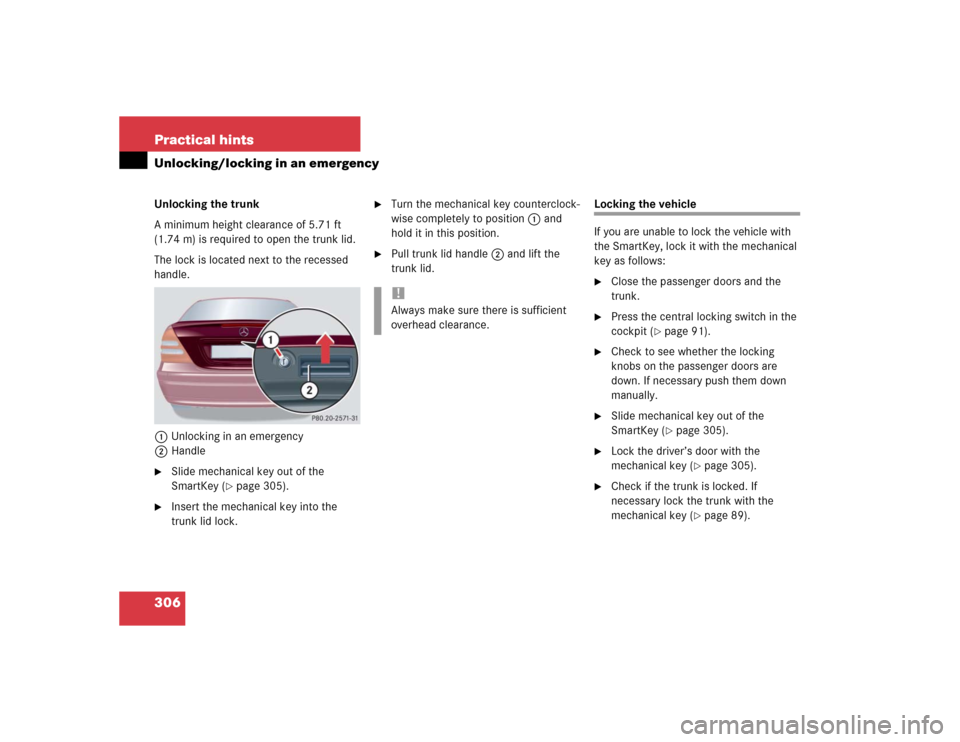
The lock is located next to the recessed
handle.
1Unlocking in an emergency
2Handle�
Slide mechanical key out of the
SmartKey (
�page 305).
�
Insert the mechanical key into the
trunk lid lock.
�
Turn the mechanical key counterclock-
wise completely to position1 and
hold it in this position.
�
Pull trunk lid handle2 and lift the
trunk lid.
Locking the vehicle
If you are unable to lock the vehicle with
the SmartKey, lock it with the mechanical
key as follows:�
Close the passenger doors and the
trunk.
�
Press the central locking switch in the
cockpit (
�page 91).
�
Check to see whether the locking
knobs on the passenger doors are
down. If necessary push them down
manually.
�
Slide mechanical key out of the
SmartKey (
�page 305).
�
Lock the driver’s door with the
mechanical key (
�page 305).
�
Check if the trunk is locked. If
necessary lock the trunk with the
mechanical key (
�page 89).
!Always make sure there is sufficient
overhead clearance.
Page 309 of 400
309 Practical hints
Opening/closing in an emergency
�Opening/closing in an emergency
Sliding/pop-up roof*
You can open or close the sliding/pop-up
roof manually should an electrical
malfunction occur.
The sliding/pop-up roof drive is located
behind the lens1 of the interior overhead
light.�
Pry of lens1 using a flat blade
screwdriver.
�
Slide both locking tabs2 in direction
of arrow.
�
Lower rear of cover and remove.
�
Remove cover.
�
Obtain crank3.
�
Insert crank3 through hole.
�
Turn crank3 clockwise to:�
slide roof closed
�
raise roof at the rear
�
Turn crank3 counterclockwise to:�
slide roof open
�
lower roof at the rear
The sliding/pop-up roof must be
resynchronized after being operated
manually (
�page 205).
iDo not disconnect electrical
connectors.
Page 310 of 400
310 Practical hintsReplacing bulbs
�Replacing bulbsSafe vehicle operation depends on proper
exterior lighting and signaling. It is there-
fore essential that all bulbs and lamp
assemblies are in good working order at all
times.
Correct headlamp adjustment is extremely
important. Have headlamps checked and
readjusted at regular intervals and when a
bulb has been replaced. See your autho-
rized Mercedes-Benz Center for headlamp
adjustment.
Bulbs Front lamps
iBackup bulbs will be brought into use
when the following lamps malfunction:�
Standing lamps
�
Tail lamps
�
Rear fog lamp
Lamp
Type
1
Additional turn signal
lamps
LED
2
Turn signal lamp
Halogen
Turn signal lamp
Bi-Xenon*
1156 A
2357 A
3
Halogen headlamps:
Low beam
Bi-Xenon* headlamps:
Low and high beam
H7 (55 W)
D2S-35 W
4
Halogen headlamps:
High beam
Bi-Xenon* headlamps:
High beam flasher
H7 (55 W)
H7 (55 W)
Parking and standing
lamps
W5W
5
Fog lamp
HB4/9006
(55 W)
6
Side marker lamp
W5W
Page 312 of 400

312 Practical hintsReplacing bulbsReplacing bulbs for front lamps
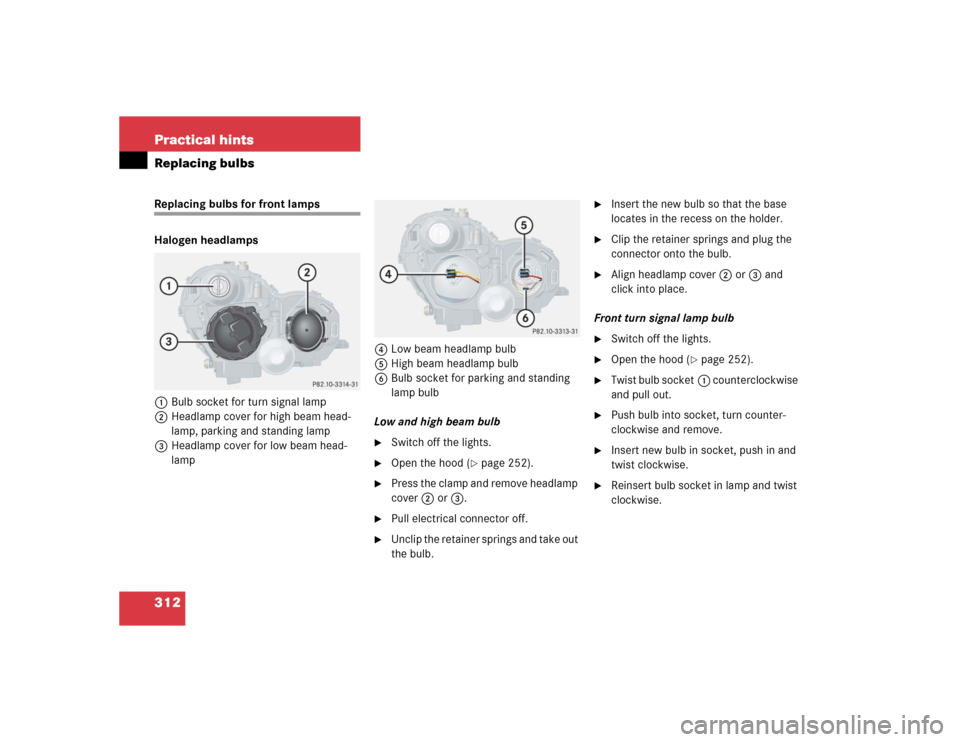
Halogen headlamps
1Bulb socket for turn signal lamp
2Headlamp cover for high beam head-
lamp, parking and standing lamp
3Headlamp cover for low beam head-
lamp4Low beam headlamp bulb
5High beam headlamp bulb
6Bulb socket for parking and standing
lamp bulb
Low and high beam bulb
�
Switch off the lights.
�
Open the hood (
�page 252).
�
Press the clamp and remove headlamp
cover2 or3.
�
Pull electrical connector off.
�
Unclip the retainer springs and take out
the bulb.
�
Insert the new bulb so that the base
locates in the recess on the holder.
�
Clip the retainer springs and plug the
connector onto the bulb.
�
Align headlamp cover2 or3 and
click into place.
Front turn signal lamp bulb
�
Switch off the lights.
�
Open the hood (
�page 252).
�
Twist bulb socket1 counterclockwise
and pull out.
�
Push bulb into socket, turn counter-
clockwise and remove.
�
Insert new bulb in socket, push in and
twist clockwise.
�
Reinsert bulb socket in lamp and twist
clockwise.
Page 313 of 400

313 Practical hints
Replacing bulbs
Parking and standing lamp bulb�
Switch off the lights.
�
Open the hood (
�page 252).
�
Press the clamp and remove headlamp
cover2.
�
Pull out bulb socket6 with the bulb.
�
Pull the bulb out of bulb socket.
�
Insert a new bulb in the socket.
�
Reinstall bulb socket.
�
Align headlamp cover2 and click into
place.Bi-Xenon* headlamps
1Bulb socket for turn signal lamp
2Headlamp cover for high beam flasher,
parking and standing lamp
3Cover for Bi-Xenon lamp4High beam flasher bulb
5Bayonet socket for high beam flasher
bulb
6Bulb socket for parking and standing
lamp bulb
High beam bulb
�
Switch off the lights.
�
Open the hood (
�page 252).
�
Press the clamp and remove lamp
cover2.
�
Pull electrical connector4 off.
Warning!
G
Do not remove the cover3 for the
Bi-Xenon headlamp. Because of high voltage
in Bi-Xenon lamps, it is dangerous to replace
the bulb or repair the lamp and its compo-
nents. We recommend that you have such
work done by a qualified technician.
��