Page 209 of 400
209 Controls in detail
Loading
�Loading
Roof rack*
�
Mount the roof rack only to the
fastening bolts (see arrows) located
under the door weatherstrips.
�
Secure the roof rack according to
manufacturer’s instructions for
installation.
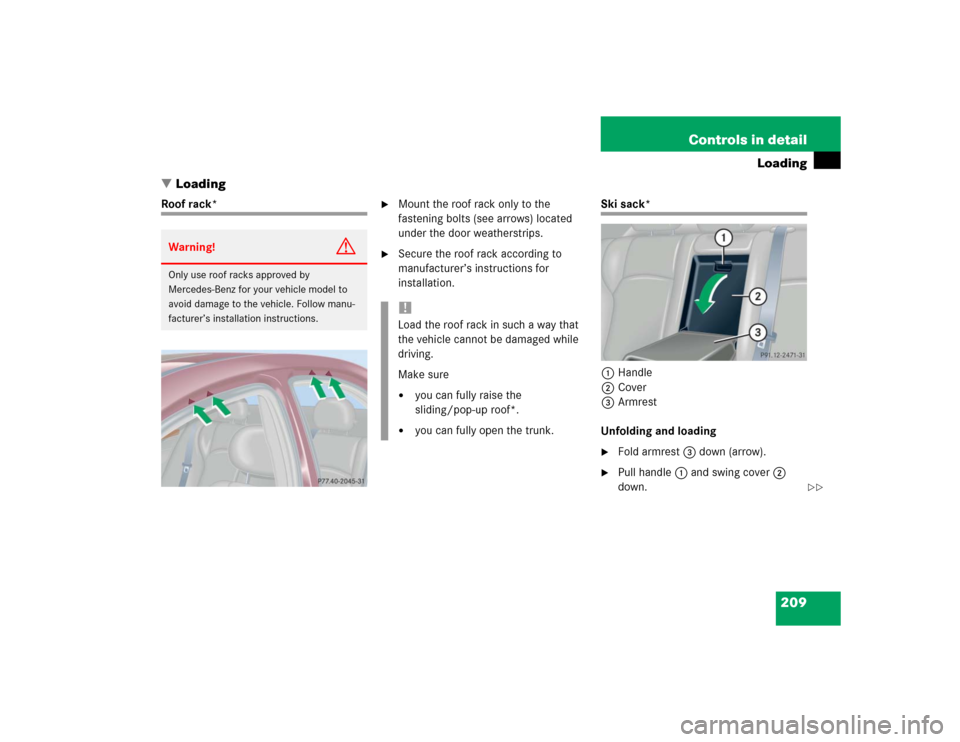
Ski sack*
1Handle
2Cover
3Armrest
Unfolding and loading�
Fold armrest3 down (arrow).
�
Pull handle1 and swing cover2
down.
Warning!
G
Only use roof racks approved by
Mercedes-Benz for your vehicle model to
avoid damage to the vehicle. Follow manu-
facturer’s installation instructions.
!Load the roof rack in such a way that
the vehicle cannot be damaged while
driving.
Make sure�
you can fully raise the
sliding/pop-up roof*.
�
you can fully open the trunk.
��
Page 238 of 400

�In the “Operation” section you will find
detailed information on operating, main-
taining and caring for your vehicle.
The first 1 000 miles (1 500")
238 OperationThe first 1 000 miles (1 500 km)
�In the “Operation” section you will find
detailed information on operating, main-
taining and caring for your vehicle.
The first 1 000 miles (1 500 km)
The more cautiously you treat your vehicle
during the break-in period, the more satis-
fied you will be with its performance later
on.�
Drive your vehicle during the first
1 000 miles (1 500 km) at varying but
moderate vehicle and engine speeds.
�
During this period, avoid heavy loads
(full throttle driving) and excessive
engine speeds (no more than
2/3 of
maximum rpm in each gear).
�
Shift gears in a timely manner.
�
Avoid accelerating by kick-down.
�
Do not attempt to slow the vehicle
down by shifting to a lower gear using
the gear selector lever.
�
Select positions3,2 or1 only when
driving at moderate speeds (for hill
driving).
After 1 000 miles (1 500 km) you may
gradually increase vehicle and engine
speeds to the permissible maximum.All of the above instructions, as may apply
to your vehicle type, also apply when
driving the first 1 000 miles (1 500 km)
after the engine or the rear differential has
been replaced
!Additional instructions for AMG
vehicles:�
During the first 1 000 miles
(1 500 km), do not exceed a speed
of 85 mph (140 km/h).
�
During this period, avoid engine
speeds above 4 500 rpm in each
gear.
iAlways obey applicable speed limits.
Page 240 of 400
, it is advisable to brake the
vehicle with considerable fo")
240 OperationDriving instructionsBrakesTo help prevent brake disk corrosion after
driving on wet road surfaces (particularly
salted roads), it is advisable to brake the
vehicle with considerable force prior to
parking. The heat generated serves to dry
the brakes.
If your brake system is normally only
subject to moderate loads, you should
occasionally test the effectiveness of the
brakes by applying above-normal braking
pressure at higher speeds. This will also
enhance the grip of the brake pads.
If the parking brake is released and the
brake warning lamp in the instrument
cluster stays on, the brake fluid level in the
reservoir is too low.Brake pad wear or a leak in the system may
be the reason for low brake fluid in the
reservoir.
Have the brake system inspected
immediately. Contact your authorized
Mercedes-Benz Center.
All checks and service work on the brake
system should be carried out by qualified
technicians only. Contact your authorized
Mercedes-Benz Center.
Only install brake pads and brake fluid
recommended by Mercedes-Benz.Warning!
G
After driving in heavy rain for some time
without applying the brakes or through wa-
ter deep enough to wet brake components,
the first braking action may be somewhat
reduced and increased pedal pressure may
be necessary to obtain expected braking ef-
fect. Maintain a safe distance from vehicles
in front.
Resting your foot on the brake pedal will
cause excessive and premature wear of the
brake pads.
It can also result in the brakes overheating,
thereby significantly reducing their effec-
tiveness. It may not be possible to stop the
vehicle in sufficient time to avoid an acci-
dent.
!Be very careful not to endanger other
road users when you apply the brakes.
Refer to the description of the Brake
Assist System (BAS) (
�page 73).
Warning!
G
If other than recommended brake pads are
installed, or other than recommended brake
fluid is used, the braking properties of the
vehicle can be degraded to an extent that
safe braking is substantially impaired. This
could result in an accident.
Page 265 of 400

265 Operation
Maintenance
�Maintenance
We strongly recommend that you have
your vehicle serviced by your authorized
Mercedes-Benz Center, in accordance with
the Service Booklet at the times called for
by the FSS (Flexible Service System).
Failure to have the vehicle maintained in
accordance with the Service Booklet at the
designated times/mileage called for by
the FSS may result in vehicle damage not
covered by the Mercedes-Benz Limited
Warranty.
FSS will notify you when your next service
is due.
Approximately one month before your next
service is due, one of the following
messages will appear in the multifunction
display while you are driving or when you
switch on the ignition (example service A):SERVICE A IN XX DAYS
SERVICE A IN XX MILES (KM)
SERVICE A DUE NOW!
The type of service due is indicated in the
multifunction display:
9Minor service (A)
´Major service (B)
Clearing the service indicator
The service indicator is automatically
cleared�
after ten seconds when you switch on
the ignition or when reaching the
service threshold while driving
�
after 30 seconds, once the suggested
service term has passed
You can also clear it yourself.
�
Press the reset button on the
instrument cluster (
�page 22).
Service term exceeded
If you have exceeded the suggested
service term, you will see the following
message in the multifunction display:SERVICE A EXCEEDED BY XX DAYS
SERVICE A EXCEEDED BY XX MI (KM)An acoustic signal will also sound.
iThe interval between services depends
on your driving habits. A gentle driving
style, moderate engine speeds and the
avoidance of short-distance trips will
lengthen the interval between services.
Page 276 of 400

276 Practical hintsWhat to do if …Problem
Possible cause
Suggested solution
?
The yellow “CHECK ENGINE”
malfunction indicator lamp
comes on while driving.
There is a malfunction in:�
The fuel management system
�
The ignition system
�
The emission control system
�
Systems which affect emissions
Such malfunctions may result in excessive
emissions values and may switch the engine
to its limp-home (emergency operation)
mode.
�
Have the vehicle checked as soon as
possible by an authorized
Mercedes-Benz Center.
An on-board diagnostic connector is
used by the service station to link the
vehicle to the shop diagnostics sys-
tem. It allows the accurate identifica-
tion of system malfunctions through
the readout of diagnostic trouble
codes. It is located in the front left
area of the footwell next to the
parking brake pedal.
The fuel cap is not closed tight.
�
Check the fuel cap.
Your gas tank is empty.
�
After refuelling start the engine three
or four times in succession.
The limp-home mode is canceled. You do
not need to have your vehicle checked.
Page 370 of 400

370 IndexAutomatic climate control* 162
Activating 163
Adjusting air distribution 166
Adjusting air volume 166
Air recirculation mode 167
Deactivating 163
Defrosting 167
Rear window defroster 153
Residual heat utilization 171
Residual ventilation 171
Setting the temperature 165
Automatic headlamp mode 103
Automatic lighting control
Activating 107
Deactivating 107
Automatic locking when driving 90
Automatic transmission fluid see ATF
Automatic transmission* 142
Accelerator position 147
Comfort program mode 146
Emergency operation
(Limp Home Mode) 147
Fluid level 256Gear ranges 144
Gear selector lever 44
Gear selector lever position 142, 145
Gear shifting malfunctions 147
Kickdown 147
Manual shifting 143
One-touch gearshifting 143
Program mode selector switch 146
Starting with 44
Transmission fluid 256
Auxiliary fuse box 334
B
BabySmart
TM
Airbag deactivation system 66, 361
Compatible child seats 66, 361
Self-test 66
Backrest
Folding forward 213
Folding rearward 213
Backrest contour
Adjusting 97Backrest side bolsters
Adjusting 97
Backrest tilt
Manual seat 33
Power seat* 35
Backup lamps 311, 315
Bulbs 310
BAS 73, 361
Messages in display 281
Batteries, SmartKey
Changing 307
Check lamp 83
Checking 84
Battery discharged
Jump starting 326
Battery, vehicle 258, 323
Charging 324
Disconnecting 324
Messages in display 285
Reconnecting 325
Reinstalling 324
Removing 324
Page 373 of 400

373 Index
Climate control 154
Adjusting air distribution
and volume 157
Defogging windshield 157
Defrosting 158
Setting the temperature 156
Clock 23, 126
Closing
Glove box 216
Hood 253
Sliding/pop-up roof* 204
Sliding/pop-up roof*
in an emergency 309
Sliding/pop-up roof*
with SmartKey 204
Trunk lid 87
Windows 201
Windows with SmartKey 202
Cloth upholstery
Cleaning 272
Cockpit 20, 361Cockpit Management and Data System
see COMAND*
COMAND* 362
COMAND*
see separate operating instructions
Combination switch 105
High beam flasher 47
Turn signals 47
Windshield wipers 47
Comfort driving
Transmission program mode 146
Consumer information 359
Control and operation of radio
transmitters 246
Control system 113, 362
AUDIO menu 118
Convenience submenu 133
Display digital speedometer 118
Functions 114, 117
Instrument cluster submenu 126
Lighting submenu 129Malfunction memory menu 122
Menus 116, 117, 363
Multifunction display 113
Multifunction steering wheel 114
NAVI* menu 121
Selecting radio system 119
Selecting satellite radio* system 119
Settings menu 123
Standard display menu 118
Submenus 115, 117
TEL* menu 138
Trip computer menu 136
Vehicle submenu 132
Controller Area Network see CAN system
Convenience submenu 133
Activating easy-entry/exit
feature* 134
Setting key dependency 135
Setting parking position* for exterior
rear view mirror 136
Page 374 of 400

374 IndexCoolant 257, 356
Adding 257
Anticorrosion/antifreeze
quantity 356
Capacities 350
Checking level 257
Messages in display 287–289
Temperature 248
Temperature display 110
Coolant level
Checking 257
Cruise control 206, 362
Canceling 207
Driving downhill 207
Driving uphill 207
Fine adjustment 208
Message in display 290
Setting current speed 207
Setting speeds 208
Cruise control lever 206
Cruising range, fuel 355Cup holder
Cleaning 271
In front of seat armrest 217
In rear seat armrest 218
Customer Assistance Center see CAC
D
Daytime running lamp mode 104
Setting 129
Deactivating
Air conditioning (cooling)
Automatic climate control* 170
Climate control 160
Air recirculation mode
Automatic climate control* 168
Climate control 159
Alarm 79
Anti-theft alarm system* 79
Automatic climate control* 163
Central locking (control system) 133
Climate control 155
Climate control system 159Cruise control 207
Defrosting
Automatic climate control* 167
Climate control 158
Engine with the SmartKey 52
ESP 75
Exterior lamps 103
Exterior lamps delayed shut-off 131
Front fog lamps 131
Hazard warning flasher 106
Headlamps 51
Interior lighting delayed shut-off 132
Rapid seat heating* 98
Rear window defroster 153
Seat heating* 98
Tow-away alarm* 80
Deep water see Standing water
Defogging
Windshield
Automatic climate control* 166
Climate control 157