Page 305 of 376

305
Practical hints
Flat tire
�
Open flap
1 on air pump.
�
Pull out electrical plug 4 and air hose
with the pressure gauge 2.
Observe instructions on air pump label.
�
Remove the valve cap from valve.
�
Screw the air hose 2 on to the tire
valve.
�
Insert electrical plug 4 into vehicle
cigarette lighter socket.
�
To switch on the air pump turn the
SmartKey in the starter switch to
position 1 (
�page 31).
�
Operate air pump until the pressure
gauge displays 36 psi (2.5 bar)
This takes about five minutes for the
space tire. The air hose 2 and the
union nut 3 can become hot during in-
flation.
�
To switch off the air pump turn the
SmartKey in the starter switch to
position 0 (
�page 31).
�
If the tire pressure is above 36 psi
(2.5 bar), release excess tire pressure
using the vent screw.
�
Detach the electric air pump.
�
Store the electrical plug and the air
hose behind the flap and place the air
pump back in the trunk.
!Do not operate the electric air pump
longer than eight minutes without in-
terruption. Otherwise it may overheat.
You may operate the air pump again af-
ter it has cooled off.
Warning!
G
Follow recommended inflation pressures.
Do not overinflate tires. Overinflated tires
can result in sudden deflation (blowout) be-
cause they are more likely to become punc-
tured or damaged by road debris, potholes,
etc.
Do not underinflate tires. Underinfalted tires
wear unevenly, adversely affect handling
and fuel economy, and are more likely to fail
from being overheated.
Do not overload the tires by exceeding the
specified vehicle capacity weight (as indicat-
ed by the label on the driver’s door latch
post). Overloading the tires can overheat
them, possibly causing a blowout.
Page 306 of 376
306 Practical hintsFlat tireLowering the vehicle�
Lower vehicle by turning crank coun-
terclockwise until vehicle is resting ful-
ly on its own weight.
�
Remove the jack.
1 -5 Wheel bolts
�
Tighten the five wheel bolts evenly, fol-
lowing the diagonal sequence
illustrated ( 1 to 5 ), until all bolts are
tight. Observe a tightening torque of
80 lb-ft (110 Nm).
�
Before storing the jack in the trunk, it
should be fully collapsed, with handle
folded in.Warning!
G
Have the tightening torque checked after
changing a wheel. The wheels could come
loose if they are not tightened to a torque of
80 lb-ft (110 Nm).
Page 316 of 376
316 Practical hintsTowing the vehicleInstalling towing eye bolt1 Cover on right side of front bumper. 2
Cover on right side of rear bumper. To remove cover:
�
Press mark on cover in direction of ar-
row.
�
Lift cover off to reveal threaded hole for
towing eye bolt.
The towing eye bolt is supplied with the
tool kit (located in the wheel well below the
trunk floor).
�
Screw towing eye bolt in to its stop and
tighten with lug wrench.
To reinstall cover:
�
Fit cover and snap into place.
Page 318 of 376
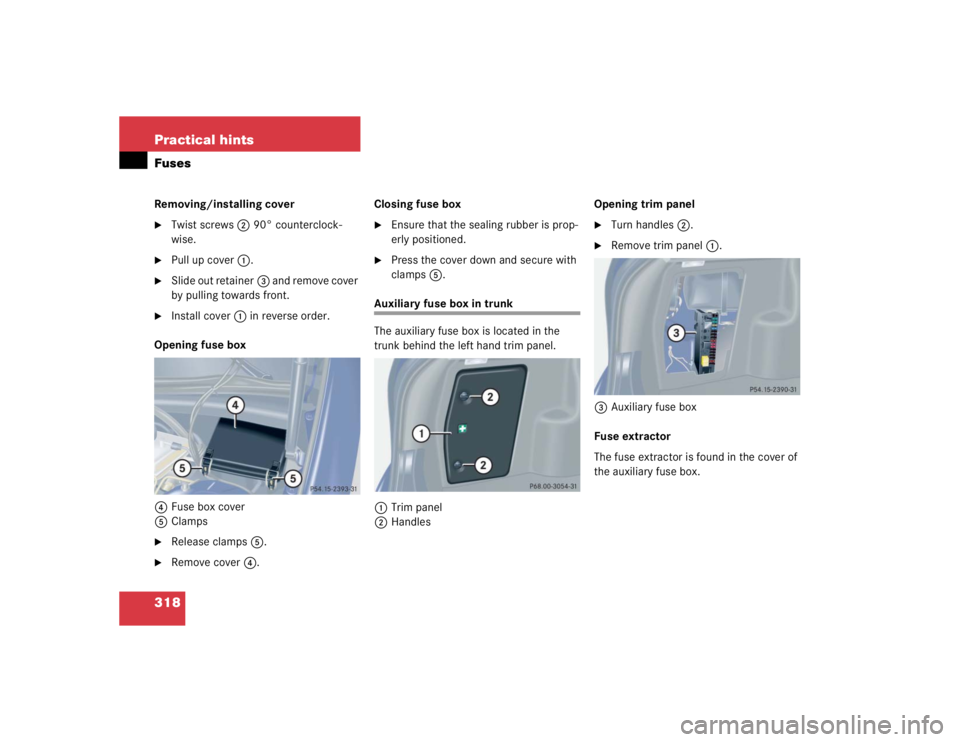
318 Practical hintsFusesRemoving/installing cover�
Twist screws2 90° counterclock-
wise.
�
Pull up cover 1.
�
Slide out retainer 3 and remove cover
by pulling towards front.
�
Install cover 1 in reverse order.
Opening fuse box
4 Fuse box cover
5 Clamps
�
Release clamps 5.
�
Remove cover 4. Closing fuse box
�
Ensure that the sealing rubber is prop-
erly positioned.
�
Press the cover down and secure with
clamps
5.
Auxiliary fuse box in trunk
The auxiliary fuse box is located in the
trunk behind the left hand trim panel.
1 Trim panel
2 Handles Opening trim panel
�
Turn handles
2.
�
Remove trim panel 1.
3 Auxiliary fuse box
Fuse extractor
The fuse extractor is found in the cover of
the auxiliary fuse box.
Page 329 of 376
329
Technical data
Weights
� Weights
Roof load max.
220 lb (100 kg)
Trunk load max.
220 lb (100 kg)
Page 351 of 376

351
Index
Checking
Coolant level 235, 241
Oil level 235, 237
Tire inflate pressure 235
Vehicle lighting 235
Child safety 65 Airbags 58
Infant and child restraint systems 62, 65
LATCH child seat mounts 70
Child seat mounts see LATCH child seat mounts 70
Cigarette lighter 204
Cleaning Cup holder 255
Gear selector lever 255
Hard plastic trim items 255
Headlamps 148
Headliner and shelf below rear window 255
Instrument cluster 255
Leather upholstery 256
Light alloy wheels 254 MB Tex upholstery 256
Plastic and rubber parts 256
Seat belts 255
Steering wheel 255
Upholstery 256
Windows 254
Windshield 50
Wiper blades 254
Wood trims 256
Climate control 150 Adjusting 153
Defogging windshield 153
Defrosting 154
Rear window defroster 149
Setting the temperature 153
Clock 23, 122
Closing Glove box 200
Hood 237
power window with SmartKey 188 Roller sunblind for the
sliding/pop-up roof 189
Side windows 187
Sliding/pop-up roof 190, 292
Trunk lid 86
Windows 186
Windows with SmartKey 188
Closing sliding/pop-up roof In an emergency 292
Cockpit 20, 341
Cockpit management and data system (COMAND*) 342
Collapsible tire 342
COMAND* 342
COMAND* see separate operating instruc- tions
Combination switch 102 High beam flasher 102
Turn signals 48
Windshield wipers 49
Consumer information 339
Control and operation of radio transmitters 230
Control system 109, 342
Page 354 of 376

354 Index
Safety systems 73
Through standing water 229
Driving abroad 230
Driving instructions 223
Driving off 225
Driving safety systems ABS 73
BAS 74
ESP 75
Driving systems 194 Cruise control 194
Driving safety systems 73
E
Easy-entry/exit feature 89 Activating 130
Interrupting movement 89, 130
Electrical fuses 317
Electrical system Technical data 327
Electronic Stability Program see ESP 23, 75, 342 Emergency call system* 206
Emergency calls
Initiating an emergency call 209
Telephone* 184
With Tele Aid* 208
Emergency operation (Limp Home Mode) 145
Emergency operations Closing sliding/pop-up roof 292
Locking the vehicle 289
Opening sliding/pop-up roof 292
Remote door unlock 213
Unlocking the vehicle 288
Emergency release Trunk lid 86
Emergency tensioning device see ETD 64, 342
Emission control 231
Emission control label 322
Ending A call (telephone) 135 Engine
Compartment 236
Message in display 260
Starting with automatic transmission 45
Starting with manual transmission 44
Starting with the key 45
Technical data 324
Turning off with the key 53
Engine cleaning 253
Engine compartment 236 Fuse box in 317
Hood 236
Engine malfunction indicator lamp 23, 260
Engine number 342
Engine oil 237, 332 Adding 239
Additives 332
Checking level 237
Consumption 237
Display messages 275
Filler neck 240
Page 356 of 376
 249, 342
Fuel 234 Additives 334
Cruising range 335
E85 (E")
356 IndexFront seat head restraintsInstalling 90
Manual seat 90
Power seat* 91
Removing 90
Front seats Heater 93
FSS (Flexible Service System) 249, 342
Fuel 234 Additives 334
Cruising range 335
E85 (Ethanol fuel) 335
Fuel reserve warning lamp 262
Gasoline additives 334
Premium unleaded gasoline 234, 331, 333
Requirements 333
Reserve warning 23
Switching (Flexible fuel vehicle) 334
Technical data 330
Fuel additives 334 Fuel consumption statistics
After start 133
Since last reset 133
Fuel filler flap 233 Locking 233
Opening 291
Unlocking 233
Fuel requirements 333
Fuel reserve tank Message in display 277
Fuel tank Capacity 331
Filler flap 233
Fuels, coolants, lubricants etc. Capacities 330
Functions (control system) 110, 113 Resetting 120
Fuse box 317
Fuse chart 317
Fuse extractor 318
Fuses 317 Auxiliary fuse box in trunk 318
Fuse box in engine compartment 317
Fuse box in passenger
compartment 317
Fuse chart 317
Fuse extractor 318
G
Garage door opener 27, 214
Gasoline see Fuel 234 Gasoline additives 334
Gear range 342 Automatic transmission 141
Limiting 141
Shifting into optimal 140
Gear range limit Canceling 140
Gear selector lever 291 Cleaning 255
Position 142
Unlocking manually 291
Global Locking 83
Unlocking 83