Page 97 of 376

97
Controls in detail
Memory function*
Storing exterior rear view mirror park-ing position
For easier parking, you can adjust the pas-
senger-side exterior rear view mirror so
that you can see the right rear wheel as
soon as you engage reverse gear
R.
For information on activating the parking
position, see see “Activating exterior rear
view mirror parking position”
(�page 147). 1
Adjustment button
2 Passenger side exterior rear view mir-
ror
3 Memory button
�
Stop the vehicle.
�
Switch ignition on (if not already on).
�
Press button 2.
The passenger side exterior rear view
mirror is selected.
�
Adjust the exterior rear view mirror
with button 1 so that you see the rear
wheel and the curb.
�
Press memory button “M” 3 on the
door.
�
Within three seconds press bottom of
adjustment button 1 above the exteri-
or lamp switch.
The parking position is stored if the
mirror does not move.
iYou can store a parking position for the
passenger side exterior rear view mir-
ror for each SmartKey using the memo-
ry switch.
iIf the mirror does move, repeat the
above steps. After the setting is stored
you can move the mirror again.
Page 102 of 376

102 Controls in detailLightingCombination switch
The combination switch is located on the
left side of the steering column.1 High beam
2 High beam flasher
Switching on high beams�
Turn exterior lamp switch to
position B or to U (
�page 98).
�
Push the combination switch in
direction 1.
The high beam indicator B on the
instrument cluster is illuminated
(�page 22). High beam flasher
�
Pull the combination switch briefly in
direction
2.
Hazard warning flasher
The hazard warning flasher can be activat-
ed with the ignition switched on or off. It is
activated automatically when an airbag is
deployed.
The switch is located on the center con-
sole.
1 Hazard warning flasher switch Switching on the hazard warning
flasher
�
Press the hazard warning flasher
switch.
All turn signals will flash.
Switching off the hazard warning
flasher
�
Press hazard warning flasher switch
again.iWith the hazard warning flasher acti-
vated and the combination switch set
for either left or right turn, only the re-
spective left or right turn signals will
operate when the SmartKey in the
starter switch is in position 1 or 2.iIf the hazard warning flasher was acti-
vated automatically press switch 1
twice.
Page 105 of 376
.
The instrument cluster is activated when
you")
105
Controls in detail
Instrument cluster
� Instrument cluster
For a full view illustration of the instrument
cluster, see “At a glance” (
�page 22).
The instrument cluster is activated when
you:
�
open a door
�
turn on the ignition
�
press the reset button (
�page 22)
�
switch on the exterior lamps
You can change the instrument cluster
settings in the Instrument cluster submenu
of the control system (
�page 122).
Instrument cluster illumination
Use the reset button (
�page 22) to adjust
the illumination brightness for the instru-
ment cluster. To brighten illumination
�
Turn the reset button in the instrument
cluster (
�page 22) clockwise.
The instrument cluster illumination will
brighten.
To dim illumination
�
Turn the reset button in the instrument
cluster (
�page 22) counterclockwise.
The instrument cluster illumination will
dim.
iThe instrument cluster illumination is
dimmed or brightened automatically to
suit ambient light conditions.
The instrument cluster illumination will
also be adjusted automatically when
you switch on the vehicle’s exterior
lamps.
Page 146 of 376
 and for setting the rear view
mirrors (
�page 39) is found in the “Get-
ting started” sectio")
146 Controls in detailGood visibility
�Good visibilityInformation on the windshield wipers
(�page 49) and for setting the rear view
mirrors (
�page 39) is found in the “Get-
ting started” section.
Rear view mirrors
Interior rear view mirror, antiglare posi-
tion
1 Lever
Tilt the mirror to the antiglare night posi-
tion using lever 1. Automatic antiglare rear view mirrors*
The reflection brightness of the exterior
rear view mirror on the driver’s side and
the interior rear view mirror will respond
automatically to glare when
�
the ignition is switched on
and
�
incoming light from headlamps falls on
the sensor in the interior rear view mir-
ror.
The rear view mirror will not react if
�
reverse gear is engaged
�
the interior lighting is turned on.
Warning!
G
The automatic antiglare function does not
react if incoming light is not aimed directly
at sensors in the interior rear view mirror.
The interior rear view mirror and the exterior
rear view mirror on the driver’s side do not
react, for example, when transporting cargo
which covers the rear window.
Glare can endanger you and others.Warning!
G
In the case of an accident liquid electrolyte
may escape from the mirror housing if the
mirror glass breaks.
Electrolyte has an irritating effect. Do not al-
low the liquid to come into contact with
eyes, skin, clothing, or respiratory system.
In case it does, immediately flush affected
area with water, and seek medical help if
necessary.
Page 147 of 376

147
Controls in detail
Good visibility
Activating exterior rear view mirror
parking position
Follow these steps to activate the mirror
parking position so that the passen-
ger-side exterior rear view mirror will be
turned downward to the stored positions.�
Make sure you stored a parking posi-
tion for the passenger-side exterior
rear view mirror (
�page 97)
�
Make sure the
MIRROR SETTING WHEN
PARKING
function, found under the
CON-
VENIENCE
submenu in the control sys-
tem, is switched to
ON (�page 132).
�
Switch on ignition.
�
Press button 2 for the passenger-side
exterior rear view mirror.
�
Place the gear selector lever in reverse
gear R.
The passenger-side exterior rear view
mirror will be turned downward to the
stored position. 1
Driver’s side exterior rear view mirror
button
2 Passenger-side exterior rear view
mirror button
The exterior rear view mirror returns to
its previously stored driving position:
�
ten seconds after you put the gear
selector lever out of position R
�
immediately once you exceed a ve-
hicle speed of approx. 6 mph
(10 km/h)
�
immediately when you press
button1 for driver’s side mirror
Warning!
G
Exercise care when using the passenger
side exterior rear view mirror. The mirror
surface is convex (outwardly curved surface
for a wider field of view). Objects in mirror
are closer than they appear. Check your in-
side rear view mirror or glance over your
shoulder before changing lanes.!Electrolyte drops coming into contact
with the vehicle paint finish can be
completely removed only while in the
liquid state by applying plenty of water.
Page 148 of 376
148 Controls in detailGood visibilityHeadlamp cleaning system*
The switch is located on the left side of the
dashboard.1 Headlamp washer switch�
Switch on ignition.
�
Press switch 1.
The headlamps are cleaned with a
high-pressure water jet.
For information on filling up the washer
reservoir, see “Windshield washer system
and headlamp cleaning system”
(
�page 243).
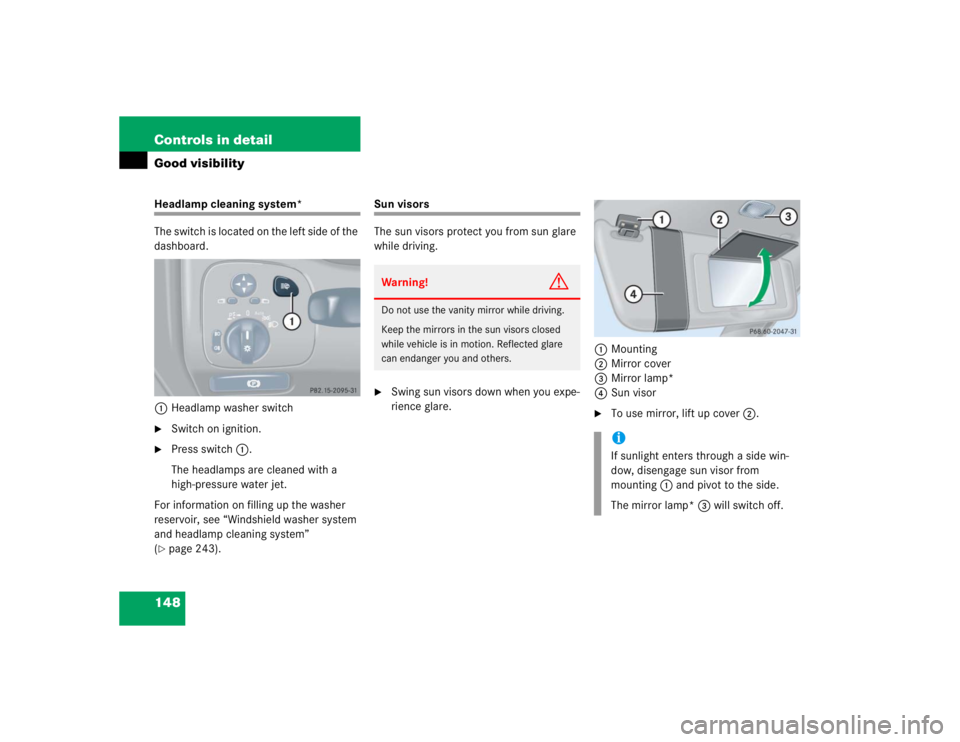
Sun visors
The sun visors protect you from sun glare
while driving.�
Swing sun visors down when you expe-
rience glare. 1
Mounting
2 Mirror cover
3 Mirror lamp*
4 Sun visor
�
To use mirror, lift up cover 2.
Warning!
G
Do not use the vanity mirror while driving.
Keep the mirrors in the sun visors closed
while vehicle is in motion. Reflected glare
can endanger you and others.
iIf sunlight enters through a side win-
dow, disengage sun visor from
mounting 1 and pivot to the side.
The mirror lamp* 3 will switch off.
Page 188 of 376
 w i l l a l s o b e o p e ne d o r c l o s e d
when t")
188 Controls in detailPower windowsOpening and closing the windows with
the SmartKey
The panorama sliding/pop-up roof*
(�p a g e 1 8 9 ) w i l l a l s o b e o p e ne d o r c l o s e d
when the power windows are operated
with the SmartKey.
�
Aim transmitter eye at the front door
handle. Opening (Summer opening feature)
�
Press and hold button
Πafter un-
locking the vehicle.
The windows and panorama slid-
ing/pop-up roof* (
�page 189) begin
to open after approximately
one second.
�
Release the Πbutton to stop proce-
dure.
Closing (Convenience feature)
�
Press and hold button ‹ after lock-
ing the vehicle.
The windows and panorama slid-
ing/pop-up roof* begin to close after
approximately one second.
�
Release the ‹ button to stop proce-
dure.
Make sure all side windows and the pan-
orama sliding/pop-up roof* are properly
closed before leaving the vehicle.
Synchronizing power windows
The power window must be resynchro-
nized each time �
after the battery has been disconnect-
ed.
�
if the power windows cannot be fully
opened (Express-open) or closed (Ex-
press-close).
Synchronizing the power windows
�
Switch on ignition.
�
Pull the power window switches until
the side windows are closed.
Hold the switches for approximately
one second.
The power window are adjusted.
Warning!
G
Never operate the windows or panorama
sliding /pop-up roof* if there is the possibil-
ity of anyone being harmed by the opening
or closing procedure.
In the event that the procedure causes po-
tential danger, the procedure can be imme-
diately halted by releasing the button on the
SmartKey. To reverse direction of move-
ment, press Œ for opening or ‹ for
closing.
Page 193 of 376

193
Controls in detail
Panorama sliding/pop-up roof*
Synchronizing the panorama
sliding / pop-up roof and the roller sun-blinds
It is necessary to resynchronize the pan-
orama sliding / pop-up roof after�
voltage supply interruption due to a
disconnected or discharged battery
�
the panorama sliding/pop-up roof has
been closed manually
�
the panorama sliding/pop-up roof has
been opened with an abrupt movement
�
a malfunction.
�
Switch on ignition.
�
Move the switch in direction
3 and
wait until the roller sunblind are fully
closed.
Hold the switch for approximately
one second.
�
Move the switch in the direction 4
and wait until the roller sunblind is ap-
proximately 4 in (10 cm) opened.
Release the switch.
�
Move the switch in the direction 3
and wait until the roller sunblind is fully
closed.
Hold the switch for approximately
one second.
The roller sunblind is synchronized.
�
Move the switch in direction 4 and
wait until the roller sunblind are fully
opened.
Hold the switch for approximately
one second.
�
Move the switch in the direction 4
and wait until the panorama slid-
ing/pop-up roof is approximately 4 in
(10 cm) opened.
Release the switch.
�
Move the switch in the direction 3
and wait until the panorama slid-
ing/pop-up roof is fully closed.
Hold the switch for approximately
one second.
The panorama sliding/pop-up roof is syn-
chronized when the panorama slid-
ing/pop-up roof opens automatically.
Repeat synchronization if necessary.