Page 308 of 376
.
�
Remove the filter box (
�page 307).
�
Disconnect the battery negative lead.
�
Re")
308 Practical hintsBatteryDisconnecting the battery�
Turn off all electrical consumers.
�
Open the hood (
�page 236).
�
Remove the filter box (
�page 307).
�
Disconnect the battery negative lead.
�
Remove the cover from the positive ter-
minal.
�
Disconnect the battery positive lead.
Removing the batteries�
Remove the screw-nuts securing the
battery.
�
Remove the battery bracket.
�
Take out the battery.
Charging and reinstalling batteries�
Charge battery in accordance with the
instructions of the battery charger
manufacturer.
�
Reinstall the charged battery. Follow
the previously described steps in re-
verse order.
Reconnecting the batteries�
Turn off all electrical consumers.
�
Connect the positive lead and fasten its
cover.
�
Connect the negative lead.
�
Reinstall the filter box (
�page 307).
Warning!
G
With a disconnected battery�
you will no longer be able to turn the
SmartKey in the starter switch
�
the gear selector lever will remain
locked in position
P
Warning!
G
Never charge a battery while still installed in
the vehicle. Gases may escape during charg-
ing and cause explosions that may result in
paint damage, corrosion or personal injury.
!NEVER invert the terminal connections!!The battery, its filler caps and the vent
tube must always be securely installed
when the vehicle is in operation.
Page 309 of 376
309
Practical hints
Battery
Batteries contain materials that can harm
the environment if disposed of improperly.
Large 12-volt storage batteries contain
lead. Recycling of batteries is the preferred
method of disposal. Many states require
sellers of batteries to accept old batteries
for recycling.
iThe following procedures must be car-
ried out following any interruption of
battery power (e.g. due to reconnec-
tion):�
Set the clock (
�page 122) (vehi-
cles with COMAND*: see COMAND
operator’s manual).
�
Resynchronize the ESP
(�page 266).
�
Resynchronize side windows
(�page 188).
�
Resynchronize panorama slid-
ing/pop-up roof (
�page 188).
Page 313 of 376

313
Practical hints
Towing the vehicle
� Towing the vehicle
Mercedes-Benz recommends that the vehi-
cle be transported with all wheels off the
ground using flatbed or appropriate wheel
lift/dolly equipment. This method is pref-
erable to other types of towing. When circumstances do not permit the
recommended towing methods, the vehi-
cle may be towed with all wheels on the
ground or front wheels raised only so far as
necessary to have the vehicle moved to a
safe location where the recommended
towing methods can be employed.
!Use flatbed or wheel lift/dolly equip-
ment with SmartKey in starter switch
turned to position
0.
Do not tow with sling-type equipment.
Towing with sling-type equipment over
bumpy roads will damage radiator and
supports.
To prevent damage during transport,
do not tie down vehicle by its chassis or
suspension parts.
Switch off the tow-away alarm
(�page 79) and deactivate the auto-
matic central locking (
�page 129).
!Vehicles with automatic transmission:
Do not tow-start the vehicle.
!If the vehicle is towed with the front
axle raised, the engine must be shut off
(SmartKey in starter switch position 0
or 1). Otherwise, the ESP will immedi-
ately be engaged and will apply the rear
wheel brakes.
When towing the vehicle with all wheels
on the ground, the gear selector lever
must be in position N (manual trans-
mission: gears disengaged) and the
SmartKey must be in starter switch
position 2.
When towing the vehicle with all wheels
on the ground or the front axle raised,
the vehicle may be towed only for dis-
tances up to 30 miles (50 km) and at a
speed not to exceed 30 mph
(50 km/h).
Page 314 of 376

314 Practical hintsTowing the vehicle!
To be certain to avoid a possibility of
damage to the transmission, however,
we recommend the drive shaft be dis-
connected at the rear axle drive flange
for any towing beyond a short tow to a
nearby garage.
Warning!
G
If circumstances require towing the vehicle
with all wheels on the ground, always tow
with a tow bar if:�
the engine will not run
�
there is a malfunction in the power sup-
ply or in the vehicle’s electrical system
as that will be necessary to adequately con-
trol the towed vehicle.
Prior to towing the vehicle with all wheels on
the ground, make certain that the SmartKey
is in starter switch position 2.
If the SmartKey is left in starter switch
position 0 for an extended period of time, it
can no longer be turned in the switch. In this
case, the steering is locked. To unlock, re-
move SmartKey from starter switch and re-
insert.
iTo signal turns while being towed with
the hazard warning flasher in use, turn
SmartKey in starter switch to
position 2 and activate the combina-
tion switch for the left or right turn sig-
nal in the usual manner – only the
selected turn signal will operate.
Upon canceling the turn signal, the
hazard warning flasher will operate
again.
Page 315 of 376

315
Practical hints
Towing the vehicle
Warning!
G
With the engine not running, there is no
power assistance for the brake and steering
systems. In this case, it is important to keep
in mind that a considerably higher degree of
effort is necessary to brake and steer the ve-
hicle. Adapt your driving accordingly.
!When towing the vehicle with all wheels
on the ground, please note the follow-
ing:
With the automatic central locking acti-
vated and the SmartKey in starter
switch position
2, the vehicle doors
lock if the left front wheel as well as the
right rear wheel are turning at vehicle
speeds of approx. 9 mph (15 km/h) or
more.
Switch off the tow-away alarm
(�page 79).
To prevent the vehicle doors from lock-
ing, deactivate the automatic central
locking (
�page 129).
Towing of the vehicle should only be
done using the properly installed tow-
ing eye bolt. Never attach tow cable,
tow rope or tow rod to vehicle chassis,
frame or suspension parts.
iIf the battery is disconnected or dis-
charged�
the SmartKey will not turn in the
starter switch. See notes on the
battery (
�page 307) or on jump
starting (�page 310).
�
the gear selector lever will remain
locked in position P. See notes on
manual unlocking of gear selector
lever (
�page 291).
Page 318 of 376
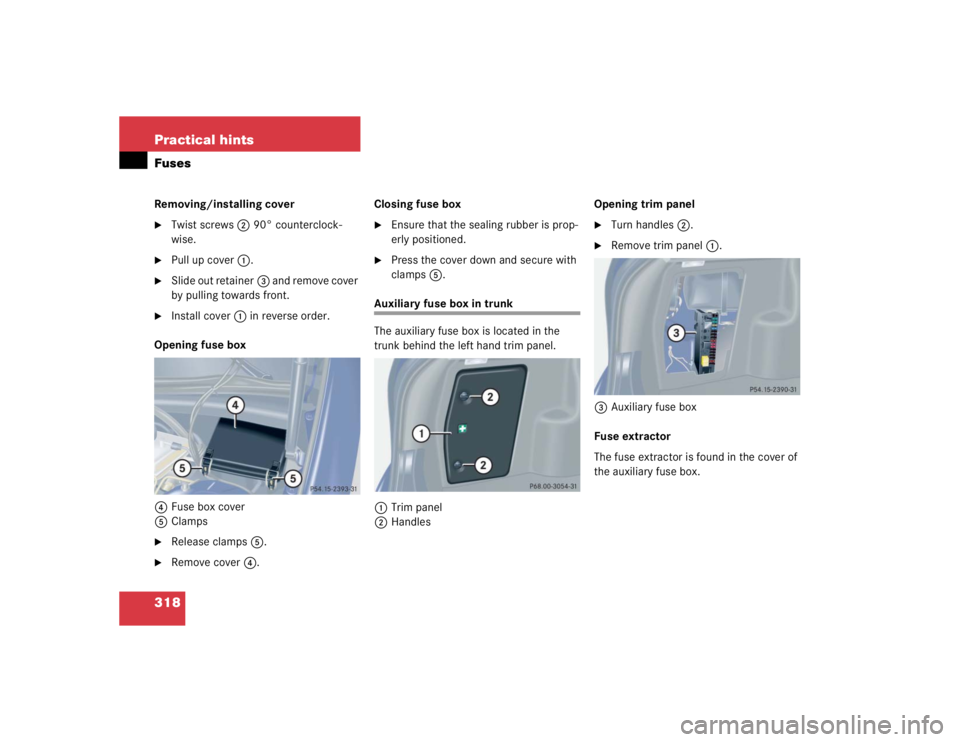
318 Practical hintsFusesRemoving/installing cover�
Twist screws2 90° counterclock-
wise.
�
Pull up cover 1.
�
Slide out retainer 3 and remove cover
by pulling towards front.
�
Install cover 1 in reverse order.
Opening fuse box
4 Fuse box cover
5 Clamps
�
Release clamps 5.
�
Remove cover 4. Closing fuse box
�
Ensure that the sealing rubber is prop-
erly positioned.
�
Press the cover down and secure with
clamps
5.
Auxiliary fuse box in trunk
The auxiliary fuse box is located in the
trunk behind the left hand trim panel.
1 Trim panel
2 Handles Opening trim panel
�
Turn handles
2.
�
Remove trim panel 1.
3 Auxiliary fuse box
Fuse extractor
The fuse extractor is found in the cover of
the auxiliary fuse box.
Page 335 of 376
.
�
Amount of adde")
335
Technical data
Fuels, coolants, lubricants, etc.
When switching fuels, make sure:�
Fuel level is below half full.
�
Fuel level is above reserve (reserve
warning lamp is not lit).
�
Amount of added fuel is more than
5 gallons (20 liters).
�
Ignition is off during refill.
�
Immediately after refueling engine is
started and operated for at least five
minutes.
These precautions and recommendations
are supposed to prevent any difficulties
when starting and operating the engine
which otherwise may be experienced be-
fore the engine has fully adapted to the dif-
ferent fuel.
If in spite of these recommendations the
engine does not perform properly, adding
more gasoline (at least 3 gallons
[12 liters]) to the fuel may improve the en-
gine behavior. Cold weather performance
It is possible that starting times will signif-
icantly increase at temperatures below
32°F (0°C). At low temperatures the use
of a block heater is recommended (see
your authorized Mercedes-Benz Center for
further information). Rough idling may also
be experienced at such temperatures be-
fore the engine is fully warmed up.
Hot weather performance
At ambient temperatures above 95°F
(35°C) start times may increase and be ac-
companied by a rough idle following the
start.
Cruising range
E85 fuel contains less energy per gallon
than gasoline. To ensure that engine per-
formance with Ethanol fuel is similar to
that when using gasoline, the engine must
burn more Ethanol fuel. As a result, it is to
be expected that the fuel consumption will
increase when using E85 compared to gas-
oline operation.
Maintenance
Please inform your Mercedes-Benz Center
if you use or have used E85 fuel when your
vehicle is delivered for maintenance or re-
pairs.
!E85 fuel is unsuitable for use when am-
bient temperatures fall below 14°F
(-10°C).
iUse of E85 may reduce your driving
range.
Page 341 of 376

Prevents the wheels from locking up
during braking so that the vehicle can
continue to be steered.
Alignment bolt Metal pin with thread. The center")
341
Technical terms
ABS
(A
ntilock B
rake S
ystem)
Prevents the wheels from locking up
during braking so that the vehicle can
continue to be steered.
Alignment bolt Metal pin with thread. The centering
pin is an aid used when changing a tire
to align the wheel with the wheel hub.
BabySmart
TM airbag deactivation
system This system detects if a special system
compatible child restraint seat is in-
stalled on the front passenger seat. The
system will automatically deactivate
the passenger front airbag when such a
seat is properly installed (indicator
lamp PASS. AIRBAG OFF in the center
console comes on). See your autho-
rized Mercedes-Benz Center for avail-
ability. BabySmart
TM compatible child seats
Special restraint system for children.
The sensor system for the passenger
seat prevents deployment of the pas-
senger front airbag if a BabySmart
TM
compatible child seat is installed.
BAS (B
rake A
ssist S
ystem)
System for potentially reducing braking
distances in emergency braking situa-
tions. The system is activated when it
senses an emergency based on how
fast the brake is applied.
Bi-Xenon headlamps* Headlamps which use an electric arc as
the light source and produce a more in-
tense light than filament headlamps.
Bi-Xenon headlamps produce low
beam and high beam. CAC
(C
ustomer A
ssistance C
enter)
Mercedes-Benz customer service cen-
ter, which can help you with any ques-
tions about your vehicle and provide
assistance in the event of a break-
down.
CAN system (C
ontroller A
rea N
etwork)
Data bus network serving to control ve-
hicle functions such as door locking or
windshield wiping.
Cockpit All instruments, switches, buttons and
indicator/warning lamps in the passen-
ger compartment needed for vehicle
operation and monitoring.