Page 100 of 304
8. Install the plastic retainer and carefully push the carpet back into
place.
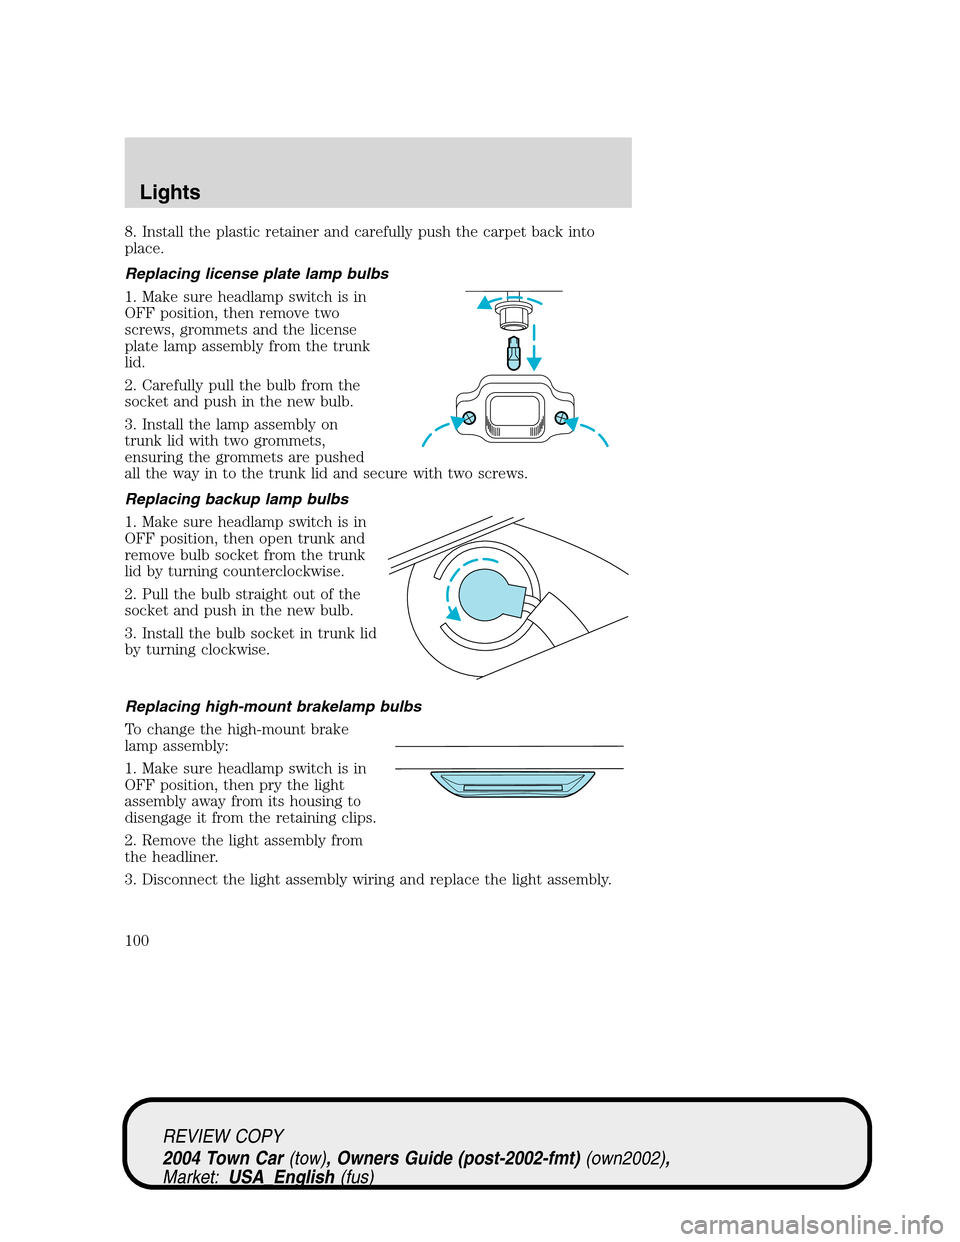
Replacing license plate lamp bulbs
1. Make sure headlamp switch is in
OFF position, then remove two
screws, grommets and the license
plate lamp assembly from the trunk
lid.
2. Carefully pull the bulb from the
socket and push in the new bulb.
3. Install the lamp assembly on
trunk lid with two grommets,
ensuring the grommets are pushed
all the way in to the trunk lid and secure with two screws.
Replacing backup lamp bulbs
1. Make sure headlamp switch is in
OFF position, then open trunk and
remove bulb socket from the trunk
lid by turning counterclockwise.
2. Pull the bulb straight out of the
socket and push in the new bulb.
3. Install the bulb socket in trunk lid
by turning clockwise.
Replacing high-mount brakelamp bulbs
To change the high-mount brake
lamp assembly:
1. Make sure headlamp switch is in
OFF position, then pry the light
assembly away from its housing to
disengage it from the retaining clips.
2. Remove the light assembly from
the headliner.
3. Disconnect the light assembly wiring and replace the light assembly.
REVIEW COPY
2004 Town Car(tow), Owners Guide (post-2002-fmt)(own2002),
Market:USA_English(fus)
Lights
100
Page 113 of 304
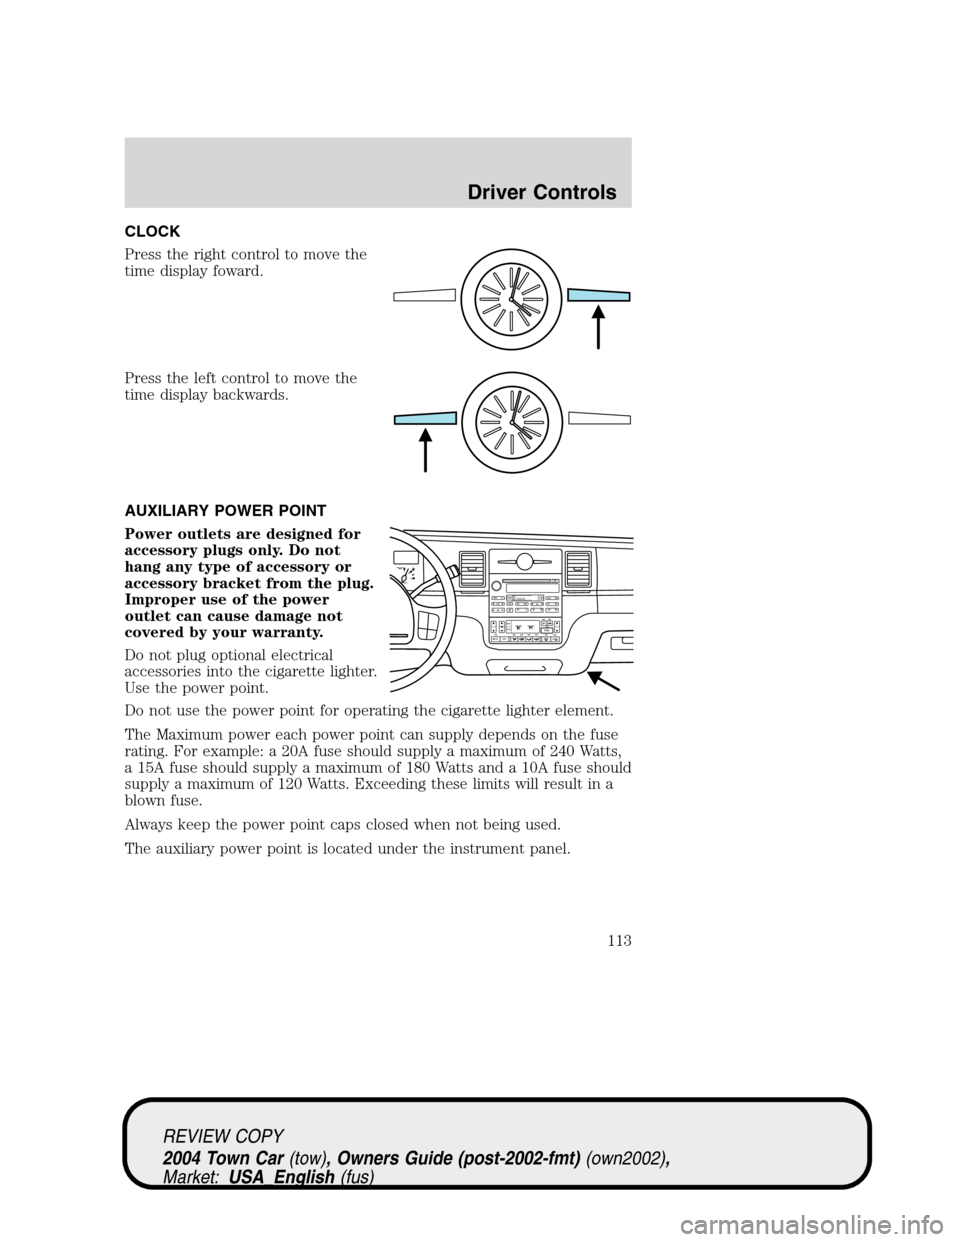
CLOCK
Press the right control to move the
time display foward.
Press the left control to move the
time display backwards.
AUXILIARY POWER POINT
Power outlets are designed for
accessory plugs only. Do not
hang any type of accessory or
accessory bracket from the plug.
Improper use of the power
outlet can cause damage not
covered by your warranty.
Do not plug optional electrical
accessories into the cigarette lighter.
Use the power point.
Do not use the power point for operating the cigarette lighter element.
The Maximum power each power point can supply depends on the fuse
rating. For example: a 20A fuse should supply a maximum of 240 Watts,
a 15A fuse should supply a maximum of 180 Watts and a 10A fuse should
supply a maximum of 120 Watts. Exceeding these limits will result in a
blown fuse.
Always keep the power point caps closed when not being used.
The auxiliary power point is located under the instrument panel.
F
E1
2FILL ON
LEFT<
SHUF MUTE
SELBALBASS
FADETREB
SCAN CD
AM/FM
SEEKREWFF
COMP
56 34 12SIDE TUNETAPE
RDS
AUTO
SET
AUTO OFFDUAL A/C
R EXT
F/ CFF
REVIEW COPY
2004 Town Car(tow), Owners Guide (post-2002-fmt)(own2002),
Market:USA_English(fus)
Driver Controls
113
Page 211 of 304
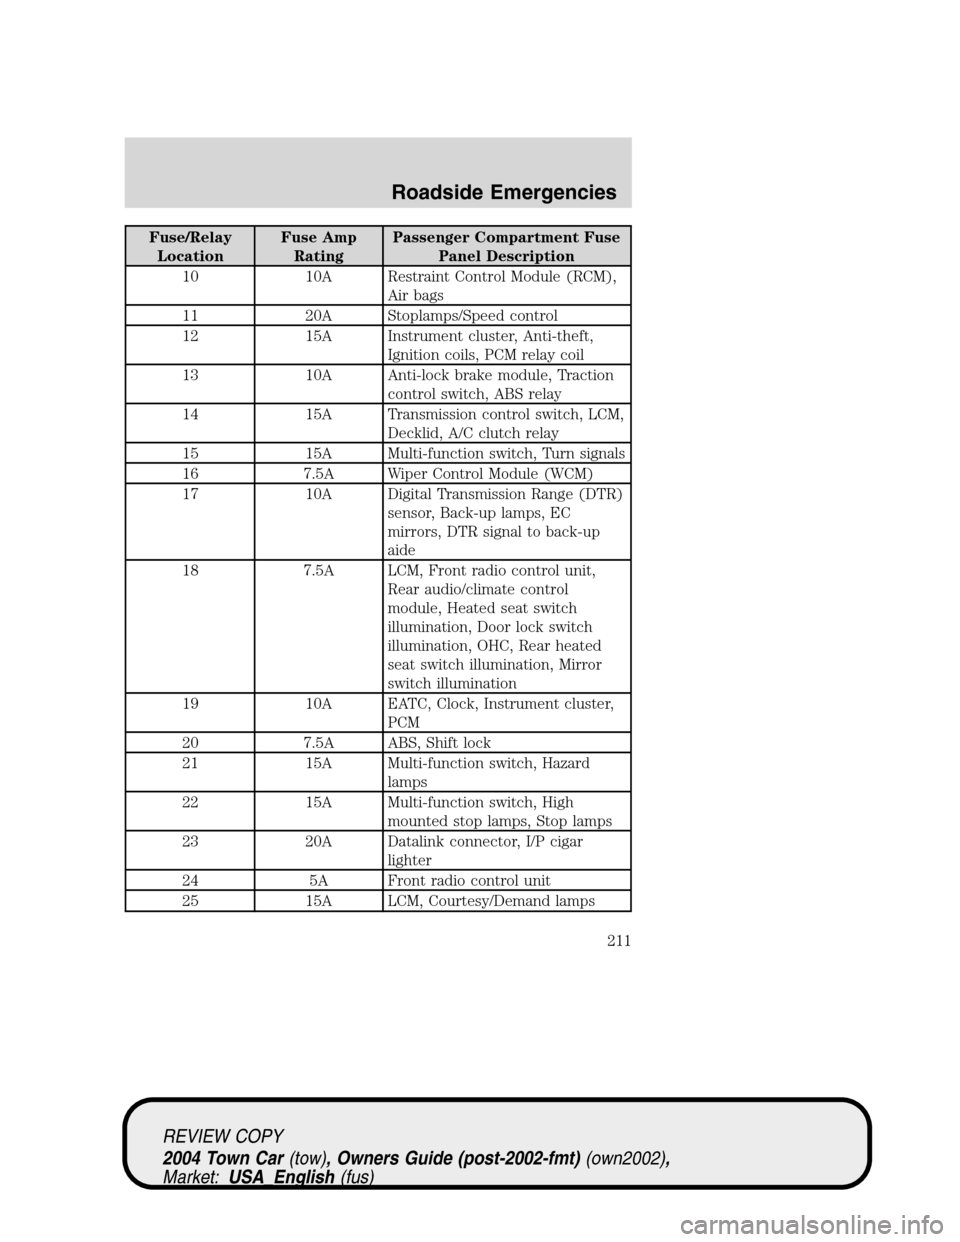
Fuse/Relay
LocationFuse Amp
RatingPassenger Compartment Fuse
Panel Description
10 10A Restraint Control Module (RCM),
Air bags
11 20A Stoplamps/Speed control
12 15A Instrument cluster, Anti-theft,
Ignition coils, PCM relay coil
13 10A Anti-lock brake module, Traction
control switch, ABS relay
14 15A Transmission control switch, LCM,
Decklid, A/C clutch relay
15 15A Multi-function switch, Turn signals
16 7.5A Wiper Control Module (WCM)
17 10A Digital Transmission Range (DTR)
sensor, Back-up lamps, EC
mirrors, DTR signal to back-up
aide
18 7.5A LCM, Front radio control unit,
Rear audio/climate control
module, Heated seat switch
illumination, Door lock switch
illumination, OHC, Rear heated
seat switch illumination, Mirror
switch illumination
19 10A EATC, Clock, Instrument cluster,
PCM
20 7.5A ABS, Shift lock
21 15A Multi-function switch, Hazard
lamps
22 15A Multi-function switch, High
mounted stop lamps, Stop lamps
23 20A Datalink connector, I/P cigar
lighter
24 5A Front radio control unit
25 15A LCM, Courtesy/Demand lamps
REVIEW COPY
2004 Town Car(tow), Owners Guide (post-2002-fmt)(own2002),
Market:USA_English(fus)
Roadside Emergencies
211
Page 219 of 304
On vehicles equipped with
Air Suspension, turn OFF
the Air Suspension switch prior to
jacking, hoisting or towing your
vehicle.
Refer toAir suspension systemin
theDrivingchapter for more
information.
4. Remove the lug wrench (A) from
the jack. Rotate the lug wrench
socket out from the handle.
5. Locate pry off notch (if
equipped) and remove the center
ornament from the aluminum wheel
with the tapered end of the wheel
nut wrench that came with your
vehicle. Insert and twist the handle,
then pry against the wheel.
6. Loosen each wheel lug nut
one-half turn counterclockwise but
do not remove them until the wheel is raised off the ground.
OFF
A
REVIEW COPY
2004 Town Car(tow), Owners Guide (post-2002-fmt)(own2002),
Market:USA_English(fus)
Roadside Emergencies
219
Page 220 of 304
Before placing the jack under the vehicle, NOTE the jack location
markings:
JACK LOCATION-FRONT
The jack location markings can be
foundon the lower outer edge of
the body.
•Locate the jack locator mark (B -
semi-circle) on the body (C)
near the tire you are changing,
then place the jack (D)under
the frame (A) of the vehicle
aligning it with the mark (B -
semi-circle).
JACK LOCATION-REAR
The jack location markings can be
foundon the lower outer edge of
the body.
•Locate the jack locator mark (B -
triangle) on the body (C) near
the tire you are changing, then
place the jack (D)under the
frame (A) of the vehicle
aligning it with the mark (B -
triangle).
•Position the jack according to the
following guides and turn the jack
handle clockwise until the wheel
is completely off the ground.
B
C
D
A
B
C
D
A
REVIEW COPY
2004 Town Car(tow), Owners Guide (post-2002-fmt)(own2002),
Market:USA_English(fus)
Roadside Emergencies
220
Page 221 of 304
To lessen risk of personal
injury, do not put any part
of your body under the vehicle
while changing a tire. Do not start
the engine when your vehicle is
on the jack. The jack is ONLY
meant for changing the tire.
•Never use the rear differential
as a jacking point.
7. Remove the lug nuts with the lug wrench.
8. Replace the flat tire with the spare tire, making sure the valve stem is
facing outward. Reinstall lug nuts until the wheel is snug against the hub.
Do not fully tighten the lug nuts until the wheel has been lowered.
9. Lower the vehicle by turning the jack handle counterclockwise.
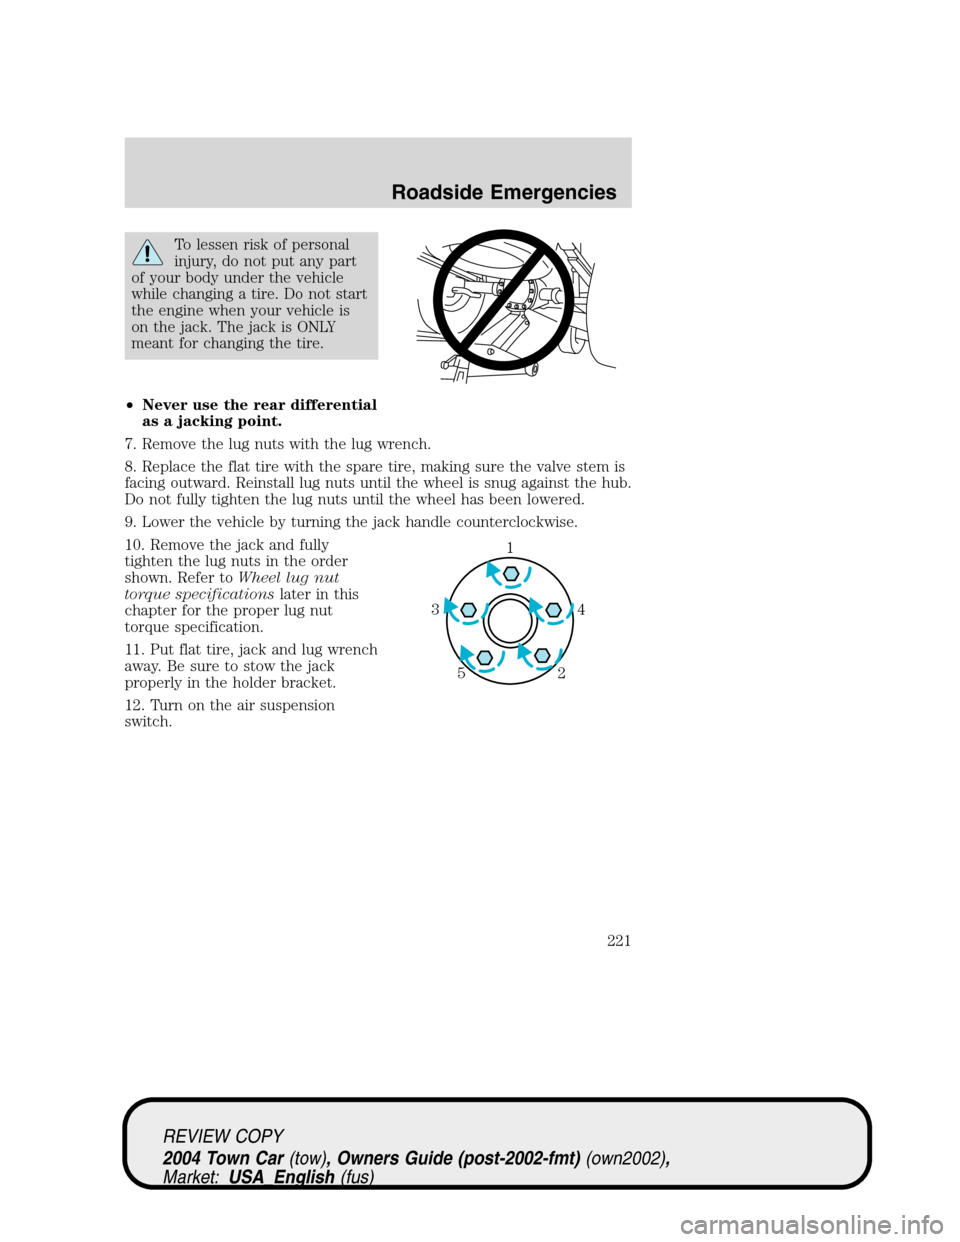
10. Remove the jack and fully
tighten the lug nuts in the order
shown. Refer toWheel lug nut
torque specificationslater in this
chapter for the proper lug nut
torque specification.
11. Put flat tire, jack and lug wrench
away. Be sure to stow the jack
properly in the holder bracket.
12. Turn on the air suspension
switch.
1
4 3
2 5
REVIEW COPY
2004 Town Car(tow), Owners Guide (post-2002-fmt)(own2002),
Market:USA_English(fus)
Roadside Emergencies
221
Page 248 of 304
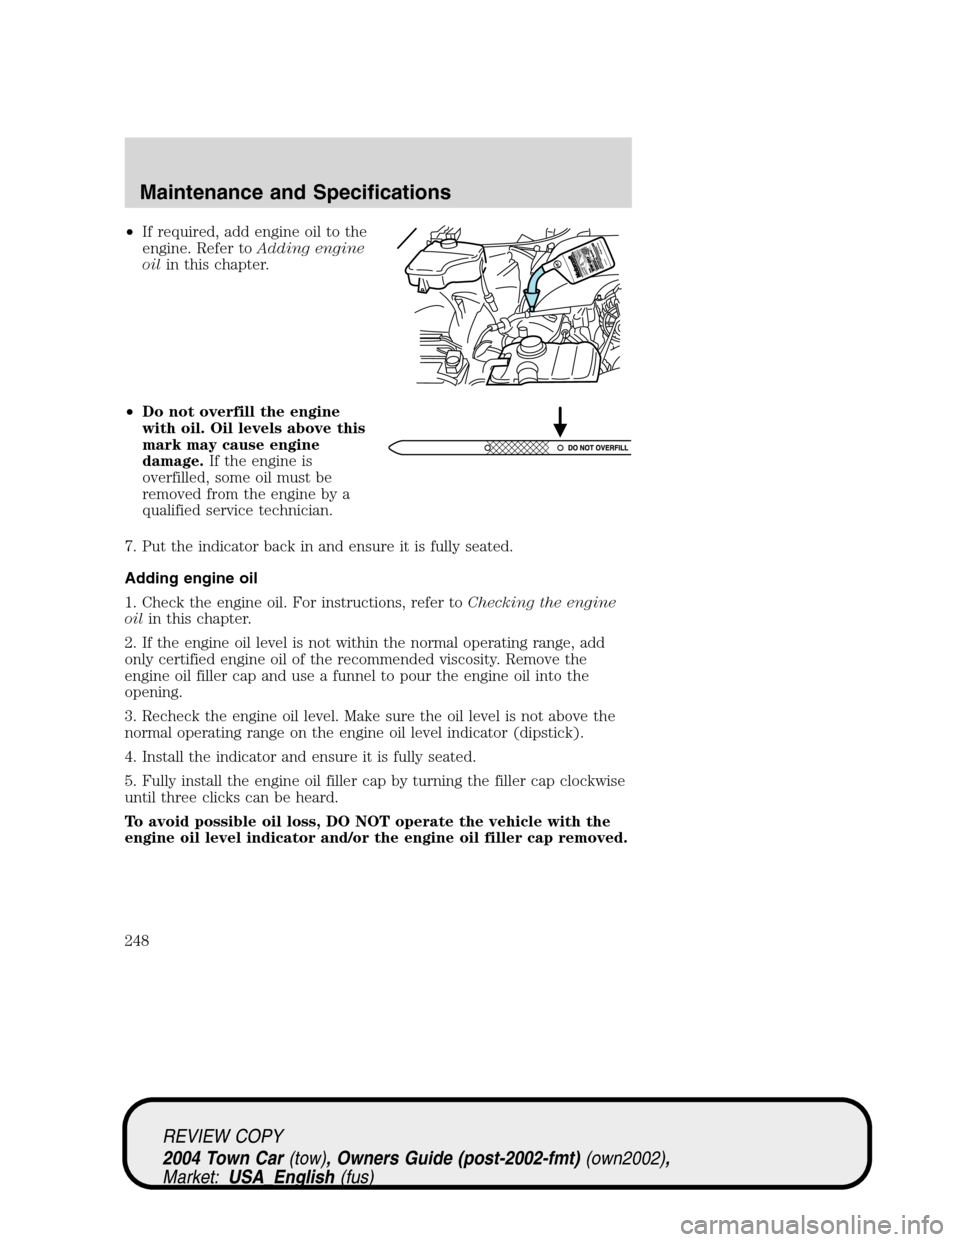
•If required, add engine oil to the
engine. Refer toAdding engine
oilin this chapter.
•Do not overfill the engine
with oil. Oil levels above this
mark may cause engine
damage.If the engine is
overfilled, some oil must be
removed from the engine by a
qualified service technician.
7. Put the indicator back in and ensure it is fully seated.
Adding engine oil
1. Check the engine oil. For instructions, refer toChecking the engine
oilin this chapter.
2. If the engine oil level is not within the normal operating range, add
only certified engine oil of the recommended viscosity. Remove the
engine oil filler cap and use a funnel to pour the engine oil into the
opening.
3. Recheck the engine oil level. Make sure the oil level is not above the
normal operating range on the engine oil level indicator (dipstick).
4. Install the indicator and ensure it is fully seated.
5. Fully install the engine oil filler cap by turning the filler cap clockwise
until three clicks can be heard.
To avoid possible oil loss, DO NOT operate the vehicle with the
engine oil level indicator and/or the engine oil filler cap removed.
REVIEW COPY
2004 Town Car(tow), Owners Guide (post-2002-fmt)(own2002),
Market:USA_English(fus)
Maintenance and Specifications
248
Page 251 of 304
When lifting a plastic-cased battery, excessive pressure on the
end walls could cause acid to flow through the vent caps,
resulting in personal injury and/or damage to the vehicle or battery.
Lift the battery with a battery carrier or with your hands on opposite
corners.
Keep batteries out of reach of children. Batteries contain sulfuric
acid. Avoid contact with skin, eyes or clothing. Shield your eyes
when working near the battery to protect against possible splashing of
acid solution. In case of acid contact with skin or eyes, flush
immediately with water for a minimum of 15 minutes and get prompt
medical attention. If acid is swallowed, call a physician immediately.
Battery posts, terminals and related accessories contain lead and
lead compounds.Wash hands after handling.
Because your vehicle’s engine is electronically controlled by a computer,
some control conditions are maintained by power from the battery. When
the battery is disconnected or a new battery is installed, the engine must
relearn its idle and fuel trim strategy for optimum driveability and
performance. To begin this process:
1. With the vehicle at a complete stop, set the parking brake.
2. Put the gearshift in P (Park), turn off all accessories and start the engine.
3. Run the engine until it reaches normal operating temperature.
4. Allow the engine to idle for at least one minute.
5. Turn the A/C on and allow the engine to idle for at least one minute.
6. Release the parking brake. With your foot on the brake pedal and with
the A/C on, put the vehicle in D (Drive) and allow the engine to idle for
at least one minute.
7. Drive the vehicle to complete the relearning process.
•The vehicle may need to be driven 10 miles (16 km) or more to
relearn the idle and fuel trim strategy.
•If you do not allow the engine to relearn its idle trim, the idle
quality of your vehicle may be adversely affected until the idle
trim is eventually relearned.
If the battery has been disconnected or a new battery has been installed,
the clock and radio settings must be reset once the battery is reconnected.
REVIEW COPY
2004 Town Car(tow), Owners Guide (post-2002-fmt)(own2002),
Market:USA_English(fus)
Maintenance and Specifications
251