Page 105 of 304

2. Hold down the MODE button for
5 seconds to enter zone mode. The
display will read PRESS RESET TO
SET ZONE XX where XX is the
current zone.
3. Release the MODE button.
4. Determine which magnetic zone
you are in by referring to the zone
map.
5. Repeatedly press and release the
RESET button to scroll through the
zones 1–15 until the desired zone is
displayed.
6. Press the MODE button to save
the new zone setting and return to
the compass normal mode.
Note:The compass exits the zone
setting mode and returns to its previous setting after one minute of no
activity.
Note:If power is interrupted during the zone setting process, the
compass resets to the same zone it was set to before the zone change
process was started.
Calibration mode
For optimum calibration, turn off all electrical accessories (heater/air
conditioning, wipers, etc.) and make sure all vehicle doors are shut.
To calibrate the compass:
1. Press and release the MODE
button until the compass directional
heading is displayed.
1 2 3
4
5
6 7 8 9 101112 13 14 15
REVIEW COPY
2004 Town Car(tow), Owners Guide (post-2002-fmt)(own2002),
Market:USA_English(fus)
Driver Controls
105
Page 106 of 304

2. Hold down the MODE button for
10 seconds to enter the calibration
mode. The display will read PRESS
RESET TO DECAL.
3. Release the MODE button.
4. Press the RESET button to
de-calibrate the compass. The
display will read CIRCLE SLOWLY
TO CALIBRATE for a few seconds
and then display a direction with
CAL displayed on the right side.
5. Drive the vehicle in a tight circle
in a magnetically clean area such as
an open parking lot.
6. Slowly drive the vehicle in a circle (less than 3 mph [5 km/h]). This
will take up to three circles to complete calibration.
7. The correct compass heading will be displayed when the compass is
calibrated.
Note:If the RESET button is not pressed, the compass will exit
calibration mode after three minutes of no activity and the original
calibration data will be restored.
Note:If power is interrupted during the calibration process, the compass
resets to the original calibration data from before the calibration process
started.
REVIEW COPY
2004 Town Car(tow), Owners Guide (post-2002-fmt)(own2002),
Market:USA_English(fus)
Driver Controls
106
Page 107 of 304

Train mode
Note:Do not train the HomeLink�with the vehicle parked in the garage.
To train a HomeLink�button to control a specific device:
1. Select the HomeLink�button to
t")
HomeLink�mode (if equipped)
Train mode
Note:Do not train the HomeLink�with the vehicle parked in the garage.
To train a HomeLink�button to control a specific device:
1. Select the HomeLink�button to
train.
2. Press and continuously hold the
button for 20 seconds. CHANNEL X
TRANSMIT will be displayed (X will
be 1, 2, or 3) during this time.
Note:If more than one button is
pressed, priority will be given to the
lowest numbered channel.
3. After 20 seconds, the display will
read CHANNEL X TRAINING to
indicate training has started.
Continue to hold the button.
Note:If the channel being trained
has not been previously trained, the
channel will immediately enter the
training mode (no 20 second delay).
4. Point the original garage door
opener/transmitter at the overhead
console. Hold down the original transmitter’s button so the overhead
console can learn the transmitter’s frequency and data stream.
5. Training will be complete in 100
seconds or less. CHANNEL X
TRAINED will be displayed when
training is complete.
REVIEW COPY
2004 Town Car(tow), Owners Guide (post-2002-fmt)(own2002),
Market:USA_English(fus)
Driver Controls
107
Page 108 of 304

6. DID NOT TRAIN will be displayed
if the channel did not properly train.
7. Release the channel X button.
Training is complete.
Note:Additional training may be
required for rolling code equipped
devices. Refer to theRolling code
programmingin this section.
Rolling code programming
To train a garage door opener (or other rolling code equipped devices)
with the rolling code feature, follow these instructionsaftercompleting
the“Train mode”in this section. (A second person may make the
following training procedures quicker & easier)
1. Locate the“learn”or“smart”buttonon the garage door motor
head unit. Exact location and color of the button may vary by product
brand. If there is difficulty locating the“learn”or“smart”button refer to
the device’s owner manual or contact HomeLink�at1–800–355–3515or
on the Internet atwww.homelink.com.
2. Press and release the“learn”or“smart”button on the garage door
motor head unit.
Note:Following step 2, there are 30 seconds in which to initiate step 3.
3. Press and release the
programmed HomeLink�button.
Press and release the HomeLink�
button asecond timeto complete
the training process. (Some garage
door openers may require this
procedure to be done athird time
to complete the training.)
The rolling code equipped device
should now recognize the
HomeLink�signal and activate when
the HomeLink button is pressed. The remaining two buttons may now be
programmed if this has not previously been done. Refer to the“Train
mode”in this section.
REVIEW COPY
2004 Town Car(tow), Owners Guide (post-2002-fmt)(own2002),
Market:USA_English(fus)
Driver Controls
108
Page 109 of 304
Transmit mode
1. Select the button for the desired
channel (for example, for the garage
door you wish to open).
2. Press the button. CHANNEL X
TRANSMIT is displayed.
3. The proper signal is transmitted
to the device being controlled.
4. Release the button.
Note:If more than one button is
pressed, priority will be given to the
lowest numbered channel.
Erase mode
To erase all three HomeLink�channel codes:
1. Simultaneously press and hold
buttons 1 and 3 for 20 seconds.
2. CLEARING CHANNELS will be
displayed when the channel codes
are being erased.
3. CHANNELS CLEARED will be
displayed when the erase operation
is complete.
4. Release buttons 1 and 3.
REVIEW COPY
2004 Town Car(tow), Owners Guide (post-2002-fmt)(own2002),
Market:USA_English(fus)
Driver Controls
109
Page 110 of 304
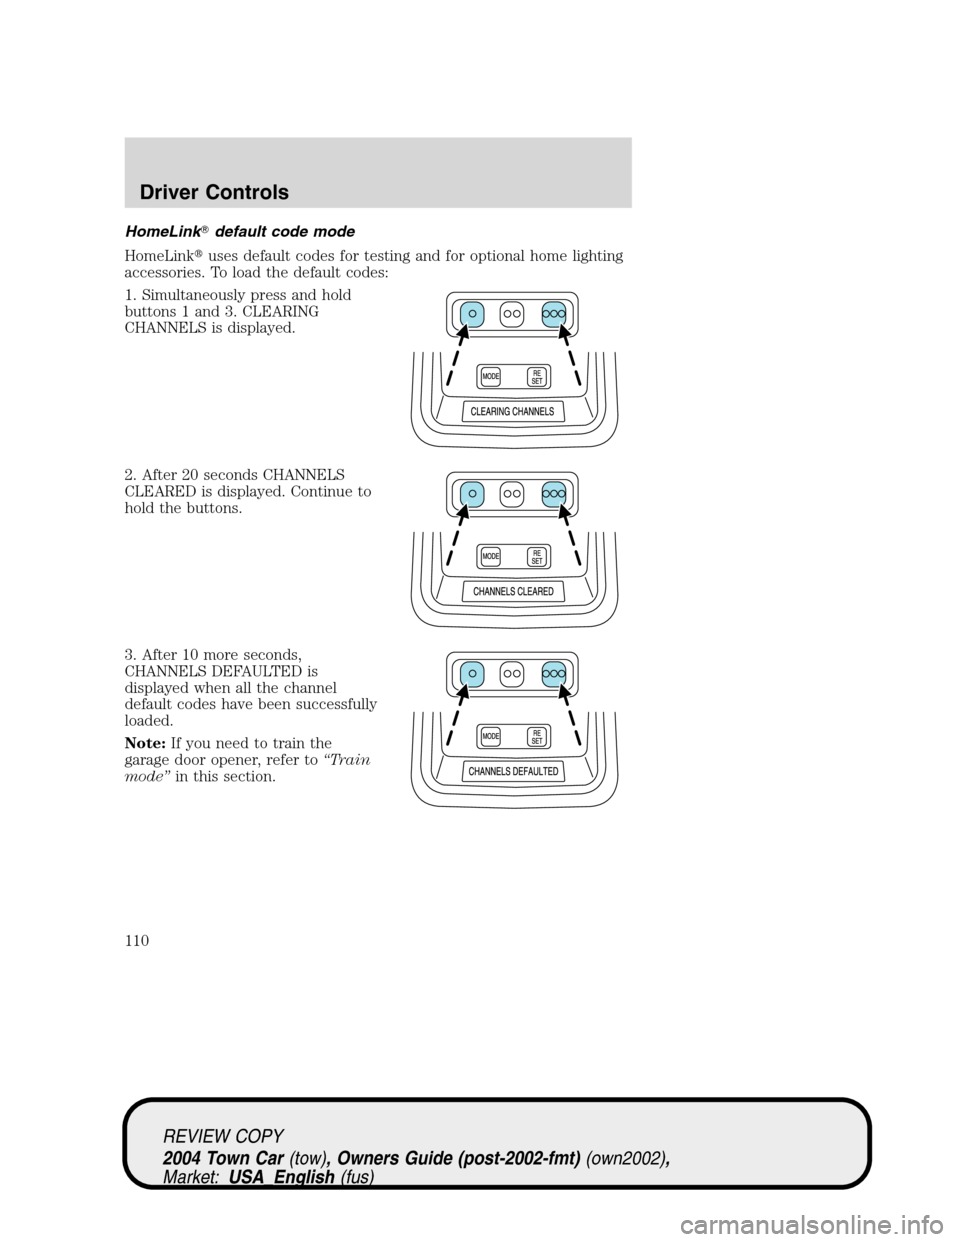
HomeLink�default code mode
HomeLink�uses default codes for testing and for optional home lighting
accessories. To load the default codes:
1. Simultaneously press and hold
buttons 1 and 3. CLEARING
CHANNELS is displayed.
2. After 20 seconds CHANNELS
CLEARED is displayed. Continue to
hold the buttons.
3. After 10 more seconds,
CHANNELS DEFAULTED is
displayed when all the channel
default codes have been successfully
loaded.
Note:If you need to train the
garage door opener, refer to“Train
mode”in this section.
REVIEW COPY
2004 Town Car(tow), Owners Guide (post-2002-fmt)(own2002),
Market:USA_English(fus)
Driver Controls
110
Page 111 of 304

Oil minder mode
Normal mode
To enter oil minder mode, press the
MODE button repeatedly until OIL
LIFE XX% is displayed. XX will be
6–100 when oil life is OK.
Change oil soon
The overhead console will warn the
user that it is time to change the oil
based on the number of engine
revolution counts, number of miles
driven or the calendar time since
the last“Oil Life”reset. These
values are constantly updated while
the vehicle is running. When
CHANGE OIL SOON is displayed as a warning, it will be displayed until
the RESET button is pressed and revert back to the previous mode.
Change oil now
The overhead console will warn the
user that the oil needs changing
when CHANGE OIL NOW is
displayed. This warning will remain
on until the oil life is reset in oil
minder mode (unless a higher
priority message is requested). In
any other mode, the CHANGE OIL
NOW warning can be cleared by pressing RESET button but will return
after a period of time.
REVIEW COPY
2004 Town Car(tow), Owners Guide (post-2002-fmt)(own2002),
Market:USA_English(fus)
Driver Controls
111
Page 112 of 304

Reset oil life mode
To reset oil minder when the vehicle oil is changed:
1. Press the MODE button
repeatedly until one of these three
messages is displayed; OIL LIFE
XX%, CHANGE OIL SOON or
CHANGE OIL NOW.
2. Press and hold the MODE button
for 5 seconds until RESET FOR
NEW OIL LIFE is displayed.
3. Press and hold the RESET button
for 2 seconds. The oil life value will
be reset to 100%
Note:If the RESET button is not pressed after one minute of no activity,
the original oil life will be restored.
Note:If power is interrupted during the reset oil life mode, the overhead
console resets the oil life to the original value.
Park assist de-activation (if equipped)
Park assist can be de-activated/re-activated with the transmission in R
(reverse) by pressing the control on the overhead console. The system
will re-activate every time the ignition key is turned ON.
To de-activate park assist:
1. Press the
OFF button to
de-activate. PARK ASSIST
DISABLED will be displayed and the
button will be backlitamber.
2. Press the
OFF button again
to re-activate. The button will be
backlitgreenat night time when
the headlamps are ON.
REVIEW COPY
2004 Town Car(tow), Owners Guide (post-2002-fmt)(own2002),
Market:USA_English(fus)
Driver Controls
112
.
2. Press the button. CHANNEL X
TRANSMIT is displayed.
3. The proper signal is transmitte")