2004 LINCOLN AVIATOR spare wheel
[x] Cancel search: spare wheelPage 12 of 336

Engine coolant temperature:
Illuminates when the engine coolant
temperature is high. Stop the
vehicle as soon as safely possible, switch off the engine and let it cool.
Refer toEngine coolantin theMaintenance and Specifications
chapter.
Never remove the coolant recovery cap while the engine is
running or hot.
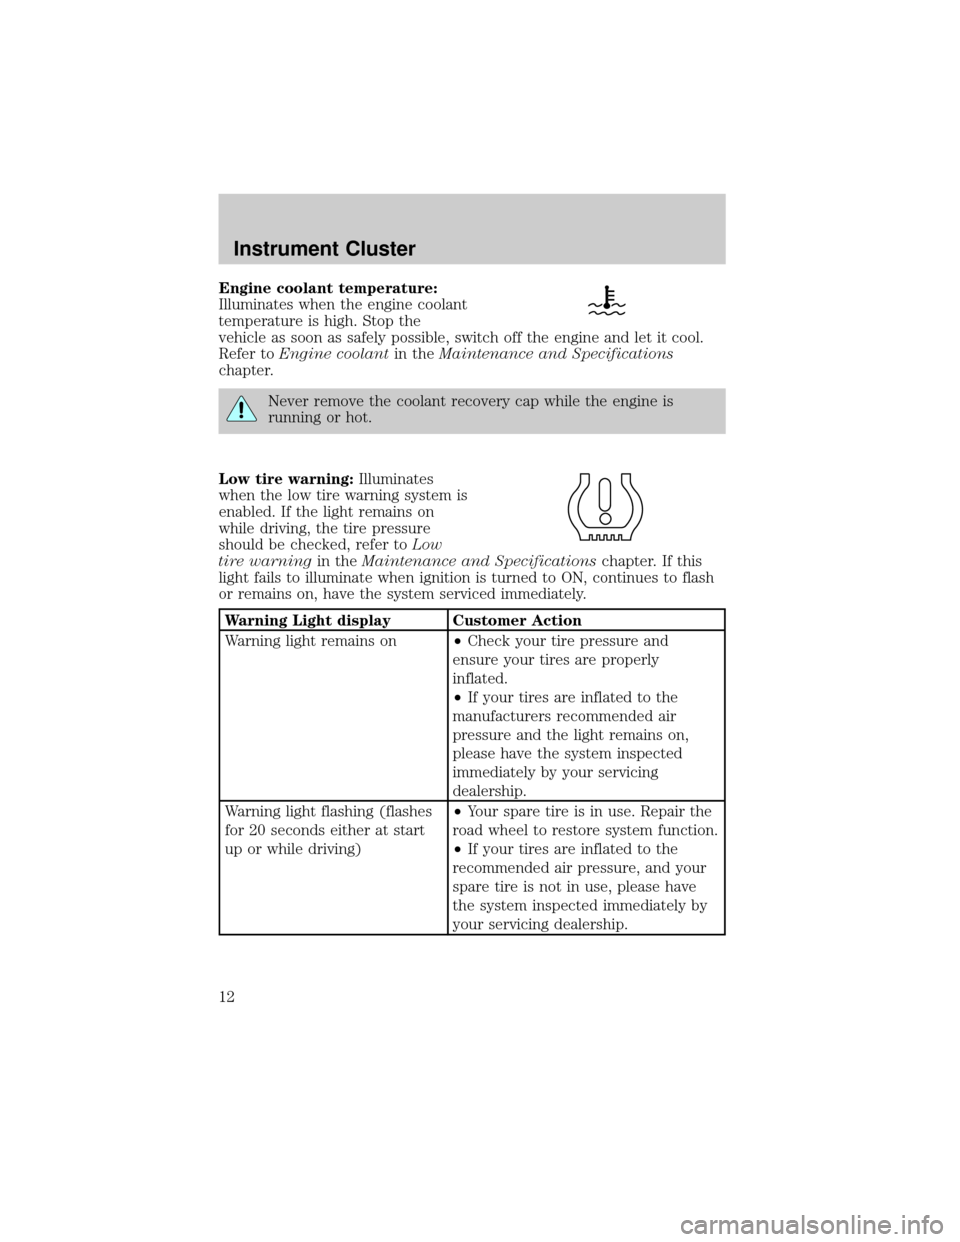
Low tire warning:Illuminates
when the low tire warning system is
enabled. If the light remains on
while driving, the tire pressure
should be checked, refer toLow
tire warningin theMaintenance and Specificationschapter. If this
light fails to illuminate when ignition is turned to ON, continues to flash
or remains on, have the system serviced immediately.
Warning Light display Customer Action
Warning light remains on²Check your tire pressure and
ensure your tires are properly
inflated.
²If your tires are inflated to the
manufacturers recommended air
pressure and the light remains on,
please have the system inspected
immediately by your servicing
dealership.
Warning light flashing (flashes
for 20 seconds either at start
up or while driving)²Your spare tire is in use. Repair the
road wheel to restore system function.
²If your tires are inflated to the
recommended air pressure, and your
spare tire is not in use, please have
the system inspected immediately by
your servicing dealership.
Instrument Cluster
12
Page 211 of 336

ALL WHEEL DRIVE (AWD) SYSTEM (IF EQUIPPED)
Your vehicle may be equipped with an All Wheel Drive (AWD) transfer
case. With the AWD option, power is supplied to all four wheels
automatically with no need to shift between two-wheel drive and
four-wheel drive. If your vehicle is equipped with the AdvanceTracy
stability enhancement feature, you can change AWD modes, if desired,
by selecting AWD options through the message center.
For the lubricant specification and refill capacity of the AWD transfer
case refer toMaintenance and specificationschapter.
If your vehicle is equipped with AWD, a spare tire of a different
diameter than the road tires should never be used. Such a tire
could make the vehicle difficult to control as well as result in damage
to driveline components.
Utility and four-wheel drive vehicles arenotdesigned for cornering
at speeds as high as passenger cars any more than low-slung sports
cars are designed to perform satisfactorily under off-road conditions.
Avoid sharp turns or abrupt maneuvers in these vehicles.
The following sections,Normal operation,Autolock operationand
Disabling AWD, apply only to vehicles which allow the driver to change
AWD modes through the message center.
Normal operation (vehicles equipped with AdvanceTracYonly)
During normal operation:
²the AWD system is in AWD AUTO mode (AWD LOCKED will
illuminate in the message center for four seconds when you first start
your vehicle). The AWD LOCKED indicator in the instrument cluster
will also come on.
²AWD AUTO mode can be overridden by pressing SETUP in the
message center. When you first press SETUP, AWD
displayed, then if you press RESET within four seconds of pressing
SETUP, AWD
power to all four wheels constantly which allows you to operate your
vehicle in severe winter or off-road conditions such as deep snow, ice
or shallow sand. It is not recommended that you use AWD
on dry pavement.
²AWD
center. (The AWD LOCKED display in the message center will then
turn off and the display will return to AWD
when the shift is complete.)
Driving
211
Page 243 of 336

CHANGING THE TIRES
If you get a flat tire while driving:
²do not brake heavily.
²gradually decrease the vehicle's speed.
²hold the steering wheel firmly.
²slowly move to a safe place on the side of the road.
The use of tire sealants may damage your tires. The use of tire
sealants may also damage your tire pressure monitoring system
(if equipped).
If your vehicle is equipped with a tire pressure monitoring
system, refer toTire Pressure Monitoring System (if
equipped)in theMaintenance and specificationssection for
important information. If the tire pressure monitor sensor becomes
damaged, it will no longer function.
Spare tire information
Your spare tire is not equipped with a tire pressure monitoring system
(TPMS) sensor. The tire pressure monitoring system indicator light will
illuminate when the spare is in use. To restore full functionality of the
monitoring system, all road wheels equipped with tire pressure
monitoring sensors must be mounted on the vehicle.
Have flat tires serviced by a dealer or qualified technician in order to
prevent damage to the TPMS sensor. Replace the spare tire with a road
tire as soon as possible.
If your vehicle is equipped with AWD, a spare tire of a different
diameter than the road tires should not be used. Such a tire
could make the vehicle difficult to control as well as result in damage
to driveline components.
Roadside Emergencies
243
Page 245 of 336

Location of the spare tire and tools
The spare tire and tools for your vehicle are stowed in the following
locations:
Tool Location
Spare tire Under the vehicle, just in front of
the rear bumper. The spare tire
winch drive nut is located at the
rear center of the cargo area
under a lid.
Jack, lug nut wrench, jack handle,
wheel chockBehind the rear seat under the
carpeted floor lid in the cargo
floor. The tools are located in a
bag attached to the jack.
Removing the jack and tools
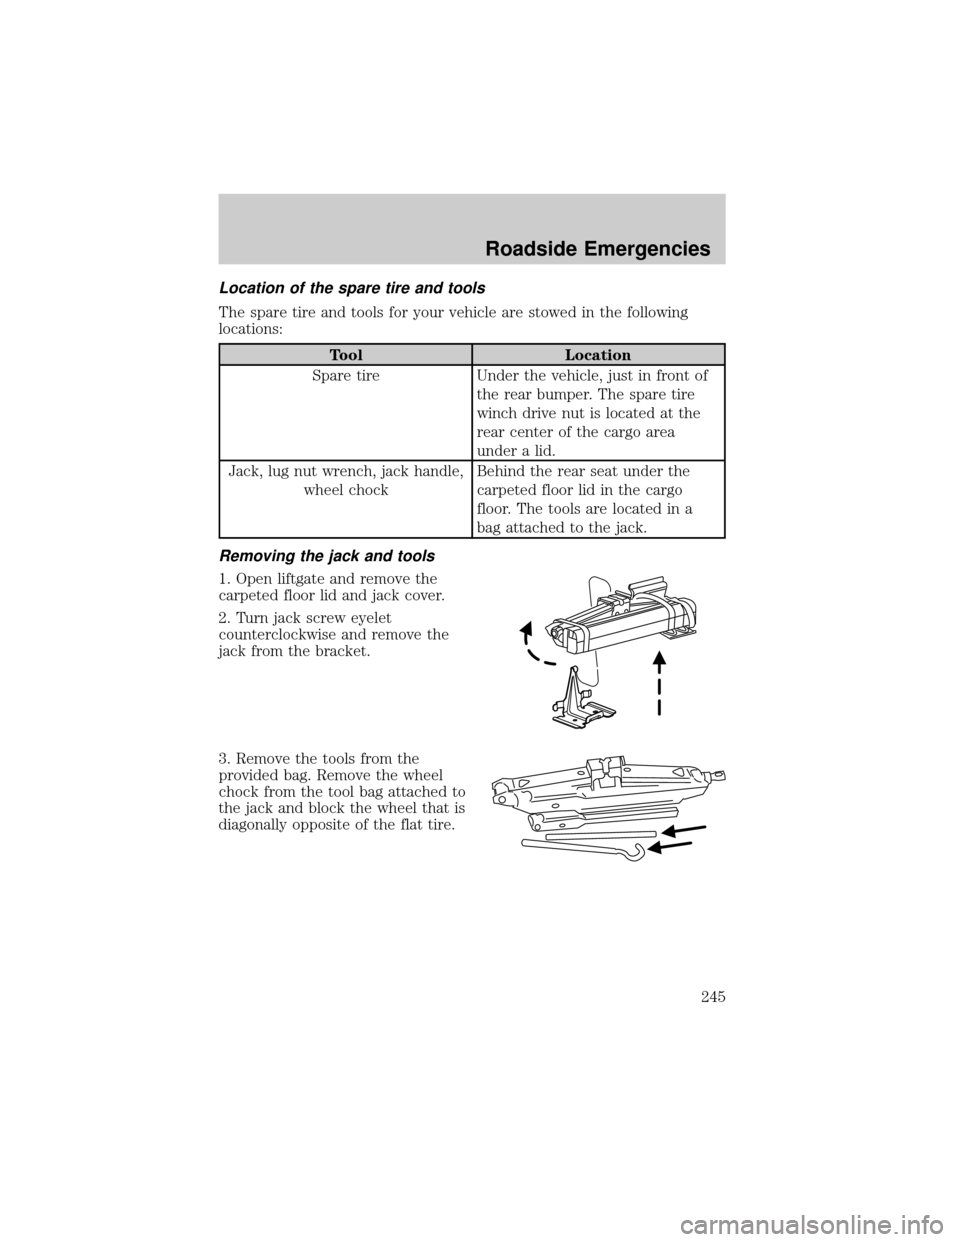
1. Open liftgate and remove the
carpeted floor lid and jack cover.
2. Turn jack screw eyelet
counterclockwise and remove the
jack from the bracket.
3. Remove the tools from the
provided bag. Remove the wheel
chock from the tool bag attached to
the jack and block the wheel that is
diagonally opposite of the flat tire.
Roadside Emergencies
245
Page 247 of 336

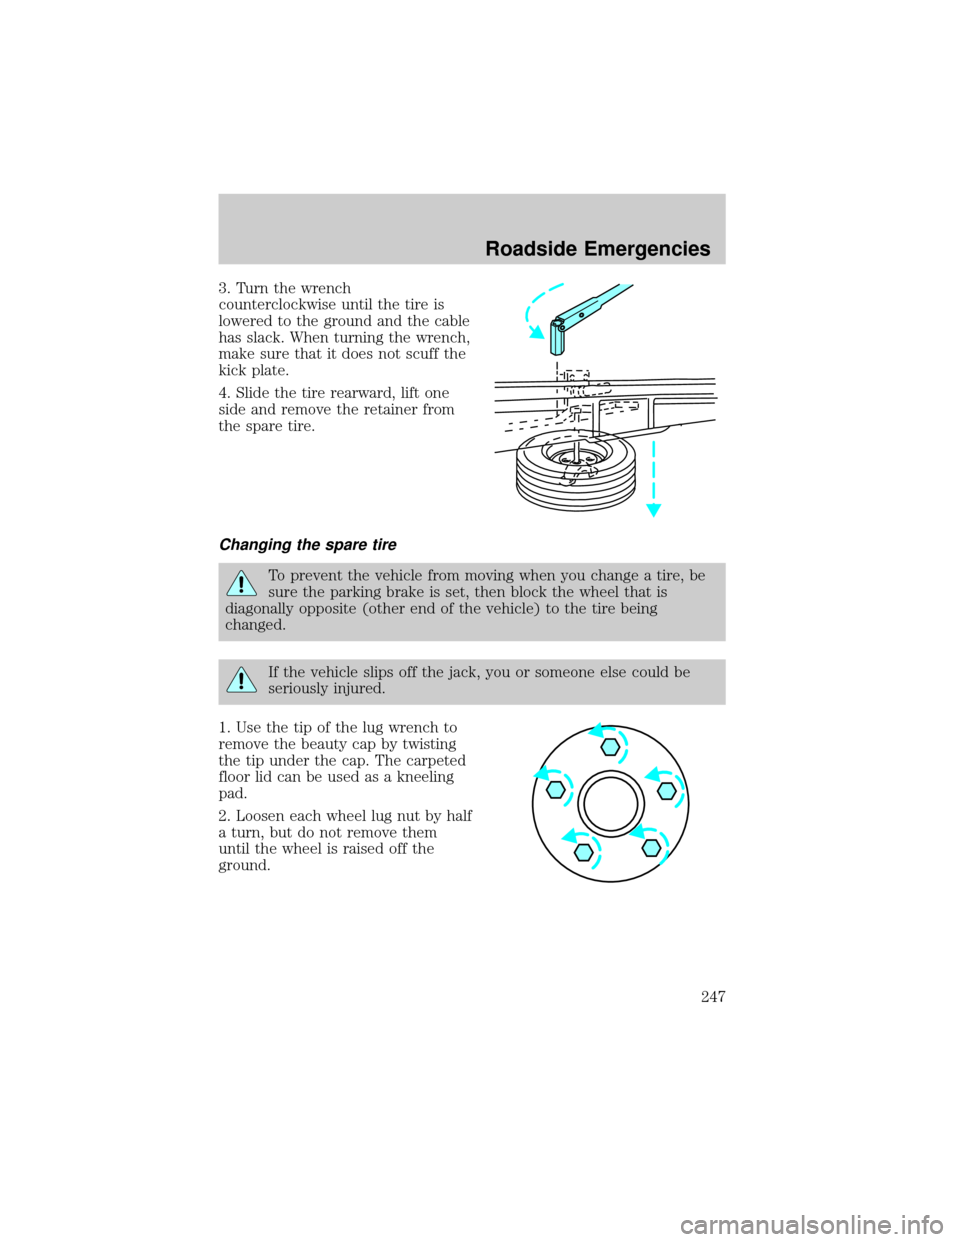
3. Turn the wrench
counterclockwise until the tire is
lowered to the ground and the cable
has slack. When turning the wrench,
make sure that it does not scuff the
kick plate.
4. Slide the tire rearward, lift one
side and remove the retainer from
the spare tire.
Changing the spare tire
To prevent the vehicle from moving when you change a tire, be
sure the parking brake is set, then block the wheel that is
diagonally opposite (other end of the vehicle) to the tire being
changed.
If the vehicle slips off the jack, you or someone else could be
seriously injured.
1. Use the tip of the lug wrench to
remove the beauty cap by twisting
the tip under the cap. The carpeted
floor lid can be used as a kneeling
pad.
2. Loosen each wheel lug nut by half
a turn, but do not remove them
until the wheel is raised off the
ground.
Roadside Emergencies
247
Page 249 of 336

To lessen the risk of
personal injury, do not put
any part of your body under the
vehicle while changing a tire. Do
not start the engine when your
vehicle is on the jack. The jack is
only meant for changing the tire.
²Never use the front or rear
differential as a jacking point.
5. Remove the lug nuts with the lug wrench.
6. Replace the flat tire with the spare tire, making sure the valve stem is
facing outward. Reinstall the lug nuts, cone side in, until the wheel is
snug against the hub. Do not fully tighten the lug nuts until the wheel
has been lowered.
7. Lower the wheel by turning the jack handle counterclockwise.
8. Remove the jack and fully tighten
the lug nuts in the order shown.
Stowing the flat/spare tire
Note:Failure to follow spare tire stowage instructions may result in
failure of cable or loss of spare tire.
1. Lay the tire on the ground with the valve stem facing up, toward the
vehicle.
2. Slide the wheel partially under the vehicle and install the retainer
through the wheel center. Pull on the cable to align the components at
the end of the cable.
3. Turn the lug wrench clockwise until the tire is raised to its stowed
position underneath the vehicle. The effort to turn the jack handle
1
4 3
2 5
Roadside Emergencies
249
Page 250 of 336

increases significantly and the spare tire carrier ratchets or slips when
the tire is raised to the maximum tightness. Tighten to the best of your
ability, to the point where the ratchet/slip occurs, if possible. The spare
tire carrier will not allow you to overtighten. If the spare tire carrier
ratchets or slips with little effort, take the vehicle to your dealer for
assistance at your earliest convenience.
4. Check that the tire lies flat against the frame and is properly
tightened. Try to push or pull, then turn the tire to be sure it will not
move. Loosen and retighten, if necessary. Failure to properly stow the
spare tire may result in failure of the winch cable and loss of the tire.
5. If your vehicle is equipped with a spare tire lock and key, be sure to
install the spare tire lock into the bumper drive tube with the spare tire
lock key and jack handle.
6. Repeat this tightness check procedure when servicing the spare tire
pressure (every six months, per scheduled maintenance guide), or at any
time that the spare tire is disturbed through service of other
components.
Re-stowing the jack and tools
1. Unblock the wheels.
2. Replace beauty cap, stow the jack and tools in their respective
locations, making sure they are fully secured so they do not rattle when
you drive.
Wheel lug nut torque specifications
Retighten the lug nuts to the specified torque at 800 km (500 miles)
after any wheel disturbance (rotation, flat tire, wheel removal, etc.).
Bolt size Wheel lug nut torque*
Nm Lb-ft
1¤2x 20 113-153 84-114
* Torque specifications are for nut and bolt threads free of dirt and
rust. Use only Ford recommended replacement fasteners.
When a wheel is installed, always remove any corrosion, dirt or
foreign materials present on the mounting surfaces of the wheel
or the surface of the front disc brake hub and rotor that contacts the
wheel. Installing wheels without correct metal-to-metal contact at the
wheel mounting surfaces can cause the wheel nuts to loosen and the
wheel to come off while the vehicle is in motion, resulting in loss of
control.
Roadside Emergencies
250
Page 297 of 336

space-saver or temporary use spare tires, tires with nominal rim
diameters of 10 to 12 inches or limited production tires as defined in
Title 49 Code of Federal Regulations Part 575.104(c)(2).
U.S. Department of Transportation-Tire quality grades:The U.S.
Department of Transportation requires Ford to give you the following
information about tire grades exactly as the government has written it.
Treadwear
The treadwear grade is a comparative rating based on the wear rate of
the tire when tested under controlled conditions on a specified
government test course. For example, a tire graded 150 would wear one
and one-half (1 1/2) times as well on the government course as a tire
graded 100. The relative performance of tires depends upon the actual
conditions of their use, however, and may depart significantly from the
norm due to variations in driving habits, service practices, and
differences in road characteristics and climate.
Traction AA A B C
The traction grades, from highest to lowest are AA, A, B, and C. The
grades represent the tire's ability to stop on wet pavement as measured
under controlled conditions on specified government test surfaces of
asphalt and concrete. A tire marked C may have poor traction
performance.
The traction grade assigned to this tire is based on
straight-ahead braking traction tests, and does not include
acceleration, cornering, hydroplaning or peak traction characteristics.
Temperature A B C
The temperature grades are A (the highest), B and C, representing the
tire's resistance to the generation of heat and its ability to dissipate heat
when tested under controlled conditions on a specified indoor laboratory
test wheel. Sustained high temperature can cause the material of the tire
to degenerate and reduce tire life, and excessive temperature can lead to
sudden tire failure. The grade C corresponds to a level of performance
which all passenger car tires must meet under the Federal Motor Vehicle
Safety Standard No. 109. Grades B and A represent higher levels of
performance on the laboratory test wheel than the minimum required by
law.
Maintenance and Specifications
297