Page 46 of 641
Page 49 of 641
 SWITCHES
32When the headlights are on, they automatically turn off about
30 seconds after any side door is opened and closed with the
ignition key turned to the ACCº or LOCKº position.* If you
wa")
SWITCHES
32When the headlights are on, they automatically turn off about
30 seconds after any side door is opened and closed with the
ignition key turned to the ACCº or LOCKº position.* If you
want to turn off the lights immediately, push the LOCKº button
on the wireless remote control key twice. The lights also can
be turned off immediately by pushing the LOCKº button on the
wireless remote control key with all the doors locked.
NOTE:
* The time before turning off the lights can be changed.
Ask your Lexus dealer for details.
If any of the side door is kept opened, the lights automatically
turn off after 30 minutes.When the headlight switch is on with all the doors locked,
pushing the LOCKº button on the wireless remote control key
turns off the headlights.
If you are going to park for over one week, make sure the
headlight switch is off.
Daytime Running Light System
The daytime running light system make your front turn signal
lights turn on when the parking brake is released with the
engine started and the headlights are turned off. They will not
go off until the ignition switch is turned off.
NOTICE
To prevent the battery from being discharged, do not
leave the lights on longer than necessary when the
engine is not running.
Page 50 of 641
SWITCHES
33
HEADLIGHT DIMMER AND TURN
SIGNAL SWITCH
12PY003
For high beam, push the lever forward. Pull it back for low
beam. For the headlight flasher, pull it further back.
A blue light in the instrument cluster indicates high beam or
headlight flasher is on.
The headlight flasher works even when the headlight switch is
off.
For signaling turns, move the lever up or down in the
conventional manner.
The ignition key must be in the ONº position.
The turn signal is self-cancelling after a turn, but after a lane
change, you may have to cancel it by hand. You can also signal
a lane change by moving the turn signal lever partway and
holding it there.
If the green light in the instrument cluster flashes faster than
normal, it indicates that the front or rear turn signal bulb has
burned out. If this indicator light does not come on, the fuse
or the indicator light itself has probably failed.
Page 51 of 641
SWITCHES
34
FOG LIGHT SWITCH
To turn on the fog lights, turn the switch to the ONº
position. The fog lights come on only when the headlights
are on low beam.
WINDSHIELD WIPER AND WASHER
SWITCH
Intermittent operation type
�1Interval adjuster
2Washer on
To turn the wipers on, move the lever down until you reach
the desired speed setting.
The ignition key must be in the ONº position.
There are 3 settings:
INTº position: Intermittent operation
LOº position: Low speed operation
HIº position: High speed operation
Page 57 of 641
SWITCHES
40
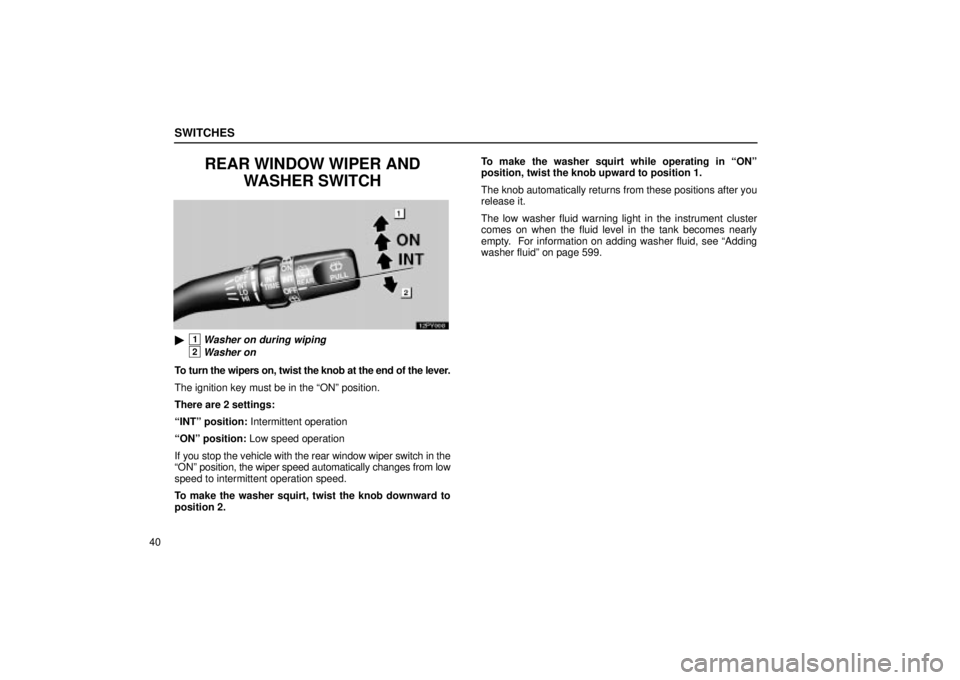
REAR WINDOW WIPER AND
WASHER SWITCH
�1Washer on during wiping
2Washer on
To turn the wipers on, twist the knob at the end of the lever.
The ignition key must be in the ONº position.
There are 2 settings:
INTº position: Intermittent operation
ONº position: Low speed operation
If you stop the vehicle with the rear window wiper switch in the
ONº position, the wiper speed automatically changes from low
speed to intermittent operation speed.
To make the washer squirt, twist the knob downward to
position 2.To make the washer squirt while operating in ONº
position, twist the knob upward to position 1.
The knob automatically returns from these positions after you
release it.
The low washer fluid warning light in the instrument cluster
comes on when the fluid level in the tank becomes nearly
empty. For information on adding washer fluid, see Adding
washer fluidº on page 599.
Page 59 of 641
SWITCHES
42
REAR WINDOW DEFOGGER
SWITCH
�Vehicles with navigation system
�Vehicles without navigation system
To turn the electric rear window defogger on, push the
switch.
The ignition key must be in the ONº position.
The thin heater wires on the inside of the rear window will
quickly clear the surface. An indicator light will illuminate to
indicate the defogger is operating.
The system will automatically shut off when the defogger has
operated about 15 minutes.
If further defrosting or defogging is desired, simply actuate the
switch again. When the surface has cleared, push the switch
once again to turn the defogger off. Continuous use may cause
the battery to discharge, especially during stop-and-go
driving. The defogger is not designed to dry rain water or to
melt snow.
Page 61 of 641
 SWITCHES
44
OUTSIDE REAR VIEW MIRROR
DEFOGGER SWITCH
To turn the electric outside rear view mirror defogger on,
push the switch.
The ignition key must be in the ONº position.
The thin heater wires o")
SWITCHES
44
OUTSIDE REAR VIEW MIRROR
DEFOGGER SWITCH
To turn the electric outside rear view mirror defogger on,
push the switch.
The ignition key must be in the ONº position.
The thin heater wires on the heater panels in the outside rear
view mirrors will quickly clear the surface. Keep your hands off
the mirror faces when the switch is on. An indicator light will
illuminate to indicate the defogger is operating.
The system will automatically shut off when the defogger has
operated about 5 minutes.
CAUTION
Since the mirror surfaces can get hot, do not touch them
when the switch is on.
If further defrosting or defogging is desired, simply actuate the
switch again. When the surface has cleared, push the switch
once again to turn the defogger off. Continuous use may cause
the battery to discharge, especially during stop-and-go
driving. The defogger is not designed to dry rain water or to
melt snow.
If the outside rear view mirrors are heavily coated with ice, use
a spray de-icer before operating the switch.
NOTICE
To prevent the battery from being discharged, turn the
switch off when the engine is not running.
Page 62 of 641
SWITCHES
45
POWER WINDOW SWITCHES
�1For driver's window
2For front passenger's window
3For left rear window
4For right rear window
To raise or lower the windows, use the switch on each
door. The passengers' windows can also be controlled by
the switches on the driver's door.
The power windows work when the ignition key is in the ONº
position.
Key off operation: Even if the ignition key is turned to the
ACCº or LOCKº position with all the doors closed, the window
can be operated until a front door is opened (or for 43 seconds).
Operating the switches
To raise or lower the window, pull the switch halfway up or
push it halfway down.
Automatic operation: To fully raise or lower the window
automatically, pull the switch fully up or push it fully down.
To stop the window partway, lightly push or pull the switch in the
opposite direction and then release it.
 KEYS AND DOORS
29")
 SWITCHES
33
HEADLIGHT DIMMER AND TURN
SIGNAL SWITCH
12PY003
For high beam, push the lever forward. Pull it back for low
beam. For the headlight flasher, pull it further back.
A blue light in the ins")
 SWITCHES
34
FOG LIGHT SWITCH
To turn on the fog lights, turn the switch to the ONº
position. The fog lights come on only when the headlights
are on low beam.
WINDSHIELD WIPER AND WASHER
SWITCH
Inte")