Page 46 of 670
KEYS AND DOORS
27
Locking with rear door child-protector
�1Unlock2Lock
Whenever small children are in the vehicle, lock the rear
door so that it does not open by the inside door handle.
To do this, move the lever to the LOCKº position as
shown and then close the door.
BACK DOOR
11PY030
�1Temporary open position
2Full-open position
To open the back door, pull the handle. The back door can
be opened at the above mentioned positions.
Page 47 of 670
 KEYS AND DOORS
28The back door can be locked and unlocked together with the
side doors by means of the power door lock system. (For
instructions, see Locking with power door lock switchº on
page 24")
KEYS AND DOORS
28The back door can be locked and unlocked together with the
side doors by means of the power door lock system. (For
instructions, see Locking with power door lock switchº on
page 24.)
See Stowage precautionsº on page 475 for precautions when
loading luggage.
CAUTION
�
Keep the back door closed while driving. This not
only keeps the luggage from being thrown out but
also prevents exhaust gases from entering the
vehicle.
� If the open back door hides the rear stop and tail
lights or rear turn signal lights while you are parked,
other road users must be warned of the presence of
your vehicle by a warning triangle or other device.
Back door stopper
�1Lock2Unlock
For your safety, lock the back door with the door stopper
when you fully open the back door.
When closing the back door, check that the back door stopper
is unlocked.
CAUTION
� When keeping the back door open, use only the lock
lever of the back door stopper without touching the
other parts.
� To avoid serious personal injury, make sure not to get
your hands caught in the back door stay when
closing the back door.
Page 48 of 670
 KEYS AND DOORS
29
THEFT DETERRENT SYSTEM
To deter theft of the vehicle, this system is designed to
sound an alarm if any of the doors or hood is forcibly
unlocked or the battery terminal is disconnect")
KEYS AND DOORS
29
THEFT DETERRENT SYSTEM
To deter theft of the vehicle, this system is designed to
sound an alarm if any of the doors or hood is forcibly
unlocked or the battery terminal is disconnected and then
reconnected while the vehicle is locked.
The alarm blows the horn intermittently and flashes the
headlights, tail lights and turn signal lights.
Further more when the center interior light switch and personal
light switch are in the DOORº position, the center interior light
and personal lights turn on.
�Security indicator light
Setting the system
1. Turn the ignition key to the LOCKº position and
remove it.
The engine immobilizer system causes the indicator light to
flash.
2. Close and lock all the doors and hood using an ignition
key or wireless remote control.
If you lock them with wireless remote control, the turn signals
flash once.
The flashing indicator light will remain on when all the doors
and hood are closed and locked.
3. After 30 seconds, the indicator starts flashing and the
system is set.
Page 49 of 670
 KEYS AND DOORS
30
Cancelling the system
When you unlock any door using an ignition key or
wireless remote control, the system is cancelled.
If you unlock any door with wireless remote control, the tur")
KEYS AND DOORS
30
Cancelling the system
When you unlock any door using an ignition key or
wireless remote control, the system is cancelled.
If you unlock any door with wireless remote control, the turn
signals flash twice.
Activating the system
The alarm sounds for 60 seconds if any of the following are
operated:
�Unlocking any door without using an ignition key or wireless
remote control.
� Opening the hood and any doors forcibly.
� Reconnecting the battery.
If the battery becomes discharged due to the vehicle being
unused for a long time, etc., when the battery is recharged or
replaced, the system will give the alarm. If this happens,
immediately unlock any of the doors with the key or the
wireless remote control, and the alarm will stop.
If any door is unlocked and the ignition key is not in the ignition
switch during the alarm sounding, its door is automatically
locked.
To stop the alarm: Use either of the following methods.
� Unlock the door using an ignition key or wireless remote
control.
� Turn the ignition switch on.
Testing the system
1. Open all the windows.
2. Set the system as described above.
The front doors should be locked with the ignition key or
wireless remote control. Be sure to wait until the indicator light
starts flashing.
3. Unlock one of the doors from the inside.
The system should activate the alarm.
4. Unlock any of the doors with a key or the wireless
remote control to cancel the system.
5. Repeat this operation for the other doors and hood.
When testing the hood, also check that the system is activated
when the battery terminal is disconnected and then
reconnected.
If the system does not work properly, have it checked by your
Lexus dealer.
Page 53 of 670
 SWITCHES
34
The automatic light control sensor is on top of the drivers side
instrument panel.
Do not place anything on the instrument panel, and/or do not
affix anything on the windshield to block")
SWITCHES
34
The automatic light control sensor is on top of the driver's side
instrument panel.
Do not place anything on the instrument panel, and/or do not
affix anything on the windshield to block this sensor.
When the headlights are on, they automatically turn off about
30 seconds after any side door is opened and closed with the
ignition key turned to the ACCº or LOCKº position.* If you
want to turn off the lights immediately, push the LOCKº button
on the wireless remote control key twice. The lights also can
be turned off immediately by pushing the LOCKº button on the
wireless remote control key with all the doors locked.
NOTE:* The time before turning off the lights can be changed.Ask your Lexus dealer for details.
If any of the side door is kept opened, the lights automatically
turn off after 30 minutes.
When the headlight switch is on with all the doors locked,
pushing the LOCKº button on the wireless remote control key
turns off the headlights.
If you are going to park for over one week, make sure the
headlight switch is off.
Daytime Running Light System
The daytime running light system make your front turn signal
lights turn on when the parking brake is released with the
engine started and the headlights are turned off. They will not
go off until the ignition switch is turned off.
Page 57 of 670
 SWITCHES
38Twist the interval adjuster upward to increase the wiping
time
interval between sweeps, and downward to decrease
it.
The wiper lever must be in the INTº position.
The time interval betwe")
SWITCHES
38Twist the interval adjuster upward to increase the wiping
time
interval between sweeps, and downward to decrease
it.
The wiper lever must be in the INTº position.
The time interval between sweeps is shortened when the
vehicle speed increases. When the vehicle speed reaches
more than about 20 km/h (12 mph) with the interval adjuster in
the full upward position, the time interval becomes the shortest
1.5 seconds.
If you stop the vehicle with the wiper switch in the LOº position,
the wiper speed automatically changes from low speed to
intermittent operation speed.* This function does not work
when the interval adjuster is in the full upward position.
NOTE: * This feature can be deactivated. Ask your Lexus dealer for details.
To make the washer squirt, pull the lever toward you and
release it.
If the wiper lever is in the OFFº position, the wipers will
automatically make 3 wipes and then a single wipe later to
sweep the windshield completely.* The interval between the
3 wipes and the last wipe will depend on the vehicle speed. The
last sweep does not happen if the vehicle speed exceeds about
170 km/h (106 mph).
NOTE: * The last single wipe can be deactivated. Ask your Lexus dealer for details.
The low washer fluid warning light in the instrument cluster
comes on when the fluid level in the tank becomes nearly
empty. For information on adding washer fluid, see Adding
washer fluidº on page 622.
In cold weather, warm the windshield with the defroster before
using the washer. This will help prevent icing, which could
block your vision.
Page 61 of 670
SWITCHES
42To make the washer squirt, pull the lever toward you and
release it.
If the wiper lever is in the OFFº position, the wipers will
automatically make 3 wipes and then a single wipe later to
sweep the windshield completely.* The interval between the
3 wipes and the last wipe will depend on the vehicle speed. The
last sweep does not happen if the vehicle speed exceeds about
170 km/h (106 mph).
NOTE:
* The last single wipe can be deactivated. Ask your Lexus dealer for details.
The low washer fluid warning light in the instrument cluster
comes on when the fluid level in the tank becomes nearly
empty. For information on adding washer fluid, see Adding
washer fluidº on page 622.
In cold weather, warm the windshield with the defroster before
using the washer. This will help prevent icing, which could
block your vision.
NOTICE
Do not operate the wipers if the windshield is dry. It mayscratch the glass.
Page 67 of 670
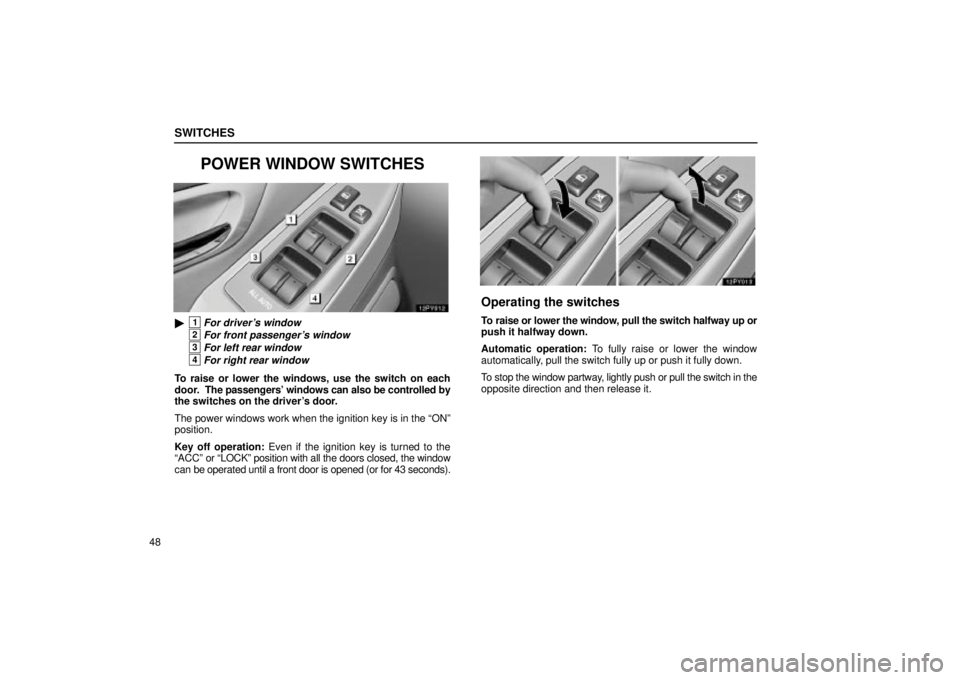
SWITCHES
48
POWER WINDOW SWITCHES
�1For driver's window
2For front passenger's window
3For left rear window
4For right rear window
To raise or lower the windows, use the switch on each
door. The passengers' windows can also be controlled by
the switches on the driver's door.
The power windows work when the ignition key is in the ONº
position.
Key off operation: Even if the ignition key is turned to the
ACCº or LOCKº position with all the doors closed, the window
can be operated until a front door is opened (or for 43 seconds).
Operating the switches
To raise or lower the window, pull the switch halfway up or
push it halfway down.
Automatic operation: To fully raise or lower the window
automatically, pull the switch fully up or push it fully down.
To stop the window partway, lightly push or pull the switch in the
opposite direction and then release it.

 SWITCHES
42To make the washer squirt, pull the lever toward you and
release it.
If the wiper lever is in the OFFº position, the wipers will
automatically make 3 wipes and then a single wipe later to")