Page 251 of 612

Finish
AUDIO
236
1Ejecting a compact disc
(See page 252 for details.)
2Compact disc slot
(See page 250 for details.)
3Display of functions in TAPE or CD mode
RPT:Automatic repeat
(See page 248 or 254 for details.)
:DOLBY NR
(See page 247 for details.)
��
:
Side change
(See page 248 for details.)
��:Rewinding or reversing
(See page 248 or 254 for details.)
��:Fast forwarding
(See page 248 or 254 for details.)
RAND:Random access
(See page 255 for details.)
:Disc selection
(See page 253 for details.)
4Station selector and function buttons
(See page 243 for details.)
5Radio mode:Scan tuning
(See page 244 for details.)
CD mode:Scan selection
(See page 253 for details.)
6Radio mode:Radio text message
(See page 246 for details.)
CD mode:Compact disc text
(See page 255 for details.)
7Compact disc load button
(See page 250 for details.)
8AUDIO´TUNE knob
(See page 239 for details.)
9Traffic announcement
(See page 245 for details.)
10Radio data system/program type
(See page 244 for details.)
11Mode selectors
(See page 238 for details.)
12Radio mode:Seek tuning
(See page 243 for details.)
TAPE mode:Direct access to a desired program
(See page 249 for details.)
CD mode:Direct access to a desired program
(See page 254 for details.)
13Cassette tape slot
(See page 247 for details.)
14Stopping and ejecting a cassette tape
(See page 247 for details.)
15Turning the system on and adjusting the volume
(See page 238 for details.)
Page 253 of 612
Finish
AUDIO
238(a) Turning the system on and off
Push this knob to turn the audio system on and off. Turn
this knob to adjust the volume.
The system turns on in the last mode used.
Push the AMº, FMº, TAPEº or DISCº button to turn on
that mode. The selected mode turns on directly.
Push these buttons if you want to switch from one mode to
another.
If the tape or disc is not set, the cassette player or compact disc
player does not turn on.
You can turn off each player by ejecting the cassette tape or
compact disc. If the audio system was previously off, then the
entire audio system will be turned off when you eject the
cassette tape or compact disc. If the another function was
previously playing, it will come on again.
Page 257 of 612
Finish
AUDIO
242
Push these buttons to choose either an AM or FM station.
AMº, FM1º, FM2º or FM TYPEº appears on the display.Turn this knob to the right to step up the frequency or to
the left to step down.
Your radio automatically changes to stereo reception when a
stereo broadcast is received. STº appears on the display. If
the signal becomes weak, the radio reduces the amount of
channel separation to prevent the weak signal from creating
noise. If the signal becomes extremely weak, the radio
switches from stereo to mono reception. In this case, STº
disappears from the display.
Page 258 of 612

Finish
AUDIO
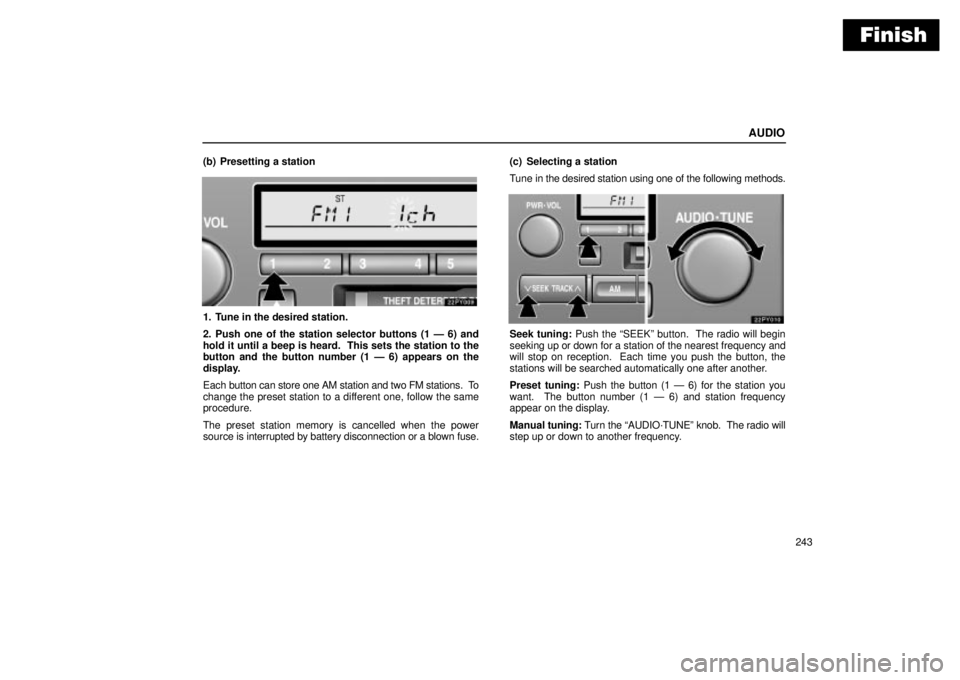
243 (b) Presetting a station
1. Tune in the desired station.
2. Push one of the station selector buttons (1 Ð 6) and
hold it until a beep is heard. This sets the station to the
button and the button number (1 Ð 6) appears on the
display.
Each button can store one AM station and two FM stations. To
change the preset station to a different one, follow the same
procedure.
The preset station memory is cancelled when the power
source is interrupted by battery disconnection or a blown fuse.(c) Selecting a station
Tune in the desired station using one of the following methods.
Seek tuning: Push the SEEKº button. The radio will begin
seeking up or down for a station of the nearest frequency and
will stop on reception. Each time you push the button, the
stations will be searched automatically one after another.
Preset tuning: Push the button (1 Ð 6) for the station you
want. The button number (1 Ð 6) and station frequency
appear on the display.
Manual tuning: Turn the AUDIO´TUNEº knob. The radio will
step up or down to another frequency.
Page 283 of 612

Finish
AUDIO
268
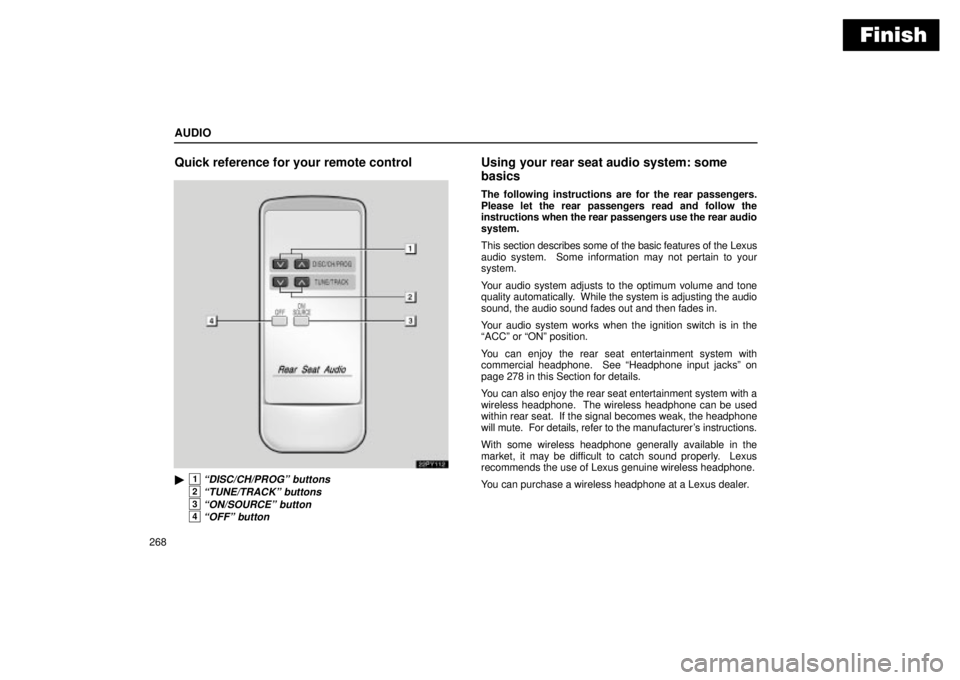
Quick reference for your remote control
22PY112
�1DISC/CH/PROGº buttons
2TUNE/TRACKº buttons
3ON/SOURCEº button
4OFFº button
Using your rear seat audio system: some
basics
The following instructions are for the rear passengers.
Please let the rear passengers read and follow the
instructions when the rear passengers use the rear audio
system.
This section describes some of the basic features of the Lexus
audio system. Some information may not pertain to your
system.
Your audio system adjusts to the optimum volume and tone
quality automatically. While the system is adjusting the audio
sound, the audio sound fades out and then fades in.
Your audio system works when the ignition switch is in the
ACCº or ONº position.
You can enjoy the rear seat entertainment system with
commercial headphone. See Headphone input jacksº on
page 278 in this Section for details.
You can also enjoy the rear seat entertainment system with a
wireless headphone. The wireless headphone can be used
within rear seat. If the signal becomes weak, the headphone
will mute. For details, refer to the manufacturer's instructions.
With some wireless headphone generally available in the
market, it may be difficult to catch sound properly. Lexus
recommends the use of Lexus genuine wireless headphone.
You can purchase a wireless headphone at a Lexus dealer.
Page 302 of 612

Finish
AUDIO
287
1TUNE/TRACKº buttons:
Operate the front audio system or select the
track/chapter when the DVD player is operated.
2DISC/CH/PROGº buttons:
Skip directly to a desired preset station, disc, track or
chapter.
3CURSORº button:
Indicates the control switches on the screen when the
DVD player is operated.
4Joy stick:
Select a control switch, mode switch on the screen or
the menu for the disc.
5ENTº button:
Input the selected switch or the selected menu for the
disc.
6SOURCEº button:
Turn on the rear seat entertainment system and selects
the mode.
7DISPLAYº button:
Adjust the color, tone, contrast and brightness of the
screen.
8VIDEOº button:
Turn on the video mode when your personal audio
device is connected.
9DVDº button:
Turn on the DVD mode.
10RETURNº button:
Skip to the predetermined scene for the disc.
11SET UPº button:
Indicate the initial set up screen when the DVD player
is operated.
12SEARCHº button:
Indicate the title search screen when the DVD player is
operated.
13ANGLEº button:
Select the angle of the screen when the DVD player is
operated.
14��º button: Fast forwards a screen when the DVD
player is operated.
15�º button: Play a screen when the DVD player is
operated.
16º button: Pause a screen when the DVD player is
operated.
17��º button: Reverse a screen when the DVD player
is operated.
18TOP MENUº button:
Indicate the title selection screen for DVD video when
the DVD player is operated.
19AUDIOº button:
Indicate the changing audio screen when the DVD
player is operated.
20SUB TITLEº button:
Indicate the changing subtitle screen when the DVD
player is operated.
21MENUº button:
Indicate the menu screen for DVD video when the DVD
player is operated.
22OFFº button:
Turn off the rear seat entertainment system.
Page 319 of 612
Finish
AUDIO
304(d) DVD player operation switches
The DVD player can be operated with the controller
buttons directly.
The player can also be operated with the switches on the
screen.
To operate the switches on the screen, select the switch by the
joy stick and push the ENTº button. You cannot select the
switches on the screen by touching them directly.
When the switch is selected by the joy stick, the outline of the
switch changes to blue. Push the ENTº button, and the switch
will be highlighted in green.
Page 325 of 612
Finish
AUDIO
310
�1Selecting switch on screen
2Selecting switch off screen
To select the menu for the disc, push the º, º, º or
º switches on the screen. Push the Enterº switch to
select the menu for the disc.
You can also select the menu for the disc by the joy stick
and the ENTº button on the controller when the control
switches are not indicated on the screen.
Push the Shift Keysº on the screen, and the switches (
º,
º, º, º, Enterº and Shift Keysº switches) will move up
and down.
To turn off the switch, push the OFFº switch on the screen. To
turn on the switch again, push the ONº switch on the screen.
To return to the previous screen, push the Backº switch on the
screen.(b) Operating the
º, �º, ��º and ��º
switches/buttons
22PY062