Page 391 of 641
 STARTING AND DRIVING
374
PARKING BRAKE
To set: Pull up the lever. For better holding power, first
depress the brake pedal and hold it while setting the
parking brake.
To release: Pull up the lever sl")
STARTING AND DRIVING
374
PARKING BRAKE
To set: Pull up the lever. For better holding power, first
depress the brake pedal and hold it while setting the
parking brake.
To release: Pull up the lever slightly (
1), press the lock
release button (2), and lower the lever (3).
Before leaving your vehicle, firmly apply the parking brake. For
better holding power, first depress the brake pedal and hold it
while setting the parking brake.
CAUTION
Before driving, make sure the parking brake is fully
released and that the parking brake reminder light is off.
HOW TO START THE ENGINE
Cranking hold function
Once you turn the ignition key to STARTº position and release
it, the cranking hold function continues to crank the engine in
ONº position until it starts.
The function stops cranking the engine after about 25 seconds
maximum if the engine has not started yet. When you crank
the engine again, wait a few seconds and restart it.
If you hold the key in STARTº position, the function will keep
cranking for about 30 seconds maximum.
Before cranking
1. Apply the parking brake firmly.
2. Turn off unnecessary lights and accessories.
3. Put the selector lever in Pº. If you need to restart the engine
while the vehicle is moving, put the selector lever in Nº. A
starter safety device will prevent the starter from operating if
the selector lever is in any drive position.
4. Depress the brake pedal and hold it to the floor until driving
off.
Page 398 of 641
STARTING AND DRIVING
381
(d) Backing up
�1Brake pedal2Rº (Reverse) position
1. Bring the vehicle to a complete stop.
2. With the brake pedal held down with your foot, shift the
selector lever to the Rº position.
NOTICE
Never shift into reverse while the vehicle is moving.
When the shift lever is shifted into Rº position, the outside rear
view mirrors automatically down to help backing up. For
details, see page 213.
Vehicles with rear view monitor system Ð
When the selector lever is shifted into Rº position with the
ignition switch in the ONº position, rear view monitor system
will activate. For instructions, see Rear view monitor systemº
on page 388.
Page 399 of 641
STARTING AND DRIVING
382
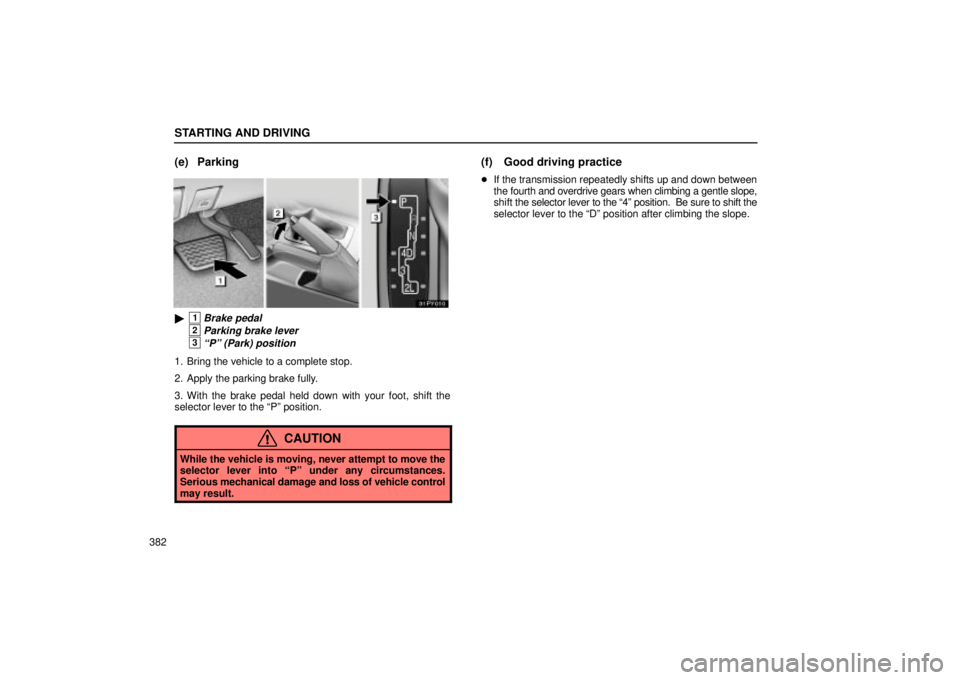
(e) Parking
�1Brake pedal
2Parking brake lever
3Pº (Park) position
1. Bring the vehicle to a complete stop.
2. Apply the parking brake fully.
3. With the brake pedal held down with your foot, shift the
selector lever to the Pº position.
CAUTION
While the vehicle is moving, never attempt to move the
selector lever into Pº under any circumstances.
Serious mechanical damage and loss of vehicle control
may result.
(f) Good driving practice
�If the transmission repeatedly shifts up and down between
the fourth and overdrive gears when climbing a gentle slope,
shift the selector lever to the 4º position. Be sure to shift the
selector lever to the Dº position after climbing the slope.
Page 400 of 641
STARTING AND DRIVING
383 �When towing a trailer, in order to maintain efficient engine
braking and electrical charging performance, do not use
overdrive.
CAUTION
Always keep your foot on the brake pedal while stopped
with the engine running. This prevents the vehicle from
creeping.
NOTICE
Always use the brake pedal or parking brake to hold the
vehicle on an upgrade. Do not attempt to hold the
vehicle using the accelerator pedal, as this can cause
the transmission to overheat.
Page 402 of 641
 STARTING AND DRIVING
385
NOTICE
As soon as the center differential lock switch is turned
on, the VSC OFFº indicator light comes on. After the
wheels are out of the ditch or off the slippery or bump")
STARTING AND DRIVING
385
NOTICE
As soon as the center differential lock switch is turned
on, the VSC OFFº indicator light comes on. After the
wheels are out of the ditch or off the slippery or bumpy
surface, turn the center differential lock switch off.
Make sure the center differential lock indicator light and
vehicle stability control system off indicator light turn
off.
Hº (high speed position, center differential unlocked):
Lever at Hº, center differential lock button left out
Use this for normal driving on all types of roads, from dry
hard-surfaced roads to wet, icy or snow-covered roads. This
position gives greater economy, quietest ride, least wear and
better vehicle control.
Hº (high speed position, center differential locked): Lever
at Hº, center differential lock button pushed in
Use this for greater traction when you experience a loss of
power, such as wheel slipping, in the center differential unlock
mode.
Nº (neutral position): Lever at Nº
No power is delivered to the wheels. The vehicle must be
stopped.Lº (low speed position, center differential unlocked):
Lever at Lº, center differential lock button left out
Use this for maximum power and traction. Use this for climbing
or descending steep hills, off-road driving, and hard pulling in
sand or mud.
In this mode, the braking feeling that occurs when the wheels
are negotiating a sharp corner is further reduced than in the Lº
(low position, center differential locked) mode.
Lº (low speed position, center differential locked): Lever
at Lº, center differential lock button pushed in
Use this for maximum power and traction. Use this for hard
pulling in situations the vehicle cannot negotiate even in the Lº
(low speed position, center differential unlocked) mode. Also,
using this mode when driving down steep off-road inclines will
help contribute to increased vehicle stability.
Page 404 of 641
STARTING AND DRIVING
387
(b) Shifting procedure
To shift between unlock and lock modes in Hº, push the
center differential lock button.
To shift between unlock and lock modes in Lº, push the
center differential lock button.
To shift between Hº and Lº, stop the vehicle, put the
transmission into Nº and move the four-wheel drive control
lever.CAUTION
Never move the four-wheel drive control lever if wheels
are slipping. Stop the slipping or spinning before
shifting.
NOTICE
For normal driving on dry and hard surface roads,
unlock the center differential. To prevent damage to the
center differential lock system, do not push the center
differential lock button when the vehicle is cornering or
when its wheels are spinning freely off the ground. If the
indicator light does not go off when unlocking the
center differential, drive straight ahead while
accelerating or decelerating, or drive in reverse.
Page 413 of 641
STARTING AND DRIVING
396
NOTICE
Use the LOº mode when the vehicle is stopped.
Otherwise, when the vehicle speed exceeds about 12
km/h (7 mph), Nº mode is selected automatically. So
be careful when you drive in any place where the
overhead height is limited.
(b) Vehicle height mode changing condition
To change the vehicle height, it is necessary to meet the
following conditions.
�The engine should be running.
�The height control OFFº indicator light should go off.�When selecting a mode, there is a vehicle speed limit. Refer
to the following table.
Yes = The mode can be selected.
No = The mode cannot be selected.
LOº
modeNº
modeHIº
mode
Under about
12 km/h (7 mph)Ye sYe sYe s
Under about
30 km/h (19 mph)NoYe sYe s
About 30 km/h
(19 mph) or overNoYe sNo
Page 414 of 641
 STARTING AND DRIVING
397 In the following cases, the rear height control suspension
will not operate.
�The underbody of the vehicle has touched the surface on
bumpy roads.
�The area around the rear su")
STARTING AND DRIVING
397 In the following cases, the rear height control suspension
will not operate.
�The underbody of the vehicle has touched the surface on
bumpy roads.
�The area around the rear suspension is coated with ice.
If the vehicle is moved to its usual location or the ice is removed
and the height select switch is pressed, the vehicle height
control cannot be operated. In this case, turn off and restart the
engine, then push the control switches.
(c) Vehicle height adjustment
�1Higher2Lower
To change the mode, push the height select switch on
either side of �º (higher) or �º (lower).The height control indicator light indicates which mode is
selected. (See (e) Height control indicator lightº described
below.)
�Selecting the HIº mode
Push the height select switch on the �º side when the vehicle
speed is under about 30 km/h (19 mph).
To change the Nº mode to HIº: Push the switch once.
To change the LOº mode to HIº: Push the switch twice. It
takes about 30 seconds until the LOº mode changes to the HIº
mode.
�Selecting the Nº mode
To change the HIº mode to Nº: Push the height select
switch on the �º side once.
To change the LOº mode to Nº: Push the height select
switch on the �º side once.
�Selecting the LOº mode
Push the height select switch on the �º side while the vehicle
is stopped.
To change the Nº mode to LOº: Push the switch once.
To change the HIº mode to LOº: Push the switch twice.
Even if the engine is stopped while the vehicle height is being
lowered, the operation continues for up to 25 seconds. If within
this 25 seconds, any of the side doors or the back door is
opened, operation will continue for a further 15 seconds.


 STARTING AND DRIVING
387
(b) Shifting procedure
To shift between unlock and lock modes in Hº, push the
center differential lock button.
To shift between unlock and lock modes in Lº, push the
cente")
 STARTING AND DRIVING
396
NOTICE
Use the LOº mode when the vehicle is stopped.
Otherwise, when the vehicle speed exceeds about 12
km/h (7 mph), Nº mode is selected automatically. So
be careful whe")