Page 277 of 670
AUDIO
258
AUDIO SYSTEM
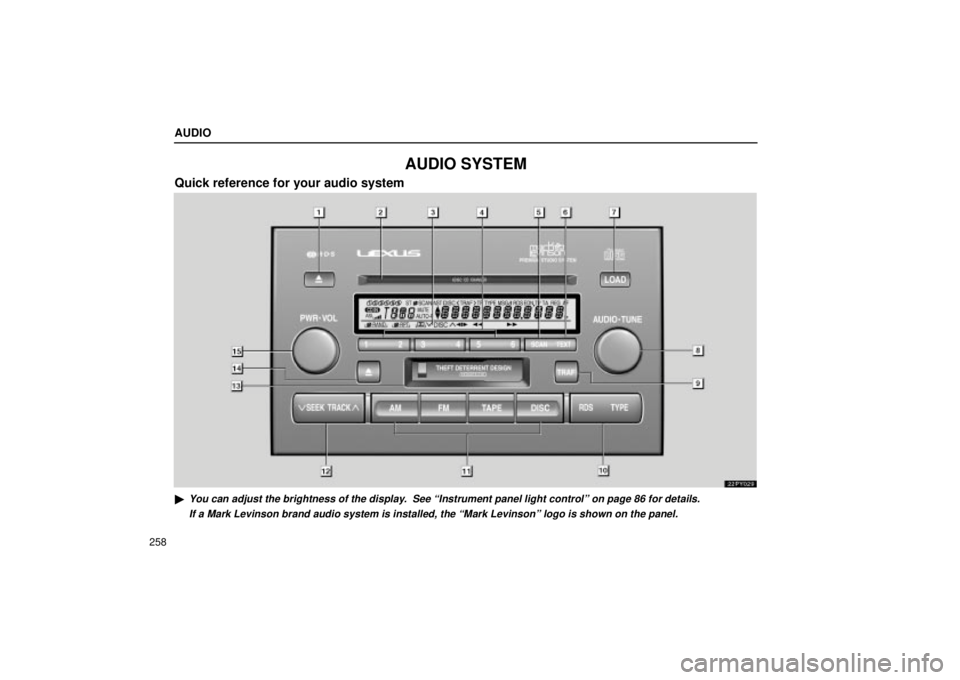
Quick reference for your audio system
22PY029
�You can adjust the brightness of the display. See Instrument panel light controlº on page 86 for details.If a Mark Levinson brand audio system is installed, the Mark Levinsonº\
logo is shown on the panel.
Page 278 of 670
 AUDIO
259
1Ejecting a compact disc
(See page 276 for details.)
2Compact disc slot
(See page 274 for details.)
3Display of functions in TAPE or CD mode
RPT: Automatic repeat
(See page 272 or 278 for de")
AUDIO
259
1Ejecting a compact disc
(See page 276 for details.)
2Compact disc slot
(See page 274 for details.)
3Display of functions in TAPE or CD mode
RPT: Automatic repeat
(See page 272 or 278 for details.)
:DOLBY NR
(See page 271 for details.)
Side change (See page 272 for details.)
�� : Rewinding or reversing
(See page 272 or 278 for details.)
�� : Fast forwarding
(See page 272 or 278 for details.)
RAND: Random access
(See page 279 for details.)
:Disc selection
(See page 277 for details.)
4Station selector and function buttons
(See page 267 for details.)
5Radio mode: Scan tuning
(See page 268 for details.)
CD mode: Scan selection
(See page 277 for details.)
6Radio mode:Radio text message
(See page 270 for details.)
CD mode: Compact disc text
(See page 279 for details.)
7Compact disc load button
(See page 274 for details.)
8AUDIO´TUNE knob
(See page 262 for details.)
9Traffic announcement
(See page 269 for details.)
10Radio data system/program type
(See page 268 for details.)
11Mode selectors
(See page 261 for details.)
12Radio mode:Seek tuning
(See page 267 for details.)
TAPE mode: Direct access to a desired program
(See page 273 for details.)
CD mode: Direct access to a desired program
(See page 278 for details.)
13Cassette tape slot
(See page 271 for details.)
14Stopping and ejecting a cassette tape
(See page 271 for details.)
15Turning the system on and adjusting the volume
(See page 261 for details.)
��
:
Page 279 of 670
AUDIO
260
Using your audio system: some basics
This section describes some of the basic features of the Lexus
audio system. Some information may not pertain to your
system. Your audio system adjusts to the optimum volume and tone
quality automatically. While the system is adjusting the audio
sound, the audio sound fades out and then fades in.
Your audio system works when the ignition switch is in the
ACCº or ONº position.
NOTICE
To prevent the battery from being discharged, do not
leave the audio system on longer than necessary whenthe engine is not running.
Page 280 of 670
AUDIO
261
(a) Turning the system on and off
Push this knob to turn the audio system on and off. Turn
this knob to adjust the volume.
The system turns on in the last mode used.
Push
the AMº, FMº, TAPEº or DISCº button to turn on
that mode. The selected mode turns on directly.
Push these buttons if you want to switch from one mode to
another.
If the tape or disc is not set, the cassette player or compact disc
player does not turn on.
You can turn off each player by ejecting the cassette tape or
compact disc. If the audio system was previously off, then the
entire audio system will be turned off when you eject the
cassette tape or compact disc. If the other function was
previously playing, it will come on again.
Vehicles with rear seat entertainment system Ð
The DISCº button may also be used to operate a DVD player.
Pressing the DISCº button changes between the CD player
and DVD player. When the DVD player is in operation, AUXº
appears on the display.
Page 282 of 670
AUDIO
263
Automatic
sound levelizer: When the audio sound becomes
difficult to be heard due to road noise, wind noise, etc. during
driving, the system adjusts to the optimum volume and tone
quality according to the noise level. While the automatic sound
levelizer is on, ASLº appears on the display. (c) Your radio antennas
The wire antenna is mounted inside the quarter windows.
NOTICE
�When cleaning the inside of the quarter windows, be
careful not to scratch or damage the wire antennas or
connectors.
�Putting a window tint (especially, conductive or metallic type) on the quarter windows may affect thereception of radio or mobile telephone. For theinstallation of the window tint, consult with yourLexus dealer.
Page 287 of 670
 AUDIO
268
To scan all the frequencies: Push the SCANº button briefly.
SCANº appears on the display. The radio will find the next
station up the band, stay there for a few seconds, and then
scan a")
AUDIO
268
To scan all the frequencies: Push the SCANº button briefly.
SCANº appears on the display. The radio will find the next
station up the band, stay there for a few seconds, and then
scan again. To select a station, push the SCANº button a
second time.
To scan the preset stations: Push the SCANº button until
you hear a beep. SCANº appears on the display. The radio
will tune in the next preset station up the band, stay there for
a few seconds, and then move to the next preset station. To
select a station, push the SCANº button a second time. (d) RDS (Radio Data System)
When you push the RDSº button briefly during FM reception,
the RDS turns on. RDSº and RDS SEARCHº appear on the
display and the radio starts to search RDS stations.
If no RDS stations can be found, NO RDS STº appears and
the display returns to the previous mode.
If RDS stations are found, FOUNDº and the number of the
RDS stations appear on the display in the FM TYPE mode and
the RDS stations are preset by program type.
To turn off the RDS, push the RDSº button until you hear a
beep.
Page 289 of 670
AUDIO
270Radio text message:
If the radio receives a radio text message during FM reception,
MSGº and a text message appears on the display. After the
text message goes off, MSGº also goes off.
After the text message goes off from the display, pushing the
TEXTº button during message reception shows the text
message again on the display.
The RDS audio system can store three messages consisting
of 64 characters in memory. To store a message in memory,
push the TEXTº button until you hear a beep.
If three messages are already stored in memory, the oldest
message will be overwritten by the new message.
To recall a radio text message, push the TEXTº button. Each
time you push the button, the available message will be
displayed beginning with the newest one.
If there is no radio text message in memory and when no
messages are received, NO MESSAGEº appears on the
display. After this, the display returns to the previous mode.
Page 290 of 670
 AUDIO
271
Cassette tape player operation
(a) Playing a cassette tape
When you insert a cassette tape, the exposed tape should
face to the right.
The player will automatically start when you insert a c")
AUDIO
271
Cassette tape player operation
(a) Playing a cassette tape
When you insert a cassette tape, the exposed tape should
face to the right.
The player will automatically start when you insert a cassette
tape. At this time, TAPEº appears on the display.
To stop or eject the cassette tape, push the EJECTº button.
Auto-reverse feature: After the cassette player reaches the
end of a tape, it automatically reverses and begins to play the
other side, regardless of whether the cassette was playing or
fast forwarding.
If a cassette is already in the slot, push the T APEº button.
Dolby� Noise Reduction* feature: If you are listening to a
tape that was recorded with Dolby � Noise Reduction, push the
button. The display will indicate that the Dolby noise
reduction system is on.
The Dolby NR mode reduces tape noise by about 10 dB. For
best sound reproduction, play your tapes with the Dolby NR on
or off according to the mode used for recording the tape.
To play a tape recorded without Dolby NR, push the button
again to turn off the Dolby NR.
* Dolby noise reduction manufactured under license from Dolby
Laboratories Licensing Corporation. DOLBYº and the double-D
symbol
are trademarks of Dolby Laboratories Licensing
Corporation.
 AUDIO
260
Using your audio system: some basics
This section describes some of the basic features of the Lexus
audio system. Some information may not pertain to your
system. Your audio system adjusts")
 AUDIO
261
(a) Turning the system on and off
Push this knob to turn the audio system on and off. Turn
this knob to adjust the volume.
The system turns on in the last mode used.
Push
the AMº, FMº,")
 AUDIO
263
Automatic
sound levelizer: When the audio sound becomes
difficult to be heard due to road noise, wind noise, etc. during
driving, the system adjusts to the optimum volume and tone
quality")
 AUDIO
270Radio text message:
If the radio receives a radio text message during FM reception,
MSGº and a text message appears on the display. After the
text message goes off, MSGº also goes off.
A")