Page 252 of 670
 STEERING WHEEL AND MIRRORS
233
Perform
circling calibration just after you have purchased
your Lexus. And then always perform circling calibration
after the battery has been removed, replaced or
dis")
STEERING WHEEL AND MIRRORS
233
Perform
circling calibration just after you have purchased
your Lexus. And then always perform circling calibration
after the battery has been removed, replaced or
disconnected.
� Do not perform circling calibration of the compass in a place
where the earth's magnetic field is subject to interference by
artificial magnetic fields (underground parking, under a steel
tower, between buildings, roof parking, near a crossing,
near a large vehicle, etc.).
� During calibration, do not operate electric systems (moon
roof, power windows, etc.) as they may interfere with the
calibration.
CAUTION
�When doing the circling calibration, be sure to secure
a wide space, and watch out for people and vehicles
in the neighborhood. Do not violate any local traffic
rules while performing circling calibration.
� Do not adjust the display while the vehicle is moving.
Be sure to adjust the display only when the vehicle is
stopped.
VANITY MIRRORS
To use the vanity mirrors, swing the sun visor down and
slide the cover.
The vanity light comes on when you slide the cover.
Page 255 of 670
AIR CONDITIONING
236
AUTOMATIC AIR CONDITIONING CONTROLS
21PY023
�You can adjust the brightness of the display. See Instrument panel light controlº on page 86 for details.
Page 259 of 670
 AIR CONDITIONING
240
(a) Climate control
SETTING OPERATION Ð automatic control
1. Push the AUTOº button.
An indicator light will illuminate to show that the automatic
operation mode has been select")
AIR CONDITIONING
240
(a) Climate control
SETTING OPERATION Ð automatic control
1. Push the AUTOº button.
An indicator light will illuminate to show that the automatic
operation mode has been selected.
Air flow quantity, switching of the diffusers, on-off of the air
conditioning and switching of the air intake between
RECIRCULATED AIR and OUTSIDE AIR are automatically
adjusted. The operation status is shown by each indicator.
When one of the manual control buttons is depressed while
operating in automatic mode, the operation corresponding to
the button depressed is set. Other conditions continue to be
adjusted automatically.
Push the OFFº button to turn the air conditioning system off.
2. Use the TEMPº or PASSENGER TEMPº button to set
the desired temperature.
The TEMPº or PASSENGER TEMPº button is used to set the
desired temperature. The temperature will be controlled on the
driver and passenger sides simultaneously or individually.
TEMPº button Ð Changes the temperature on the driver and
passenger sides simultaneously or the driver side only.
PASSENGER TEMPº button Ð Changes the temperature
settings separate from driver side.
DUALº button Ð Changes the mode of the temperature
setting.
The indicator on the DUALº button has two modes:
� With the indicator on Ð For individual temperature setting
� With the indicator off Ð For simultaneous temperature
setting
Page 261 of 670
 AIR CONDITIONING
242If quick heating or cooling is desired Ð
Push the TEMPº or PASSENGER TEMPº button on either
side
and hold it until MAX. HOTº or MAX. COLDº appears on
the display.
If manu")
AIR CONDITIONING
242If quick heating or cooling is desired Ð
Push the TEMPº or PASSENGER TEMPº button on either
side
and hold it until MAX. HOTº or MAX. COLDº appears on
the display.
If manual fan speed control is desired Ð
�1Fan speed at low2Fan speed at high
The fan speed can be set to your desired speed by pushing the
appropriate side of fan speed control button. The higher the fan
speed is, the more air is delivered. Pushing the OFFº button
turns off the fan.
To remove exterior windshield frost, use the high speed setting. If manual switching of air intake is desired Ð
Each time you push the air intake control button, the mode
changes in order from the RECIRCULATED AIR mode to
OUTSIDE AIR mode, then back to the RECIRCULATED AIR
mode. Each indicator light shows which mode is now selected.
1RECIRCULATED AIR mode Ð
If quick circulation of
cooled air is desired, select this mode.
2OUTSIDE AIR mode Ð The system will take fresh
outside air into the vehicle.
To prevent fogging up of the windshield, the air intake mode
may change automatically to the OUTSIDE AIR mode
depending on the condition of the air conditioning system.
For example, when the ambient temperature is low, the air
intake mode may change automatically to the OUTSIDE AIR
mode. This is not a malfunction.
Page 262 of 670
 AIR CONDITIONING
243
If quick circulation of cooled air is desired, push the air intake
control
button for RECIRCULATED AIR. The indicator light will
come on.
For normal use, it is best to keep the a")
AIR CONDITIONING
243
If quick circulation of cooled air is desired, push the air intake
control
button for RECIRCULATED AIR. The indicator light will
come on.
For normal use, it is best to keep the air intake control button
set to the OUTSIDE AIR mode. If recirculated air is used during
heating, the windows will fog up more easily.
If manual on-off of the air conditioning is desired Ð
Push the A/Cº button to turn the air conditioning on and push
it again to turn the air conditioning off.
The air conditioning does not work if the outside temperature
is lowered down to around 0 �C (32�F).
If the system is used for ventilation, heating in dry weather or
removing frost or exterior fog on the windshield, turn the air
conditioning off once it is no longer required. This will improve
fuel economy. The air conditioning can be used for year-round
automatic temperature control including cooling and
dehumidifying operation.
If the air conditioning compressor does not operate, the
indicator of the A/Cº button will blink. If the indicator of the
A/Cº button blinks even when the A/Cº button is pushed
again, have the compressor checked by your nearest Lexus
dealer.
(b) Windshield defogging and defrosting
To remove interior fog on the windshield Ð
Push the windshield air flow button.
To remove frost or exterior fog on the windshield Ð
1. Push the TEMPº button to set the maximum temperature.
2. Push the windshield air flow button.
3. Push the fan speed control button on the right side to obtain
a maximum air flow.
4. Leave the A/Cº button off.
When the windshield air flow button is pushed, air flows mainly
from the windshield vents and turns on the defogging function
with the purpose of clearing the front view.
Pushing this button once again returns the air flow mode to the
last one used.
Page 277 of 670
AUDIO
258
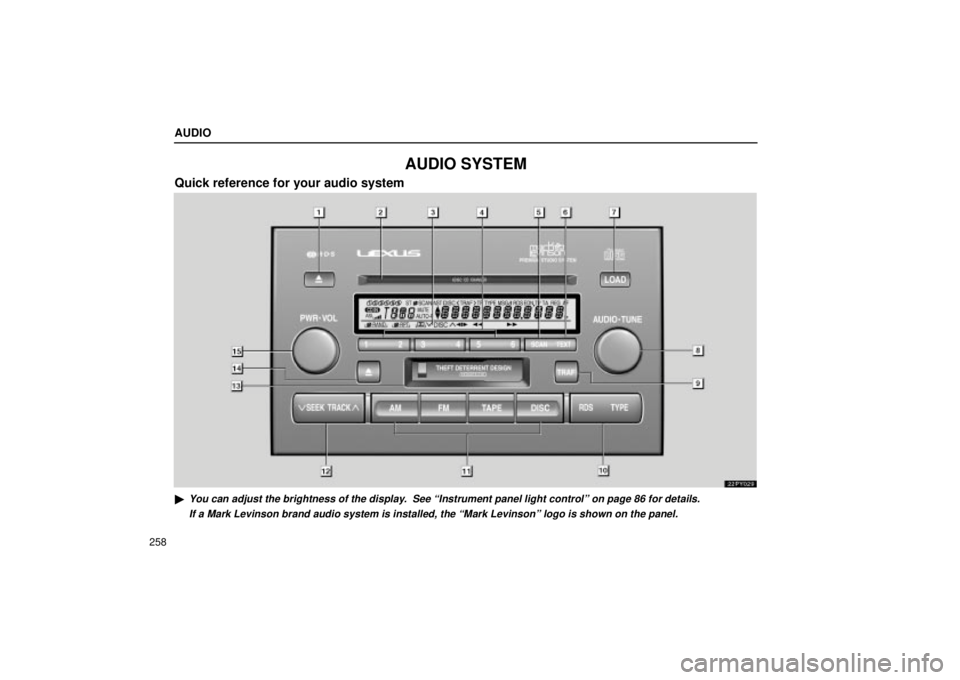
AUDIO SYSTEM
Quick reference for your audio system
22PY029
�You can adjust the brightness of the display. See Instrument panel light controlº on page 86 for details.If a Mark Levinson brand audio system is installed, the Mark Levinsonº\
logo is shown on the panel.
Page 295 of 670
AUDIO
276
�Ejecting a single disc alone:
1. Push the
º or º button to display the disc number
you want to eject.
2. Push the EJECTº button for the compact disc briefly.
At this time, the display shows EJECTº and the indicators at
both ends of the slot as well as disc number light up.
� Ejecting all the discs:
Push the EJECTº button for the compact disc until you
hear a beep. (b) Playing a compact discPush the DISCº button if the discs are already loaded in
the player.
CDº appears on the display.
The discs set in the player are played continuously, starting
with the last disc you inserted. The disc number of the disc
currently
being played, the track number and the time from the
beginning of the program appear on the display.
When play of one disc ends, the first track of the following disc
starts. When play of the final disc ends, play of the first disc
starts again.
The player will skip any empty disc trays.
Page 302 of 670
 AUDIO
283
Station swapping Ð If the FM signal you are listening to is
interrupted or weakened, and there is another strong station
nearby on the FM band, your radio may tune in the second
station unt")
AUDIO
283
Station swapping Ð If the FM signal you are listening to is
interrupted or weakened, and there is another strong station
nearby on the FM band, your radio may tune in the second
station until the original signal can be picked up again.
AM
Fading Ð AM broadcasts are reflected by the upper
atmosphere Ð especially at night. These reflected signals can
interfere with those received directly from the radio station,
causing
the radio station to sound alternately strong and weak.
Station interference Ð When a reflected signal and a signal
received directly from a radio station are very nearly the same
frequency, they can interfere with each other, making it dif ficult
to hear the broadcast.
Static Ð AM is easily affected by external sources of electrical
noise, such as high tension power lines, lightening, or electrical
motors. This results in static.
Caring for your cassette player and tapes
For the best performance for your cassette player and tapes:
Clean the tape head and other parts regularly.
� A dirty tape head or tape path can decrease sound quality
and tangle your cassette tapes. The easiest way to clean
them is by using a cleaning tape. (A wet type is
recommended.)