Page 66 of 482
SWITCHES
51
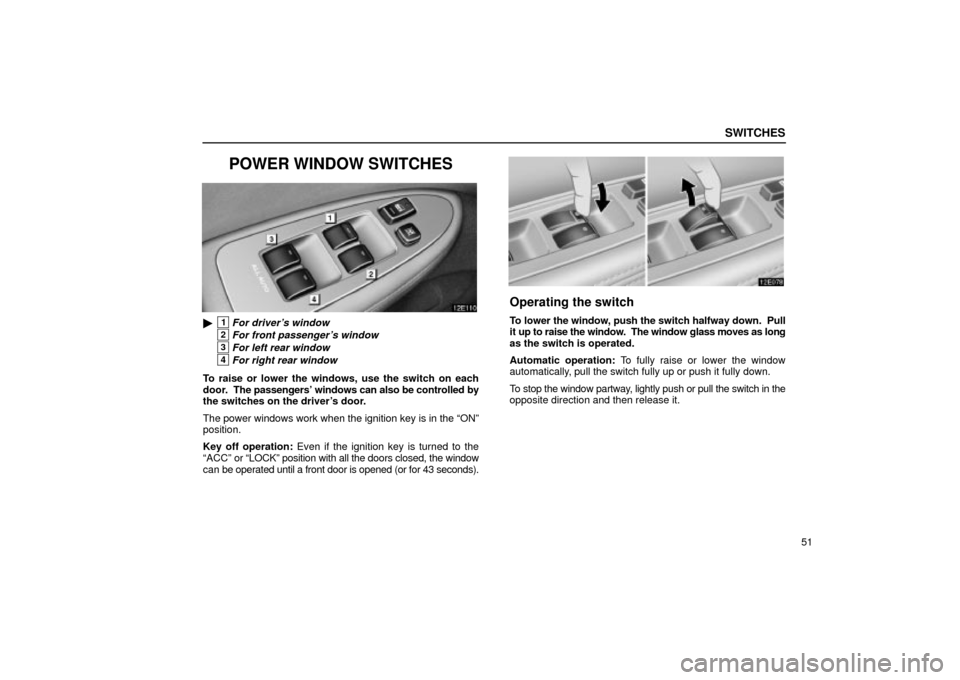
POWER WINDOW SWITCHES
�1For driver's window
2For front passenger's window
3For left rear window
4For right rear window
To raise or lower the windows, use the switch on each
door. The passengers' windows can also be controlled by
the switches on the driver's door.
The power windows work when the ignition key is in the ONº
position.
Key off operation: Even if the ignition key is turned to the
ACCº or LOCKº position with all the doors closed, the window
can be operated until a front door is opened (or for 43 seconds).
Operating the switch
To lower the window, push the switch halfway down. Pull
it up to raise the window. The window glass moves as long
as the switch is operated.
Automatic operation: To fully raise or lower the window
automatically, pull the switch fully up or push it fully down.
To stop the window partway, lightly push or pull the switch in the
opposite direction and then release it.
Page 89 of 482
 Finish
GAUGES, METERS AND SERVICE REMINDER INDICATORS
64
(l) Rear Light Failure Warning Light
If this light comes on when the headlight switch is turned on (at
the first or second clickstop), it indic")
Finish
GAUGES, METERS AND SERVICE REMINDER INDICATORS
64
(l) Rear Light Failure Warning Light
If this light comes on when the headlight switch is turned on (at
the first or second clickstop), it indicates that one or more of the
tail lights are burned out.
If it comes on when the brake pedal is depressed, one or more
stop lights are burned out.
Have defective bulbs replaced as soon as possible.
(m) Vehicle Stability Control System/Traction
Control System Warning Light
This light warns that there is a problem somewhere in the
vehicle stability control system or traction control system.
The light will come on when the ignition key is turned to ONº
and will go off after a few seconds.
If the light comes on while driving, the system does not work.
However, as conventional braking operates when applied,
there is no problem to continue your driving.
In the following cases, contact your Lexus dealer:
�The warning light does not come on after the ignition key is
turned to ONº.
�The warning light remains on after the ignition key is turned
to ONº.
�The warning light comes on while driving.
The TRAC OFFº indicator light will come on when the VSCº
warning light comes on even if the TRAC OFFº switch is not
pushed.
(n) Low Washer Fluid Warning Light
This light comes on when the fluid level in the tank becomes
nearly empty. Fill the tank as soon as possible.
(o) Automatic Headlight Leveling System Warning
Light (vehicles with discharge headlight only)
This light warns that when there is a problem somewhere
in the automatic headlight leveling system.
If it comes on, have your vehicle checked by your Lexus dealer.
(p) Low Fuel Level Warning Light
This light comes on when the fuel level in the tank becomes
nearly empty. Fill the tank as soon as possible.
On inclines or curves, due to the movement of fuel in the tank,
the low fuel level warning light may come on earlier than usual.
(q) Key Reminder Buzzer
This buzzer reminds you to remove the key when you open the
driver's door with the ignition key in the ACCº or LOCKº
position.
Page 95 of 482
 Finish
SECTION 1 ± 4
70
INSTRUMENTS AND CONTROLS
Interior equipment
Vanity mirrors71 . . . . . . . . . . . . . . . . . . . . . . . . . . . . . . . . . . . . . . . . . . . . . . . . . . . . . . . .")
Finish
SECTION 1 ± 4
70
INSTRUMENTS AND CONTROLS
Interior equipment
Vanity mirrors71 . . . . . . . . . . . . . . . . . . . . . . . . . . . . . . . . . . . . . . . . . . . . . . . . . . . . . . . . . . . . . . . . . . . . . . .
Interior light72 . . . . . . . . . . . . . . . . . . . . . . . . . . . . . . . . . . . . . . . . . . . . . . . . . . . . . . . . . . . . . . . . . . . . . . . .
Personal lights73 . . . . . . . . . . . . . . . . . . . . . . . . . . . . . . . . . . . . . . . . . . . . . . . . . . . . . . . . . . . . . . . . . . . . . .
Illuminated entry system73 . . . . . . . . . . . . . . . . . . . . . . . . . . . . . . . . . . . . . . . . . . . . . . . . . . . . . . . . . . . . .
Clock74 . . . . . . . . . . . . . . . . . . . . . . . . . . . . . . . . . . . . . . . . . . . . . . . . . . . . . . . . . . . . . . . . . . . . . . . . . . . . . .
Cigarette lighter and ashtray75 . . . . . . . . . . . . . . . . . . . . . . . . . . . . . . . . . . . . . . . . . . . . . . . . . . . . . . . . . .
Power outlet76 . . . . . . . . . . . . . . . . . . . . . . . . . . . . . . . . . . . . . . . . . . . . . . . . . . . . . . . . . . . . . . . . . . . . . . . .
Glove box77 . . . . . . . . . . . . . . . . . . . . . . . . . . . . . . . . . . . . . . . . . . . . . . . . . . . . . . . . . . . . . . . . . . . . . . . . . .
Rear console box77 . . . . . . . . . . . . . . . . . . . . . . . . . . . . . . . . . . . . . . . . . . . . . . . . . . . . . . . . . . . . . . . . . . .
Garage door opener78 . . . . . . . . . . . . . . . . . . . . . . . . . . . . . . . . . . . . . . . . . . . . . . . . . . . . . . . . . . . . . . . . .
Cup holders82 . . . . . . . . . . . . . . . . . . . . . . . . . . . . . . . . . . . . . . . . . . . . . . . . . . . . . . . . . . . . . . . . . . . . . . . .
Overhead console box83 . . . . . . . . . . . . . . . . . . . . . . . . . . . . . . . . . . . . . . . . . . . . . . . . . . . . . . . . . . . . . . .
Auxiliary boxes85 . . . . . . . . . . . . . . . . . . . . . . . . . . . . . . . . . . . . . . . . . . . . . . . . . . . . . . . . . . . . . . . . . . . . .
Trunk storage extension86 . . . . . . . . . . . . . . . . . . . . . . . . . . . . . . . . . . . . . . . . . . . . . . . . . . . . . . . . . . . . . .
Floor mat86 . . . . . . . . . . . . . . . . . . . . . . . . . . . . . . . . . . . . . . . . . . . . . . . . . . . . . . . . . . . . . . . . . . . . . . . . . .
Grocery bag hook87 . . . . . . . . . . . . . . . . . . . . . . . . . . . . . . . . . . . . . . . . . . . . . . . . . . . . . . . . . . . . . . . . . . .
Coat hooks88 . . . . . . . . . . . . . . . . . . . . . . . . . . . . . . . . . . . . . . . . . . . . . . . . . . . . . . . . . . . . . . . . . . . . . . . . .
Rear electric sunshade88 . . . . . . . . . . . . . . . . . . . . . . . . . . . . . . . . . . . . . . . . . . . . . . . . . . . . . . . . . . . . . .
Tie-down hooks89 . . . . . . . . . . . . . . . . . . . . . . . . . . . . . . . . . . . . . . . . . . . . . . . . . . . . . . . . . . . . . . . . . . . .
Page 102 of 482
Finish
INTERIOR EQUIPMENT
77
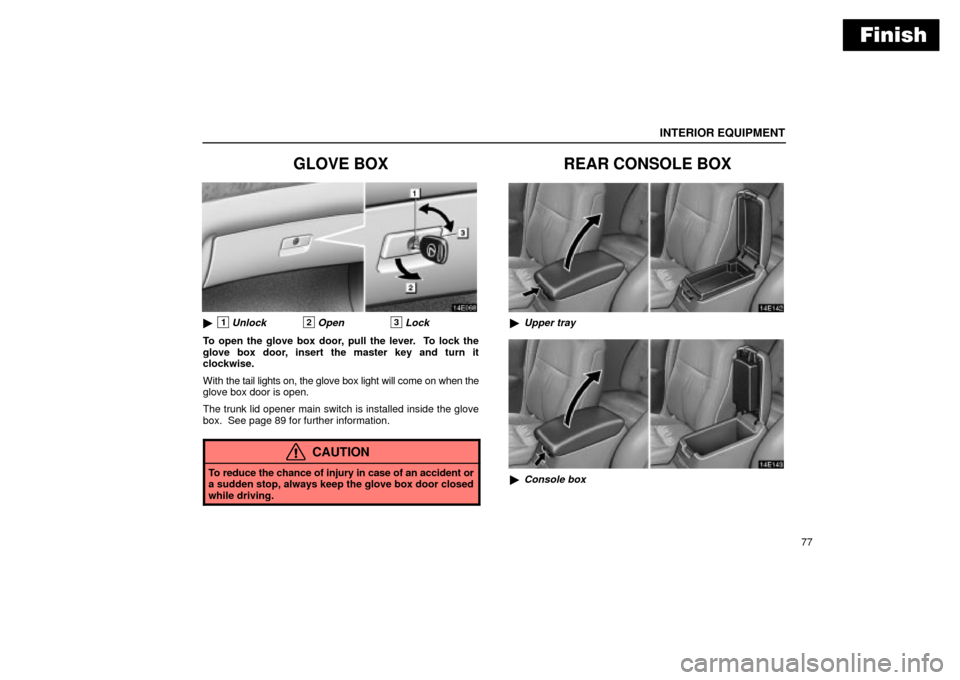
GLOVE BOX
�1Unlock2Open3Lock
To open the glove box door, pull the lever. To lock the
glove box door, insert the master key and turn it
clockwise.
With the tail lights on, the glove box light will come on when the
glove box door is open.
The trunk lid opener main switch is installed inside the glove
box. See page 89 for further information.
CAUTION
To reduce the chance of injury in case of an accident or
a sudden stop, always keep the glove box door closed
while driving.
REAR CONSOLE BOX
�Upper tray
�Console box
Page 103 of 482
Finish
INTERIOR EQUIPMENT
78To access the upper tray, push the lock release button and
raise the lid. To access the console box, pull up the lock
release lever and raise the lid.
The rear console box light comes on when the tail lights are
turned on.
CAUTION
To reduce the chance of injury in case of an accident or
a sudden stop, always keep the rear console box closed
while driving.
GARAGE DOOR OPENER
The garage door opener (�
�Universal
Transceiver) is manufactured under license from
HomeLink
� and can be programmed to operate garage
doors, gates, entry doors, door locks, home lighting
systems, and security systems, etc.
(a) Programming the HomeLink�
�1Indicator light2Buttons
The HomeLink� in your vehicle has 3 buttons and you can
store one program for each button.
To ensure correct programming into the HomeLink
�, install a
new battery in the hand-held transmitter prior to programming.
Page 111 of 482
Finish
INTERIOR EQUIPMENT
86
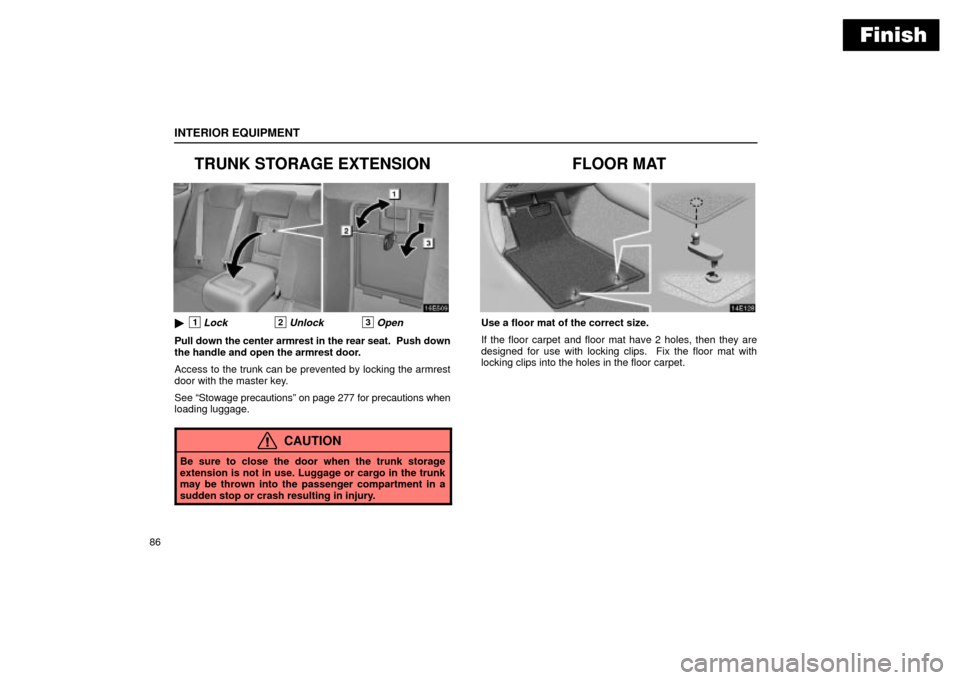
TRUNK STORAGE EXTENSION
�1Lock2Unlock3Open
Pull down the center armrest in the rear seat. Push down
the handle and open the armrest door.
Access to the trunk can be prevented by locking the armrest
door with the master key.
See Stowage precautionsº on page 277 for precautions when
loading luggage.
CAUTION
Be sure to close the door when the trunk storage
extension is not in use. Luggage or cargo in the trunk
may be thrown into the passenger compartment in a
sudden stop or crash resulting in injury.
FLOOR MAT
Use a floor mat of the correct size.
If the floor carpet and floor mat have 2 holes, then they are
designed for use with locking clips. Fix the floor mat with
locking clips into the holes in the floor carpet.
Page 119 of 482
EXTERIOR EQUIPMENT
94The trunk lid can be opened using a loop of wire in the trunk
even with the main switch in the glove box turned off. When
keeping items in the trunk, be sure to turn off the main switch
and lock the glove box and rear armrest door. For locking the
glove box, see page 77. For locking the rear armrest door, see
page 86.
In case the opener is not actuated
1. Pull down the rear armrest and open the rear armrest
door.
2. Pull the loop of wire to unlock the trunk lid.
This is used in case the trunk lid cannot be unlocked due to a
discharged battery or other trouble.
Page 135 of 482
OCCUPANT RESTRAINT SYSTEM
11 0
Adjusting lumbar support
(driver's seat only)
Push the control switch on either side.
The amount of lumbar support will change while the switch is
pushed.
HEAD RESTRAINTS
For your safety and comfort, adjust the head restraint
before driving.
Front seats
To raise the head restraint, pull it up. To lower it, press the
lock release button and push the head restraint down. To
move the head restraint forward or rearward, pull or push
the base of the head restraint.
The head restraint is most effective when it is close to your
head. Therefore, using a cushion on the seatback is not
recommended.
 Finish
INTERIOR EQUIPMENT
78To access the upper tray, push the lock release button and
raise the lid. To access the console box, pull up the lock
release lever and raise the lid.
The rear console box")
 EXTERIOR EQUIPMENT
94The trunk lid can be opened using a loop of wire in the trunk
even with the main switch in the glove box turned off. When
keeping items in the trunk, be sure to turn off the main")
 OCCUPANT RESTRAINT SYSTEM
11 0
Adjusting lumbar support
(drivers seat only)
Push the control switch on either side.
The amount of lumbar support will change while the switch is
pushed.
HEAD RESTRAINT")