Page 65 of 296
Knowing your vehicle54
3
1
2
3
4
5
6
7
8
9
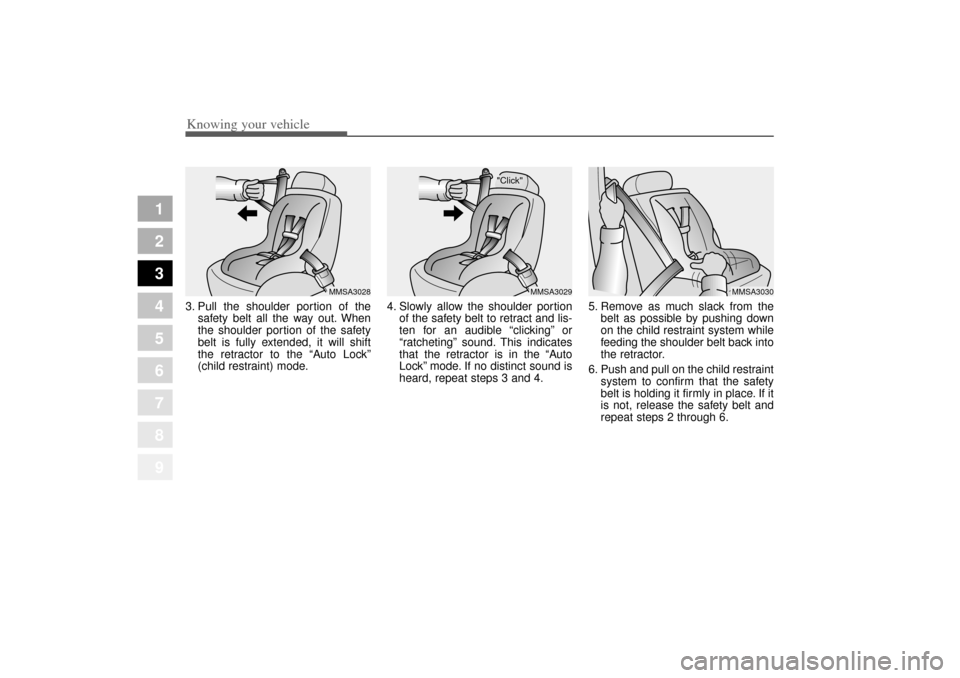
3. Pull the shoulder portion of the
safety belt all the way out. When
the shoulder portion of the safety
belt is fully extended, it will shift
the retractor to the “Auto Lock”
(child restraint) mode. 4. Slowly allow the shoulder portion
of the safety belt to retract and lis-
ten for an audible “clicking” or
“ratcheting” sound. This indicates
that the retractor is in the “Auto
Lock” mode. If no distinct sound is
heard, repeat steps 3 and 4. 5. Remove as much slack from the
belt as possible by pushing down
on the child restraint system while
feeding the shoulder belt back into
the retractor.
6. Push and pull on the child restraint system to confirm that the safety
belt is holding it firmly in place. If it
is not, release the safety belt and
repeat steps 2 through 6.
MMSA3028
"Click"
MMSA3029
MMSA3030
Opirus-ENG (CAN) 3.qxd 7/8/03 1:56 PM Page 54
Page 66 of 296

355
1
2
3
4
5
6
7
8
9
Knowing your vehicle
7. Double check that the retractor isin the “Auto Lock” mode by
attempting to pull more of the safe-
ty belt out of the retractor. If you
cannot, the retractor is in the “Auto
Lock” mode.
To remove the child restraint, press
the release button on the buckle and
then pull the lap/shoulder belt out of
the restraint and allow the safety belt
to retract fully.
✽ ✽ NOTICEWhen the safety belt is allowed to
retract to its fully stowed position,
the retractor will automatically
switch from the “Auto Lock” mode
to the emergency lock mode for nor-
mal adult usage.
WARNING
- Auto lock
mode
The lap/shoulder belt automati-
cally returns to the “emergency
lock mode” whenever the belt is
allowed to retract fully.
Therefore, the preceding seven
steps must be followed each
time a child restraint is
installed.
If the safety belt is not placed in
the “auto lock” mode, severe
injury or death could occur to
the child and/or other occupants
in the vehicle in a collision,
since the child restraint will not
be effectively held in place.
Opirus-ENG (CAN) 3.qxd 7/8/03 1:56 PM Page 55
Page 67 of 296
Knowing your vehicle56
3
1
2
3
4
5
6
7
8
9
Securing a child restraint seat
with “Tether Anchor” systemChild restraint hook holders are
located on the shelf behind the rear
seats.
1. Open the tether anchor cover on
the shelf behind the rear seats. 2. Route the child restraint seat strap
over the seatback.
For vehicles with adjustable head-
rest, route the tether strap under
the headrest and between the
headrest posts, otherwise route
the tether strap over the top of the
seatback.
3. Connect the tether strap hook to the correct child restraint hook
holder and tighten to secure the
seat.
WARNING
If the tether strap is secured
incorrectly, the child restraint
seat may not be restrained
properly in the event of a colli-
sion.
2GHA2025
2GHN3300
Opirus-ENG (CAN) 3.qxd 7/8/03 1:56 PM Page 56
Page 68 of 296

357
1
2
3
4
5
6
7
8
9
Knowing your vehicle
Child seat lower anchorsSome child seat manufacturers
make child restraint seats that are
labeled as International Standards
Organization Fixed (ISOFIX) or
ISOFIX-compatible child restraint
seats. These seats include two rigid
or webbing mounted attachments
that connect to two ISOFIX anchors
at specific seating positions in your
vehicle. This type of child restraint
seat eliminates the need to use seat
belts to attach the child seat for for-
ward-facing child restraint seats in
the rear seats.
WARNING
- Childrestraint
Check that the child restraint
system is secure by pushing
and pulling it in different direc-
tions. Incorrectly fitted child
restraints may swing, twist, tip
or come away causing death or
injury.
WARNING - Child restraint anchorage
Child restraint anchorages are
designed to withstand only
those loads imposed by cor-
rectly fitted child restraints.
Under no circumstances are
they to be used for adult seat
belts or harnesses or for
attaching other items or
equipment to the vehicle.
The tether strap may not work
properly if attached some-
where other than the correct
tether anchor.
2GHN2025A
Opirus-ENG (CAN) 3.qxd 7/8/03 1:56 PM Page 57
Page 69 of 296
Knowing your vehicle58
3
1
2
3
4
5
6
7
8
9
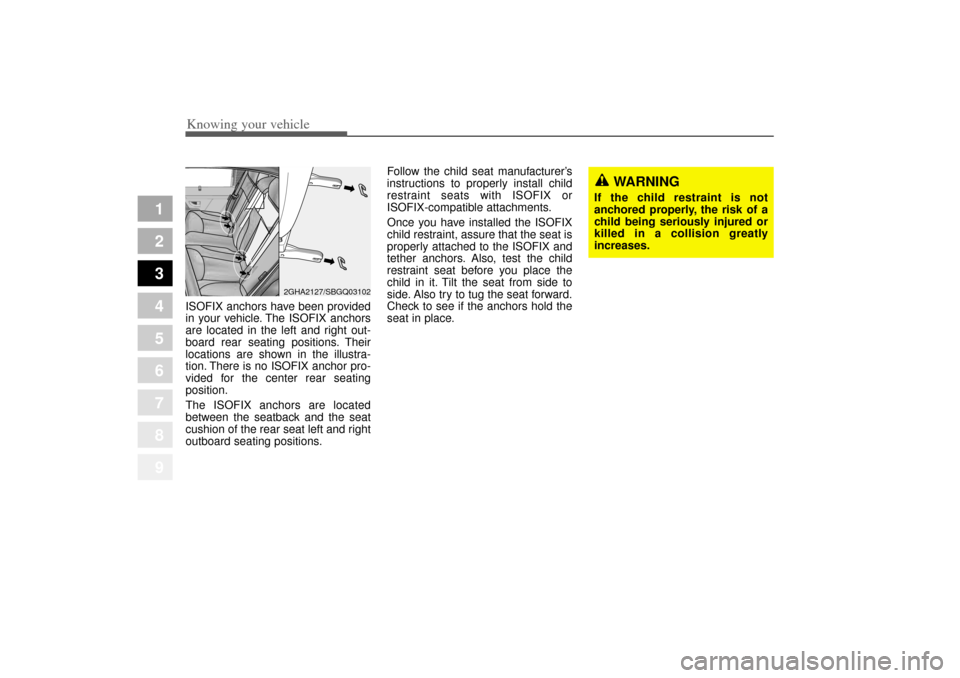
ISOFIX anchors have been provided
in your vehicle. The ISOFIX anchors
are located in the left and right out-
board rear seating positions. Their
locations are shown in the illustra-
tion. There is no ISOFIX anchor pro-
vided for the center rear seating
position.
The ISOFIX anchors are located
between the seatback and the seat
cushion of the rear seat left and right
outboard seating positions. Follow the child seat manufacturer
’s
instructions to properly install child
restraint seats with ISOFIX or
ISOFIX-compatible attachments.
Once you have installed the ISOFIX
child restraint, assure that the seat is
properly attached to the ISOFIX and
tether anchors. Also, test the child
restraint seat before you place the
child in it. Tilt the seat from side to
side. Also try to tug the seat forward.
Check to see if the anchors hold the
seat in place.
WARNING
If the child restraint is not
anchored properly, the risk of a
child being seriously injured or
killed in a collision greatly
increases.
2GHA2127/SBGQ03102
Opirus-ENG (CAN) 3.qxd 7/8/03 1:56 PM Page 58
Page 70 of 296

359
1
2
3
4
5
6
7
8
9
Knowing your vehicle
WARNING
Do not mount more than one
child restraint to a single teth-
er or to a child restraint lower
anchorage point. The improp-
er increased load may cause
the anchorage points or tether
anchor to break, causing seri-
ous injury or death.
Do not install a child restraint
seat at the rear center seating
position using the vehicle ’s
ISOFIX anchors. The ISOFIX
anchors are only provided for
the left and right outboard rear
seating positions. Do not mis-
use the ISOFIX anchors by
attempting to attach a child
restraint seat in the middle
rear seating position to the
ISOFIX anchors.
(Continued)
(Continued)In a crash, the child restraint
seat ISOFIX attachments may
not be strong enough to
secure the child restraint seat
improperly in the rear center
seating position and may
break, causing serious injury
or death.
Attach the ISOFIX or ISOFIX-
compatible child restraint seat
only to the appropriate loca-
tions shown in the illustration.
Always follow the installation
and use instructions provided
by the manufacturer of the
child restraint.
Opirus-ENG (CAN) 3.qxd 7/8/03 1:56 PM Page 59
Page 76 of 296

365
1
2
3
4
5
6
7
8
9
Knowing your vehicle
(Continued)
If driver brakes the vehicle
heavily in an urgent situa-
tions, occupants will be
thrown forward. If front pas-
sengers are not wearing the
safety belts, they will be
directly in front of the storage
compartment when inflation
occurs. In that situation, seri-
ous injury or death is possi-
ble.
Never allow front passenger
to put their hands or feet on
the instrument panel or put
their face close to the instru-
ment panel. The airbag will
impact the front passenger
when it inflates.
(Continued)
(Continued)
Never allow children/old
and feeble persons/pregnant
women to sit on the front pas-
senger’ s seat. Do not put child
restraint system on the front
passenger’ s seat either. They
may be seriously injured by
the airbag inflation when
airbag deploys.
Do not put objects or stickers
on the instrument panel. Do
not apply any accessory on
the front windshield glass or
do not install aftermarket mir-
rors or accessories on the fac-
tory installed rearview mirror.
These may interfere with the
deployment of airbag inflation
or could hit your body at high
speed and cause severe bodi-
ly injury and even death.
WARNING
The front seat passenger ’s
airbag is much larger than the
steering wheel airbag and
inflates with considerably
more force. It can seriously
hurt or kill a passenger who is
not in the proper position and
wearing the safety belt proper-
ly. The front passengers
should always move their seat
as far back as practical and sit
back in their seat.
It is essential that the front
passengers always wear their
safety belts, even when the
vehicle is moving in a parking
lot or up a driveway into
garage.
(Continued)
Opirus-ENG (CAN) 3.qxd 7/8/03 1:56 PM Page 65
Page 78 of 296

367
1
2
3
4
5
6
7
8
9
Knowing your vehicle
If the curtain airbag deploys, it
remains inflated for approximately
3 seconds. The curtain airbag
deployment occurs only on the
side of the vehicle affected by the
impact.
The side airbags (side and curtain
airbags) are not designed to
deploy during collisions from the
front or rear of the vehicle or in
most rollover situations.
The curtain airbags are designed
to deploy only during certain side-
impact collisions, depending on the
crash severity, angle, speed and
impact. The curtain airbags are not
designed to deploy in all side
impact situations.
WARNING
In order for side airbags (side
and curtain airbags) to pro-
vide its best protection, both
front seat occupants and both
outboard rear occupants
should sit in an upright posi-
tion with the seat belts proper-
ly fastened. Especially, chil-
dren should sit in a proper
child restraint system.
When children are seated in
the rear outboard seats, they
must be seated in the proper
child restraint system. Make
sure to put the child restraint
system as far away from the
door side as possible, and
secure the child restraint sys-
tem to be locked in position.
(Continued)
(Continued)
Do not allow the passengers
to lean their heads or bodies
onto doors, put their arms on
the doors, stretch their arms
out of the window, or place
objects between the doors
and passengers when they are
seated on the seats where
side airbags are equipped.
Never try to open or repair any
components of the side cur-
tain airbag system. This
should be done only by an
authorized Kia dealer.
Failure to follow the above men-
tioned instructions can result in
injury or death to the vehicle
occupants in an accident.
Opirus-ENG (CAN) 3.qxd 7/8/03 1:56 PM Page 67