Page 9 of 315
23
1 23456789
Your vehicle at a glance
1. Rear door child safety lock
2. Fuel filler lid
3. Rear window
4. Trunk (if equipped)
5. Spare tire
6. Outside rearview mirror
7. Tail lights
8. Door handle (driver)
9. Door handle (passenger)
10. Antenna (if equipped)1LDN0002
Page 10 of 315
Your vehicle at a glance
4
2
1 23456789
INTERIOR OVERVIEW
1. Door lock/unlock button
2. Outside rearview mirror control switch
(if equipped)
3. Power window switches (if equipped)
4. Master power door lock control (if equipped)
5. Master power window control lock (if equipped)
6. Vent controls
7. Instrument cluster
8. Inside rearview mirror
9. Steering wheel
10. Steering wheel tilt (if equipped)
11. Trunk release button
12. Instrument panel illumination (if equipped)
13. Hood release lever
14. Brake pedal
15. Accelerator pedal
16. Fuel filler lid release lever
1LDN0004/1LDA2018
Page 12 of 315
1 23456789Keys / 3-2 Remote keyless entry / 3-4
Immobilizer system / 3-7
Door locks / 3-8
Window / 3-13 Seat / 3-16Safety belts / 3-30
Airbags-supplemental restraint system / 3-56
Trunk / 3-75Hood / 3-78
Fuel filler lid / 3-80
Mirrors / 3-82
Interior lights / 3-86
Storage compartment / 3-88
Interior features / 3-91
Sunroof / 3-96Luggage net / 3-99Antenna / 3-100
Knowing your vehicle
Page 91 of 315

Knowing your vehicle
80
3
1 23456789
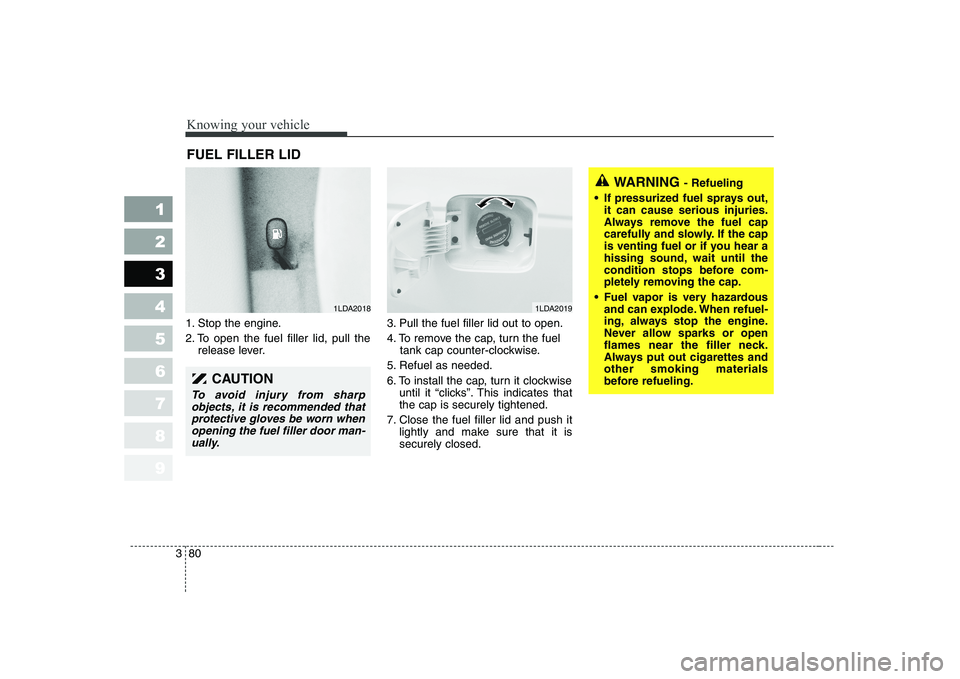
1. Stop the engine.
2. To open the fuel filler lid, pull the
release lever. 3. Pull the fuel filler lid out to open.
4. To remove the cap, turn the fuel
tank cap counter-clockwise.
5. Refuel as needed.
6. To install the cap, turn it clockwise until it “clicks”. This indicates that the cap is securely tightened.
7. Close the fuel filler lid and push it lightly and make sure that it issecurely closed.
FUEL FILLER LID
1LDA20181LDA2019
WARNING
- Refueling
If pressurized fuel sprays out, it can cause serious injuries.
Always remove the fuel cap
carefully and slowly. If the cap
is venting fuel or if you hear a
hissing sound, wait until the
condition stops before com-
pletely removing the cap.
Fuel vapor is very hazardous and can explode. When refuel-
ing, always stop the engine.
Never allow sparks or open
flames near the filler neck.
Always put out cigarettes andother smoking materials
before refueling.
CAUTION
To avoid injury from sharp
objects, it is recommended thatprotective gloves be worn when opening the fuel filler door man-ually.
Page 123 of 315
411
1 23456789
Driving your vehicle
R (reverse)
Use this position to drive the vehicle
backward.
✽✽
NOTICE
Always come to a complete stop
before shifting into or out of R(Reverse); you may damage thetransaxle if you shift into R whilethe vehicle is in motion, except as
explained in “Rocking the Vehicle”,in this manual.
N (neutral)
With the gearshift in the N position,
the wheels and transaxle are not
locked. The vehicle will roll freely
even on the slightest incline unless
the parking brake or service brakesare applied.
D (drive)
This is the normal forward driving
position. The transaxle will automati-cally shift through a 4-gear
sequence, providing the best fuel
economy and power.
For extra power when passing anoth-
er vehicle or climbing grades,
depress the accelerator fully, at
which time the transaxle will auto-
matically downshift to the next lower
gear.
Page 145 of 315
433
1 23456789
Driving your vehicle
INSTRUMENT CLUSTER
1. Tachometer
2. Turn signal indicators
3. Speedometer4. Engine temperature gauge
5. Warning and indicator lights
6. Odometer / Tripmeter
7. Tripmeter mode/reset button8. Shift position indicator
(Automatic transaxle only)
9. Fuel gauge
10. Trip computer (if equipped)
1LDE2090/1LDE2090A/1LDE2090B/1LDE2090C
■■ Gasoline (Type A)
■
■ Gasoline (Type B) ■
■
Diesel (Type A)
■
■ Diesel (Type B)
➀➁➁
➂
➃
➄➄➅
➉➇
➆
➈
➀➁➁
➂
➃
➄➄➅
➉➇
➆
➈
➀➁➁
➂
➃
➄➄➅
➉➇
➆
➈
➀➁➁
➂
➃
➄➄➅
➉➇
➆
➈
Page 147 of 315
435
1 23456789
Driving your vehicle
Engine temperature gauge
This gauge shows the temperature of the engine coolant when the igni-
tion switch is ON.
Do not continue driving with an over-
heated engine. If your vehicle over-
heats, refer to “Overheating” in the
Index.
✽✽
NOTICE
If the gauge pointer moves beyond
the normal range area toward the“H” position, it indicates overheat-ing that may damage the engine.
Fuel gauge
The fuel gauge indicates the approx- imate amount of fuel remaining in thefuel tank.
Fuel tank capacity - 55 liters.
The fuel gauge is supplemented by a
low fuel warning light, which will illu-
minate when the fuel level has
dropped to about 8.5 liters.
Trip computer (if equipped)
Trip computer is a microcomputer-
controlled driver information gauge
that displays information related to
driving, such as estimated distance
to empty, average speed and driving
time on the LCD.
1LDA2095
Page 148 of 315
Driving your vehicle
36
4
1 23456789
Mode
Push “TRIP” to select distance to
empty, average speed and driving
time for the driving information. Each
push of the button changes the dis-
play as follows;
Distance to empty
This mode indicates the estimated distance to empty from the current
fuel in the fuel tank. When the
remaining distance is below 50 km
(30 miles), a blinking “--.-” symbol will
be displayed.
Trip computer recognizes only the amount of fuel consumed to the
engine. Therefore if the vehicle hap-
pens to abnormal oil leakage, the trip
computer fails to sense causing the
amount of fuel more than it really is.
✽✽
NOTICE