2004 KIA CERATO warning light
[x] Cancel search: warning lightPage 204 of 315
57
Driving tips
SPECIAL DRIVING CONDITIONS
Hazardous driving conditions
When hazardous driving conditions
are encountered such as water,
snow, ice, mud, sand, or similar haz-
ards, follow these suggestions:
Drive cautiously and allow extra distance for braking.
Avoid sudden movements in brak- ing or steering.
When braking, pump the brake pedal with a light up-and-down
motion until the vehicle is stopped.
✽✽ NOTICE
Do not pump the brake pedal on a
vehicle equipped with ABS.
If stalled in snow, mud, or sand, use second gear. Accelerate slow-
ly to avoid spinning the drive
wheels.
Use sand, rock salt, tire chains, or other non-slip material under the
drive wheels to provide traction
when stalled in ice, snow, or mud. Rocking the vehicle
If it is necessary to rock the vehicle
to free it from snow, sand, or mud,
first turn the steering wheel right and
left to clear the area around your
front wheels. Then, shift back and
forth between 1 (First) and R
(Reverse) in vehicles equipped with
a manual transaxle or R (Reverse)
and any forward gear in vehiclesequipped with an automatic
transaxle. Do not race the engine,and spin the wheels as little as pos-
sible. If you are still stuck after a few
tries, have the vehicle pulled out by a
tow vehicle to avoid engine overheat-
ing and possible damage to the
transaxle.
✽✽
NOTICE
Prolonged rocking may cause engine
over-heating, transaxle damage or
failure, and tire damage.
1 23456789
WARNING - Downshifting
Downshifting with an automatic
transaxle, while driving on slip-
pery surfaces can cause an
accident. The sudden change intire speed could cause the tires
to skid. Be careful when down-
shifting on slippery surfaces.
Page 205 of 315
Driving tips
8
5
Driving at night
Because night driving presents more
hazards than driving in the daylight,
here are some important tips to
remember:
Slow down and keep more dis-
tance between you and other vehi-
cles, as it may be more difficult tosee at night, especially in areas
where there may not be any street
lights.
Adjust your mirrors to reduce the glare from other driver's head-
lights.
Keep your headlights clean and properly aimed on vehicles notequipped with the automatic head-
light aiming feature. Dirty or
improperly aimed headlights will
make it much more difficult to seeat night.
Avoid staring directly at the head- lights of oncoming vehicles. You
could be temporarily blinded, and it
will take several seconds for your
eyes to readjust to the darkness. Driving in the rain
Rain and wet roads can make driving
dangerous, especially if you’re not
prepared for the slick pavement.
Here are a few things to consider
when driving in the rain:
A heavy rainfall will make it harder
to see and will increase the dis-
tance needed to stop your vehicle,
so slow down.
Keep your windshield wiping equipment in good shape. Replace
your windshield wiper blades when
they show signs of streaking ormissing areas on the windshield.
If your tires are not in good condi- tion, making a quick stop on wet
pavement can cause a skid and
possibly lead to an accident. Be
sure your tires are in good shape.
Turn on your headlights to make it easier for others to see you.
1 23456789
WARNING - Spinning tires
Do not spin the wheels, espe-
cially at speeds more than 56
km/h (35 mph). Spinning thewheels at high speeds when the
vehicle is stationary could
cause a tire to overheat, explode
and injure bystanders.
Page 214 of 315
517
Driving tips
1 23456789
Safety chains
You should always attach chains
between your vehicle and your trail-
er. Cross the safety chains under the
tongue of the trailer so that thetongue will not drop to the road if it
becomes separated from the hitch.
Instructions about safety chains may
be provided by the hitch manufactur-
er or by the trailer manufacturer.
Follow the manufacturer’s recom-
mendation for attaching safety
chains. Always leave just enough
slack so you can turn with your trail-
er. And, never allow safety chains to
drag on the ground.
Trailer brakes
If your trailer weighs more than 550
kg (1212 lbs.) loaded, then it needs
its own brakes and they must be ade-
quate. Be sure to read and follow the
instructions for the trailer brakes so
you’ll be able to install, adjust and
maintain them properly.
Don’t tap into your vehicle's brakesystem.
Driving with a trailer
Towing a trailer requires a certain
amount of experience. Before setting
out for the open road, you must get
to know your trailer. Acquaint your-
self with the feel of handling and
braking with the added weight of the
trailer. And always keep in mind that
the vehicle you are driving is now a
good deal longer and not nearly so
responsive as your vehicle is by
itself.
Before you start, check the trailer
hitch and platform, safety chains,
electrical connector(s), lights, tires
and mirror adjustment. If the trailer
has electric brakes, start your vehicle
and trailer moving and then apply the
trailer brake controller by hand to be
sure the brakes are working. This lets
you check your electrical connection
at the same time.
During your trip, check occasionally
to be sure that the load is secure,
and that the lights and any trailer
brakes are still working.
WARNING
Do not use a trailer with its own
brakes unless you are absolute-
ly certain that you have properly
set up the brake system. This is
not a task for amateurs. Use an
experienced, competent trailer
shop for this work.
Page 222 of 315
In case of an emergency
2
6
ROAD WARNING
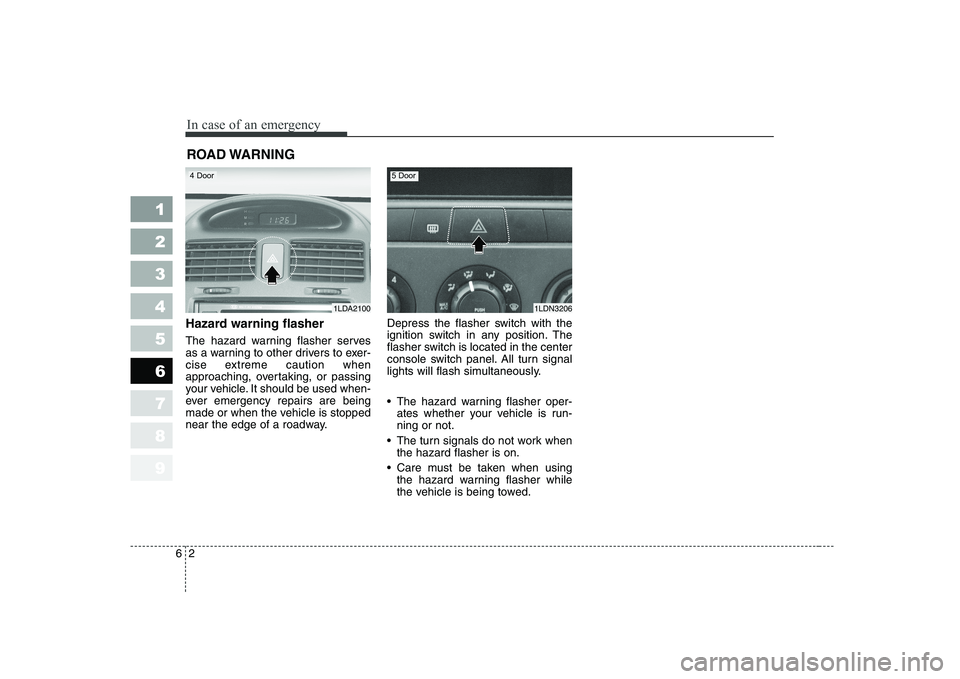
Hazard warning flasher
The hazard warning flasher serves
as a warning to other drivers to exer-
cise extreme caution when
approaching, overtaking, or passing
your vehicle. It should be used when-
ever emergency repairs are being
made or when the vehicle is stopped
near the edge of a roadway. Depress the flasher switch with the
ignition switch in any position. The
flasher switch is located in the center
console switch panel. All turn signal
lights will flash simultaneously.
• The hazard warning flasher oper-
ates whether your vehicle is run- ning or not.
The turn signals do not work when the hazard flasher is on.
Care must be taken when using the hazard warning flasher while
the vehicle is being towed.
1 23456789
1LDA21001LDN3206
4 Door5 Door
Page 228 of 315
In case of an emergency
8
6
Fuse replacement
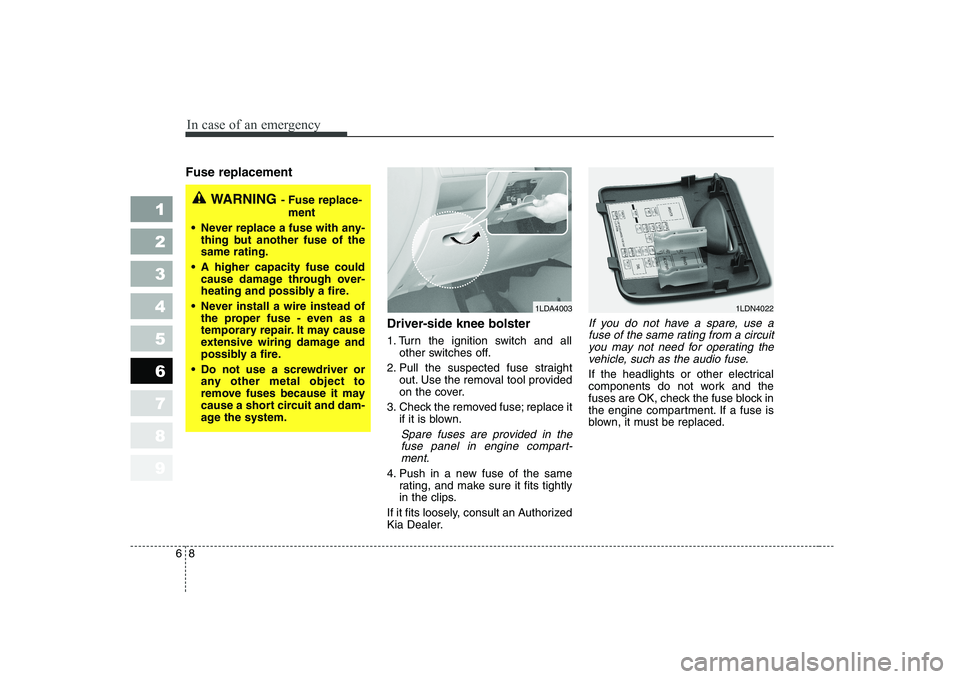
Driver-side knee bolster
1. Turn the ignition switch and allother switches off.
2. Pull the suspected fuse straight out. Use the removal tool provided
on the cover.
3. Check the removed fuse; replace it if it is blown.
Spare fuses are provided in the
fuse panel in engine compart-ment.
4. Push in a new fuse of the same rating, and make sure it fits tightly
in the clips.
If it fits loosely, consult an Authorized
Kia Dealer.
If you do not have a spare, use a fuse of the same rating from a circuityou may not need for operating thevehicle, such as the audio fuse.
If the headlights or other electrical
components do not work and the
fuses are OK, check the fuse block in
the engine compartment. If a fuse is
blown, it must be replaced.
1 23456789
1LDA40031LDN4022
WARNING - Fuse replace-
ment
Never replace a fuse with any- thing but another fuse of the same rating.
A higher capacity fuse could cause damage through over-
heating and possibly a fire.
Never install a wire instead of the proper fuse - even as a
temporary repair. It may cause
extensive wiring damage and
possibly a fire.
Do not use a screwdriver or any other metal object to
remove fuses because it may
cause a short circuit and dam-
age the system.
Page 232 of 315

In case of an emergency
12
6
1 23456789
Driver-side knee bolster
Description Fuse rating Protected component
START 10A Start motor
SRF/D_LOCK 20A Sunroof, Door lock
RR FOG 10A Rear fog light
HAZARD 10A Hazard warning flasher
A/CON 10A Air conditioner
CLUSTER 10A Cluster
RKE 10A Remote keyless entry
S/HTR 20A Seat warmer
C/LIGHTER 15A Cigar lighter
A/BAG 15A Airbag
R/WIPER 15A Rear wiper
AUDIO 10A Audio
ABS 10A Anti-lock brake system
ACC/PWR 15A Accessory / Power socket
ROOM 15A Room lamp
IGN 10A Ignition
ECU 10A Engine control unit
TAIL RH 10A Tail light (right)
T/SIG 10A Turn signal light
RR/HTR 30A Rear window defroster
P/WDW LH 25A Power window (left)
HTD/MIRR 10A Outside rearview mirror heater
P/WDW RH 25A Power window (right)
TAIL LH 10A Tail light (left)Description Fuse rating Protected component
RR/HTR - Rear window defroster relay
RESISTOR - Resistor
P/WDW - Power window relay
ACC/PWR - Accessory / Power socket relay
TAIL - Tail light relay
Description Fuse rating Protected component
F/HEATER 30A Fuel filter heater
HEATER 3 40A PTC heater 3
HEATER 2 40A PTC heater 2
GLOW 60A Glow plug
HEATER 1 40A PTC heater 1
RELAY F/HEATER - Fuel filter heater relay
RELAY HEATER 3 - PTC heater relay 3
RELAY HEATER 2 - PTC heater relay 2
RELAY GLOW - Glow plug relay
RELAY HEATER 1 - PTC heater relay 1
Engine compartment (Diesel only)
Page 255 of 315
Maintenance
10
7
1 23456789
OWNER MAINTENANCE
Owner maintenance schedule
The following lists are vehicle checks and inspections that should be per-
formed by the owner or an
Authorized Kia Dealer at the fre-quencies indicated to help ensure
safe, dependable operation of your
vehicle.
Any adverse conditions should be
brought to the attention of your deal-
er as soon as possible.
These Owner Maintenance Checks
are generally not covered by war-
ranties and you may be charged for
labor, parts and lubricants used.
When you stop for fuel:
Check the engine oil level.
Check coolant level in coolant reservoir.
Check the windshield washer fluid level.
Look for low or under-inflated tires.
While operating your vehicle:
Note any changes in the sound of the exhaust or any smell of
exhaust fumes in the vehicle.
Check for vibrations in the steering wheel. Notice any increased steer-
ing effort or looseness in the steer-
ing wheel, or change in its straight-ahead position.
Notice if your vehicle constantly turns slightly or “pulls” to one side
when traveling on smooth, levelroad.
When stopping, listen and check for strange sounds, pulling to one
side, increased brake pedal travel
or “hard-to-push” brake pedal.
If any slipping or changes in the operation of your transaxle occurs,
check the transaxle fluid level.
Check automatic transaxle P (Park) function.
Check parking brake.
Check for fluid leaks under your vehicle (water dripping from the air conditioning system after use is
normal).
WARNING
Be careful when checking your
engine coolant level when the
engine is hot. Scalding hot
coolant and steam may blow out
under pressure. This could
cause serious injury.
Page 256 of 315
711
Maintenance
1 23456789
At least monthly:
Check coolant level in the coolantrecovery reservoir.
Check the operation of all exterior lights, including the stoplights, turn
signals and hazard warning flash-
ers.
Check the inflation pressures of all tires including the spare.
At least twice a year
(i.e., every Spring and Fall) :
Check radiator, heater and air con- ditioning hoses for leaks or da-
mage.
Check windshield washer spray and wiper operation. Clean wiper
blades with clean cloth dampened
with washer fluid.
Check headlight alignment.
Check muffler, exhaust pipes, shields and clamps.
Check the lap/shoulder belts for wear and function.
Check for worn tires and loose wheel lug nuts.
At least once a year :
Clean body and door drain holes.
Lubricate door hinges and checks,and hood hinges.
Lubricate door and hood locks and latches.
Lubricate door rubber weather- strips.
Check the air conditioning system before the warm weather season.
Check the power steering fluid level.
Inspect and lubricate automatic transaxle linkage and controls.
Clean battery and terminals.
Check the brake fluid level.