Page 263 of 315
Maintenance
18
7
1 23456789
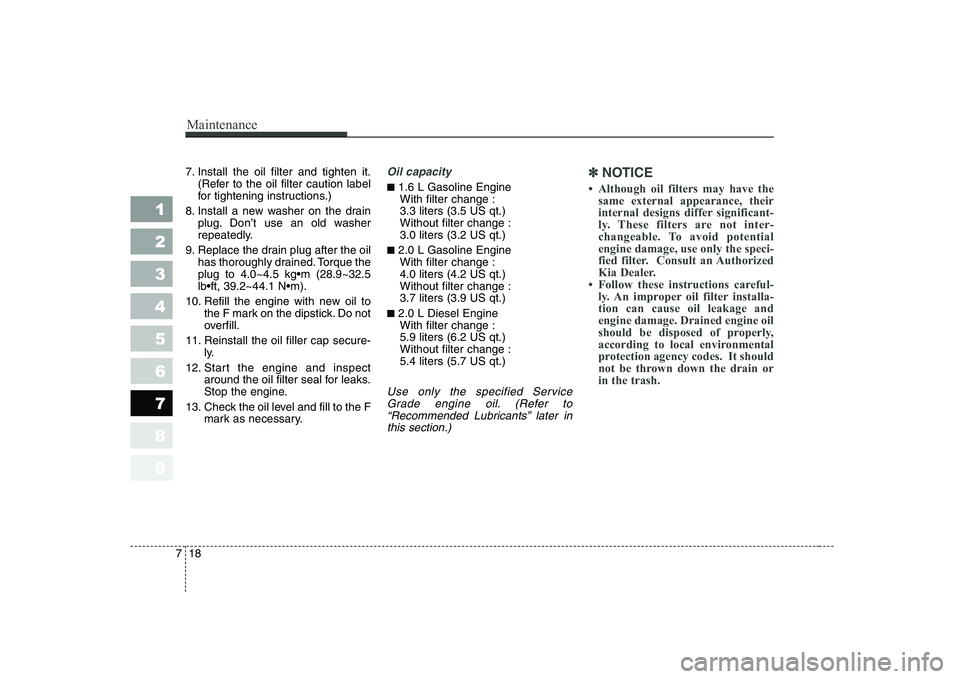
7. Install the oil filter and tighten it.
(Refer to the oil filter caution label
for tightening instructions.)
8. Install a new washer on the drain plug. Don’t use an old washer
repeatedly.
9. Replace the drain plug after the oil has thoroughly drained. Torque the
10. Refill the engine with new oil to the F mark on the dipstick. Do not
overfill.
11. Reinstall the oil filler cap secure- ly.
12. Start the engine and inspect around the oil filter seal for leaks.
Stop the engine.
13. Check the oil level and fill to the F mark as necessary.Oil capacity
■1.6 L Gasoline Engine
With filter change : 3.3 liters (3.5 US qt.)Without filter change :3.0 liters (3.2 US qt.)
■ 2.0 L Gasoline Engine
With filter change :4.0 liters (4.2 US qt.)Without filter change :3.7 liters (3.9 US qt.)
■ 2.0 L Diesel Engine
With filter change :5.9 liters (6.2 US qt.)Without filter change :5.4 liters (5.7 US qt.)
Use only the specified Service
Grade engine oil. (Refer to“Recommended Lubricants” later inthis section.)
✽✽ NOTICE
Page 268 of 315
723
Maintenance
1 23456789
Checking the parking brake
Check the stroke of the parking
brake by counting the number of
“clicks’’ heard while fully applying it
from the released position. Also, the
parking brake alone should securely
hold the vehicle on a fairly steep
grade. If the stroke is more or less
than specified, have the parking
brake adjusted by an Authorized Kia
Dealer.
Stroke : 7~8 “clicks’’ at a force of 20 kg (44 lbs, 196 N).
1LDA5029
PARKING BRAKE
CAUTION
Do not allow brake/clutch fluid
to contact the vehicle's body paint, as paint damage willresult. Brake/clutch fluid, whichhas been exposed to open air for an extended time shouldnever be used as its quality can-not be guaranteed. It should be thrown out. Don't put in thewrong kind of fluid. For exam-ple, just a few drops of mineral- based oil, such as engine oil, inyour brake clutch system candamage brake clutch systemparts.
Page 273 of 315
Maintenance
28
7
1 23456789
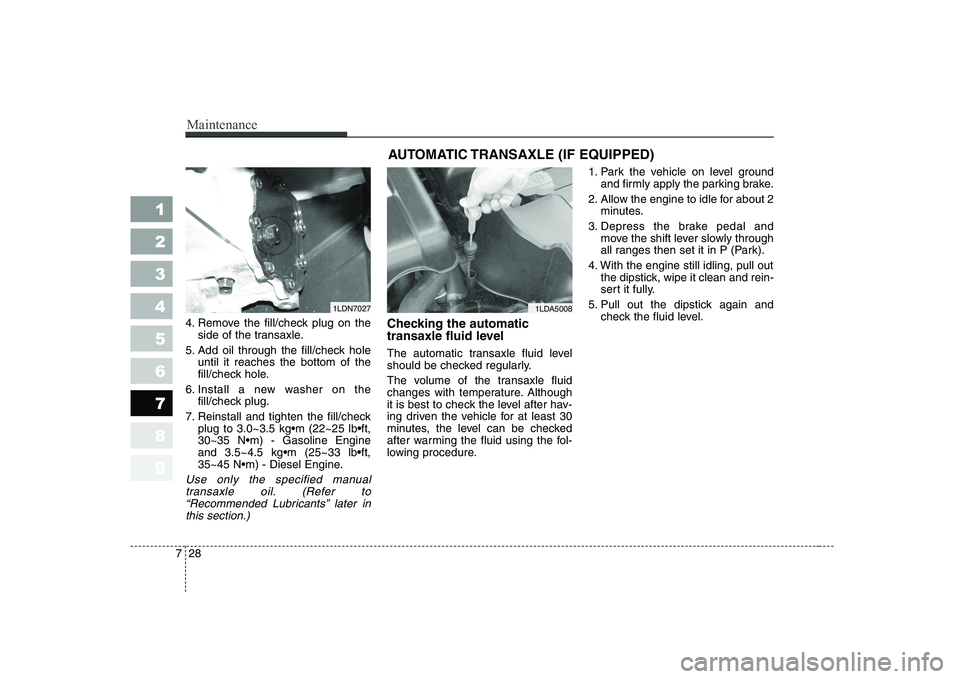
4. Remove the fill/check plug on the
side of the transaxle.
5. Add oil through the fill/check hole until it reaches the bottom of the
fill/check hole.
6. Install a new washer on the fill/check plug.
7. Reinstall and tighten the fill/check
Use only the specified manual
transaxle oil. (Refer to“Recommended Lubricants’’ later inthis section.)
Checking the automatic
transaxle fluid level
The automatic transaxle fluid level
should be checked regularly.
The volume of the transaxle fluid
changes with temperature. Although
it is best to check the level after hav-
ing driven the vehicle for at least 30
minutes, the level can be checked
after warming the fluid using the fol-
lowing procedure. 1. Park the vehicle on level ground
and firmly apply the parking brake.
2. Allow the engine to idle for about 2 minutes.
3. Depress the brake pedal and move the shift lever slowly through
all ranges then set it in P (Park).
4. With the engine still idling, pull out the dipstick, wipe it clean and rein-
sert it fully.
5. Pull out the dipstick again and check the fluid level.
1LDA50081LDN7027 AUTOMATIC TRANSAXLE (IF EQUIPPED)
Page 274 of 315
729
Maintenance
1 23456789
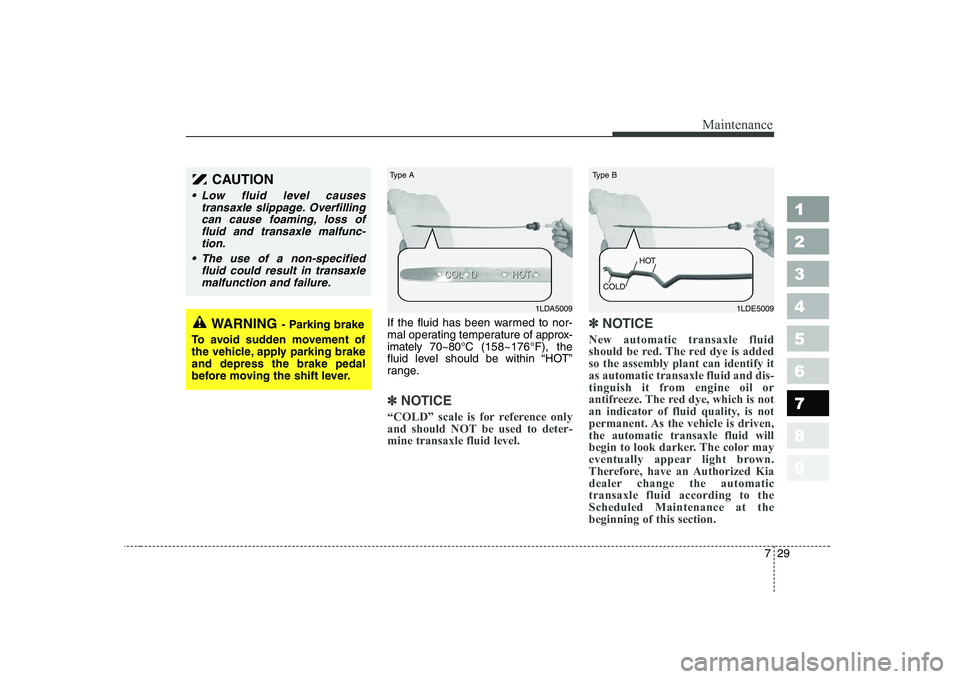
If the fluid has been warmed to nor-
mal operating temperature of approx-
imately 70~80°C (158~176°F), the
fluid level should be within “HOT”
range.
✽✽ NOTICE
“COLD” scale is for reference only
and should NOT be used to deter-mine transaxle fluid level. ✽
✽
NOTICE
New automatic transaxle fluid
should be red. The red dye is addedso the assembly plant can identify itas automatic transaxle fluid and dis-
tinguish it from engine oil or
antifreeze. The red dye, which is not
an indicator of fluid quality, is not
permanent. As the vehicle is driven,the automatic transaxle fluid will
begin to look darker. The color may
eventually appear light brown.
Therefore, have an Authorized Kia
dealer change the automatictransaxle fluid according to theScheduled Maintenance at thebeginning of this section.
CAUTION
Low fluid level causes transaxle slippage. Overfillingcan cause foaming, loss offluid and transaxle malfunc- tion.
The use of a non-specified fluid could result in transaxlemalfunction and failure.
WARNING - Parking brake
To avoid sudden movement of
the vehicle, apply parking brakeand depress the brake pedal
before moving the shift lever.
1LDA5009
Type A1LDE5009
Type B
COLD HOT
Page 275 of 315

Maintenance
30
7
1 23456789
Changing the automatic transaxle fluid
1. Raise and suitably support the
vehicle.
2. Remove the drain plug located atthe bottom of the transaxle pan.
3. After the oil has drained complete- ly, install a new washer on the
plug, reinstall the drain plug, and
4. Lower the vehicle.
5. Remove the automatic transaxle dipstick located near the center of
the engine compartment bulkheadand, using a funnel, add the nec-
essary amount of automatic
transaxle fluid.
Use only the specified automatic
transaxle fluid. (Refer to"Recommended Lubricants" later in this section.)
✽✽ NOTICE
Do NOT overfill the automatic
transaxle reservoir. Doing so cancause a seal “blow out”, loss of fluid,and damage to the transaxle. If you
overfill the reservoir, you must drain
the excess prior to driving the vehi-
cle. It is likely that there will be fluid
left in the transaxle after draining,
especially if the front of the vehicle
was raised to remove the drain plug.
6. Check the fluid level. If necessary, add a small amount of fluid and
check the level again. Continue
this process until the level reads
within “HOT” range.
7. Replace the dipstick and properly dispose of the used transaxle fluid.
WARNING - Lifting your
vehicle
If you raise your vehicle, always
ensure that it is supported at all
four jacking or lift points for the
vehicle. Do not use jacks meant
for tire changes. Use only lift
equipment specifically recom-
mended for doing maintenance
work under the vehicle. Place
the vehicle and lift equipment
on a hard, level surface capable
of supporting the full weight of
the vehicle without moving or
deforming. If the support is not
stable, the vehicle could fall andcause serious or fatal injuries.
Follow the instructions with the
lift device.
1LDN7029
Page 276 of 315
731
Maintenance
1 23456789
LUBRICANTS AND FLUIDS
Checking the washer fluid
level
The reservoir is translucent so that
you can check the level with a quickvisual inspection.
Check the fluid level in the washer
fluid reservoir and add fluid if neces-
sary. Plain water may be used if
washer fluid is not available.
However, use washer solvent with
antifreeze characteristics in cold cli-
mates to prevent freezing. Body lubrication
All moving points of the body, such
as door hinges, hood hinges, and
locks, should be lubricated each time
the engine oil is changed. Use a non-
freezing lubricant on locks during
cold weather.
Make sure the engine hood second-
ary latch keeps the hood from open-
ing when the primary latch isreleased.
1LDA5021
WARNING
Do not use radiator coolant or antifreeze in the washer fluid
reservoir.
Radiator coolant can severely obscure visibility when
sprayed on the windshield
and may cause loss of vehicle
control or damage to paint
and body trim.
Page 301 of 315
Maintenance
56
7
1 23456789
LUBRICANT SPECIFICATIONS
Recommended lubricants
To help achieve proper engine and
powertrain performance and durabil-
ity, use only lubricants of the proper
quality. The correct lubricants alsohelp promote engine efficiency that
results in improved fuel economy. Engine oils labeled Energy
Conserving Oil are now available.
Along with other additional benefits,
they contribute to fuel economy byreducing the amount of fuel neces-
sary to overcome engine friction.
Often, these improvements are diffi-
cult to measure in everyday driving,
but in a year’s time, they can offer
significant cost and energy savings.Recommended SAE viscosity
number
✽✽
NOTICE
Always be sure to clean the area
around any filler plug, drain plug,
or dipstick before checking or drain-
ing any lubricant. This is especially
important in dusty or sandy areasand when the vehicle is used on
unpaved roads. Cleaning the plug
and dipstick areas will prevent dirt
and grit from entering the engine
and other mechanisms that could bedamaged.
*¹ Refer to the recommended SAE viscosity numbers on the next page.
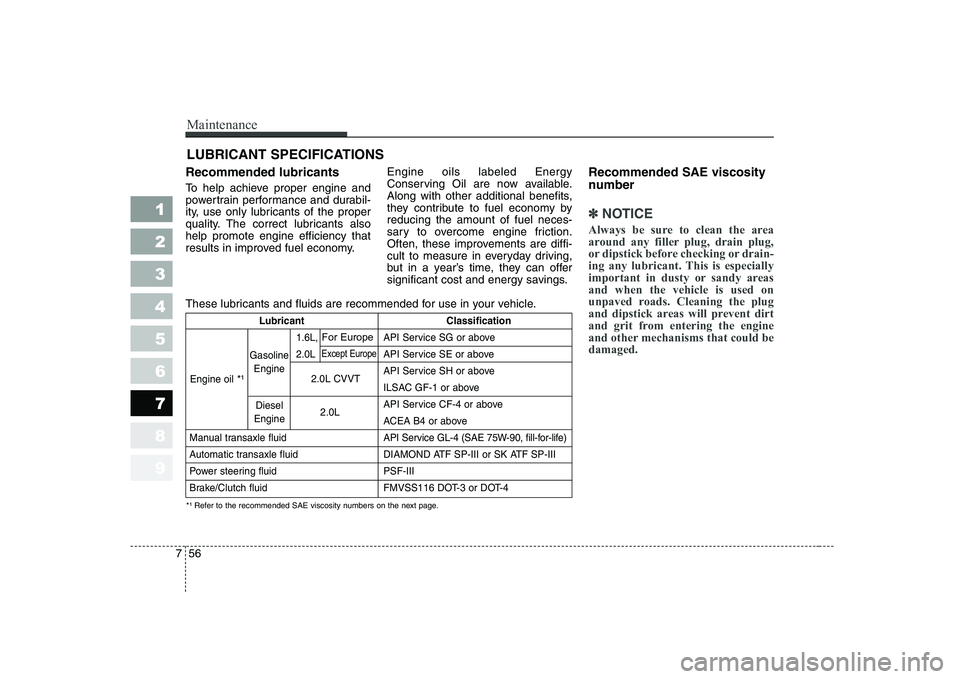
These lubricants and fluids are recommended for use in your vehicle.
Lubricant Classification
1.6L, API Service SG or above
2.0L API Service SE or above
2.0L CVVT API Service SH or above
ILSAC GF-1 or above
2.0L API Service CF-4 or above
ACEA B4 or above
Manual transaxle fluid API Service GL-4 (SAE 75W-90, fill-for-life)
Automatic transaxle fluid DIAMOND ATF SP-III or SK ATF SP-III
Power steering fluid PSF-III
Brake/Clutch fluid FMVSS116 DOT-3 or DOT-4
Engine oil *¹
Gasoline Engine
Diesel
Engine
For Europe
Except Europe
Page 302 of 315
757
Maintenance
1 23456789
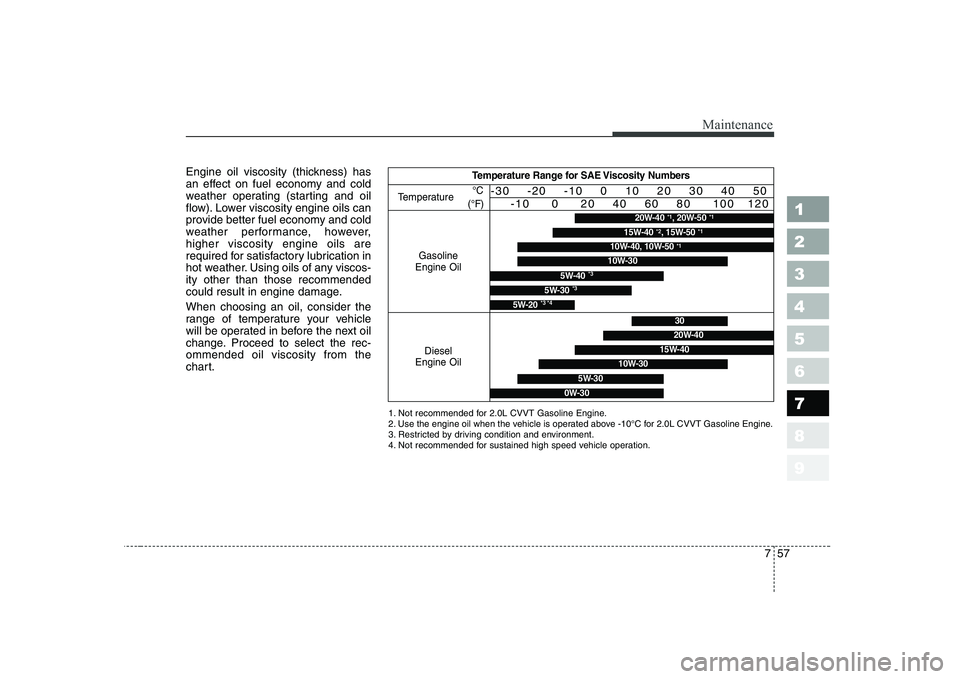
Engine oil viscosity (thickness) has
an effect on fuel economy and cold
weather operating (starting and oil
flow). Lower viscosity engine oils can
provide better fuel economy and cold
weather performance, however,higher viscosity engine oils are
required for satisfactory lubrication in
hot weather. Using oils of any viscos-ity other than those recommended
could result in engine damage. When choosing an oil, consider the
range of temperature your vehicle
will be operated in before the next oil
change. Proceed to select the rec-ommended oil viscosity from the
chart.Temperature Range for SAE Viscosity Numbers
TemperatureGasoline
Engine Oil °C
(°F)-30 -20 -10 0 10 20 30 40 50 -10 0 20 40 60 80 100 120
10W-30
20W-40 *1, 20W-50 *1
15W-40 *2, 15W-50 *1
10W-40, 10W-50 *1
5W-30*35W-40*3
5W-20*3 *4
Diesel
Engine Oil
10W-30
30
20W-40
15W-40
0W-30
5W-30
1. Not recommended for 2.0L CVVT Gasoline Engine.
2. Use the engine oil when the vehicle is operated above -10°C for 2.0L CVVT Gasoline Engine.
3. Restricted by driving condition and environment.
4. Not recommended for sustained high speed vehicle operation.