Page 255 of 315

Maintenance
10
7
1 23456789
OWNER MAINTENANCE
Owner maintenance schedule
The following lists are vehicle checks and inspections that should be per-
formed by the owner or an
Authorized Kia Dealer at the fre-quencies indicated to help ensure
safe, dependable operation of your
vehicle.
Any adverse conditions should be
brought to the attention of your deal-
er as soon as possible.
These Owner Maintenance Checks
are generally not covered by war-
ranties and you may be charged for
labor, parts and lubricants used.
When you stop for fuel:
Check the engine oil level.
Check coolant level in coolant reservoir.
Check the windshield washer fluid level.
Look for low or under-inflated tires.
While operating your vehicle:
Note any changes in the sound of the exhaust or any smell of
exhaust fumes in the vehicle.
Check for vibrations in the steering wheel. Notice any increased steer-
ing effort or looseness in the steer-
ing wheel, or change in its straight-ahead position.
Notice if your vehicle constantly turns slightly or “pulls” to one side
when traveling on smooth, levelroad.
When stopping, listen and check for strange sounds, pulling to one
side, increased brake pedal travel
or “hard-to-push” brake pedal.
If any slipping or changes in the operation of your transaxle occurs,
check the transaxle fluid level.
Check automatic transaxle P (Park) function.
Check parking brake.
Check for fluid leaks under your vehicle (water dripping from the air conditioning system after use is
normal).
WARNING
Be careful when checking your
engine coolant level when the
engine is hot. Scalding hot
coolant and steam may blow out
under pressure. This could
cause serious injury.
Page 261 of 315

Maintenance
16
7
1 23456789
ENGINE OIL AND OIL FILTER
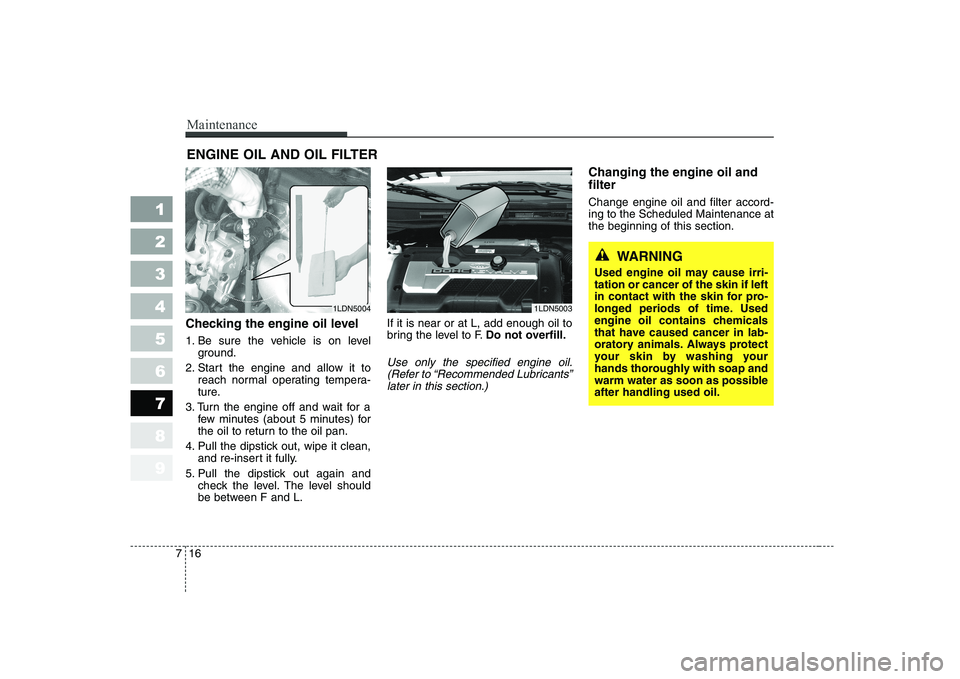
Checking the engine oil level
1. Be sure the vehicle is on level ground.
2. Start the engine and allow it to reach normal operating tempera-
ture.
3. Turn the engine off and wait for a few minutes (about 5 minutes) for
the oil to return to the oil pan.
4. Pull the dipstick out, wipe it clean, and re-insert it fully.
5. Pull the dipstick out again and check the level. The level should
be between F and L. If it is near or at L, add enough oil to
bring the level to F.
Do not overfill.
Use only the specified engine oil.
(Refer to “Recommended Lubricants”later in this section.)
Changing the engine oil and filter Change engine oil and filter accord- ing to the Scheduled Maintenance atthe beginning of this section.
1LDN50031LDN5004
WARNING
Used engine oil may cause irri- tation or cancer of the skin if left
in contact with the skin for pro-
longed periods of time. Used
engine oil contains chemicals
that have caused cancer in lab-
oratory animals. Always protect
your skin by washing your
hands thoroughly with soap and
warm water as soon as possibleafter handling used oil.
Page 263 of 315

Maintenance
18
7
1 23456789
7. Install the oil filter and tighten it.
(Refer to the oil filter caution label
for tightening instructions.)
8. Install a new washer on the drain plug. Don’t use an old washer
repeatedly.
9. Replace the drain plug after the oil has thoroughly drained. Torque the
10. Refill the engine with new oil to the F mark on the dipstick. Do not
overfill.
11. Reinstall the oil filler cap secure- ly.
12. Start the engine and inspect around the oil filter seal for leaks.
Stop the engine.
13. Check the oil level and fill to the F mark as necessary.Oil capacity
■1.6 L Gasoline Engine
With filter change : 3.3 liters (3.5 US qt.)Without filter change :3.0 liters (3.2 US qt.)
■ 2.0 L Gasoline Engine
With filter change :4.0 liters (4.2 US qt.)Without filter change :3.7 liters (3.9 US qt.)
■ 2.0 L Diesel Engine
With filter change :5.9 liters (6.2 US qt.)Without filter change :5.4 liters (5.7 US qt.)
Use only the specified Service
Grade engine oil. (Refer to“Recommended Lubricants” later inthis section.)
✽✽ NOTICE
Page 268 of 315
723
Maintenance
1 23456789
Checking the parking brake
Check the stroke of the parking
brake by counting the number of
“clicks’’ heard while fully applying it
from the released position. Also, the
parking brake alone should securely
hold the vehicle on a fairly steep
grade. If the stroke is more or less
than specified, have the parking
brake adjusted by an Authorized Kia
Dealer.
Stroke : 7~8 “clicks’’ at a force of 20 kg (44 lbs, 196 N).
1LDA5029
PARKING BRAKE
CAUTION
Do not allow brake/clutch fluid
to contact the vehicle's body paint, as paint damage willresult. Brake/clutch fluid, whichhas been exposed to open air for an extended time shouldnever be used as its quality can-not be guaranteed. It should be thrown out. Don't put in thewrong kind of fluid. For exam-ple, just a few drops of mineral- based oil, such as engine oil, inyour brake clutch system candamage brake clutch systemparts.
Page 271 of 315

Maintenance
26
7
1 23456789
STEERING WHEEL
Park the vehicle on level ground,
start the car and place the tire
wheels in the straight-ahead posi-
tion. Turn the steering wheel to the
left and right with a little force and
check the free play until you get a
feel for resistance against the tire
wheels movement.
Standard value: 30 mm (1.2 in) or less
✽✽ NOTICE
If the measured value exceeds the standard value, have the systemchecked by an authorized Kia deal-
er.
Checking the manual
transaxle oil level
1. Raise and suitably support the vehicle.
2. Remove the fill/check plug on theside of the transaxle.
1LDN5019 MANUAL TRANSAXLE (IF EQUIPPED)1LDN7027
30 mm (1.2 in)
WARNING
- Lifting your
vehicle
If you raise your vehicle, always
ensure that it is supported at all
four jacking or lift points for the
vehicle. Do not use jacks meant
for tire changes. Use only lift
equipment specifically recom-
mended for doing maintenance
work under the vehicle. Place
the vehicle and lift equipment
on a hard, level surface capable
of supporting the full weight of
the vehicle without moving or
deforming. If the support is not
stable, the vehicle could fall andcause serious or fatal injuries.
Follow the instructions with the
lift device.
Page 272 of 315

727
Maintenance
1 23456789
3. Verify that the oil level reaches thebottom of the fill/check hole. Fill as
necessary.
If the oil level is low, check for leaks
before adding oil. Do not overfill. Use only the specified manual transaxleoil. (Refer to “RecommendedLubricants” later in this section.)
4. Install a new washer on the fill/check plug and tighten the plug
Changing the manual transaxle oil
1. Raise and suitably support the
vehicle.
2. Remove the drain plug on the bot-tom of the transaxle.
3. After the oil has drained complete- ly, install a new washer on the
plug, reinstall the drain plug and
2LDA70041LDN7026
WARNING - Lifting your
vehicle
If you raise your vehicle, always
ensure that it is supported at all
four jacking or lift points for the
vehicle. Do not use jacks meant
for tire changes. Use only lift
equipment specifically recom-
mended for doing maintenance
work under the vehicle. Place
the vehicle and lift equipment
on a hard, level surface capable
of supporting the full weight of
the vehicle without moving or
deforming. If the support is not
stable, the vehicle could fall andcause serious or fatal injuries.
Follow the instructions with the
lift device.
Page 273 of 315

Maintenance
28
7
1 23456789
4. Remove the fill/check plug on the
side of the transaxle.
5. Add oil through the fill/check hole until it reaches the bottom of the
fill/check hole.
6. Install a new washer on the fill/check plug.
7. Reinstall and tighten the fill/check
Use only the specified manual
transaxle oil. (Refer to“Recommended Lubricants’’ later inthis section.)
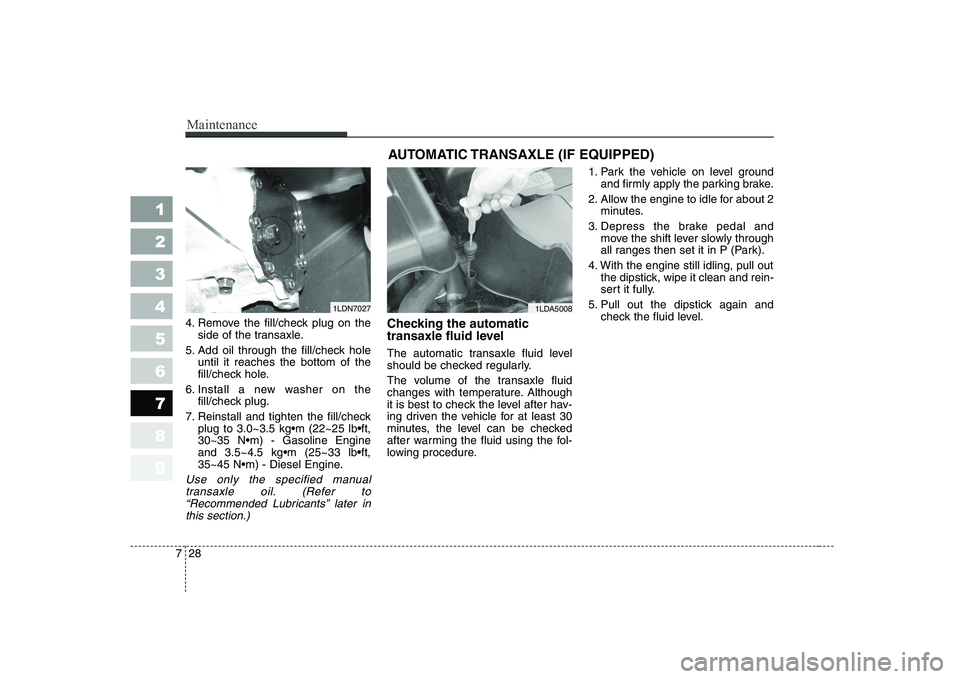
Checking the automatic
transaxle fluid level
The automatic transaxle fluid level
should be checked regularly.
The volume of the transaxle fluid
changes with temperature. Although
it is best to check the level after hav-
ing driven the vehicle for at least 30
minutes, the level can be checked
after warming the fluid using the fol-
lowing procedure. 1. Park the vehicle on level ground
and firmly apply the parking brake.
2. Allow the engine to idle for about 2 minutes.
3. Depress the brake pedal and move the shift lever slowly through
all ranges then set it in P (Park).
4. With the engine still idling, pull out the dipstick, wipe it clean and rein-
sert it fully.
5. Pull out the dipstick again and check the fluid level.
1LDA50081LDN7027 AUTOMATIC TRANSAXLE (IF EQUIPPED)
Page 275 of 315

Maintenance
30
7
1 23456789
Changing the automatic transaxle fluid
1. Raise and suitably support the
vehicle.
2. Remove the drain plug located atthe bottom of the transaxle pan.
3. After the oil has drained complete- ly, install a new washer on the
plug, reinstall the drain plug, and
4. Lower the vehicle.
5. Remove the automatic transaxle dipstick located near the center of
the engine compartment bulkheadand, using a funnel, add the nec-
essary amount of automatic
transaxle fluid.
Use only the specified automatic
transaxle fluid. (Refer to"Recommended Lubricants" later in this section.)
✽✽ NOTICE
Do NOT overfill the automatic
transaxle reservoir. Doing so cancause a seal “blow out”, loss of fluid,and damage to the transaxle. If you
overfill the reservoir, you must drain
the excess prior to driving the vehi-
cle. It is likely that there will be fluid
left in the transaxle after draining,
especially if the front of the vehicle
was raised to remove the drain plug.
6. Check the fluid level. If necessary, add a small amount of fluid and
check the level again. Continue
this process until the level reads
within “HOT” range.
7. Replace the dipstick and properly dispose of the used transaxle fluid.
WARNING - Lifting your
vehicle
If you raise your vehicle, always
ensure that it is supported at all
four jacking or lift points for the
vehicle. Do not use jacks meant
for tire changes. Use only lift
equipment specifically recom-
mended for doing maintenance
work under the vehicle. Place
the vehicle and lift equipment
on a hard, level surface capable
of supporting the full weight of
the vehicle without moving or
deforming. If the support is not
stable, the vehicle could fall andcause serious or fatal injuries.
Follow the instructions with the
lift device.
1LDN7029