2004 KIA Amanti esp
[x] Cancel search: espPage 201 of 296
515
Driving tips
1
2
3
4
5
6
7
8
9
Safety chains You should always attach chains
between your vehicle and your trail-
er. Cross the safety chains under the
tongue of the trailer so that the
tongue will not drop to the road if it
becomes separated from the hitch.
Instructions about safety chains may
be provided by the hitch manufactur-
er or by the trailer manufacturer.
Follow the manufacturer’s recom-
mendation for attaching safety
chains. Always leave just enough
slack so you can turn with your trail-
er. And, never allow safety chains to
drag on the ground.
Trailer brakes If your trailer weighs more than 453
kg (1000 lbs.) loaded, then it needs
its own brakes and they must be ade-
quate. Be sure to read and follow the
instructions for the trailer brakes so
you’ll be able to install, adjust and
maintain them properly.
Don’t tap into your vehicle's brakesystem.
Driving with a trailer Towing a trailer requires a certain
amount of experience. Before setting
out for the open road, you must get
to know your trailer. Acquaint your-
self with the feel of handling and
braking with the added weight of the
trailer. And always keep in mind that
the vehicle you are driving is now a
good deal longer and not nearly so
responsive as your vehicle is by
itself.
Before you start, check the trailer
hitch and platform, safety chains,
electrical connector(s), lights, tires
and mirror adjustment. If the trailer
has electric brakes, start your vehicle
and trailer moving and then apply the
trailer brake controller by hand to be
sure the brakes are working. This lets
you check your electrical connection
at the same time.
During your trip, check occasionally
to be sure that the load is secure,
and that the lights and any trailer
brakes are still working.
WARNING
Do not use a trailer with its own
brakes unless you are absolute-
ly certain that you have properly
set up the brake system. This is
not a task for amateurs. Use an
experienced, competent trailer
shop for this work.
Opirus CAN 5-1.qxd 7/8/03 2:21 PM Page 15
Page 213 of 296
527
Driving tips
1
2
3
4
5
6
7
8
9
WARNING
The transmitter has been tested
and complies with FCC and
DOC/MDC rules. Changes or
modifications not expressly
approved by the party responsi-
ble for compliance could void
the user’s authority to operate
the device.
IC: 4112104541A Gentex
MODEL/FCC ID: NZLSTDHL3
Opirus CAN 5-1.qxd 7/8/03 2:21 PM Page 27
Page 215 of 296
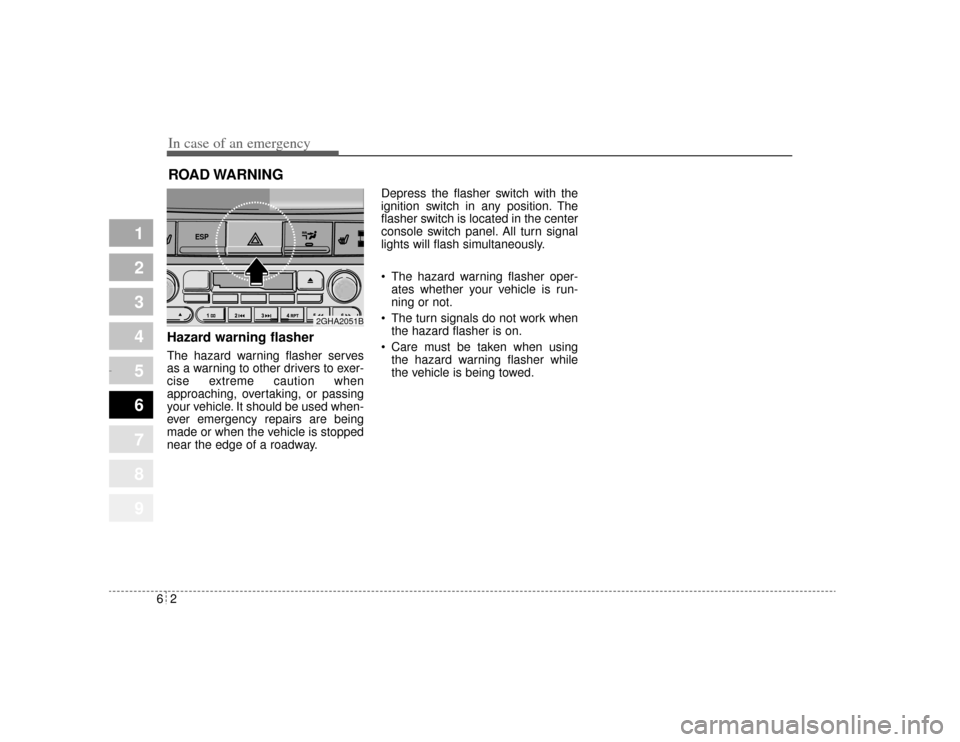
In case of an emergency26ROAD WARNING Hazard warning flasher The hazard warning flasher serves
as a warning to other drivers to exer-
cise extreme caution when
approaching, overtaking, or passing
your vehicle. It should be used when-
ever emergency repairs are being
made or when the vehicle is stopped
near the edge of a roadway.Depress the flasher switch with the
ignition switch in any position. The
flasher switch is located in the center
console switch panel. All turn signal
lights will flash simultaneously.
• The hazard warning flasher oper-
ates whether your vehicle is run-
ning or not.
The turn signals do not work when the hazard flasher is on.
Care must be taken when using the hazard warning flasher while
the vehicle is being towed.
1
2
3
4
5
6
7
8
9
ESP
2GHA2051B
Opirus CAN 6-1.qxd 7/8/03 2:22 PM Page 2
Page 240 of 296

73
Maintenance
MAINTENANCE SERVICESYou should exercise the utmost care
to prevent damage to your vehicle
and injury to yourself whenever per-
forming any maintenance or inspec-
tion procedures.
Should you have any doubts con-
cerning the inspection or servicing of
your vehicle, we strongly recom-
mend that you have an Authorized
Kia Dealer perform this work.
An Authorized Kia Dealer has facto-
ry-trained technicians and genuine
Kia parts to service your vehicle
properly. For expert advice and qual-
ity service, see an Authorized Kia
Dealer.
Inadequate, incomplete or insuffi-
cient servicing may result in opera-
tional problems with your vehicle that
could lead to vehicle damage, an
accident, or personal injury.
Owner’s responsibility ✽ ✽NOTICEMaintenance Service and Record
Retention are the owner's responsi-
bility. You should retain documents that
show proper maintenance has been
performed on your vehicle in accor-
dance with the scheduled mainte-
nance service charts shown on the
following pages. You need this infor-
mation to establish your compliance
with the servicing and maintenance
requirements of your Kia warranties.
Detailed warranty information is pro-
vided in your Warranty & Consumer
Information Book. Repairs and adjustments required as
a result of improper maintenance or
a lack of required maintenance are
not covered.
We strongly recommend that all vehi-
cle maintenance be performed by an
authorized Kia dealer using genuine
Kia parts.
1
2
3
4
5
6
7
8
9
Opirus CAN 7-1.qxd 7/8/03 2:25 PM Page 3
Page 247 of 296
Maintenance10
7
1
2
3
4
5
6
7
8
9
Owner maintenance precau-
tions Improper or incomplete service may
result in problems. This section gives
instructions only for the maintenance
items that are easy to perform.
As explained earlier in this section,
several procedures can be done only
by a qualified service technician with
special tools.✽ ✽
NOTICEImproper owner maintenance dur-
ing the warranty period may affect
warranty coverage. For details, read
the separate Kia Warranty &
Maintenance book provided with
the vehicle. If you're unsure about
any servicing or maintenance proce-
dure, have it done by an Authorized
Kia Dealer.
WARNING
- Maintenance
work
Performing maintenance work on a vehicle can be danger-
ous. You can be seriously
injured while performing some
maintenance procedures. If
you lack sufficient knowledge
and experience or the proper
tools and equipment to do the
work, have it done by a quali-
fied technician.
Working under the hood with the engine running is danger-
ous. It becomes even more
dangerous when you wear
jewelry or loose clothing.
These can become entangled
in moving parts and result in
injury. Therefore, if you must
run the engine while working
under the hood, make certain
that you remove all jewelry
(especially rings, bracelets,
watches, and necklaces) and
all neckties, scarves, and sim-
ilar loose clothing before get-
ting near the engine or cool-
ing fans.
Opirus CAN 7-1.qxd 7/8/03 2:25 PM Page 10
Page 261 of 296
Maintenance24
7
1
2
3
4
5
6
7
8
9
Changing the automatic
transaxle fluid 1. Raise and suitably support the
vehicle. 2. Remove the drain plug located at
the bottom of the transaxle pan.
3. After the oil has drained complete- ly, install a new washer on the
plug, reinstall the drain plug, and
tighten to 290~340 kgcm (21~24
lbin, 29~33 Nm).
4. Lower the vehicle.
5. Remove the automatic transaxle dipstick located near the center of
the engine compartment bulkhead
and, using a funnel, add approxi-
mately 2 liters (2 US quarts) of
automatic transaxle fluid.
Use only the specified automatictransaxle fluid. (Refer to"Recommended Lubricants" later inthis section.)
✽ ✽ NOTICEDo NOT overfill the automatic
transaxle reservoir. Doing so can
cause a seal “blow out”, loss of fluid,
and damage to the transaxle. If you
overfill the reservoir, you must drain
the excess prior to driving the vehi-
cle. The transaxle will hold 2.5 liters
(2.5 US qt.) when completely empty.
However, it is likely that there will
be fluid left in the transaxle after
draining, especially if the front of
the vehicle was raised to remove the
drain plug. 6. Check the fluid level. If necessary,
add a small amount of fluid and
check the level again. Continue
this process until the level reads
within “HOT” range.
7. Replace the dipstick and properly dispose of the used transaxle fluid.
WARNING
- Lifting your
vehicle
If you raise your vehicle, always
ensure that it is supported at all
four jacking or lift points for the
vehicle. Only if this level of sup-
port is provided can you ensure
that the vehicle will remain sta-
ble and not fall off the jack
stands or other supports. If you
do not provide such support,
the vehicle may fall off the jack
stands, or other supports, caus-
ing serious injury or death.
Opirus CAN 7-1.qxd 7/8/03 2:25 PM Page 24
Page 264 of 296
727
Maintenance
1
2
3
4
5
6
7
8
9
Replace the element according to
the Scheduled Maintenance Section.If the vehicle is operated in extreme-ly dusty or sandy areas, replace theelement more often than the usualrecommended intervals. (Refer toMaintenance Schedule in this sec-tion.)
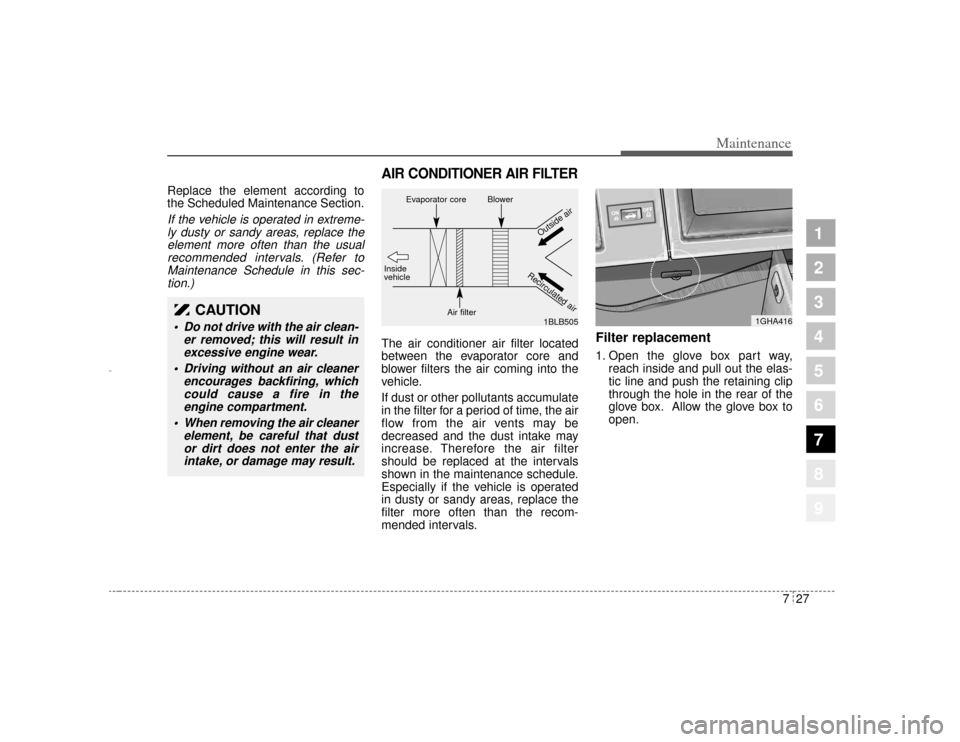
AIR CONDITIONER AIR FILTERThe air conditioner air filter located
between the evaporator core and
blower filters the air coming into the
vehicle.
If dust or other pollutants accumulate
in the filter for a period of time, the air
flow from the air vents may be
decreased and the dust intake may
increase. Therefore the air filter
should be replaced at the intervals
shown in the maintenance schedule.
Especially if the vehicle is operated
in dusty or sandy areas, replace the
filter more often than the recom-
mended intervals.
Filter replacement1. Open the glove box part way, reach inside and pull out the elas-
tic line and push the retaining clip
through the hole in the rear of the
glove box. Allow the glove box to
open.
CAUTION
Do not drive with the air clean-er removed; this will result inexcessive engine wear.
Driving without an air cleaner encourages backfiring, whichcould cause a fire in theengine compartment.
When removing the air cleaner element, be careful that dustor dirt does not enter the airintake, or damage may result.
1GHA416
1BLB505
Evaporator core
BlowerOutside air
Recirculated air
Air filter
Inside
vehicle
Opirus CAN 7-1.qxd 7/8/03 2:25 PM Page 27
Page 271 of 296

Maintenance34
7
1
2
3
4
5
6
7
8
9
TIRES AND WHEELS Tires care For proper maintenance, safety, and
maximum fuel economy, you must
always maintain recommended tire
inflation pressures and stay within
the load limits and weight distribution
recommended for your vehicle.Inflation pressures All tire pressures (including the
spare) should be checked every day
when the tires are cold. “Cold Tires”
means the vehicle has not been driv-
en for at least three hours or driven
less than 1.6 km (one mile).
Recommended pressures must be
maintained for the best ride, top vehi-
cle handling, and minimum tire wear. All specifications (sizes and pres-
sures) can be found on a label
attached to the front driver
’s door sill.
✽ ✽
NOTICE• Warm tires normally exceed rec-
ommended cold tire pressures by
28 to 41 kPa (4 to 6 psi). Do not
release air from warm tires to
adjust the pressure or the tires will
be underinflated.
• Underinflation results in excessive wear, poor handling, reduced fuel
economy, and the possibility of
blowouts from overheated tires.
Also, low tire pressure can cause
poor sealing of the tire bead. If the
tire pressure is excessively low,
wheel deformation and/or tire sep-
aration is possible. So, keep your
tire pressures at the proper levels.
If a tire frequently needs refilling,
have it checked by an Authorized
Kia Dealer. (Continued)
3GHA523
WARNING
Severe underinflation (70 kPa
(10 psi) or more) can lead to
severe heat build-up, especially
on hot days and when driving at
high speed. This can potentially
cause tread separation and
other tire irregularities to
appear that can result in the
loss of vehicle control leading
to severe injury or death.
Opirus CAN 7-1.qxd 7/8/03 2:26 PM Page 34