Page 1195 of 4449
CO-6
[VQ35DE]
PREPARATION
Revision: 2004 November 2004 FX35/FX45
Commercial Service ToolsABS004T5
Tool nameDescription
Power toolLoosening bolts and nuts
Radiator cap tester Checking radiator and radiator cap
PBIC0190E
PBIC1982E
Page 1196 of 4449
![INFINITI FX35 2004 Service Manual OVERHEATING CAUSE ANALYSIS
CO-7
[VQ35DE]
C
D
E
F
G
H
I
J
K
L
MA
CO
Revision: 2004 November 2004 FX35/FX45
OVERHEATING CAUSE ANALYSISPFP:00012
Troubleshooting ChartABS004UZ
Symptom Check items
Cooling](/manual-img/42/57021/w960_57021-1195.png "INFINITI FX35 2004 Service Manual OVERHEATING CAUSE ANALYSIS
CO-7
[VQ35DE]
C
D
E
F
G
H
I
J
K
L
MA
CO
Revision: 2004 November 2004 FX35/FX45
OVERHEATING CAUSE ANALYSISPFP:00012
Troubleshooting ChartABS004UZ
Symptom Check items
Cooling")
OVERHEATING CAUSE ANALYSIS
CO-7
[VQ35DE]
C
D
E
F
G
H
I
J
K
L
MA
CO
Revision: 2004 November 2004 FX35/FX45
OVERHEATING CAUSE ANALYSISPFP:00012
Troubleshooting ChartABS004UZ
Symptom Check items
Cooling sys-
tem parts
malfunctionPoor heat transferWater pump malfunction Worn or loose drive belt
— Thermostat stuck closed —
Damaged finsDust contamination or
paper clogging
Physical damage
Clogged radiator cooling
tubeExcess foreign material
(rust, dirt, sand, etc.)
Reduced air flowCooling fan does not oper-
ate
Fan assembly — High resistance to fan rota-
tion
Damaged fan blades
Damaged radiator shroud — — —
Improper engine coolant
mixture ratio—— —
Poor engine coolant quality — Engine coolant density —
Insufficient engine coolantEngine coolant leaksCooling hoseLoose clamp
Cracked hose
Water pump Poor sealing
Radiator capLoose
Poor sealing
RadiatorO-ring for damage, deterio-
ration or improper fitting
Cracked radiator tank
Cracked radiator core
Reservoir tank Cracked reservoir tank
Overflowing reservoir tankExhaust gas leaks into
cooling systemCylinder head deterioration
Cylinder head gasket dete-
rioration
Page 1200 of 4449
![INFINITI FX35 2004 Service Manual ENGINE COOLANT
CO-11
[VQ35DE]
C
D
E
F
G
H
I
J
K
L
MA
CO
Revision: 2004 November 2004 FX35/FX45
ENGINE COOLANTPFP:KQ100
InspectionABS004T8
LEVEL CHECK
�Check if the reservoir tank engine coolant level](/manual-img/42/57021/w960_57021-1199.png "INFINITI FX35 2004 Service Manual ENGINE COOLANT
CO-11
[VQ35DE]
C
D
E
F
G
H
I
J
K
L
MA
CO
Revision: 2004 November 2004 FX35/FX45
ENGINE COOLANTPFP:KQ100
InspectionABS004T8
LEVEL CHECK
�Check if the reservoir tank engine coolant level")
ENGINE COOLANT
CO-11
[VQ35DE]
C
D
E
F
G
H
I
J
K
L
MA
CO
Revision: 2004 November 2004 FX35/FX45
ENGINE COOLANTPFP:KQ100
InspectionABS004T8
LEVEL CHECK
�Check if the reservoir tank engine coolant level is within the
“MIN” to “MAX” when engine is cool.
�Adjust the engine coolant level as necessary.
CHECKING COOLING SYSTEM FOR LEAKS
�To check for leaks, apply pressure to the cooling system with
radiator cap tester (commercial service tool) and radiator cap
tester adapter (SST).
WARNING:
Do not remove radiator cap when engine is hot. Serious
burns could occur from high-pressure engine coolant
escaping from radiator.
CAUTION:
Higher test pressure than specified may cause radiator
damage.
NOTE:
In a case that engine coolant decreases, replenish radiator with engine coolant.
�If anything is found, repair or replace damaged parts.
Changing Engine CoolantABS004T9
WARNING:
�To avoid being scalded, never change engine coolant when engine is hot.
�Wrap a thick cloth around cap and carefully remove cap. First, turn cap a quarter of a turn to
release built-up pressure. Then turn cap all the way.
DRAINING ENGINE COOLANT
1. Remove front engine undercover with power tool.
2. Open radiator drain plug at the bottom of radiator, and remove
radiator cap.
CAUTION:
Be careful not to allow engine coolant to contact drive belts.
When drain all of engine coolant in the system, open water drain plugs on cylinder block. Refer to
EM-121, "
DISASSEMBLY" .
3. Check drained engine coolant for contaminants such as rust, corrosion or discoloration.
SMA412B
Testing pressure
: 157 kPa (1.6 kg/cm
2 , 23 psi)
SLC756A
SBIA0444E
Page 1201 of 4449
![INFINITI FX35 2004 Service Manual CO-12
[VQ35DE]
ENGINE COOLANT
Revision: 2004 November 2004 FX35/FX45
If contaminated, flush the engine cooling system. Refer to CO-13, "FLUSHING COOLING SYSTEM" .
4. Remove reservoir tank, drain engin](/manual-img/42/57021/w960_57021-1200.png "INFINITI FX35 2004 Service Manual CO-12
[VQ35DE]
ENGINE COOLANT
Revision: 2004 November 2004 FX35/FX45
If contaminated, flush the engine cooling system. Refer to CO-13, \"FLUSHING COOLING SYSTEM\" .
4. Remove reservoir tank, drain engin")
CO-12
[VQ35DE]
ENGINE COOLANT
Revision: 2004 November 2004 FX35/FX45
If contaminated, flush the engine cooling system. Refer to CO-13, "FLUSHING COOLING SYSTEM" .
4. Remove reservoir tank, drain engine coolant and clean reservoir tank before installing.
REFILLING ENGINE COOLANT
1. Install reservoir tank if removed, and radiator drain plug.
CAUTION:
Be sure to clean drain plug and install with new O-ring.
If water drain plugs are removed, close and tighten them. Refer to EM-126, "
ASSEMBLY" .
2. Remove air relief plug on heater hose.
3. Fill radiator and reservoir tank to specified level.
�Use Genuine Nissan Long Life Antifreeze/ Coolant or
equivalent mixed with water (distilled or demineralized).
Refer to MA-12, "
RECOMMENDED FLUIDS AND LUBRI-
CANTS".
�Pour engine coolant through engine coolant filler neck
slowly of less than 2 (2-1/8 US qt,1-3/4 lmp qt) a minute
to allow air in system to escape.
�When engine coolant overflows air relief hole on heater hose,
install air relief plug with new O-ring.
4. Warm up engine to normal operating temperature with radiator cap installed.
5. Run engine at 3,000 rpm for 10 seconds and return to idle speed.
�Repeat two or three times.
CAUTION:
Watch engine coolant temperature gauge so as not to overheat engine.
6. Stop engine and cool down to less than approximately 50°C (122°F).
�Cool down using a fan to reduce the time.
�If necessary, refill radiator up to filler neck with engine coolant.
7. Refill reservoir tank to “MAX” level line with engine coolant.Radiator drain plug:
: 1.18 N·m (0.12 kg-m, 10 in-lb)
SBIA0445E
Engine coolant capacity
(with reservoir tank at “MAX” level)
: Approximately 8.6 (9-1/8 US qt, 7-5/8 lmp qt)
SMA182B
Reservoir tank engine coolant capacity (at “MAX” level)
: 0.8 (7/8 US qt, 3/4 lmp qt)
Air relief plug:
: 1.19 N·m (0.12 kg-m, 10 ft-lb)
SMA412B
Page 1202 of 4449
![INFINITI FX35 2004 Service Manual ENGINE COOLANT
CO-13
[VQ35DE]
C
D
E
F
G
H
I
J
K
L
MA
CO
Revision: 2004 November 2004 FX35/FX45
8. Repeat steps 3 through 6 two or more times with radiator cap installed until engine coolant level no l](/manual-img/42/57021/w960_57021-1201.png "INFINITI FX35 2004 Service Manual ENGINE COOLANT
CO-13
[VQ35DE]
C
D
E
F
G
H
I
J
K
L
MA
CO
Revision: 2004 November 2004 FX35/FX45
8. Repeat steps 3 through 6 two or more times with radiator cap installed until engine coolant level no l")
ENGINE COOLANT
CO-13
[VQ35DE]
C
D
E
F
G
H
I
J
K
L
MA
CO
Revision: 2004 November 2004 FX35/FX45
8. Repeat steps 3 through 6 two or more times with radiator cap installed until engine coolant level no longer
drops.
9. Check cooling system for leaks with engine running.
10. Warm up engine, and check for sound of engine coolant flow while running engine from idle up to 3,000
rpm with heater temperature controller set at several position between “COOL” and “WARM”.
�Sound may be noticeable at heater unit.
11. Repeat step 10 three times.
12. If sound is heard, bleed air from cooling system by repeating step 3 through 6 until engine coolant level no
longer drops.
�Clean excess engine coolant from engine.
FLUSHING COOLING SYSTEM
1. Fill radiator with water until water spills from the air relief hole, then close air relief plug. Fill radiator and
reservoir tank with water and reinstall radiator cap.
2. Run engine and warm it up to normal operating temperature.
3. Rev engine two or three times under no-load.
4. Stop engine and wait until it cools down.
5. Drain water from the system. Refer to CO-11, "
DRAINING ENGINE COOLANT" .
6. Repeat steps 1 through 5 until clear water begins to drain from radiator.
Page 1203 of 4449
![INFINITI FX35 2004 Service Manual CO-14
[VQ35DE]
RADIATOR
Revision: 2004 November 2004 FX35/FX45
RADIATORPFP:21400
Removal and InstallationABS004WE
WARNING:
Never remove radiator cap when engine is hot. Serious burns could occur from](/manual-img/42/57021/w960_57021-1202.png "INFINITI FX35 2004 Service Manual CO-14
[VQ35DE]
RADIATOR
Revision: 2004 November 2004 FX35/FX45
RADIATORPFP:21400
Removal and InstallationABS004WE
WARNING:
Never remove radiator cap when engine is hot. Serious burns could occur from")
CO-14
[VQ35DE]
RADIATOR
Revision: 2004 November 2004 FX35/FX45
RADIATORPFP:21400
Removal and InstallationABS004WE
WARNING:
Never remove radiator cap when engine is hot. Serious burns could occur from high-pressure engine
coolant escaping from radiator.
REMOVAL
1. Remove front engine undercover with power tool.
2. Drain engine coolant from radiator. Refer to CO-11, "
Changing Engine Coolant" .
CAUTION:
Perform when engine is cold.
3. Remove air duct and air cleaner case assembly. Refer to EM-17, "
AIR CLEANER AND AIR DUCT" .
4. Remove reservoir tank and reservoir tank bracket.
5. Disconnect A/T fluid cooler hoses from radiator.
�Install blind plug to avoid leakage of A/T fluid.
6. Disconnect radiator upper and lower hoses from radiator.
7. Remove radiator cooling fan assembly. Refer to CO-21, "
COOLING FAN" .
1. Radiator 2. Radiator upper mount bracket 3. Mounting rubber (upper)
4. Radiator cap 5. Mounting rubber (lower) 6. O-ring
7. Drain plug 8. Clamp (radiator hose) 9. Radiator hose (lower)
10. Radiator hose (upper) 11. Clamp (A/T fluid cooler hose) 12. A/T fluid cooler hose
13. Clamp (reservoir tank hose) 14. Reservoir tank hose 15. Reservoir tank cap
16. Reservoir tank 17. Reservoir tank bracket 18. Radiator cooling fan assembly
SBIA0446E
Page 1204 of 4449
![INFINITI FX35 2004 Service Manual RADIATOR
CO-15
[VQ35DE]
C
D
E
F
G
H
I
J
K
L
MA
CO
Revision: 2004 November 2004 FX35/FX45
8. Rotate two radiator upper mount brackets 90 degrees in the
direction shown in the figure, and remove them.
9](/manual-img/42/57021/w960_57021-1203.png "INFINITI FX35 2004 Service Manual RADIATOR
CO-15
[VQ35DE]
C
D
E
F
G
H
I
J
K
L
MA
CO
Revision: 2004 November 2004 FX35/FX45
8. Rotate two radiator upper mount brackets 90 degrees in the
direction shown in the figure, and remove them.
9")
RADIATOR
CO-15
[VQ35DE]
C
D
E
F
G
H
I
J
K
L
MA
CO
Revision: 2004 November 2004 FX35/FX45
8. Rotate two radiator upper mount brackets 90 degrees in the
direction shown in the figure, and remove them.
9. Lift up and remove radiator.
CAUTION:
Do not damage or scratch air conditioner condenser and
radiator core when removing.
INSTALLATION
Install in the reverse order of removal.
INSPECTION AFTER INSTALLATION
�Check for leaks of engine coolant using radiator cap tester adapter [SST: EG17650301 (J-33984-A)] and
radiator cap tester (commercial service tool). Refer to CO-11, "
CHECKING COOLING SYSTEM FOR
LEAKS" .
�Start and warm up engine. Visually make sure that there is no leaks of engine coolant and A/T fluid.
Checking Radiator CapABS008FW
1. Pull radiator cap negative-pressure valve to open it, and make
sure it close completely when released.
�Make sure there is no dirt or damage on valve seat of radiator
cap negative-pressure valve.
�Make sure there are no unusualness in the opening and clos-
ing conditions of radiator cap negative-pressure valve.
2. Check radiator cap relief pressure.
�When connecting radiator cap to radiator cap tester adapter
(SST) and radiator cap tester (commercial service tool), apply
engine coolant to the cap seal part.
�Replace radiator cap if there is an unusualness in radiator cap
negative-pressure valve, or if the open-valve pressure is out-
side of the standard values.
SBIA0447E
SBIA0448E
SMA967B
Standard
: 78 - 98 kPa (0.8 - 1.0 kg/cm
2 , 11 - 14 psi)
Limit
: 59 kPa (0.6 kg/cm
2 , 9 psi)
SLC755A
Page 1209 of 4449
CO-20
[VQ35DE]
RADIATOR (ALUMINUM TYPE)
Revision: 2004 November 2004 FX35/FX45
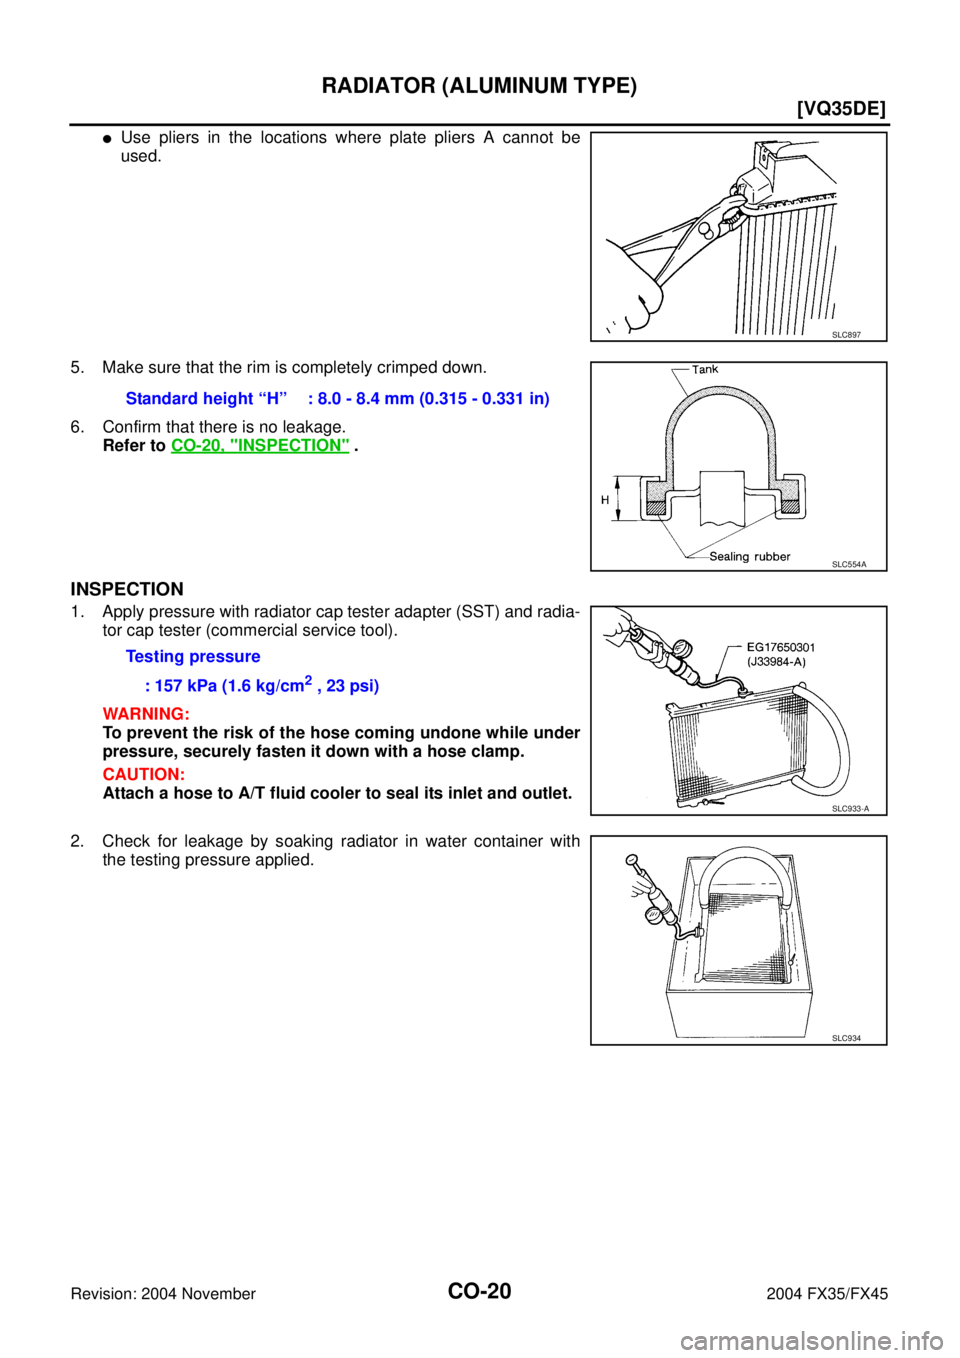
�Use pliers in the locations where plate pliers A cannot be
used.
5. Make sure that the rim is completely crimped down.
6. Confirm that there is no leakage.
Refer to CO-20, "
INSPECTION" .
INSPECTION
1. Apply pressure with radiator cap tester adapter (SST) and radia-
tor cap tester (commercial service tool).
WARNING:
To prevent the risk of the hose coming undone while under
pressure, securely fasten it down with a hose clamp.
CAUTION:
Attach a hose to A/T fluid cooler to seal its inlet and outlet.
2. Check for leakage by soaking radiator in water container with
the testing pressure applied.
SLC897
Standard height “H” : 8.0 - 8.4 mm (0.315 - 0.331 in)
SLC554A
Testing pressure
: 157 kPa (1.6 kg/cm
2 , 23 psi)
SLC933-A
SLC934
![INFINITI FX35 2004 Service Manual CO-6
[VQ35DE]
PREPARATION
Revision: 2004 November 2004 FX35/FX45
Commercial Service ToolsABS004T5
Tool nameDescription
Power toolLoosening bolts and nuts
Radiator cap tester Checking radiator and radi](/manual-img/42/57021/w960_57021-1194.png "INFINITI FX35 2004 Service Manual CO-6
[VQ35DE]
PREPARATION
Revision: 2004 November 2004 FX35/FX45
Commercial Service ToolsABS004T5
Tool nameDescription
Power toolLoosening bolts and nuts
Radiator cap tester Checking radiator and radi")