2004 Hyundai Tiburon oil pressure
[x] Cancel search: oil pressurePage 13 of 224

YOUR VEHICLE AT A GLANCE
B255A01GK-AAT
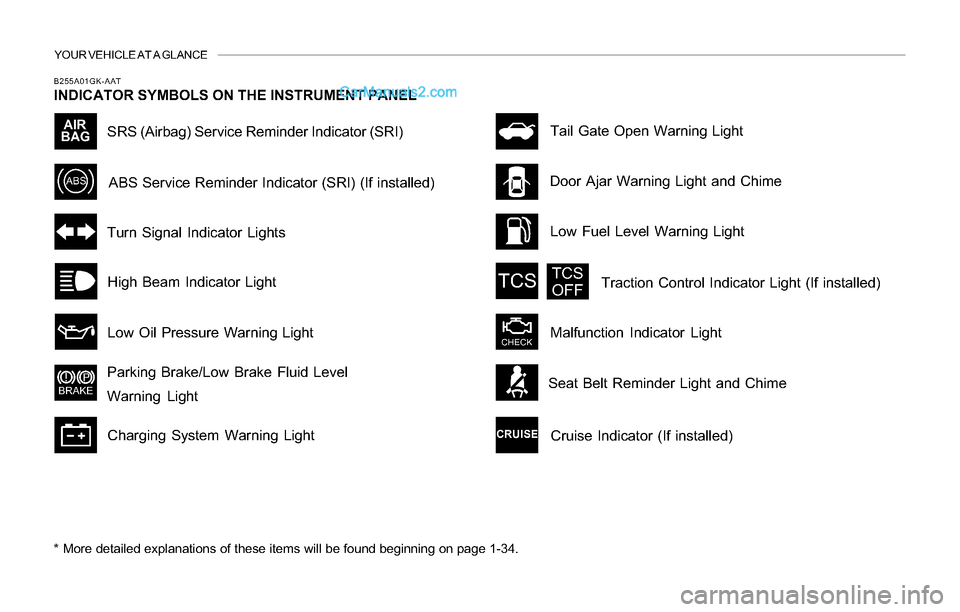
INDICATOR SYMBOLS ON THE INSTRUMENT PANEL
* More detailed explanations of these items will be found beginning on page 1-34.
SRS (Airbag) Service Reminder Indicator (SRI)
Door Ajar Warning Light and Chime
Turn Signal Indicator Lights
High Beam Indicator Light
Low Oil Pressure Warning Light
Parking Brake/Low Brake Fluid Level
Warning Light
Charging System Warning LightTail Gate Open Warning Light
ABS Service Reminder Indicator (SRI) (If installed)
Low Fuel Level Warning Light
Malfunction Indicator LightTraction Control Indicator Light (If installed)
Cruise Indicator (If installed)
Seat Belt Reminder Light and Chime
Page 46 of 224

1FEATURES OF YOUR HYUNDAI
33
1. Speedometer
2. Turn Signal Indicator Light
3. Odometer
4. Automatic Transaxle Position Indicator Light (If installed)
5. Coolant Temperature Gauge
6. Trip odometer
7. Fuel Gauge
8. Tachometer
9. Traction Control Indicator Light (If installed)
10.Door Ajar Warning Light
11.Trip Odometer Reset Knob12.Charging System Warning Light
13.SRS (Airbag) Warning Light
14.Seat Belt Warning Light
15.High Beam Indicator Light
16.Oil Pressure Warning Light
17.Malfunction Indicator Light
18.Low Fuel Warning Light
19.Parking Brake/Brake Fluid Level Warning Light
20.Cruise Indicator (If installed)
21.Tailgate Open Warning Light
22.Anti-Lock Brake Warning Light (If installed)
Page 48 of 224

1FEATURES OF YOUR HYUNDAI
35
B260G01A-AAT
Oil Pressure Warning Light
CAUTION:
If the oil pressure warning light stays on
while the engine is running, serious engine
damage may result. The oil pressure warn-
ing light comes on whenever there is insuf-
ficient oil pressure. In normal operation, it
should come on when the ignition switch
is turned on, then go out when the engine
is started. If the oil pressure warning light
stays on while the engine is running, there
is a serious malfunction.
If this happens, stop the car as soon as it is
safe to do so, turn off the engine and check
the oil level. If the oil level is low, fill the
engine oil to the proper level and start the
engine again. If the light stays on with the
engine running, turn the engine off imme-
diately. In any instance where the oil light
stays on when the engine is running, the
engine should be checked by a Hyundai
dealer before the car is driven again.
!
B260H01GK-AAT
Parking Brake/Brake Fluid
Level Warning Light
CAUITON:
If you suspect brake trouble, have your
brakes checked by a Hyundai dealer as
soon as possible. Driving your car with a
problem in either the brake electrical sys-
tem or brake hydraulic system is danger-
ous, and could result in a serious injury or
death.
Warning Light Operation
The parking brake/brake fluid level warning light
should come on when the parking brake is
applied and the ignition switch is turned to "ON"
or "START". After the engine is started, the light
should go out in three seconds.
If the parking brake is not applied, the warning
light should come on when the ignition switch is
turned to "ON" or "START", then go out in three
seconds. If the light comes on at any other time,
you should slow the vehicle and bring it to a
complete stop in a safe location off the roadway.The brake fluid level warning light indicates that
the brake fluid level in the brake master cylinder
is low and hydraulic brake fluid conforming to
DOT 3 or DOT 4 specifications should be
added. After adding fluid, if no other trouble is
found, the car should be immediately and care-
fully driven to a Hyundai dealer for inspection.
If further trouble is experienced, the vehicle
should not be driven at all but taken to a dealer
by a professional towing service or some other
safe method.
Your Hyundai is equipped with dual-diagonal
braking systems. This means you still have
braking on two wheels even if one of the dual
systems should fail. With only one of the dual
systems working, more than normal pedal travel
and greater pedal pressure are required to stop
the car. Also, the car will not stop in as short a
distance with only half of the brake system
working. If the brakes fail while you are driving,
shift to a lower gear for additional engine braking
and stop the car as soon as it is safe to do so.
!
Page 135 of 224

2DRIVING YOUR HYUNDAI
18TRAILER OR VEHICLE TOWING
C170A01A-AAT
HIGHER SPEED MOTORING
Pre-Trip Inspections
1. Tires:
Adjust the tire inflation pressures to specifica-
tion. Low tire inflation pressures will result in
overheating and possible failure of the tires.
Avoid using worn or damaged tires which may
result in reduced traction or tire failure.
NOTE:Never exceed the maximum tire inflation
pressure shown on the tires.
2. Fuel, engine coolant and engine oil: High
speed travel consumes more fuel than urban
motoring. Do not forget to check both engine
coolant and engine oil.
3. Drive belt:
A loose or damaged drive belt may result in
overheating of the engine.
C180A01A-AATUSE OF LIGHTS
Check your lights regularly for correct opera-
tion and always keep them clean. When driving
during the day in conditions of poor visibility, it
is helpful to drive with headlights on low beam.
This enables you to be seen as well as to see.
C190A02S-AAT
If you are considering towing with your car, you
should first check with your State's Department
of Motor Vehicles to determine their legal re-
quirements.
Since laws vary from State to State, the require-
ments for towing trailers, cars, other types of
vehicles, or apparatus may differ. Ask your
Hyundai dealer for further details before towing.
CAUTION:Do not do any towing with your car during
its first 1,200 miles (2,000 km) in order to
allow the engine to properly break in. Fail-
ure to heed this caution may result in seri-
ous engine or transaxle damage.
!
C190B01S-AAT
Trailer Hitches
Select the proper hitch and ball combination,
making sure that its location is compatible with
that of the trailer or vehicle being towed. Use a
quality non-equalizing hitch which distributes
the tongue load uniformly throughout the chas-
sis.
The hitch should be bolted securely to the car
and installed by a qualified technician. DO NOT
USE A HITCH DESIGNED FOR TEMPORARY
INSTALLATION AND NEVER USE ONE THAT
ATTACHES ONLY TO THE BUMPER.
Page 170 of 224

6DO-IT-YOURSELF MAINTENANCE
4GENERAL CHECKS
G020C01A-AAT
Vehicle Interior
The following should be checked each time
when the vehicle is driven:
o Lights operation
o Windshield wiper operation
o Horn operation
o Defroster, heating system operation (and air
conditioning, if installed)
o Steering operation and condition
o Mirror condition and operation
o Turn signal operation
o Accelerator pedal operation
o Brake operation, including parking brake
o Manual transaxle operation, including clutch
operation
o Automatic transaxle operation, including
"Park" mechanism operation
o Seat control condition and operation
o Seat belt condition and operation
o Sunvisor operation
If you notice anything that does not operate
correctly or appears to be functioning incor-
rectly, inspect it carefully and seek assistance
from your Hyundai dealer if service is needed.
G020B01A-AAT
Vehicle Exterior
The following should be checked monthly:
o Overall appearance and condition
o Wheel condition and wheel nut torque
o Exhaust system condition
o Light condition and operation
o Windshield glass condition
o Wiper blade condition
o Paint condition and body corrosion
o Fluid leaks
o Door and hood lock condition
o Tire pressure and condition (including spare
tire)
G020A01A-AAT
Engine Compartment
The following should be checked regularly:
o Engine oil level and condition
o Transaxle fluid level and condition
o Brake fluid level
o Clutch fluid level
o Engine coolant level
o Windshield washer fluid level
o Accessory drive belt condition
o Engine coolant hose condition
o Fluid leaks (on or below components)
o Power steering fluid level
o Battery condition
o Air filter condition
Page 173 of 224

6DO-IT-YOURSELF MAINTENANCE
7
!
CHECKING AND CHANGING THE
ENGINE COOLANT
!
G050A01A-AAT
WARNING:Do not remove the radiator cap when the
engine is hot. When the engine is hot, the
engine coolant is under pressure and may
erupt through the opening if the cap is
removed. You could be seriously burned if
you do not observe this precaution. Do not
remove the radiator cap until the radiator is
cool to the touch. Be sure that the mounting surface on the
engine is clean and that the old gasket is
removed completely. Lubricate the new
gasket on the filter with clean engine oil
before installation.
7. Refill the crankcase with the recommended
engine oil. Refer to the specification in chap-
ter 9 for engine oil capacity.
8. Start the engine and check to be sure no oil
is leaking from the drain plug or oil filter.
9. Shut off the engine and recheck the oil level.
NOTE:Always dispose of used engine oil in an
environmentally acceptable manner. It is
suggested that it be placed in a sealed
container and taken to a service station for
reclamation. Do not pour the oil on the
ground or put it in with the household
trash.
PROPOSITION 65 WARNING:Used engine oil may cause irritation or
cancer of the skin if left in contact with the
skin for prolonged periods of time. Used
engine oil contains chemicals that have
caused cancer in laboratory animals. Al-
ways protect your skin by washing your
hands thoroughly with soap and warm
water as soon as possible after handling
used oil.
G050B01A-AAT
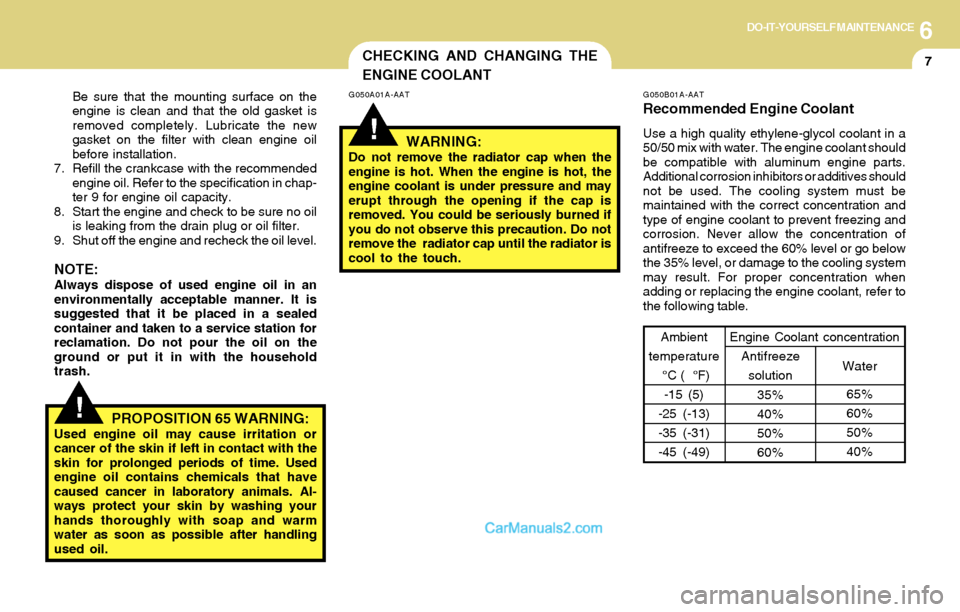
Recommended Engine Coolant
Use a high quality ethylene-glycol coolant in a
50/50 mix with water. The engine coolant should
be compatible with aluminum engine parts.
Additional corrosion inhibitors or additives should
not be used. The cooling system must be
maintained with the correct concentration and
type of engine coolant to prevent freezing and
corrosion. Never allow the concentration of
antifreeze to exceed the 60% level or go below
the 35% level, or damage to the cooling system
may result. For proper concentration when
adding or replacing the engine coolant, refer to
the following table.
Ambient
temperature
°C ( °F)
-15 (5)
-25 (-13)
-35 (-31)
-45 (-49)
65%
60%
50%
40% 35%
40%
50%
60%Water Antifreeze
solution Engine Coolant concentration
Page 191 of 224

6DO-IT-YOURSELF MAINTENANCE
25HEADLIGHT AIMING ADJUSTMENT
G290A03GK G290A02GK-AAT
Before performing aiming adjustment, make
sure of the following.
1. Keep all tires inflated to the correct pressure.
2. Place the vehicle on level ground and press
the front bumper & rear bumper down sev-
eral times. Place vehicle at a distance of 118
in. (3m) from the test wall.
3. See that the vehicle is unloaded (except for
full levels of coolant, engine oil and fuel, and
spare tire, jack, and tools).
4. Clean the head light lenses and turn on the
headlights (low beam).
5. Open the hood.
!
6. Draw the vertical line (through the center of
each headlight beam pattern) and the hori-
zontal line (through the center of each head-
light beam pattern) on the aiming screen.
And then, draw the parallel line at 0.827 in. (21
mm) under the horizontal line.
7. Adjust each cut-off line of the low beam to the
parallel line with a phillips screwdriver -
VERTICAL AIMING.
WARNING:Horizontal aiming should be adjusted by an
authorized Hyundai Dealer. Low Beam
Vertical aiming
G290B01GK-AAT
Adjustment After Headlight Assembly
Replacement
If the vehicle has had front body repair and the
headlight assembly has been replaced, the
headlight aiming should be checked using an
aiming screen as shown in the illustration. Turn
on the headlight switch.
1. Adjust headlights so that main axis of light is
parallel to center line of the body and is
aligned with point "P" shown in the illustration.
2. Dotted lines in the illustration show the center
of headlights.
G290B01GK
L
W
H
H
Cut-off line
Ground line
"P"Horizontal line
Vertical line0.827 in. (21 mm)
Page 223 of 224

10INDEX
5
Spark Plugs ......................................................................................... 6-9
Spectacle Case.................................................................................1-50
Speedometer.....................................................................................1-38
Starting Procedures............................................................................ 2-5
Steering Wheel
Free play ......................................................................................6-19
Tilt lever ........................................................................................1-57
Stereo Radio Operation (H260, H280) ................................... 1-81, 1-90
Stereo Sound System .......................................................................1-79
Sun Visor...........................................................................................1-57
Sunroof..............................................................................................1-47
T
Tachometer.......................................................................................1-38
Tail Gate............................................................................................1-55
Tailgate Wiper and Washer Switch..................................................1-44
Theft-alarm System............................................................................ 1-6
Tires
Balancing........................................................................................ 8-5
Chains............................................................................................ 8-4
Changing a flat tire ......................................................................... 3-6
If you have a flat tire ....................................................................... 3-6
Information...................................................................................... 8-2
Pressure......................................................................................... 8-3
Replacement.................................................................................. 8-5
Rotation.......................................................................................... 8-4
Snow tires....................................................................................... 8-3
Spare tire........................................................................................ 3-5
Traction.......................................................................................... 8-5Towing
A trailer (or vehicle)......................................................................2-18
Emergency...................................................................................3-13
If your car must be towed ............................................................3-11
Transaxle
Automatic ........................................................................................ 2-8
Automatic transaxle fluid checking ..............................................6-13
Manual............................................................................................ 2-5
Manual transaxle oil checking.....................................................6-12
Traction Control System ...................................................................2-13
Trip Odometer...................................................................................1-39
V
Vehicle Identification Number (VIN) ................................................... 8-2
Vehicle Specification........................................................................... 9-1
Ventilation
Center ventilator...........................................................................1-62
Side ventilator...............................................................................1-63
W
Warning Lights...................................................................... 1-34 ~ 1-37
Windows Glass................................................................................... 1-8
Windshield Wiper and Washer ..........................................................1-43
Windshield Wiper Blades..................................................................6-11