2004 Hyundai Santa Fe fuse
[x] Cancel search: fusePage 48 of 253

1FEATURES OF YOUR HYUNDAI
35
!
B990B04Y-AAT
Side Impact Airbag (If installed)
WARNING:
o The side impact airbag is supplemental
to the driver's and the passenger's seat
belt systems and is not a substitute for
them. Therefore your seat belts must be
worn at all times while the vehicle is in
motion. The airbags deploy only in cer-
tain side impact conditions severe
enough to cause significant injury to the
vehicle occupants. Your Hyundai is equipped with a side impact
airbag in each front seat. The purpose of the
airbag is to provide the vehicle's driver and/or
the front passenger with additional protection
than that offered by the seat belt alone. The side
impact airbags are designed to deploy only
during certain side-impact collisions, depend-
ing on the crash severity, angle, speed and point
of impact. The side impact airbags are not
designed to deploy in all side impact situations.
B990B02Y
HTB072
Side airbag
sensor
!WARNING:o The SRS can function only when the
ignition key is in the "ON" position. If the
SRS SRI does not come on, or continu-
ously remains on after flashing for about
6 seconds when the ignition key is
turned to the "ON" position, or after the
engine is started, comes on while driv-
ing, the SRS is not working properly. If
this occurs, have your vehicle immedi-
ately inspected by your Hyundai dealer.
o Before you replace a fuse or disconnect
a battery terminal, turn the ignition key
to the "LOCK" position or remove the
ignition key. Never remove or replace the
air bag related fuse(s) when the ignition
key is in the "ON" position. Failure to
heed this warning will cause the SRS SRI
to illuminate.
Page 61 of 253

1FEATURES OF YOUR HYUNDAI
48MULTI-FUNCTION LIGHT SWITCH
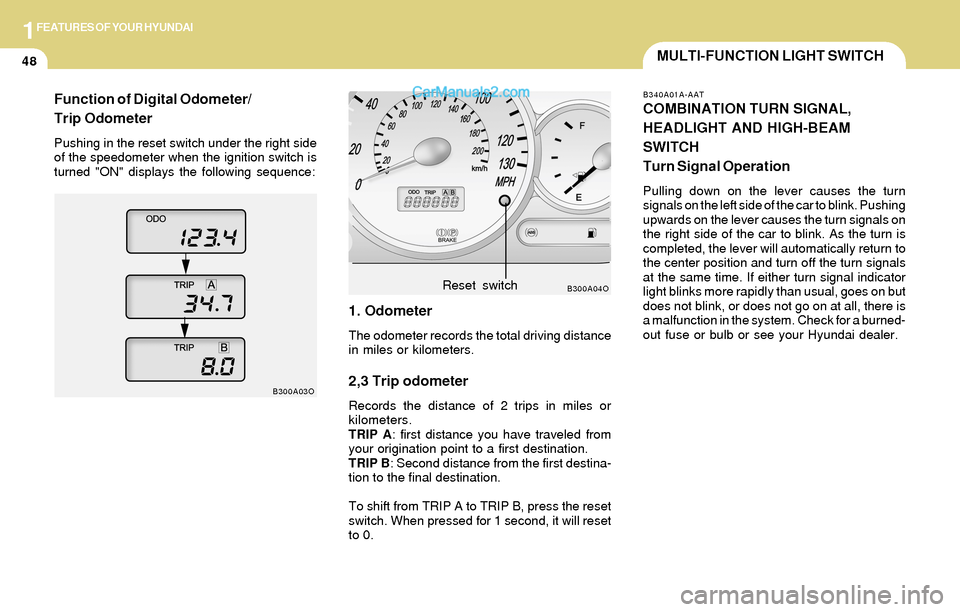
1. Odometer
The odometer records the total driving distance
in miles or kilometers.
2,3 Trip odometer
Records the distance of 2 trips in miles or
kilometers.
TRIP A: first distance you have traveled from
your origination point to a first destination.
TRIP B: Second distance from the first destina-
tion to the final destination.
To shift from TRIP A to TRIP B, press the reset
switch. When pressed for 1 second, it will reset
to 0.
B300A04O
B300A03OReset switch
B340A01A-AAT
COMBINATION TURN SIGNAL,
HEADLIGHT AND HIGH-BEAM
SWITCH
Turn Signal Operation
Pulling down on the lever causes the turn
signals on the left side of the car to blink. Pushing
upwards on the lever causes the turn signals on
the right side of the car to blink. As the turn is
completed, the lever will automatically return to
the center position and turn off the turn signals
at the same time. If either turn signal indicator
light blinks more rapidly than usual, goes on but
does not blink, or does not go on at all, there is
a malfunction in the system. Check for a burned-
out fuse or bulb or see your Hyundai dealer.
Function of Digital Odometer/
Trip Odometer
Pushing in the reset switch under the right side
of the speedometer when the ignition switch is
turned "ON" displays the following sequence:
Page 113 of 253

1FEATURES OF YOUR HYUNDAI
100
B260D04O-AAT
1. Playing CD
o Insert the CD with the label facing upward.
o Insert the CD to start CD playback, during
radio operation.
o When a disc is in the CD deck, if you press
the CD button, the CD player will begin
playing even if the radio is being used.
o The CD player can be used when the ignition
switch is in either the "ON" or "ACC" position.
2. FF/REW ( / )
If you want to fast forward or reverse through
the compact disc track, push and hold the FF
( ) or REW ( ) button.
When you release the button, the compact disc
player will resume playing.
3. TRACK UP/DOWN
o The desired track on the disc currently being
played can be selected using the track
number.
o Press once to skip forward to the beg-
inning of the next track. Press once to
skip back to the beginning of the track.
4. SCAN Button
o Press the SCAN button to playback the first
10 seconds of each track.
o Press the SCAN button again within 10 sec.
when you have reached the desired track.
5. REPEAT Button
o To repeat the track you are currently listen-
ing to, press the RPT button. To cancel ,
press again.
o If you do not release RPT operation when the
track ends, it will automatically be replayed.
This process will be continued until you push
the button again.
6. EJECT Button
When the EJECT button is pressed with a
CD loaded, the CD will eject.
NOTE:o If the CD does not operate properly or if
the ER2 fault code is displayed, use one
of two methods to reset the CD deck
function.
- Remove the audio fuse for 5 minutes.
Then, reinstall the audio fuse.
- Diconnect the negative terminal of the
battery and wait 5 minutes. Then re-
connect the negative battery terminal.
o To assure proper operation of the unit,
keep the vehicle interior temperature
within a normal range by using the
vehicle's air conditioning or heating
system.
o When replacing the fuse, replace it with
a fuse having the correct capacity.
o The preset station frequencies are all
erased when the car battery is discon-
nected. Therefore, all data will have to be
set again if this should occur.
o Do not add any oil to the rotating parts.
Keep magnets, screwdrivers and other
metallic objects away from the tape
mechanism and head.
Page 168 of 253

3
2
WHAT TO DO IN AN EMERGENCY
IF THE ENGINE WILL NOT START
!
D010A01A-AAT D010B02A-AAT
If Engine Doesn't Turn Over or Turns
Over Slowly
D010C01Y-AAT
If Engine Turns Over Normally but Does
Not Start
1. Check fuel level.
2. With the key in the "OFF" position, check all
connectors at ignition, coil and spark plugs.
Reconnect any that may be disconnected or
loose.
3. Check the fuel line in the engine room.
4. If engine still refuses to start, call a Hyundai
dealer or seek other qualified assistance.
D010D01A-AAT
If Engine Stalls While Driving
1. Reduce your speed gradually, keeping a
straight line. Move cautiously off the road to
a safe place.
2. Turn on your emergency flashers.
3. Try to start the engine again. If your vehicle
will not start, contact a Hyundai dealer or
seek other qualified assistance.
WARNING:If the engine will not start, do not push or
pull the car to start it. This could result in a
collision or cause other damage. In addi-
tion, push or pull starting may cause the
catalytic converter to be overloaded and
create a fire hazard.
1. If your car has an automatic transaxle, be
sure the gear selector lever is in "N" or "P"
and the emergency brake is set.
2. Check the battery connections to be sure
they are clean and tight.
3. Turn on the interior light. If the light dims or
goes out when you operate the starter, the
battery is discharged.
4. Check the starter connections to be sure
they are securely tightened.
5. Do not push or pull the vehicle to start it. See
instructions for "Jump Starting".
D010B01Y
Page 195 of 253

6
Engine Compartment.............................................................. 6-2
General Checks....................................................................... 6-5
Checking the Engine Oil........................................................ 6-6
Changing the Oil and Filter.................................................... 6-7
Checking and Changing the Engine Coolant.................... 6-8
Spark Plugs...........................................................................6-10
Changing the Air Cleaner Filter.........................................6-12
Checking the Transaxle Oil (Manual) ..............................6-13
Checking the Transaxle Fluid (Automatic).....................6-14
Checking the Brakes...........................................................6-16
Checking the Clutch Fluid..................................................6-17
Air Conditioning Care ...........................................................6-18
Checking Drive Belts...........................................................6-20
Checking and Replacing Fuses ........................................6-21
Checking the Battery...........................................................6-22
Power Steering Fluid Level................................................6-24
Replacement of Light Bulbs...............................................6-26
Bulb Wattage .........................................................................6-33
Fuse Panel Description.......................................................6-34
6
DO-IT-YOURSELF MAINTENANCE
Page 196 of 253

6DO-IT-YOURSELF MAINTENANCE
2ENGINE COMPARTMENT
G010A01O-AAT
(2.4 DOHC)
HSM241
12 34
6 7 8 9 10 11
1. Coolant reservoir cap
2 . Engine oil filler cap
3. Brake & Clutch fluid reservoir
4. Air cleaner5 . Fuse and Relay box
6. Windshield washer fluid reservoir
7 . Power steering fluid reservoir
8 . Engine oil level dipstick 9. Radiator cap
10. Automatic transaxle fluid level dipstick
(Vehicle with Automatic Transaxle)
11. Battery
CAUTION:When inspecting or servicing the engine,
you should handle tools and other heavy
objects carefully so that the plastic cover of
the engine is not damaged.
!
5
Page 197 of 253

6DO-IT-YOURSELF MAINTENANCE
3
G010B01O-AAT
(2.7 V6)
1. Coolant reservoir cap
2. Brake & Clutch fluid reservoir
3. Air cleaner
4 . Fuse and Relay box5. Windshield washer fluid reservoir
6. Power steering fluid reservoir
7. Engine oil level dipstick
8. Radiator cap 9. Engine oil filler cap
10. Automatic transaxle fluid level dipstick
(Vehicle with Automatic Transaxle)
11. Battery
G010B01O
1234
56 7 8 9 10 11
CAUTION:When inspecting or servicing the engine,
you should handle tools and other heavy
objects carefully so that the plastic cover of
the engine is not damaged.
!
Page 198 of 253

6DO-IT-YOURSELF MAINTENANCE
4
G010C01O-AAT
(3.5 V6)
1. Coolant reservoir cap
2 . Engine oil filler cap
3. Brake fluid reservoir
4. Air cleaner5 . Fuse and Relay box
6. Windshield washer fluid reservoir
7. Power steering fluid reservoir
8. Radiator cap 9. Engine oil level dipstick
10. Automatic transaxle fluid level dipstick
11. Battery
HSM424
1345
6 7 8 9 10 11
CAUTION:When inspecting or servicing the engine,
you should handle tools and other heavy
objects carefully so that the plastic cover of
the engine is not damaged.
!
2