2004 Hyundai Santa Fe warning lights
[x] Cancel search: warning lightsPage 76 of 253

1FEATURES OF YOUR HYUNDAI
63DAY/NIGHT INSIDE REARVIEW
MIRROR
!
B510C01A-AAT
FOLDING THE OUTSIDE REARVIEW
MIRRORS
To fold the outside rearview mirrors, push them
toward the rear.
The outside rearview mirrors can be folded
rearward for parking in narrow areas.
WARNING:Do not adjust or fold the outside rearview
mirrors while the vehicle is moving. This
could result in loss of control, and an acci-
dent which could cause death, serious in-
jury or property damage.
B520A01A-AAT
Manual Type
Your Hyundai is equipped with a day/night inside
rearview mirror. The "night" position is selected
by flipping the tab at the bottom of the mirror
toward you. In the "night" position, the glare of
headlights of cars behind you is reduced.B510C01OB520A01O
B520B01O-GAT
Electric Type (If installed)
The electric type day/night inside rearview mir-
ror controls automatically the glare of headlights
of the car behind you. Adjust the rearview mirror
to the desired position.
B520B01O
Page 84 of 253

1FEATURES OF YOUR HYUNDAI
71REMOTE FUEL-FILLER LID RELEASEAUTO FUEL CUT SWITCHHIGH-MOUNTED REAR STOP LIGHT
B550A01A-AAT
(If installed)
In addition to the lower-mounted rear stoplights
on either side of the car, the high mounted rear
stoplight in the center of the rear window also
lights when the brakes are applied.
B550A01O
!
B560B01O-AAT
The auto fuel cut switch is located on the driver's
side of the engine compartment.
In the event of a collision or sudden impact, the
auto fuel cut device cuts off the fuel supply. If this
device is activated, it must be reset by pressing
in on the top of the switch before the engine can
be restarted.
WARNING:Before resetting the auto fuel cut switch,
the fuel line should be checked for fuel
leaks.
B560B01O
B560A02S-AAT
The fuel-filler lid may be opened from inside the
vehicle by pulling up on the fuel-filler lid opener
located on the front floor area on the left side of
the car.
NOTE:If the fuel-filler lid will not open because ice
has formed around it, tap lightly or push on
the lid to break the ice and release the lid. Do
not pry on the lid. If necessary, spray around
the lid with an approved de-icer fluid (do
not use radiator anti-freeze) or move the
vehicle to a warm place and allow the ice to
melt.
B560A01O
Page 87 of 253

1FEATURES OF YOUR HYUNDAI
74FRONT DOOR EDGE WARNING
LIGHTSTEERING WHEEL TILT LEVER
!
To adjust the steering wheel:
1. Pull the lever upward and hold it to unlock.
2. Raise or lower the steering wheel to the
desired position.
3. After adjustment, release the lever.
WARNING:Do not attempt to adjust the steering wheel
while driving as this may result in loss of
control of the vehicle and serious injury or
death.
B620A01S-AAT
A red light comes on when the front door is
opened. The purpose of this light is to assist
when you get in or out and also to warn passing
vehicles.
B620A01O B580B01O-AAT
Illuminated Vanity Mirror (If installed)
Opening the lid of the vanity mirror will automati-
cally turn on the mirror light when the multi-
function switch is turned to the first/second
position.
B600A02Y-AAT
B600A01O
!WARNING:Do not place the sun visor in such a manner
that it obscures visibility of the roadway,
traffic or other objects.
Page 140 of 253

2DRIVING YOUR HYUNDAI
3BEFORE STARTING THE ENGINE
!!WARNING:o The 2WD Santa Fe is not designed for
off-road use. The 4WD Santa Fe is de-
signed primarily for use on paved roads.
However, occasional use in off-highway
conditions such as established unpaved
roads and non-challenging off-road
trails is allowed. The 4WD Santa Fe is not
designed for blazing new trails, chal-
lenging off-road conditions, or unpaved
hill climbing. Exceeding the conditions
that were intended for the vehicle's pri-
mary design may result in injury or death.
o Utility vehicle has a significantly higher
collision rate than other type of vehicles.
C020A01A-AAT
Before you start the engine, you should always:
1. Look around the vehicle to be sure there are
no flat tires, puddles of oil, water or other
indications of possible trouble.
2. After entering the car, check to be sure the
parking brake is engaged.
3. Check that all windows, and lights are clean.
4. Check that the interior and exterior mirrors
are clean and in position.
5. Check your seat, seatback and headrest to
be sure they are in their proper positions.
6. Lock all the doors.
7. Fasten your seat belt and be sure that all
other occupants have fastened theirs.
8. Turn off all lights and accessories that are
not needed.
9. When you turn the ignition switch to "ON",
check that all appropriate warning lights are
operating and that you have sufficient fuel.
10.Check the operation of warning lights and all
bulbs when key is in the "ON" position. o Utility vehicle have higher ground clear-
ance and a narrower track to make them
capable of performing in a wide variety
of off-road applications. Specific design
characteristics give them a higher center
of gravitiy than ordinary cars. An advan-
tage of the higher ground clearance is a
better view of the road allowing you to
anticipate problem. They are not de-
signed for cornering at the same speeds
as conventional 2-wheel drive vehicles
any more than low-slung sports cars are
designed to perform satisfactorily un-
der off-road conditions. If at all possible,
avoid sharp turns or abrupt maneuvers.
As with other vehicles of this type, fail-
ure to operate this vehicle correctly may
result in loss of control or vehicle rollover.
o In a collision crash, an unbelted person
is significantly more likely to die than a
person wearing a seatbelt.WARNING:
Page 142 of 253

2DRIVING YOUR HYUNDAI
5STARTING
!
C070C01A-AAT
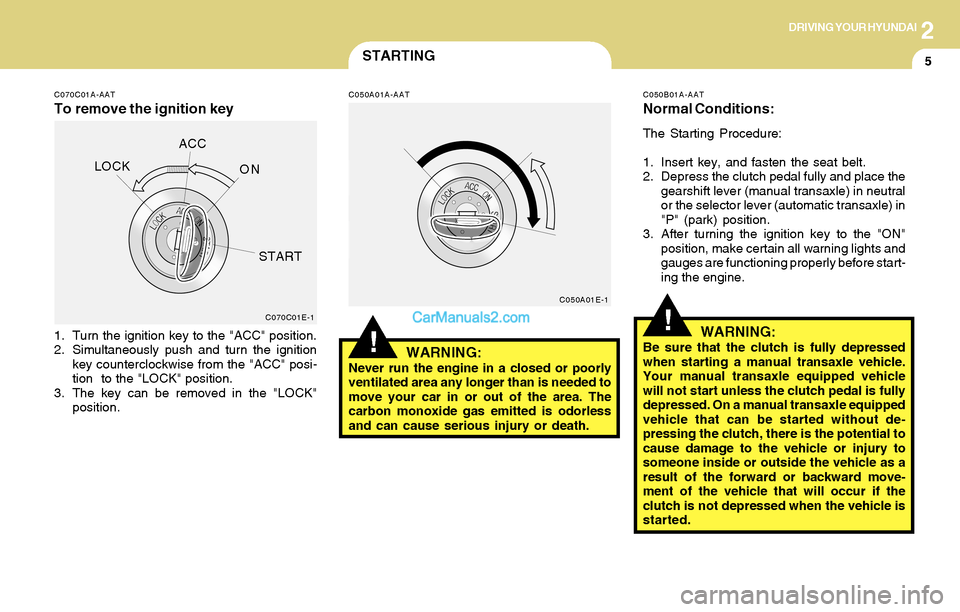
To remove the ignition key
C050A01A-AAT
1. Turn the ignition key to the "ACC" position.
2. Simultaneously push and turn the ignition
key counterclockwise from the "ACC" posi-
tion to the "LOCK" position.
3. The key can be removed in the "LOCK"
position.
WARNING:Never run the engine in a closed or poorly
ventilated area any longer than is needed to
move your car in or out of the area. The
carbon monoxide gas emitted is odorless
and can cause serious injury or death.
C050B01A-AAT
Normal Conditions:
The Starting Procedure:
1. Insert key, and fasten the seat belt.
2. Depress the clutch pedal fully and place the
gearshift lever (manual transaxle) in neutral
or the selector lever (automatic transaxle) in
"P" (park) position.
3. After turning the ignition key to the "ON"
position, make certain all warning lights and
gauges are functioning properly before start-
ing the engine.
WARNING:Be sure that the clutch is fully depressed
when starting a manual transaxle vehicle.
Your manual transaxle equipped vehicle
will not start unless the clutch pedal is fully
depressed. On a manual transaxle equipped
vehicle that can be started without de-
pressing the clutch, there is the potential to
cause damage to the vehicle or injury to
someone inside or outside the vehicle as a
result of the forward or backward move-
ment of the vehicle that will occur if the
clutch is not depressed when the vehicle is
started.
!C070C01E-1C050A01E-1
LOCKACC
ON
START
Page 165 of 253

2DRIVING YOUR HYUNDAI
28
8. If the trailer has electric brakes, start your
vehicle and trailer moving, and then apply the
trailer brake controller by hand to be sure the
brakes are working. This lets you check
your electrical connection at the same time.
9. During your trip, check occasionally to be
sure that the load is secure, and that the
lights and any trailer brakes are still working.
10.Avoid jerky starts, sudden acceleration or
sudden stops.
11.Avoid sharp turns and rapid lane changes.
12.Avoid holding the brake pedal down too long
or too frequently. This could cause the brakes
to overheat, resulting in reduced braking
efficiency.
13.When going down a hill, shift into a lower gear
and use the engine braking effect.
When ascending a long grade, downshift the
transaxle to a lower gear and reduce speed
to reduce chances of engine overloading
and/or overheating.
14.If you have to stop while going uphill, do not
hold the vehicle in place by pressing on the
accelerator. This can cause the automatic
transaxle to overheat. Use the parking brake
or footbrake.
15.If the transaxle shifts frequently while going
up a hill, shift down one gear.
NOTE:When towing check transaxle fluid more
frequently.
!
C190F01O-AAT
Trailer or Vehicle Towing Tips
1. Before towing, check hitch and safety chain
connections as well as proper operation of
the trailer running lights, brake lights, and
turn signals.
2. Trailer towing requires more fuel than normal
conditions.
3. To maintain engine braking efficiency, do not
tow a trailer with the transaxle in fifth gear
(manual transaxle) or overdrive (automatic
transaxle).
4. Always secure items in the trailer to prevent
load shift while driving.
5. Check the condition and air pressure of all
tires on the trailer and your car. Low tire
pressure can seriously affect the handling.
Also check the spare tire.
6. The vehicle/trailer combination is more af-
fected by crosswind and buffeting.
When being passed by a large vehicle, keep
a constant speed and steer straight ahead.
If there is too much wind buffeting, slow down
to get out of the other vehicle's air turbulence.
7. When parking your car and trailer, especially
on a hill, be sure to follow all the normal
precautions. Turn your front wheel into the
curb, set the parking brake firmly, and put the
transaxle in 1st or Reverse (manual) or Park
(automatic). In addition, place wheel chocks
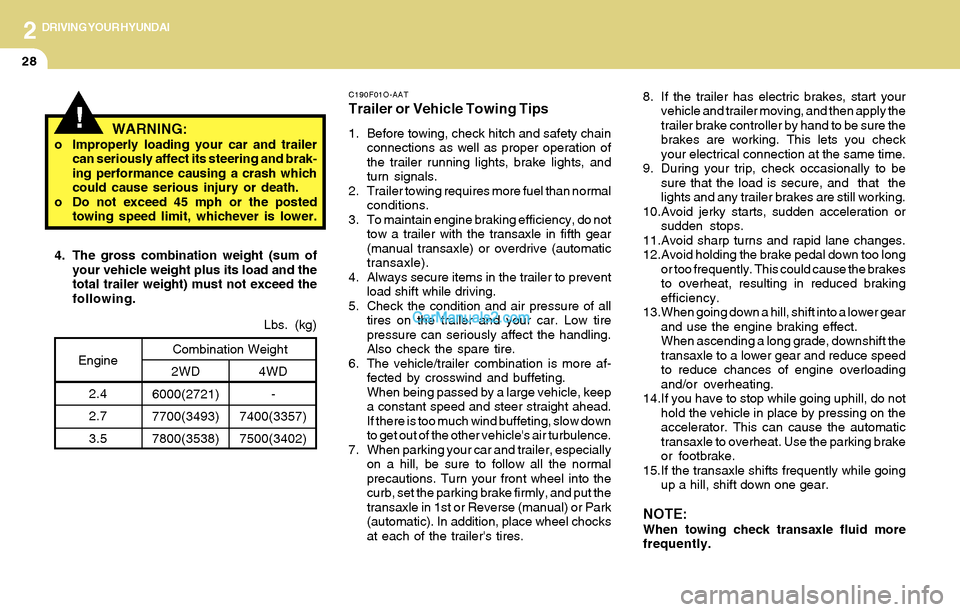
at each of the trailer's tires. 4. The gross combination weight (sum of
your vehicle weight plus its load and the
total trailer weight) must not exceed the
following.
4WD
-
7400(3357)
7500(3402)Lbs. (kg)
2WD
6000(2721)
7700(3493)
7800(3538)Combination WeightEngine
2.4
2.7
3.5
WARNING:o Improperly loading your car and trailer
can seriously affect its steering and brak-
ing performance causing a crash which
could cause serious injury or death.
o Do not exceed 45 mph or the posted
towing speed limit, whichever is lower.
Page 169 of 253

3WHAT TO DO IN AN EMERGENCY
3JUMP STARTING
!
o If you should accidentally get acid on your
skin or in your eyes, immediately remove
any contaminated clothing and flush the area
with clear water for at least 15 minutes. Then
promptly obtain medical attention. If you
must be transported to an emergency facil-
ity, continue to apply water to the affected
area with a sponge or cloth.
o The gas produced by the battery during the
jump-start operation is highly explosive. Do
not smoke or allow a spark or an open flame
in the vicinity.
o The battery being used to provide the jump
start must be 12-volt. If you cannot deter-
mine that it is a 12-volt battery, do not attempt
to use it for the jump start.
o To jump start a car with a discharged battery,
follow this procedure exactly:
1. If the booster battery is installed in another
vehicle, be sure the two vehicles are not
touching.
2. Turn off all unnecessary lights and acces-
sories in both vehicles.
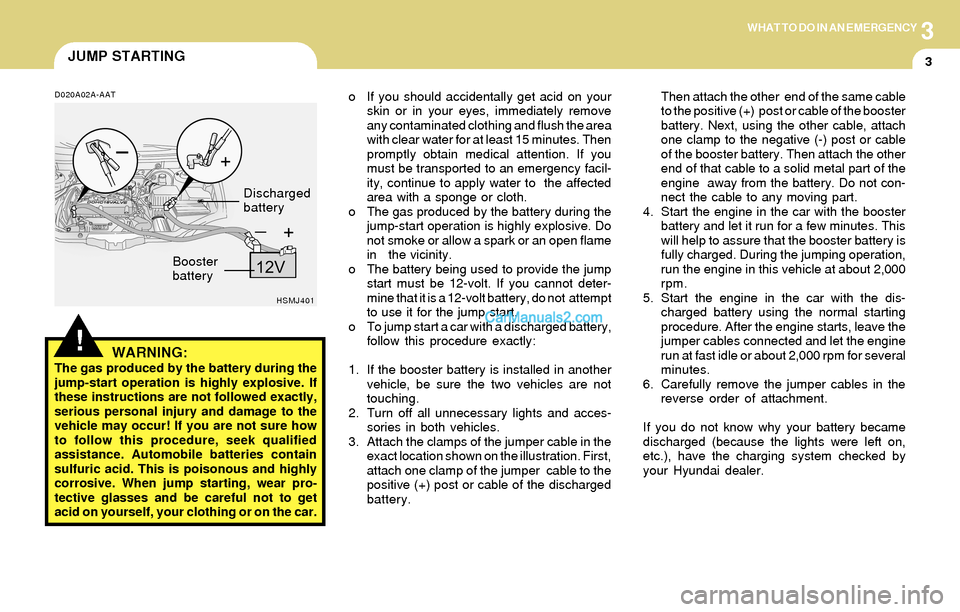
3. Attach the clamps of the jumper cable in the
exact location shown on the illustration. First,
attach one clamp of the jumper cable to the
positive (+) post or cable of the discharged
battery.Then attach the other end of the same cable
to the positive (+) post or cable of the booster
battery. Next, using the other cable, attach
one clamp to the negative (-) post or cable
of the booster battery. Then attach the other
end of that cable to a solid metal part of the
engine away from the battery. Do not con-
nect the cable to any moving part.
4. Start the engine in the car with the booster
battery and let it run for a few minutes. This
will help to assure that the booster battery is
fully charged. During the jumping operation,
run the engine in this vehicle at about 2,000
rpm.
5. Start the engine in the car with the dis-
charged battery using the normal starting
procedure. After the engine starts, leave the
jumper cables connected and let the engine
run at fast idle or about 2,000 rpm for several
minutes.
6. Carefully remove the jumper cables in the
reverse order of attachment.
If you do not know why your battery became
discharged (because the lights were left on,
etc.), have the charging system checked by
your Hyundai dealer.D020A02A-AAT
WARNING:The gas produced by the battery during the
jump-start operation is highly explosive. If
these instructions are not followed exactly,
serious personal injury and damage to the
vehicle may occur! If you are not sure how
to follow this procedure, seek qualified
assistance. Automobile batteries contain
sulfuric acid. This is poisonous and highly
corrosive. When jump starting, wear pro-
tective glasses and be careful not to get
acid on yourself, your clothing or on the car.
HSMJ401
Booster
batteryDischarged
battery
Page 219 of 253

6DO-IT-YOURSELF MAINTENANCE
25HEADLIGHT AIMING ADJUSTMENT
G290B01O-AAT
Adjustment After Headlight Assembly
Replacement
If the vehicle has had front body repair and the
headlight assembly has been replaced, the
headlight aiming should be checked using an
aiming chart as shown in the illustration. Turn on
the headlight switch. (Low Beam Position)
1 . Adjust headlights so that main axis of light is
parallel to center line of the body and is
aligned with point "P" shown in the illustration.
2 . Dotted lines in the illustration show the center
of headlights.
G290A03O
L
W
H
H
Cut-off line
Ground line
"P"
Horizontal line
Vertical line
!
6 . Draw the vertical line (through the center of
each headlight beam pattern) and the hori-
zontal line (through the center of each head-
light beam pattern) on the aiming screen.
And then, draw a parallel line at 0.8 in. (21
mm) under the horizontal line.
7. Adjust each cut-off line of the low beam to the
parallel line with a phillips screwdriver -
VERTICAL AIMING.
WARNING:Horizontal aiming should be adjusted by
an authorized Hyundai dealer.
G290A01O
Vertical
aiming
G290A02O-AAT
Before performing aiming adjustment, make
sure of the following.
1 . Keep all tires inflated to the correct pressure.
2 . Place the vehicle on level ground and press
the front bumper & rear bumper down sev-
eral times.
Place vehicle at a distance of 118 in. (3m)
from the test wall.
3 . See that the vehicle is unloaded (except for
full levels of coolant, engine oil and fuel, and
spare tire, jack, and tools). Have the driver
or equivalent weight placed in driver's seat.
4 . Clean the head light lenses and turn on the
headlights (Low beam).
5 . Open the hood.