2004 Hyundai Santa Fe Glass
[x] Cancel search: GlassPage 63 of 253

1FEATURES OF YOUR HYUNDAI
50WINDSHIELD WIPER AND WASHER
SWITCH
B340G01L-GAT
Auto Light (If installed)
To operate the automatic light feature, turn the
barrel on the end of the multi-function switch. If
you set the multi-function switch to "AUTO", the
tail lights and headlights will be turned automati-
cally on or off according to external illumination.
B350A01A-AAT
The windshield wiper switch has three posi-
tions:
1. Intermittent wiper operation
2. Low-speed operation
3. High-speed operation
NOTE:To prevent damage to the wiper system, do
not attempt to wipe away heavy accumula-
tions of snow or ice. Accumulated snow
and ice should be removed manually. If
there is only a light layer of snow or ice,
operate the heater in the defrost mode to
melt the snow or ice before using the wiper.
HSM294B350A01O-A
(1)
(2)
(3)
B350B01O-GAT
Windshield Washer Operation
To use the windshield washer, pull the wiper/
washer lever toward the steering wheel. When
the washer lever is operated, the wipers auto-
matically make two passes across the wind-
shield. The washer continues to operate until
the lever is released.
NOTE:o Do not operate the washer more than 15
seconds at a time or when the fluid
reservoir is empty.
o In icy or freezing weather, be sure the
wiper blades are not frozen to the glass
prior to operating the wipers.
o In areas where water freezes in winter,
use windshield washer antifreeze.
B350B01O-A
Page 66 of 253

1FEATURES OF YOUR HYUNDAI
53DIGITAL CALENDARDIGITAL CLOCK
NOTE:The ignition must be in the "ON" position
for the rear window defroster to operate.
B400A01A-AAT
There are three control buttons for the digital
clock. Their functions are:
HOUR - Push "H" to advance the hour indi-
cated.
MIN - Push "M" to advance the minute indicated.
RESET - Push "R" to reset minutes to ":00" to
facilitate resetting the clock to the correct time.
When this is done:
Pressing "R" between 10 : 30 and 11 : 29
changes the readout to 11 : 00.
Pressing "R" between 11 : 30 and 12 : 29
changes the readout to 12 : 00.
B400B02O-GAT
(If installed)
How to adjust the date & the time
1. Whenever "M" button is pushed, the "YEAR",
"MONTH", "DAY", "HOUR" and "MINUTE"
blinks in order.
2. Adjust the date & the time by pushing
" (UP)", " (DOWN)" button when the
year/month/day/hour/minute each blinks.
3. After adjusting the date & the time, push "M"
button once more and the adjustment is
completed.
NOTE:When the battery has been reconnected or
charged, set the date and time as described
above. However, the first display mode is
set on DEC 01.
HSM100
HSM292
CAUTION:Do not clean the inner side of the rear
window glass with an abrasive type of glass
cleaner or use a scraper to remove foreign
deposits from the inner surface of the glass
as this may cause damage to the defroster
elements.
!
Page 70 of 253

1FEATURES OF YOUR HYUNDAI
57
CAUTION:o Do not open the sunroof in severely cold
temperature or when it is covered with
ice or snow.
o Periodically remove any dirt that may
have accumulated on the guide rails.
!
!
B460B01GK-GAT
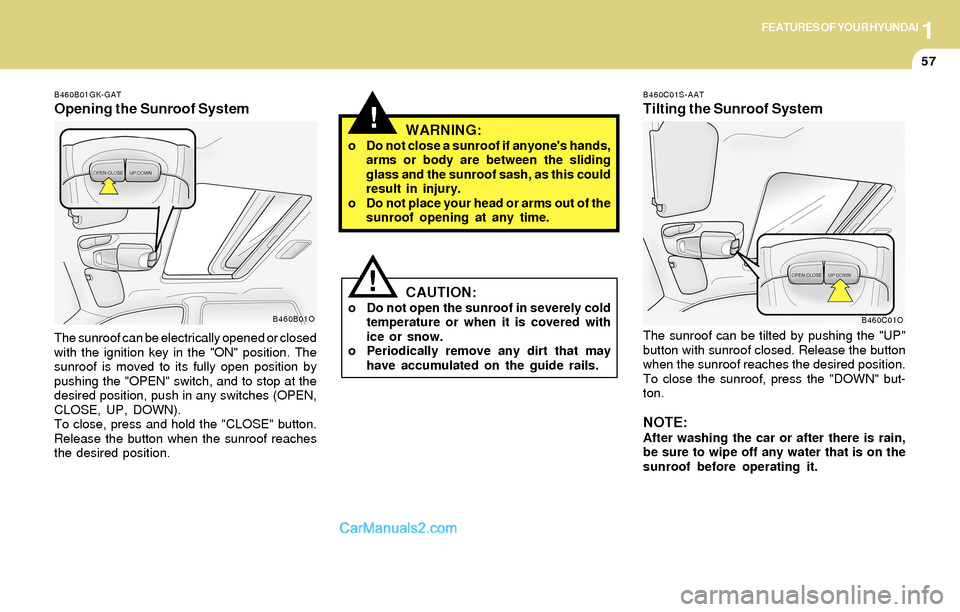
Opening the Sunroof System
The sunroof can be electrically opened or closed
with the ignition key in the "ON" position. The
sunroof is moved to its fully open position by
pushing the "OPEN" switch, and to stop at the
desired position, push in any switches (OPEN,
CLOSE, UP, DOWN).
To close, press and hold the "CLOSE" button.
Release the button when the sunroof reaches
the desired position.
WARNING:o Do not close a sunroof if anyone's hands,
arms or body are between the sliding
glass and the sunroof sash, as this could
result in injury.
o Do not place your head or arms out of the
sunroof opening at any time.
B460B01O
B460C01S-AAT
Tilting the Sunroof System
The sunroof can be tilted by pushing the "UP"
button with sunroof closed. Release the button
when the sunroof reaches the desired position.
To close the sunroof, press the "DOWN" but-
ton.
NOTE:After washing the car or after there is rain,
be sure to wipe off any water that is on the
sunroof before operating it.
B460C01O
Page 75 of 253

1FEATURES OF YOUR HYUNDAI
62
B510D01Y-AAT
OUTSIDE REARVIEW MIRROR HEATER
(If installed)
The outside rearview mirror heater is actuated
in connection with the rear window defroster. To
heat the outside rearview mirror glass, push in
the switch for the rear window defroster. The
rearview mirror glass will be heated for defrost-
ing or defogging and will give you improved rear
vision in inclement weather conditions. Push the
switch again to turn the heater off. The outside
rearview mirror heater automatically turns itself
off after 15 minutes.
HSM035
!WARNING:Be careful when judging the size or dis-
tance of any object seen in the passenger
side rear view mirror. It is a convex mirror
with a curved surface. Any objects seen in
this mirror are closer than they appear.
CAUTION:o Do not operate the switch continuously
for an unnecessary length of time.
o Scraping ice from the mirror face could
cause permanent damage. To remove
any ice, use a sponge, soft cloth or
approved de-icer.
!
B510B02O
To adjust the position of either mirror:
1. Move the selecting switch to the right or left
to activate the adjustable mechanism for the
corresponding door mirror.
2. Adjust mirror angle by depressing the appro-
priate perimeter switch as illustrated.
Page 136 of 253

1FEATURES OF YOUR HYUNDAI
123ANTENNA
B870C01A-GAT
Manual Antenna (If installed)
B880C02B-AAT
Glass Antenna (If installed)
Your car uses a manual stainless steel antenna
to receive both AM and FM broadcast signals.
Pull up the antenna using your fingers, as shown
in the drawing.When the radio power switch is turned on while
the ignition key is in either the "ON" or "ACC"
position, your car will receive both AM and FM
broadcast signals through the antenna in the
rear quarter glass.
CAUTION:Before entering an automatic car wash or a
place with a low height clearance such as a
residential or commercial garage, be sure
that the antenna is fully retracted.
!
B870C01O
B880C01ONOTE:Look at a tape before you insert it. If the tape
is loose, tighten it by turning one of the
hubs with a pencil or your finger. If the label
is peeling off, do not put it in the drive
mechanism.
Do not leave tapes sitting where they are
exposed to hot, warm, or high humidity,
such as on top of the dashboard or in the
player. If a tape is excessively hot or cold, let
it reach a moderate temperature before
putting it in the player.
B860A03L
Page 137 of 253

1FEATURES OF YOUR HYUNDAI
124
CAUTION:o Do not clean the inner side of the rear
quarter glass with an abrasive type of
glass cleaner or use a scraper to remove
foreign deposits from the inner surface
of the glass as this may cause damage to
the antenna elements.
o Avoid adding metallic coating (some
aftermarket window tinting has metallic
contents). These can disturb receiving
AM and FM broadcast signals.
!
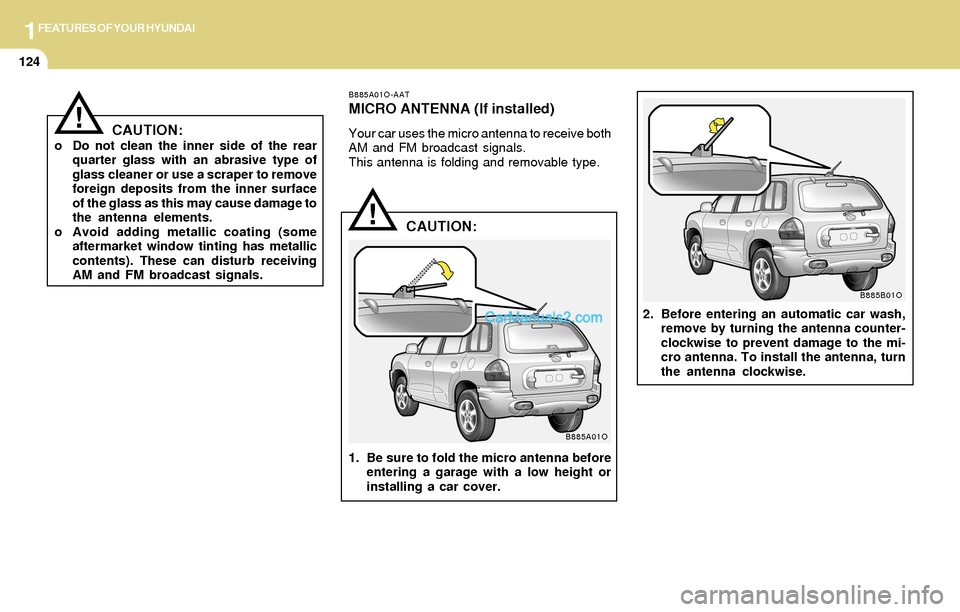
B885A01O-AAT
MICRO ANTENNA (If installed)
Your car uses the micro antenna to receive both
AM and FM broadcast signals.
This antenna is folding and removable type.
CAUTION:
1. Be sure to fold the micro antenna before
entering a garage with a low height or
installing a car cover.2. Before entering an automatic car wash,
remove by turning the antenna counter-
clockwise to prevent damage to the mi-
cro antenna. To install the antenna, turn
the antenna clockwise.
!
B885A01O
B885B01O
Page 169 of 253

3WHAT TO DO IN AN EMERGENCY
3JUMP STARTING
!
o If you should accidentally get acid on your
skin or in your eyes, immediately remove
any contaminated clothing and flush the area
with clear water for at least 15 minutes. Then
promptly obtain medical attention. If you
must be transported to an emergency facil-
ity, continue to apply water to the affected
area with a sponge or cloth.
o The gas produced by the battery during the
jump-start operation is highly explosive. Do
not smoke or allow a spark or an open flame
in the vicinity.
o The battery being used to provide the jump
start must be 12-volt. If you cannot deter-
mine that it is a 12-volt battery, do not attempt
to use it for the jump start.
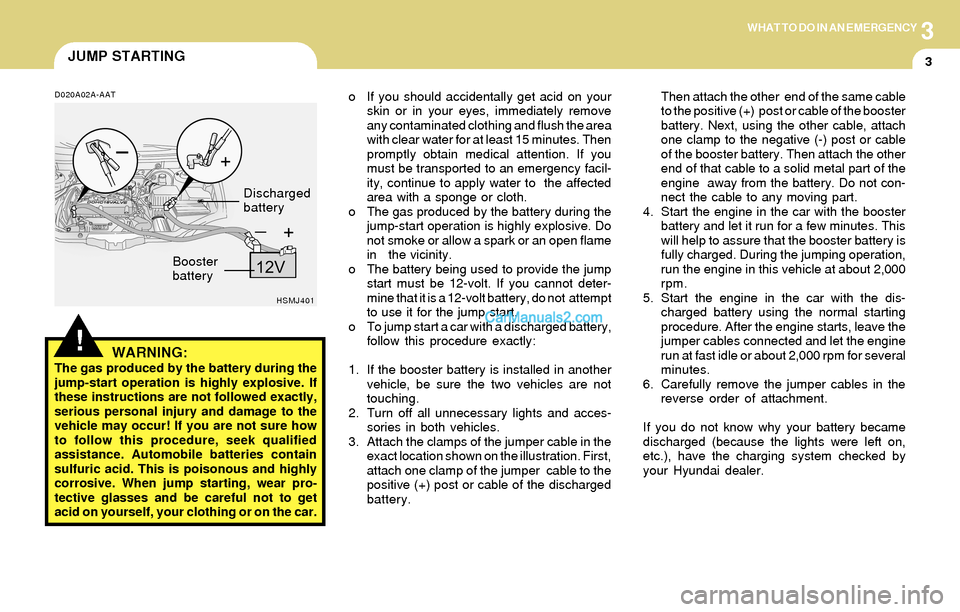
o To jump start a car with a discharged battery,
follow this procedure exactly:
1. If the booster battery is installed in another
vehicle, be sure the two vehicles are not
touching.
2. Turn off all unnecessary lights and acces-
sories in both vehicles.
3. Attach the clamps of the jumper cable in the
exact location shown on the illustration. First,
attach one clamp of the jumper cable to the
positive (+) post or cable of the discharged
battery.Then attach the other end of the same cable
to the positive (+) post or cable of the booster
battery. Next, using the other cable, attach
one clamp to the negative (-) post or cable
of the booster battery. Then attach the other
end of that cable to a solid metal part of the
engine away from the battery. Do not con-
nect the cable to any moving part.
4. Start the engine in the car with the booster
battery and let it run for a few minutes. This
will help to assure that the booster battery is
fully charged. During the jumping operation,
run the engine in this vehicle at about 2,000
rpm.
5. Start the engine in the car with the dis-
charged battery using the normal starting
procedure. After the engine starts, leave the
jumper cables connected and let the engine
run at fast idle or about 2,000 rpm for several
minutes.
6. Carefully remove the jumper cables in the
reverse order of attachment.
If you do not know why your battery became
discharged (because the lights were left on,
etc.), have the charging system checked by
your Hyundai dealer.D020A02A-AAT
WARNING:The gas produced by the battery during the
jump-start operation is highly explosive. If
these instructions are not followed exactly,
serious personal injury and damage to the
vehicle may occur! If you are not sure how
to follow this procedure, seek qualified
assistance. Automobile batteries contain
sulfuric acid. This is poisonous and highly
corrosive. When jump starting, wear pro-
tective glasses and be careful not to get
acid on yourself, your clothing or on the car.
HSMJ401
Booster
batteryDischarged
battery
Page 199 of 253

6DO-IT-YOURSELF MAINTENANCE
5GENERAL CHECKS
G020C01A-AAT
Vehicle Interior
The following should be checked each time
when the vehicle is driven:
o Lights operation
o Windshield wiper operation
o Horn operation
o Defroster, heating system operation (and air
conditioning, if installed)
o Steering operation and condition
o Mirror condition and operation
o Turn signal operation
o Accelerator pedal operation
o Brake operation, including parking brake
o Manual transaxle operation, including clutch
operation
o Automatic transaxle operation, including
"Park" mechanism operation
o Seat control condition and operation
o Seat belt condition and operation
o Sunvisor operation
If you notice anything that does not operate
correctly or appears to be functioning correctly,
inspect it carefully and seek assistance from
your Hyundai dealer if service is needed.
G020B01A-AAT
Vehicle Exterior
The following should be checked monthly:
o Overall appearance and condition
o Wheel condition and wheel nut torque
o Exhaust system condition
o Light condition and operation
o Windshield glass condition
o Wiper blade condition
o Paint condition and body corrosion
o Fluid leaks
o Door and hood lock condition
o Tire pressure and condition
(including spare tire)
G020A01A-AAT
Engine Compartment
The following should be checked regularly:
o Engine oil level and condition
o Transaxle fluid level and condition
o Brake fluid level
o Clutch fluid level
o Engine coolant level
o Windshield washer fluid level
o Accessory drive belt condition
o Engine coolant hose condition
o Fluid leaks (on or below components)
o Power steering fluid level
o Battery condition
o Air filter condition