2004 Hyundai Grandeur service
[x] Cancel search: servicePage 179 of 235

5- 6 VEHICLE MAINTENANCE REQUIREMENTS
ENGINE OIL AND FILTER AIR CLEANER FILTERSPARK PLUGSTIMING BELTBRAKE PADS, CALIPERS AND ROTORSREAR BRAKE DRUMS/LININGS,PARKING BRAKE
STEERING GEAR BOX, LINKAGE& BOOTS/LOWER ARM BALL JOINT,UPPER ARM BALL JOINTDRIVESHAFTS & BOOTSMANUAL TRANSAXLE OILAUTOMATICTRANSAXLE FLUIDAIR CONDITIONER FILTER (FOR EVAP. AND BLOWER UNIT) European Community OnlyExcept European Community
F040A04L-GAT MAINTENANCE UNDER SEVERE USAGE CONDITIONS The following items must be serviced more frequently on cars normally used under severe driving conditions. Refer to the chart below for the appropriate maintenance intervals. R : Replace I : Inspect and, after inspection, clean, adjust, repair or replace if necessaryR RRR
I I I I
RRREVERY 7,500 KM OR 6 MONTHS MORE FREQUENTLYMORE FREQUENTLYEVERY 60,000 KM OR 48 MONTHSMORE FREQUENTLY MORE FREQUENTLY MORE FREQUENTLY EVERY 15,000 KM OR 12 MONTHS EVERY 100,000 KMEVERY 45,000 KMEVERY 40,000 KMMORE FREQUENTLYA, B, C, D, E, F, G, H I, K C, EB, HD, E, F, GC, D, G, H C, D, G, H C, D, E, F C, D, E, F A, C, D, E, F, G, H, I, J A, C, E, F, G, H, I, JC, E DRIVING
CONDITION
MAINTENANCE INTERVALS
MAINTENANCE
OPERATION
MAINTENANCE ITEM
SEVERE DRIVING CONDITIONS
A - Repeatedly driving short distance of less than 8km(5miles) in normal temperature or less than 16km(10miles) in freezing temperature
B - Extensive engine idling or low speed driving for long distances
C - Driving on rough, dusty, muddy, unpaved, graveled or salt- spread roads
D - Driving in areas using salt or other corrosive materials or in very cold weather E - Driving in sandy areas
F - Driving in heavy traffic area over 32°C(90°F)G - Driving on uphill, downhill, or mountain roadH - Towing a Trailer, or using a camper, or roof rack
I - Driving as a patrol car, taxi, other commercial use or vehicle towing
J - Driving over 170 Km/h(100 MPH)K - Frequently driving in stop-and-go conditions
Page 181 of 235

5- 8 VEHICLE MAINTENANCE REQUIREMENTS
F060H01A-AAT
o Air Cleaner Filter A Genuine Hyundai air cleaner filter is
recommended when the filter is re- placed. F060J01A-AAT
o Spark Plugs Make sure to install new spark plugs of the correct heat range. F070C02A-AAT
o Coolant The coolant should be changed at the intervals specified in the mainte- nance schedule. F070D01A-AAT
o Manual Transaxle Oil
Inspect the manual transaxle oil ac-cording to the maintenance schedule.
NOTE: If the oil level is low, check forpossible leaks before adding oil. Do not overfill. F070E03A-AAT
o Automatic Transaxle Fluid
The fluid level should be in the "HOT" range of the dipstick, after the engine and transaxle are at normal operatingtemperature. Check the automatic transaxle fluid level with the engine running and the transaxle in neutral,with the parking brake properly ap- plied. Use HYUNDAI GENUINE ATF SP III, DIAMOND ATF SP III, SK ATFSP III or other brands approved by Hyundai Motor Co., when adding or changing fluid. F070F01A-AAT
o Brake Hoses and Lines
Visually check for proper installation,chafing, cracks, deterioration and any leakage. Replace any deteriorated or damaged parts immediately. F070G02A-AAT
o Brake Fluid
Check brake fluid level in the brake fluid reservoir. The level should be between "MIN" and "MAX" marks on the side of the reservoir. Use onlyhydraulic brake fluid conforming to DOT 3 or DOT 4.
F070H01A-AAT
o Rear Brake Drums/Linings,
Parking Brake
Check the rear brake drums and lin-
ings for scoring, burning, leaking fluid,broken parts, and excessive wear. Inspect the parking brake system in-cluding the parking brake lever and cables. For detailed service proce- dures, refer to the Shop Manual.
F070B01A-GAT
o Cooling System Check the cooling system part, such as radiator, coolant reservoir, hosesand connections for leakage and dam- age. Replace any damaged parts.
Page 187 of 235

DO-IT-YOURSELF MAINTENANCE 6- 5
G020A02A-AAT
GENERAL CHECKS Engine Compartment
The following should be checked regu- larly:
o Engine oil level and condition
o Transaxle fluid level and condition
o Brake fluid level
o Clutch fluid level
o Coolant level
o Windshield washer fluid level
o Accessory drive belt condition
o Coolant hose condition
o Fluid leaks (on or below compo- nents)
o Power steering fluid level and con- dition
o Battery condition
o Air filter condition G020C01A-AAT Vehicle Interior The following should be checked each time when the vehicle is driven:
o Lights operation
o Windshield wiper operation
o Horn operation
o Defroster, heater system operation
(and air conditioning, if installed)
o Steering operation and condition
o Mirror condition and operation
o Turn signal operation
o Accelerator pedal operation
o Brake operation, including parking
brake
o Manual transaxle operation, includ- ing clutch operation
o Automatic transaxle operation, in- cluding "Park" mechanism opera-tion
o Seat control condition and opera- tion
o Seat belt condition and operation
o Sunvisor operation If you notice anything that does not operate correctly or appears to befunctioning incorrectly, inspect it care- fully and seek assistance from your Hyundai dealer if service is needed.
G020B01A-AAT
Vehicle Exterior
The following should be checked
monthly:
o Overall appearance and condition
o Wheel condition and wheel nut torgue
o Exhaust system condition
o Light condition and operation
o Windshield glass condition
o Wiper blade condition
o Paint condition and body corrosion
o Fluid leaks
o Door and hood lock condition
o Tire pressure and condition (including spare tire)
Page 188 of 235
6- 6 DO-IT-YOURSELF MAINTENANCE
G030C02A-AAT
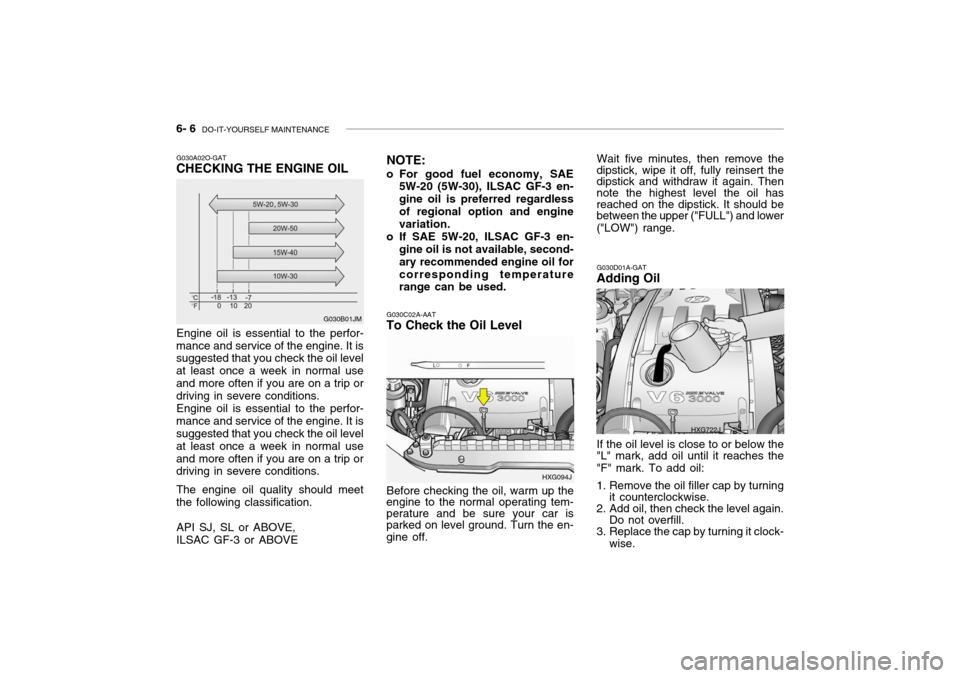
To Check the Oil Level
Before checking the oil, warm up the
engine to the normal operating tem- perature and be sure your car is parked on level ground. Turn the en- gine off. HXG094JG030D01A-GAT
Adding Oil
If the oil level is close to or below the
"L" mark, add oil until it reaches the"F" mark. To add oil:
1. Remove the oil filler cap by turning it counterclockwise.
2. Add oil, then check the level again. Do not overfill.
3. Replace the cap by turning it clock-
wise.
HXG722J
G030A02O-GAT CHECKING THE ENGINE OIL Engine oil is essential to the perfor-
mance and service of the engine. It is suggested that you check the oil level at least once a week in normal useand more often if you are on a trip or driving in severe conditions.
Engine oil is essential to the perfor-
mance and service of the engine. It issuggested that you check the oil level at least once a week in normal useand more often if you are on a trip or driving in severe conditions.
The engine oil quality should meet
the following classification.
API SJ, SL or ABOVE, ILSAC GF-3 or ABOVE G030B01JM
NOTE:
o For good fuel economy, SAE 5W-20 (5W-30), ILSAC GF-3 en-gine oil is preferred regardlessof regional option and engine variation.
o If SAE 5W-20, ILSAC GF-3 en- gine oil is not available, second- ary recommended engine oil forcorresponding temperature range can be used. Wait five minutes, then remove the
dipstick, wipe it off, fully reinsert the dipstick and withdraw it again. Then note the highest level the oil has reached on the dipstick. It should bebetween the upper ("FULL") and lower ("LOW") range.
Page 190 of 235
6- 8 DO-IT-YOURSELF MAINTENANCE
!
4. When the oil has stopped draining,
replace the drain plug using a new gasket and retighten by turning itclockwise. Oil pan drain plug tightening torque : 3.5 ~4.0 kgf.m
5. Remove the oil filter by turning it counterclockwise with a oil filter wrench of the proper size. A cer- tain amount of oil will come out when you remove the filter. So besure to have your drain pan in place underneath it.
6. Install a new oil filter in accordance with the instructions on the carton or on the filter itself. Do not over-tighten. Oil filter tightening torque : 1.2 ~ 1.6 kgf.m Be sure that the mounting surface on the engine is clean and that theold gasket is removed completely. Lubricate the new gasket on the filter with clean engine oil beforeinstallation. 7. Remove the engine oil level dip-
stick.
8. Refill the crankcase with the rec- ommended engine oil. Refer tothe specification in chapter 9 forengine oil capacity.
G050A01A-AAT
CHECKING AND CHANGING THE ENGINE COOLANT
WARNING:
Do not remove the radiator cap
when the engine is hot. When the engine is hot, the engine coolant is under pressure and may eruptthrough the opening if the cap is removed. You could be seriously burned if you do not observe thisprecaution. Do not remove the ra- diator cap until the radiator is cool to the touch.
!
!
WARNING:
Used motor oil may cause irrita- tion or cancer of the skin if left incontact with the skin for prolonged periods of time. Wash your hands thoroughly with soap and warmwater as soon as possible after handling used oil.
CAUTION
Slowly pour the recommended oil
using by a tunnel. Do not overfill not to damage engine.
9. Start the engine and check to be sure no oil is leaking from the drain plug or oil filter.
10.Shut off the engine and recheck
the oil level.
NOTE: Always dispose of used engine oil
in an environmentally acceptable manner. It is suggested that it be placed in a sealed container andtaken to a service station for recla- mation. Do not pour the oil on the ground or put it in with the house-hold trash.
Page 198 of 235
6- 16 DO-IT-YOURSELF MAINTENANCE
G120E02A-AAT
Adding Brake Fluid
WARNING:
Handle brake fluid carefully. It can
damage your vision if it gets into your eyes. Use only DOT 3 or DOT 4 specification fluid from a sealedcontainer. Do not allow the fluid can or reservoir to remain open any longer than required. This willprevent entry of dirt and moisture which can damage the brake sys- tem and cause improper opera- tion.G130A01A-AAT
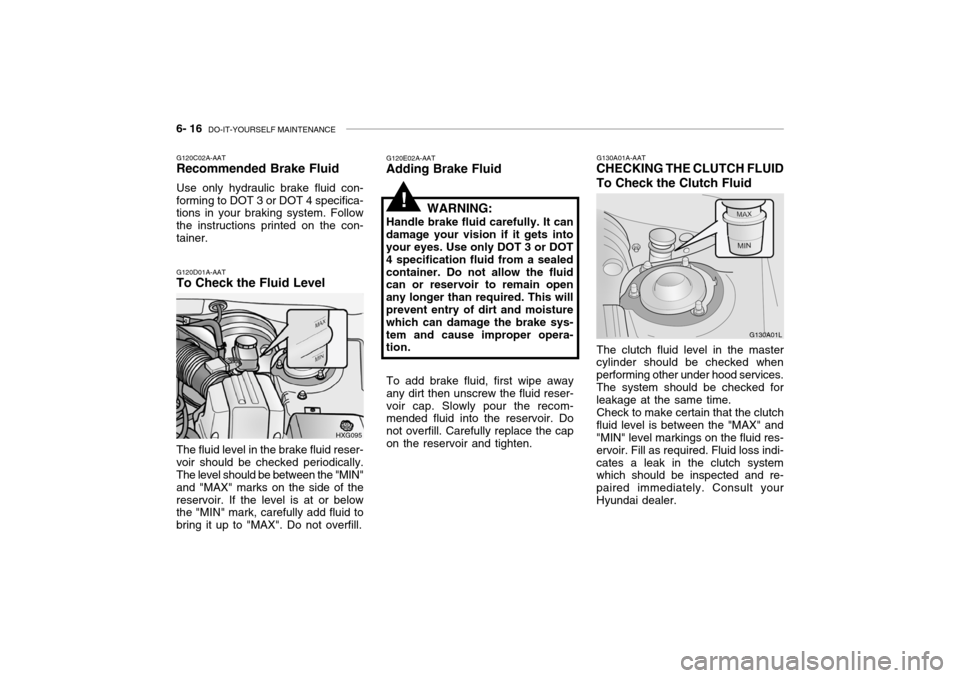
CHECKING THE CLUTCH FLUID To Check the Clutch Fluid
The clutch fluid level in the master
cylinder should be checked when performing other under hood services.The system should be checked for leakage at the same time.
Check to make certain that the clutch
fluid level is between the "MAX" and"MIN" level markings on the fluid res- ervoir. Fill as required. Fluid loss indi-cates a leak in the clutch system which should be inspected and re- paired immediately. Consult yourHyundai dealer. G130A01L
!
To add brake fluid, first wipe away any dirt then unscrew the fluid reser-voir cap. Slowly pour the recom- mended fluid into the reservoir. Do not overfill. Carefully replace the capon the reservoir and tighten.
G120C02A-AAT Recommended Brake Fluid Use only hydraulic brake fluid con- forming to DOT 3 or DOT 4 specifica- tions in your braking system. Follow the instructions printed on the con-tainer. G120D01A-AAT To Check the Fluid Level
HXG095
The fluid level in the brake fluid reser- voir should be checked periodically. The level should be between the "MIN" and "MAX" marks on the side of thereservoir. If the level is at or below the "MIN" mark, carefully add fluid to bring it up to "MAX". Do not overfill.
Page 233 of 235

10- 4 INDEX
H Hazard Warning Syst em ........................................... 1-54
Headlight Aiming Adjustment ....................................6-25
Headlight Leveling Device Syst em ...........................1-75
Heating and Ventilation ................................. 1-80 ~ 1-93
Air flow control ..................... 1-82 ~ 1-83, 1-91 ~ 1-92
Air intake control .................. 1-81 ~ 1-82, 1-90 ~ 1-91
Bi-level heating ....................................................... 1-84
Fan speed control ........................................ 1-81, 1-90Temperature control ............................................... 1-84
High-Mounted Rear Stop Light................................. 1-69
Hood Release ........................................................... 1-70
Horn .......................................................................... 1-74
IIgnition Sw itch ............................................................. 2-3
Illuminated Ignition Switch .......................................... 1-5
Immobilizer System ........................................... 1-4 ~ 1-5
Instrument Cluster and Indicator Lights ....... 1-41 ~ 1-46
Instrument Panel Light Control (Rheo stat)............... 1-57
Intergrated Memory System (I. M. S) .......... 1-16 ~ 1-17Interior Light Interior light ................................................ 1-62 ~ 1-63
Map light .................................................... 1-61 ~ 1-62
Personal light ......................................................... 1-63
Intermittent Wiper ..................................................... 1-53
J Jump Starting .................................................... 3-2 ~ 3-3 K
Key .................................................................... 1-3 ~ 1-4
If you lose your keys ............................................. 3-12
Positions ......................................................... 2-3 ~ 2-4
L Lubrication Chart ......................................................... 9-4
Luggage Net ............................................................. 1-72
MMaintenance Intervals Explanation of scheduled maintenance items
....................................................................... 5-7 ~ 5-9
Maintenance under severe usage conditions .......... 5-6Scheduled maintenance ................................. 5-4 ~ 5-5
Service requ irements............................................... 5-2
Mirrors Day-night inside rearview ....................................... 1-65
Outside rearview mirror heater .............................. 1-64
O
Odometer ...................................................... 1-48 ~ 1-49
Outside rearview mirror ............................................ 1-64
PParking Brake ........................................................... 1-66
Passenger Presence Detec tion .............................. 1-36
Power Outle t ............................................................. 1-71
Power Seat ............................................................... 1-14