2004 Hyundai Getz ECU
[x] Cancel search: ECUPage 284 of 445

1- 26 FEATURES OF YOUR HYUNDAI
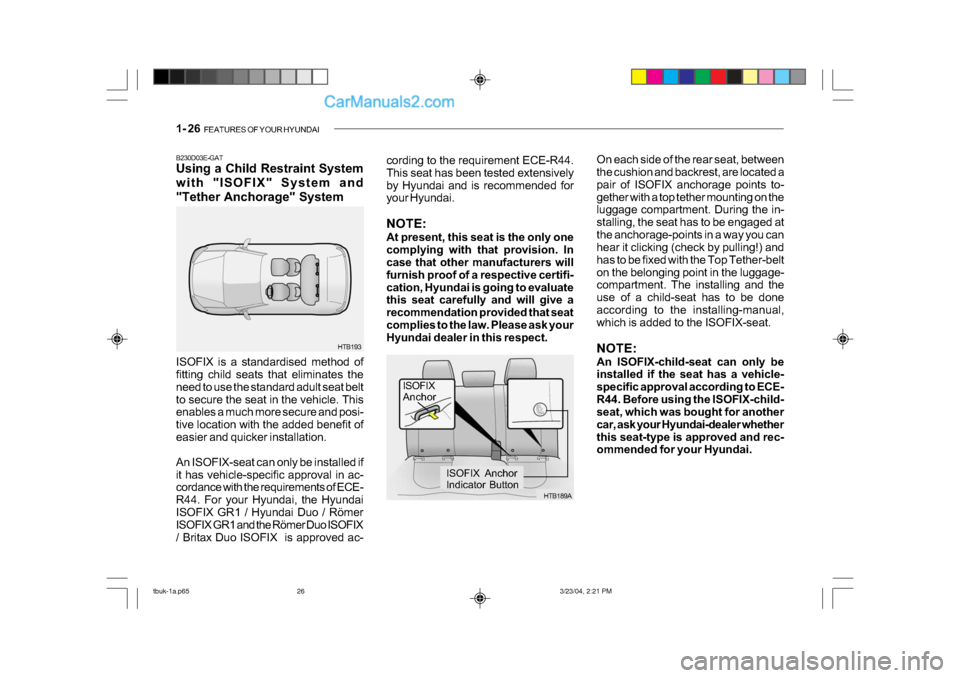
On each side of the rear seat, between
the cushion and backrest, are located a
pair of ISOFIX anchorage points to-
gether with a top tether mounting on the
luggage compartment. During the in-
stalling, the seat has to be engaged at
the anchorage-points in a way you can
hear it clicking (check by pulling!) and
has to be fixed with the Top Tether-belt
on the belonging point in the luggage-
compartment. The installing and the
use of a child-seat has to be done
according to the installing-manual,
which is added to the ISOFIX-seat.
NOTE:
An ISOFIX-child-seat can only be
installed if the seat has a vehicle-
specific approval according to ECE-
R44. Before using the ISOFIX-child-
seat, which was bought for another
car, ask your Hyundai-dealer whether
this seat-type is approved and rec-
ommended for your Hyundai.
cording to the requirement ECE-R44.
This seat has been tested extensively
by Hyundai and is recommended for
your Hyundai.
NOTE:
At present, this seat is the only one
complying with that provision. In
case that other manufacturers will
furnish proof of a respective certifi-
cation, Hyundai is going to evaluate
this seat carefully and will give a
recommendation provided that seat
complies to the law. Please ask your
Hyundai dealer in this respect.
HTB189A
ISOFIX
Anchor
ISOFIX Anchor
Indicator Button
B230D03E-GAT
Using a Child Restraint System
with "ISOFIX" System and
"Tether Anchorage" System
ISOFIX is a standardised method of
fitting child seats that eliminates the
need to use the standard adult seat belt
to secure the seat in the vehicle. This
enables a much more secure and posi-
tive location with the added benefit of
easier and quicker installation.
An ISOFIX-seat can only be installed if
it has vehicle-specific approval in ac-
cordance with the requirements of ECE-
R44. For your Hyundai, the Hyundai
ISOFIX GR1 / Hyundai Duo / R
Page 285 of 445

FEATURES OF YOUR HYUNDAI 1- 27
!
B230H01TB-GAT
Child Seat Restraint Suitability
For Seat Position
Use child safety seats that have been
officially approved and are appropriate
for your children. When using the child
safety seats, refer to the following table.
Rear
Centre
Age Group Seating Position
UX
X UX
Rear
Outboard
Front
Passenger
0 : Up to 10 kg
(0 ~ 9 months)
0+ : Up to 13 kg
(0 ~ 2 years)
I : 9kg to 18kg
(9 months ~ 4
years)
II & III : 15kg to
36kg (4 ~ 12
years) X
XU
, L 1X
XU FX
WARNING:
o Do not install a child restraint seat at the center of the rear seat using
the vehicle's ISOFIX anchors. The
ISOFIX anchors are only provided
for the left and right outboard rear
seating positions. Do not misuse
the ISOFIX anchors by attempting
to attach a child restraint seat in
the middle of the rear seat to the
ISOFIX anchors. In a crash, the
child restraint seat ISOFIX attach-
ments may not be strong enough
to secure the child restraint seat
properly in the center of the rear
seat and may break, causing seri-
ous injury or death.
o Do not mount more than one child restraint to a child restraint lower
anchorage point. The improper
increased load may cause the an-
chorage points or tether anchor to
break, causing serious injury or
death.
o Attach the ISOFIX or ISOFIX-com-
patible child restraint seat only to
the appropriate locations shown
in the illustration.
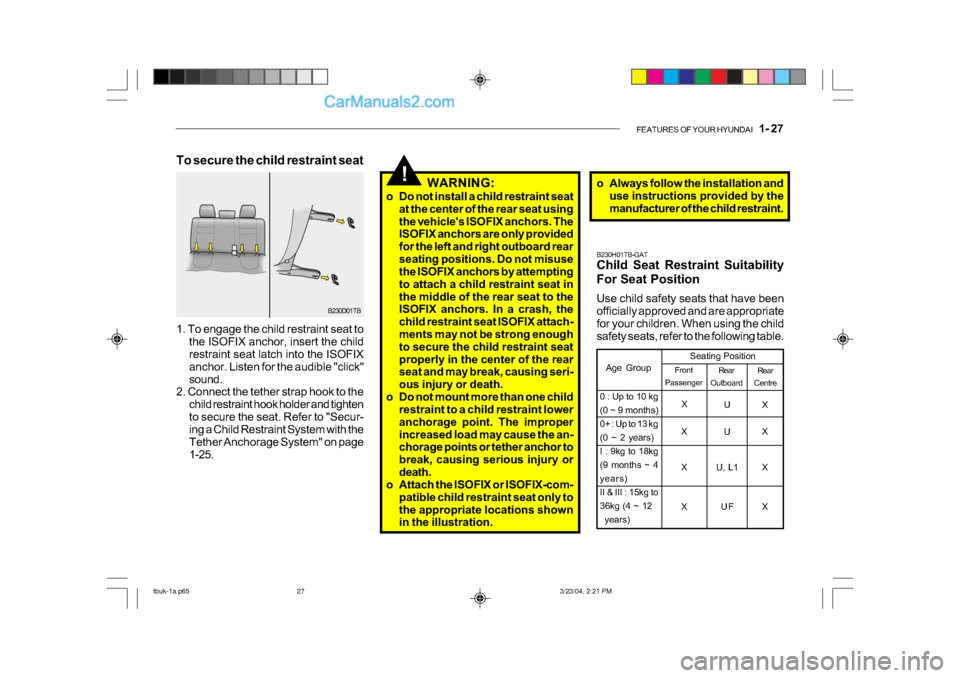
B230D01TB
1. To engage the child restraint seat to the ISOFIX anchor, insert the child
restraint seat latch into the ISOFIX
anchor. Listen for the audible "click"
sound.
2. Connect the tether strap hook to the
child restraint hook holder and tighten
to secure the seat. Refer to "Secur-
ing a Child Restraint System with the
Tether Anchorage System" on page
1-25.
To secure the child restraint seat
o Always follow the installation and
use instructions provided by the
manufacturer of the child restraint.
tbuk-1a.p65 3/23/04, 2:21 PM
27
Page 327 of 445

FEATURES OF YOUR HYUNDAI 1- 69
!
!
SB520A1-F
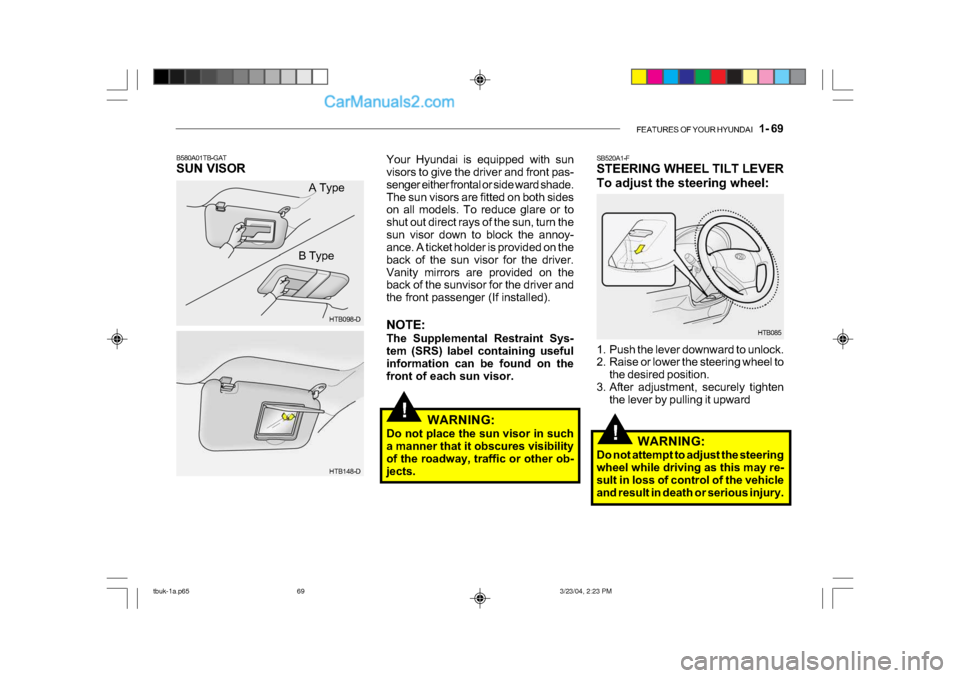
STEERING WHEEL TILT LEVER
To adjust the steering wheel:
1. Push the lever downward to unlock.
2. Raise or lower the steering wheel to
the desired position.
3. After adjustment, securely tighten the lever by pulling it upward
WARNING:
Do not attempt to adjust the steering
wheel while driving as this may re-
sult in loss of control of the vehicle
and result in death or serious injury.
Your Hyundai is equipped with sun
visors to give the driver and front pas-
senger either frontal or side ward shade.
The sun visors are fitted on both sides
on all models. To reduce glare or to
shut out direct rays of the sun, turn the
sun visor down to block the annoy-
ance. A ticket holder is provided on the
back of the sun visor for the driver.
Vanity mirrors are provided on the
back of the sunvisor for the driver and
the front passenger (If installed).
NOTE:
The Supplemental Restraint Sys-
tem (SRS) label containing useful
information can be found on the
front of each sun visor.
WARNING:
Do not place the sun visor in such
a manner that it obscures visibility
of the roadway, traffic or other ob-
jects.
HTB098-D
B580A01TB-GAT
SUN VISOR
HTB148-D
A Type
B Type
HTB085
tbuk-1a.p653/23/04, 2:23 PM
69
Page 362 of 445

DRIVING YOUR HYUNDAI 2- 19
Coupling point
Nose
weight
97
(44)
Without Brake Type Trailer
1,543 (700)
2,204 (1,000) 2,425 (1,100) 2,425(1,100)
1,984 (900)
2,425 (1,100)
992(450)
MANUAL
TRANSAXLE
AUTO
TRANSAXLE
1.1L 1.3L 1.6L
Diesel 1.3L 1.6L
With
Brake Type Lbs (kg.)
Maximum Towable
Weight
Type
NOTE:
o The total gross vehicle weight with trailer must not exceed the Gross Vehicle Weight Rating(GVWR) shown on the vehicleidentification plate (see page 8- 2). The total gross vehicle weight is the combined weight of thevehicle, driver, all passengersand their luggage, cargo, towbarhitch, trailer nose weight andother optional equipment. o The front or rear axle weight must
not exceed the Gross Axle Weight Rating (GAWR) shown on the ve- hicle identification plate (seepage 8-2). it is possible that yourtowing package does not exceedthe GVWR but exceeds theGAWR. Improper trailer loading and/or too much luggage in the trunk can overload the rear axle.Redistribute the load and checkthe axle weight again.
o The maximum permissible static vertical load on the coupling de- vice : 44kg
o The maximum permissible over-
hang of the coupling point : 690 mm. YC200E3-E Trailer or Vehicle Towing Tips
1. Before towing, check towbar hitch
and safety cable connections as well as proper operation of the trailerrunning lights, brake lights, and turnsignals.
2. Always drive your vehicle at a mod-
erate speed (Less than 60 mph(max.))
3. Trailer towing requires more fuel than normal conditions.
4. To maintain engine braking effi- ciency and electrical charging per-formance, do not use fifth gear(manual transaxle) or overdrive (au-tomatic transaxle).
5. Always secure items in the trailer to
prevent load shift while driving.
6. Check the condition and air pres-
sure of all tyres on the trailer andyour car. Low tyre pressure canseriously affect the handling. Alsocheck the spare tyre.
7. The vehicle/trailer combination is more affected by crosswind andbuffeting.
HTB312
tbuk-2.p65 3/23/04, 4:55 PM
19
Page 363 of 445

2- 20 DRIVING YOUR HYUNDAI
When being passed by a large ve- hicle, keep a constant speed andsteer straight ahead. If there is toomuch wind buffeting slow down toget out of the other vehicle's air turbulence.
8. When parking your car and trailer, especially on a hill, be sure to follow all the normal precautions. Turn yourfront wheel into the curb, set theparking brake firmly, and put the transaxle in 1st or Reverse (manual) or Park (automatic). In addition,place wheel chocks at each of thetrailer's tyres.
9. If the trailer has electric brakes,
start your vehicle and trailer mov- ing, and then apply the trailer brake controller by hand to be sure thebrakes are working. This lets youcheck your electrical connection atthe same time.
10. During your trip, check occasion- ally to be sure that the load issecure, and that the lights andany trailer brakes are still working.
11. Avoid jerky starts, sudden accel- eration or sudden stops.
12. Avoid sharp turns and rapid lane changes. 13. Avoid holding the brake pedal
down too long or too frequently.This could cause the brakes tooverheat, resulting in reduced brak-ing efficiency.
14. When going down a hill, shift into
a lower gear and use the enginebraking effect.When ascending a long grade,
downshift the transaxle to a lowergear and reduce speed to reduce chances of engine overloading and/ or overheating.
15. If you have to stop while going
uphill, do not hold the vehicle inplace by pressing on the accelera-tor. This can cause the automatic transaxle to overheat. Use the park- ing brake or footbrake.
NOTE: When towing check transaxle fluid more frequently. CAUTION:
If overheating should occur whentowing, (temperature gauge reads near red zone), taking the following action may reduce or eliminate theproblem.
1. Turn off the air conditioner.
2. Reduce highway speed.
3. Select a lower gear when going uphill.
4. While in stop and go traffic, place the gear selection in park or neu- tral and idle the engine at a higherspeed.
!
tbuk-2.p65 3/23/04, 4:55 PM
20
Page 367 of 445

3- 4 WHAT TO DO IN AN EMERGENCY
!
!
D030A01TB-EAT
IF THE ENGINE OVERHEATS
If the temperature gauge indicates
overheating:
1. Pull off the road and stop as soon as
it is safe to do so.
2. Place the gear selector lever in "P" (automatic), or neutral (manual
transaxle) and set the parking brake.
If the air conditioning is on, turn it off.
3. If coolant is running out under the car
or steam is coming out from under
the bonnet stop the engine. Do not
open the bonnet until the coolant has
stopped running or the steaming has
stopped. If there is no visible loss of
coolant and no steam, leave the
engine running and check to be sure
the engine cooling fan is operating.
If the fan is not running, turn the
engine off.
4. Check to see if the water pump drive belt is missing. If it is not missing,
check to see that it is tight. If the
drive belt seems to be satisfactory,
check for coolant leaking from the
radiator, hoses or under the car. (If
the air conditioning had been in use,
it is normal for cold water to be
draining from it). WARNING:
Whilst the engine is running, keep
hands and clothing away from mov-
ing parts such as the fan and drive
belts to prevent injury.
7. Switch ON the main beam
headlamps before carefully remov-
ing the jumper cables in the reverse
order of attachment. Once the
jumper cables have been removed,
switch "OFF" the main beam
headlamps.
CAUTION:
If the jump cable is incorrectly in-
stalled, damage to the vehicle elec-
trical system may occur, in particu-
lar the electronic components such
as the Fuel Injection system com-
puter and the Automatic transaxle
computer. The battery must never
be disconnected whilst the engine
is running.
!
WARNING (Diesel only):
Never work on injection system with
engine running or within 30 sec-
onds after shutting off engine. High
pressure pump, rail, injectors and
high pressure pipes are subject to
high pressure even after the engine
stopped. The fuel jet produced by
fuel leaks may cause serious in-
jury, if it touch the body. People
using pacemakers should not move
than 30cm closer to the ECU or
wiring harness within the engine
room while engine is running, since
the high currents in the Common
Rail system produce considerable
magnetic fields.
tbuk-3.p65 3/23/04, 4:24 PM
4
Page 373 of 445

3- 10 WHAT TO DO IN AN EMERGENCY
!
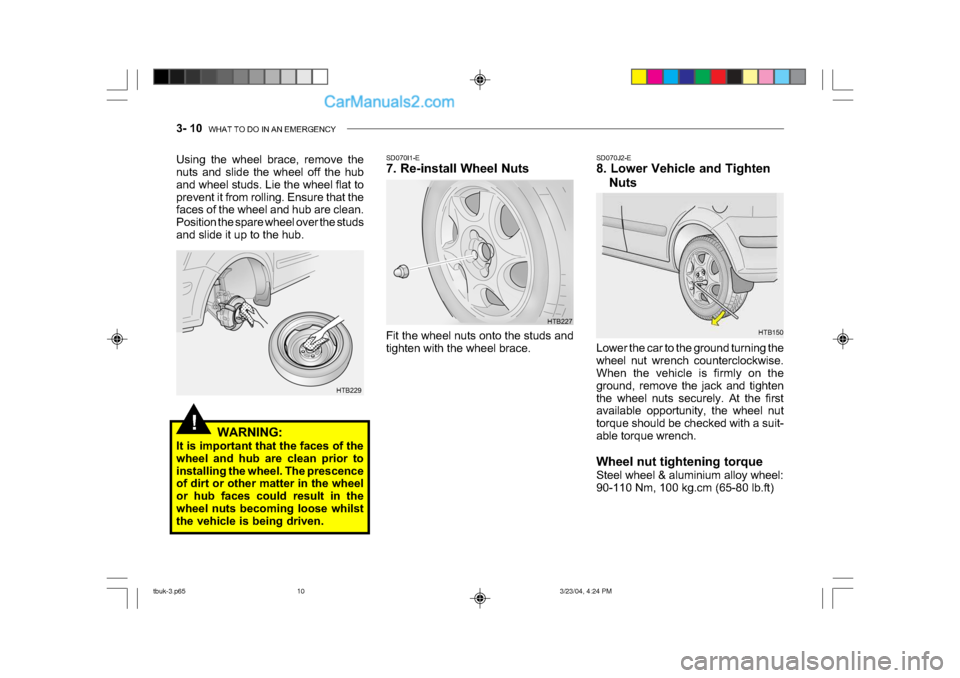
HTB150
SD070J2-E
8. Lower Vehicle and Tighten
Nuts
Lower the car to the ground turning the
wheel nut wrench counterclockwise.
When the vehicle is firmly on the
ground, remove the jack and tighten
the wheel nuts securely. At the first
available opportunity, the wheel nut
torque should be checked with a suit-
able torque wrench.
Wheel nut tightening torque
Steel wheel & aluminium alloy wheel:
90-110 Nm, 100 kg.cm (65-80 lb.ft)
SD070I1-E
7. Re-install Wheel NutsFit the wheel nuts onto the studs and
tighten with the wheel brace.
HTB227
Using the wheel brace, remove the
nuts and slide the wheel off the hub
and wheel studs. Lie the wheel flat to
prevent it from rolling. Ensure that the
faces of the wheel and hub are clean.
Position the spare wheel over the studs
and slide it up to the hub.
HTB229
WARNING:
It is important that the faces of the
wheel and hub are clean prior to
installing the wheel. The prescence
of dirt or other matter in the wheel
or hub faces could result in the
wheel nuts becoming loose whilst
the vehicle is being driven.
tbuk-3.p65 3/23/04, 4:24 PM
10
Page 388 of 445

VEHICLE MAINTENANCE REQUIREMENTS 5- 7
!
6ZF060A1-A
EXPLANATION OF SCHEDULED MAINTENANCE ITEMS
6ZF060M1-A
o Engine oil and filter
The engine oil and filter should be changed at the intervals specified inthe maintenance schedule. If the car is being driven in severe conditions, more frequent oil and filter changesare required. 6ZF060B1-A
o Drive belts
Inspect all drive belts for evidence of cuts, cracks, excessive wear or oilsaturation and replace if necessary. Drive belts should be checked peri- odically for proper tension and ad-justed as necessary. 6ZF060C1-A
o Fuel filter
A clogged filter can limit the speed at
which the vehicle may be driven, dam- age the emission system and cause hard starting. If an excessive amountof foreign matter accumulates in the fuel tank, the filter may require re- placement more frequently.
After installing a new filter, run the
engine for several minutes, and checkfor leaks at the connections.
F060D01TB-EAT
o Fuel lines, fuel hoses and con- nections
Check the fuel lines, fuel hoses and
connections for leakage and damage. Replace any damaged or leaking parts immediately.
6ZF060E1-A o Timing belt Replace timimg belt and inspect all associated parts related for damage and deformation. Replace any dam-aged parts immediately.WARNING (Diesel only):
Never work on injection system with engine running or within 30 seconds after shutting off engine.High pressure pump, rail, injectors and high pressure pipes are sub- jected to high pressure even afterthe engine has been switched off. The fuel jet produced by fuel leaks may cause serious injury, if it con-tacts with the body. People using pacemakers should not move closer than 30cm to the ECU orwiring harness within the engine room with the engine running, since the high currents in the CommonRail system produce considerable magnetic fields.
tbuk-5.p65 7/3/2008, 4:10 PM
7