Page 94 of 296
�µ
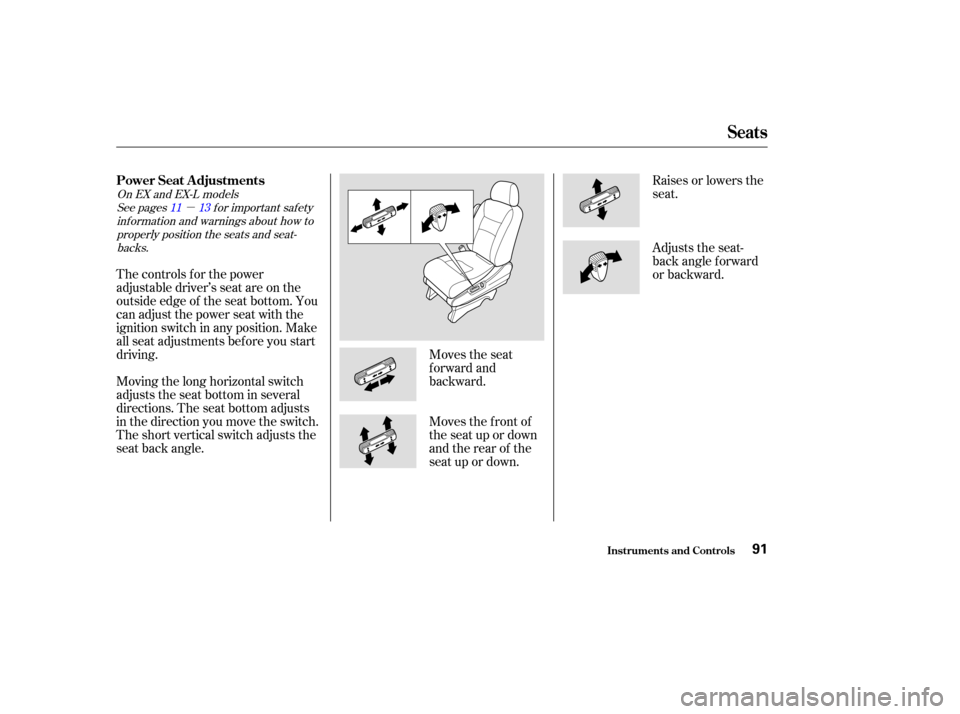
Moves the seat
forward and
backward.Raises or lowers the
seat.
The controls f or the power
adjustable driver’s seat are on the
outside edge of the seat bottom. You
can adjust the power seat with the
ignition switch in any position. Make
all seat adjustments bef ore you start
driving.
Moving the long horizontal switch
adjusts the seat bottom in several
directions. The seat bottom adjusts
in the direction you move the switch.
The short vertical switch adjusts the
seat back angle. Moves the f ront of
the seat up or down
and the rear of the
seat up or down.Adjusts the seat-
back angle f orward
or backward.
See pages f or important saf ety
inf ormation and warnings about how toproperly position the seats and seat-backs.
On EX and EX-L models
11 13
Seats
Inst rument s and Cont rols
Power Seat A djustments
91
Page 95 of 296
See page f or important saf etyinf ormation and a warning about how toproperly position the head restraints. 13
On EX and EX-L models
Your vehicle is equipped with head
restraints in all seating positions to
help protect you and your
passengers f rom whiplash and other
injuries.
An armrest is located on each of the
frontseatsandoneachsideof the
second row seats. Pivot it down to
use it. When you remove the bucket
seats in the second row, pivot the
armrests up out of the way.
To change the lumbar support, move
the lever on the right side of the
seat-back forward or backward.
Keep moving the lever f orward or
backward until you f ind a suitable
position. They are most ef f ective when you
adjust them so the back of the
occupant’s head rests against the
center of the restraint.
Seats
Inst rument s and Cont rols
Head Restraints
Armrests
Driver’s L umbar Support
92
Page 124 of 296

�Û�Ý �µ
Select . The system
automatically switches to Fresh
Air mode and turns on the A/C.
Select .
Set the f an and temperature
controls to maximum level.
To clear the windows f aster, you can
close the dashboard corner vents by
rotating the wheel next it. This will
send more warm air to the
windshield def roster vents. Once the
windshield is clear, select the Fresh
Air mode to avoid f ogging the
windows.
For your saf ety, make sure you have
a clear view through all the windows
bef ore driving. The Automatic Climate Control
system can adjust the f an speed and
airflow levels to maintain the interior
temperature you select.
Press the Auto button. With
Navigation System, the light in the
button comes on.
Set the desired temperature by
turning the Temperature Control
dial. You will see FULL AUTO in
the system’s display.
Set the desired temperature by
pressing to raise the
temperature or to lower the
temperature. The selected
temperature will show in the
temperature display on the control
panel. The system automatically selects the
proper mix of conditioned and/or
heated air to raise or lower the
interior temperature to the
temperature you selected.
If you set the temperature to its
lower limit or its highest limit, the
system runs at f ull cooling or heating
only. It does not regulate the interior
temperature.
In cold weather, the f an will not
come on automatically until the
heater starts to develop warm air.
When the
system is in FULL AUTO, the rear
A/C passenger control dials cannot
be used. Turning the rear A/C
controldialonthefrontpanel
disables the FULL AUTO f unction.
1.
2.
1.
2.
3.
Without Navigation System
With Navigation System
EX and EX-L models
Vents, Heating, and A/C
Comf ort and Convenience Feat ures
T o Remove Exterior Frost or Ice
From the Windows
Using A utomatic Climate Control
Rear A /C Cont rol
121
Page 147 of 296

Your vehicle’s audio system will
disable itself if it is disconnected
f rom electrical power f or any reason.
To make it work again, you must
enter a specif ic f ive-digit code with
the preset buttons. Because there
are hundreds of number
combinations possible f rom the f ive
digits, making the system work
without knowing the exact code is
nearly impossible.
Youshouldhavereceivedacardthat
lists your audio system code number
and serial number. It is best to store
this card in a saf e place at home. In
addition, you should write the audio
system’s serial number in this
Owner’s Manual.
If youshouldhappentolosethecard,
you must obtain the code number
f rom a Honda dealer. To do this, you
will need the system’s serial number.If your vehicle’s battery is discon-
nected or goes dead, or the radio
f use is removed, the audio system
will disable itself . If this happens,
youwillsee‘‘ ’’inthe
frequencydisplaythenexttimeyou
turn on the system. Use the preset
buttons to enter the five-digit code.
The code is located on the radio code
card included in your Owner’s
Manual kit. When it is entered
correctly, the radio will start playing.
If you make a mistake entering the
code, do not start over; complete the
f ive-digit sequence, then enter the
correct code. You have ten tries to
enter the correct code. If you are
unsuccessful in ten attempts, you
must then leave the system on for 1
hour bef ore trying again.
You will have to store your favorite
stations in the preset buttons after
the system begins working. Your
original settings were lost when the
power was disconnected.
On EX and EX-L models
Radio T hef t Prot ect ion
Comf ort and Convenience Feat ures144
Page 166 of 296

�µ
The HomeLinkUniversal
Transceiver built into your vehicle
canbeprogrammedtooperateupto
three remote controlled devices
around your home, such as garage
doors, lighting, or home security
systems.
If you are training HomeLink to
operate a garage door or gate, you
should unplug the motor f or that
device during training. Repeatedly
pressing the remote control button
could burn out the motor.
The HomeLink transceiver stores
the code in a permanent memory.
There should be no need to retrain
the transmitter if your vehicle’s
battery goes dead or is disconnected.
If your garage door opener was
manuf actured bef ore April 1982, you
may not be able to program
HomeLink to operate it. They do not have the safety feature that causes
the motor to stop and reverse if an
obstacle is detected during closing,
increasing the risk of injury.
HomeLink
is a registered
trademark of Johnson Controls . If you just
received your vehicle and have not
trained any of the buttons in
HomeLink bef ore, you should erase
any previously learned codes bef ore
training the first button.
Todothis,pressandholdthetwo
outside buttons on the HomeLink
transceiver for about 20 seconds, or
until the red light f lashes. Release
the buttons, then proceed to Step 1.
If you are training the second or
third buttons, go directly to Step 1.
Always ref er to the opening
instructions and saf ety inf ormation
that came with your garage door
opener or other equipment you
intend to operate with the HomeLink
Universal Transceiver. If you do not
have this inf ormation, you should
contact the manuf acturer of the
equipment.
CONT INUED
On EX and EX-L models
HomeL ink Universal T ransceiver
Comf ort and Convenience Feat ures
General Inf ormation T raining HomeL ink
Important Saf ety Precautions
Bef ore you begin
163
TM
Page 177 of 296

Modif ying your vehicle, or installing
some non-Honda accessories, can
make your vehicle unsaf e. Bef ore
you make any modif ications or add
anyaccessories,besuretoreadthe
f ollowing inf ormation.
Your dealer has Honda accessories
that allow you to personalize your
vehicle. These accessories have
been designed and approved f or your
vehicle, and are covered by warranty.
Although aftermarket accessories
may f it on your vehicle, they may not
meet f actory specif ications, and
could adversely af f ect your vehicle’s
handling and stability. (See
‘‘Modif ications’’ on page f or
additional information.)When properly installed, cellular
phones, alarms, two-way radios, and
low-powered audio systems should
not interf ere with your vehicle’s
computer controlled systems, such
as the SRS and anti-lock brake
system.Bef ore installing any accessory:
Make sure the accessory does not
obscure any lights, or interf ere
with proper vehicle operation or
perf ormance.
Be sure electronic accessories do
not overload electrical circuits
(see page ) or interf ere with
proper operation.
Have the installer contact your
Honda dealer f or assistance bef ore
installing any electronic accessory. 257
175
A ccessories
A ccessories
Bef ore Driving174
Improper accessories or
modifications can affect your
vehicle’s handling, stability, and
performance, and cause a
crash in which you can be hurt
or killed.
Follow all instructions in this
owner’s manual regarding
accessories and modifications.
Page 178 of 296
 components
could seriously af f ect your vehicle’s
handling, stability, and reliability.
Some examples are:L")
Removing parts f rom your vehicle,
or replacing components with non-
Honda (af termarket) components
could seriously af f ect your vehicle’s
handling, stability, and reliability.
Some examples are:Lowering the vehicle with an
aftermarket suspension kit that
signif icantly reduces ground
clearance can allow the
undercarriage to hit speed bumps
or other raised objects, which
could cause the airbags to deploy.
Raising your vehicle with an
af termarket suspension kit can
af f ect the handling and stability.
Af termarket wheels, because they
are a universal design, can cause
excessive stress on suspension
components. Larger or smaller wheels and tires
can interf ere with the operation of
your vehicle’s anti-lock brakes and
other systems.
Do not modif y your steering wheel
or any other part of your
Supplemental Restraint System.
Modif ications could make the
system inef f ective. See the saf ety
precautions on page .
If you plan to modif y your vehicle,
consult with your Honda dealer. Any object
attached to or placed on the covers
marked ‘‘SRS AIRBAG’’ in the
center of the steering wheel and
on top of the dashboard, could
interf ere with the proper operation
of the airbags. Or, if the airbags
inf late, the objects could be
propelled inside the vehicle and
hurt someone.
If a side airbag
inflates,acupholderorotherhard
object attached on or near the
door could be propelled inside the
vehicle and hurt someone.
This could prevent the
airbag from inflating properly.
34
Modif ications
Bef ore Driving
Modif ying Your Vehicle
Additional Saf ety Precautions
Do not at t ach or place object s on
the f ront airbag covers.
Do not at t ach hard object s on ornear a f ront door.
Do not place any object s over orreplacetheoutsideedgeof afrontseat -back.
175
Page 179 of 296
�Î
�Î �Î
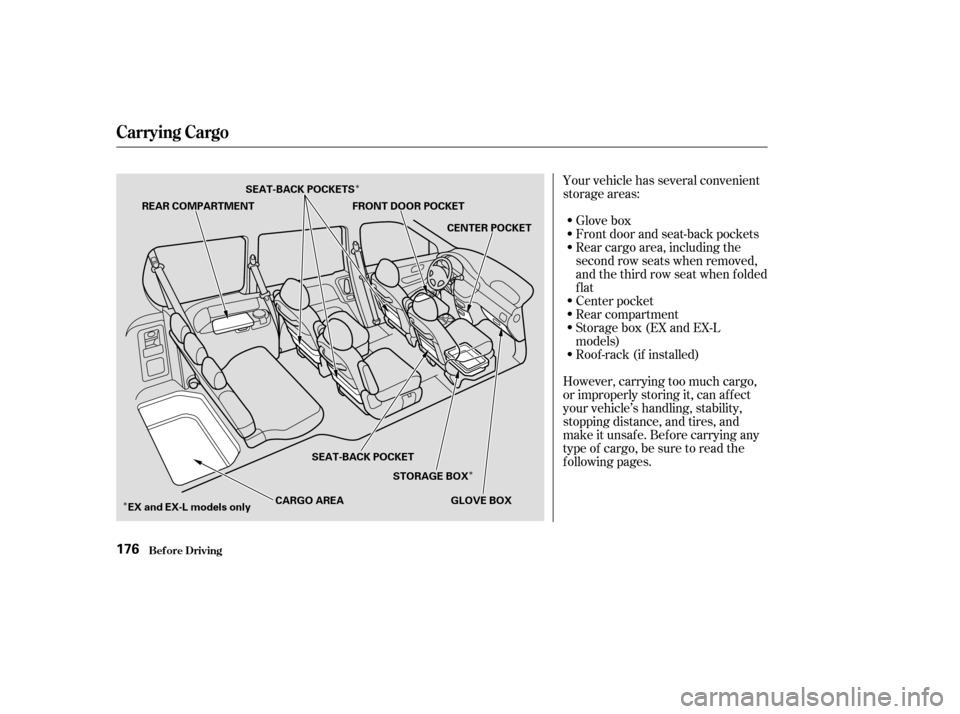
Your vehicle has several convenient
storage areas:
Glove box
Front door and seat-back pockets
Rear cargo area, including the
second row seats when removed,
andthethirdrowseatwhenfolded
flat
Center pocket
Rear compartment
Storage box (EX and EX-L
models)
Roof -rack (if installed)
However, carrying too much cargo,
or improperly storing it, can af f ect
your vehicle’s handling, stability,
stopping distance, and tires, and
make it unsaf e. Bef ore carrying any
type of cargo, be sure to read the
f ollowing pages.
Carrying Cargo
Bef ore Driving176
REAR COMPARTMENT FRONT DOOR POCKET
CENTER POCKET
GLOVE BOX
STORAGE BOX
SEAT-BACK POCKET
EX and EX-L models only CARGO AREA
SEAT-BACK POCKETS