Page 250 of 296
:You hear nothing, or almost
nothing. The engine’s starter
m")
CONT INUED
Diagnosing why your engine won’t
start f alls into two areas, depending
on what you hear when you turn the
key to START (III):You hear nothing, or almost
nothing. The engine’s starter
motor does not operate at all, or
operates very slowly.
You can hear the starter motor
operating normally, or the starter
motor sounds like it is spinning
f aster than normal, but the engine
does not start up and run.
When you turn the ignition switch to
START (III), you do not hear the
normal noise of the engine trying to
start. You may hear a clicking sound
or series of clicks, or nothing at all.
Check these things: Check the transmission interlock.
The transmission must be in Park
orNeutralorthestarterwillnot
operate.
Turn the ignition switch to ON (II).
Turn on the headlights and check
their brightness. If the headlights
are very dim or don’t light at all,
the battery is discharged. See
on page .
Turn the ignition switch to START
(III). If the headlights do not dim,
check the condition of the f uses. If
thefusesareOK,thereis
probably something wrong with
the electrical circuit f or the
ignition switch or starter motor.
You will need a qualif ied
technician to determine the
problem (see
on page ). If the headlights dim noticeably or
go out when you try to start the
engine, either the battery is
discharged or the connections are
corroded. Check the condition of the
battery and terminal connections
(see page ). You can then try
jump starting the vehicle from a
booster battery (see page ).
In this case, the starter motor’s
speed sounds normal, or even f aster
than normal, when you turn the
ignition switch to START (III), but
the engine does not run.
Are you using the proper starting
procedure? Ref er to on page .
255 248
235
248
183
If theEngineWon’tStart
T aking Care of t he Unexpect ed
Nothing Happens or the Starter
Motor Operates Very Slowly Jump Starting
Emergency T owing T he Starter Operates Normally
Starting the
Engine
247
Page 251 of 296
.
Do you have f uel? Check the f uel")
�´�´
Are you using a properly coded
key? An improperly coded key will
cause the immobilizer system
indicator in the instrument panel
to blink rapidly (see page ).
Do you have f uel? Check the f uel
gauge; the low f uel indicator may
not be working.
There may be an electrical
problem, such as no power to the
f uel pump. Check all the f uses
(see page ).
If youfindnothingwrong,youwill
need a qualif ied technician to f ind
the problem. See on page . Although this seems like a simple
procedure, you should take several
precautions.
You cannot start a Honda by pushing
or pulling it.
Connect one jumper cable to the
positive ( ) terminal on your
Honda’s battery. Connect the
other end to the positive ( )
terminal on the booster battery. Put the transmission in Neutral or
Park, and set the parking brake. Turn of f all the electrical acces-
sories: heater, A/C, climate
control, audio system, lights, etc. Open the hood and check the
physical condition of the battery.
In very cold weather, check the
condition of the electrolyte. If it
seems slushy or like ice, do not try
jump starting until it thaws.
1.
2.
3.
76
257 255Emergency
Towing Jump Starting
If the Engine Won’t Start, Jump Starting
T aking Care of t he Unexpect ed
To Jump Start Your Vehicle:
248
NOTICE:
A battery can explode if you do
not follow the correct procedure,
seriously injuring anyone
nearby.
Keep all sparks, open flames,
and smoking materials away
from the battery. If a battery sits in extreme
cold, the electrolyte inside can f reeze.
Attempting to jump start with a f rozen
battery can cause it to rupture.
Page 252 of 296
�µ
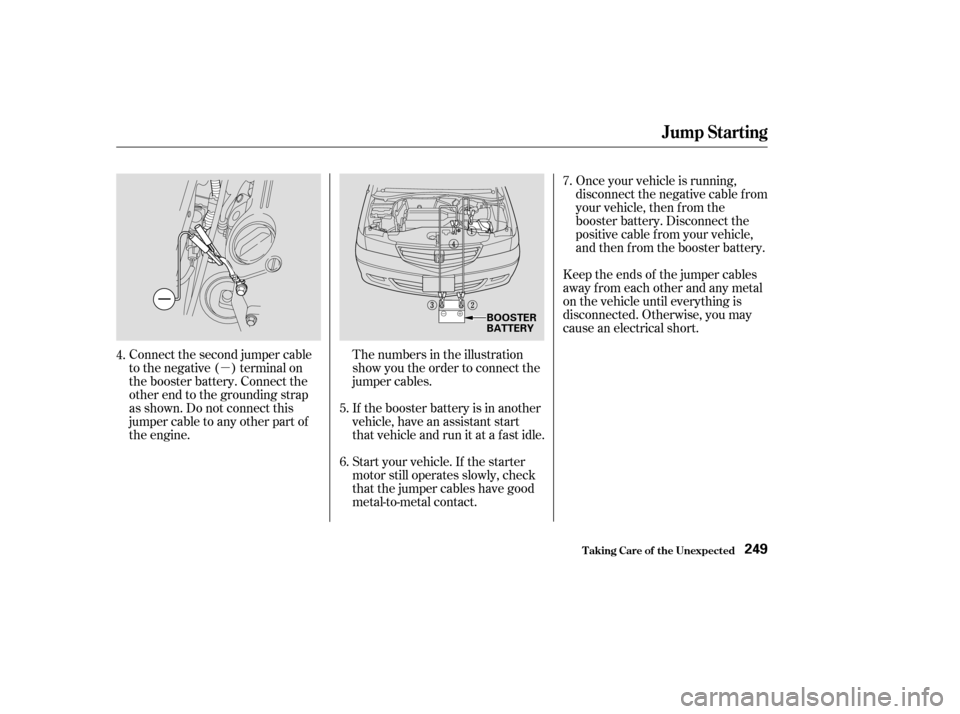
Connect the second jumper cable
to the negative ( ) terminal on
the booster battery. Connect the
other end to the grounding strap
as shown. Do not connect this
jumper cable to any other part of
the engine.The numbers in the illustration
show you the order to connect the
jumper cables.
If the booster battery is in another
vehicle, have an assistant start
that vehicle and run it at a fast idle.
Start your vehicle. If the starter
motor still operates slowly, check
that the jumper cables have good
metal-to-metal contact.Once your vehicle is running,
disconnect the negative cable f rom
your vehicle, then f rom the
booster battery. Disconnect the
positive cable f rom your vehicle,
and then from the booster battery.
Keep the ends of the jumper cables
away from each other and any metal
on the vehicle until everything is
disconnected. Otherwise, you may
cause an electrical short.
4.
6.7.
5.
Jump Starting
T aking Care of t he Unexpect ed249
BOOSTER
BATTERY
Page 255 of 296

This indicator should never
come on when the engine is
running. If it starts f lashing or stays
on, the oil pressure has dropped very
low or lost pressure. Serious engine
damage is possible and you should
take immediate action. Saf ely pull of f the road, and shut
of f the engine. Turn on the hazard
warning indicators.
Let the vehicle sit f or a minute.
Open the hood, and check the oil
level (see page ). An engine
very low on oil can lose pressure
during cornering and other driving
maneuvers.
If necessary, add oil to bring the
level back to the full mark on the
dipstick (see page ).
Start the engine, and watch the oil
pressure indicator. If it does not go
out within 10 seconds, turn of f the
engine. There is a mechanical
problem that needs to be repaired
bef ore you can continue driving.
(See
on page
). Immediately turn of f all electrical
accessories. Try not to use other
electrically operated controls such as
the power windows. Keep the engine
running; starting the engine will
discharge the battery rapidly.
Go to a Honda dealer or a service
station where you can get technical
assistance.
If the charging system
indicator comes on brightly
when the engine is running, the
battery is not being charged.
1.
2.
3.
4.
211
171
255
L ow Oil Pressure Indicator, Charging System Indicator
L ow Oil Pressure Indicator
Emergency T owingCharging System Indicator
T aking Care of t he Unexpect ed252
NOTICE:
Running the engine with low
oil pressure can cause serious
mechanical damage almost immediately.
Turn of f the engine as soon as you can
saf ely get the vehicle stopped.
Page 256 of 296

If this indicator comes on
while driving, it means one
of the engine’s emissions control
systems may have a problem. Even
though you may f eel no dif f erence in
your vehicle’s perf ormance,
continued operation may cause
serious damage.
If you have recently ref ueled your
vehicle, the indicator could come on
because of a loose or missing f uel f ill
cap. Tighten the cap until it clicks at
least three times. Tightening the cap
will not turn the indicator turn of f
immediately; it takes at least three
days of normal driving.
If the indicator remains on, or the
f uel cap was not loose or missing,
have your vehicle checked by the
dealer as soon as possible. This indicator may also come on
along with the ‘‘D’’ indicator.
Your vehicle has certain ‘‘readiness
codes’’ that are part of the on-board
diagnostics f or the emissions
systems. In some states, part of the
emissions testing is to make sure
these codes are set. If they are not
set, the test cannot be completed.
If your vehicle battery has been
disconnected or gone dead, these
codes are erased. It takes at least
three days of driving under various
conditions to set the codes again.To check if they are set, turn the
ignition switch to ON (II), without
starting the engine. The Malf unction
Indicator Lamp will come on f or 20
seconds. If it then goes of f , the
readiness codes are set. If it blinks 5
times, the readiness codes are not
set. If possible, do not take your
vehicle f or a state emissions test
until the readiness codes are set.
Refer to State Emissions Testing for
more information (see page ).
274
Malf unction Indicator L amp
T aking Care of t he Unexpect ed
Readiness Codes
253
NOTICE:If you keep driving with the
Malf unction Indicator Lamp on, you
can damage your vehicle’s emissions
controls and the engine. Those repairs
may not be covered by your vehicle’s
warranties.
Page 259 of 296
If you decide to tow your vehicle
with all f our wheels on the ground,
make sure you use a properly-
designed and attached tow bar.
Prepare the vehicle for towing as
described above, and leave the
ignition switched in the
ACCESSORY (I) position so the
steering wheel does not lock. Make
sure the radio and any items plugged
into the accessory power socket are
turned of f so they do not run down
the battery.
Emergency T owing
T aking Care of t he Unexpect ed256
NOTICE:
NOTICE: Trying to lif t or tow your
vehicle by the bumpers will cause
serious damage. The bumpers are not
designed to support the vehicle’s weight.
T he steering system can be
damaged if the steering wheel is locked.
Leave the ignition switched to
Accessory (I), and make sure the
steering wheel turns f reely bef ore you
begin towing.
Page 260 of 296
The vehicle’s f uses are located in
f our f use boxes. The interior f use
boxes are located under the
dashboard on the driver’s and
passenger’s side.To open the passenger’s side, pull
the right edge of the cover.
The primary under-hood f use box is
locatedonthepassenger’sside.
The secondary f use box is next to
the battery.
Fuses
T aking Care of t he Unexpect ed257
DRIVER’S SIDE INTERIOR
PASSENGER’S SIDE
INTERIORPRIMARY UNDER-HOOD FUSE BOX
SECONDARY UNDER-HOOD FUSE BOX
Page 263 of 296
�Î
�Î �Î
�Î
�Î
�µ
�µ�µ �Î
�Î
�Î
Circuits Protected
Circuits Protected
No. Amps. No. Amps.
Circuits Protected
Amps.
No.
Back Up, ACC
Power Seat
Heater Motor
Cooling Fan
Spare Fuse
Spare Fuse
Spare Fuse
Battery
Condenser Fan
MG Clutch
Ignition Switch (IG 1 Main)
ABS Motor
Spare Fuse
Spare Fuse
Right Headlight
ACG S
Hazard
Not Used
Stop
Lef t Headlight
ABS F/S
Power Window Motor
Power Sliding Door
Rear Defroster
1
2
3
4
5
6
7
8
9
10
11
12 20 A
30 A
15 A
15 A
15 A
20 A
15 A
20 A
40 A
30 A
30 A 13
14
15
16
17
18
19
20
21
22
23
2440 A
40 A
40 A
30 A
7.5 A 10 A
15 A
120 A 30 A
7.5 A 50 A
30 A
Rear Entertaiment System
Not Used
Seat Heaters
Driver’s Power Window
Rear A/C
Power Sliding Door
20 A
20 A
30 A
40 A
20 A
1
27 8
9
10
11 : EX and EX-L models
EX-L models
1:
EX and EX-L models
2:
1
1
2
Fuse Locations
T aking Care of t he Unexpect ed260
PRIMARY UNDER-HOOD FUSE BOX
SECONDARY UNDER-HOOD FUSE BOX