Page 215 of 296

You may use a synthetic motor oil if
it meets the same requirements
given f or a conventional motor oil: it
displays the API Certif ication Seal
and it is the proper weight. You must
f ollow the oil and f ilter change
intervals given on the maintenance
schedule.
Your Honda does not require any oil
additives. Additives may adversely
af f ect your engine’s or transmission’s
perf ormance and durability.Always change the oil and f ilter
according to the recommendations in
the maintenance schedule. The oil
and f ilter collect contaminants that
can damage your engine if they are
not removed regularly.
Changing the oil and f ilter requires
special tools and access f rom
underneath the vehicle. The vehicle
should be raised on a service station-
type hydraulic lif t f or this service.
Unless you have the knowledge and
proper equipment, you should have
this maintenance done by a skilled
mechanic.
Run the engine until it reaches
normal operating temperature,
then shut it off. Open the hood and remove the
engine oil f ill cap. Remove the oil
drain bolt and washer f rom the
bottom of the engine. Drain the oil
into an appropriate container.
1. 2.
A dding Engine Oil, Changing the Oil and Filter
Maint enance
Synthetic Oil
Engine Oil A dditivesChanging the Oil and Filter
212
WASHER
DRAIN BOLT
Page 240 of 296
This section covers the more
common problems that motorists
experience with their vehicles. It
gives you inf ormation about how to
safely evaluate the problem and what
to do to correct it. If the problem has
stranded you on the side of the road,
you may be able to get going again.
If not, you will also f ind instructions
on getting your vehicle towed.......................
Compact Spare Tire .238
....................
Changing a Flat Tire .239
.............
If the Engine Won’t Start . 247
................................
Jump Starting .248
..............
If the Engine Overheats . 250
.........
Low Oil Pressure Indicator . 252
..........
Charging System Indicator . 252
.......
Malf unction Indicator Lamp . 253
...............
Brake System Indicator . 254
......................
Emergency Towing .255
..............................................
Fuses .257
..............................
Fuse Locations .260
Taking Care of the Unexpected
T aking Care of t he Unexpect ed237
Page 250 of 296
:You hear nothing, or almost
nothing. The engine’s starter
m")
CONT INUED
Diagnosing why your engine won’t
start f alls into two areas, depending
on what you hear when you turn the
key to START (III):You hear nothing, or almost
nothing. The engine’s starter
motor does not operate at all, or
operates very slowly.
You can hear the starter motor
operating normally, or the starter
motor sounds like it is spinning
f aster than normal, but the engine
does not start up and run.
When you turn the ignition switch to
START (III), you do not hear the
normal noise of the engine trying to
start. You may hear a clicking sound
or series of clicks, or nothing at all.
Check these things: Check the transmission interlock.
The transmission must be in Park
orNeutralorthestarterwillnot
operate.
Turn the ignition switch to ON (II).
Turn on the headlights and check
their brightness. If the headlights
are very dim or don’t light at all,
the battery is discharged. See
on page .
Turn the ignition switch to START
(III). If the headlights do not dim,
check the condition of the f uses. If
thefusesareOK,thereis
probably something wrong with
the electrical circuit f or the
ignition switch or starter motor.
You will need a qualif ied
technician to determine the
problem (see
on page ). If the headlights dim noticeably or
go out when you try to start the
engine, either the battery is
discharged or the connections are
corroded. Check the condition of the
battery and terminal connections
(see page ). You can then try
jump starting the vehicle from a
booster battery (see page ).
In this case, the starter motor’s
speed sounds normal, or even f aster
than normal, when you turn the
ignition switch to START (III), but
the engine does not run.
Are you using the proper starting
procedure? Ref er to on page .
255 248
235
248
183
If theEngineWon’tStart
T aking Care of t he Unexpect ed
Nothing Happens or the Starter
Motor Operates Very Slowly Jump Starting
Emergency T owing T he Starter Operates Normally
Starting the
Engine
247
Page 252 of 296
�µ
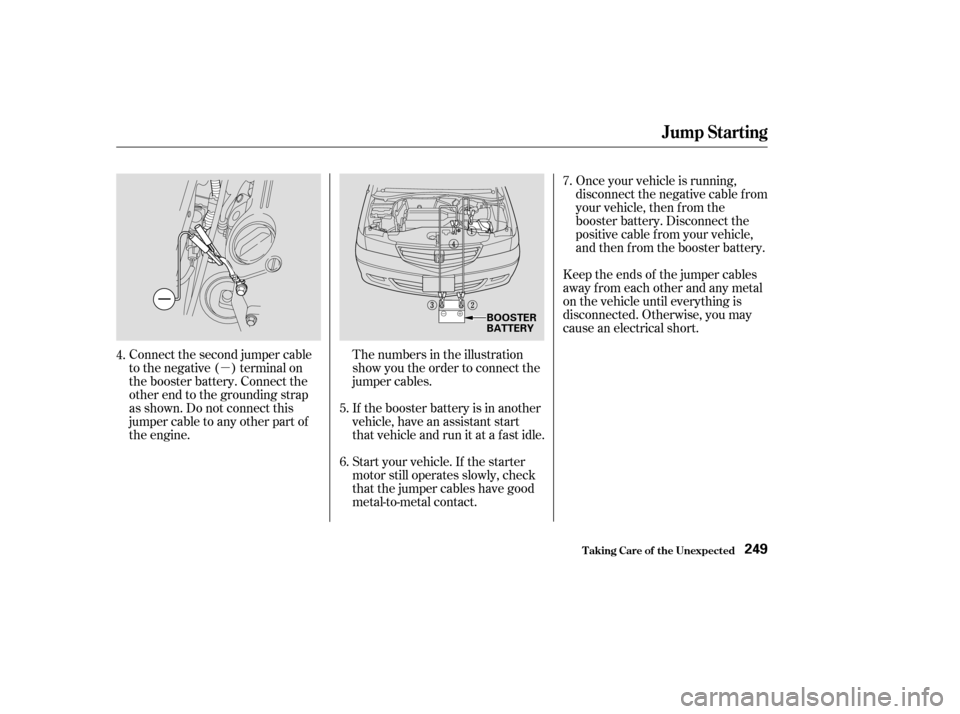
Connect the second jumper cable
to the negative ( ) terminal on
the booster battery. Connect the
other end to the grounding strap
as shown. Do not connect this
jumper cable to any other part of
the engine.The numbers in the illustration
show you the order to connect the
jumper cables.
If the booster battery is in another
vehicle, have an assistant start
that vehicle and run it at a fast idle.
Start your vehicle. If the starter
motor still operates slowly, check
that the jumper cables have good
metal-to-metal contact.Once your vehicle is running,
disconnect the negative cable f rom
your vehicle, then f rom the
booster battery. Disconnect the
positive cable f rom your vehicle,
and then from the booster battery.
Keep the ends of the jumper cables
away from each other and any metal
on the vehicle until everything is
disconnected. Otherwise, you may
cause an electrical short.
4.
6.7.
5.
Jump Starting
T aking Care of t he Unexpect ed249
BOOSTER
BATTERY
Page 263 of 296
�Î
�Î �Î
�Î
�Î
�µ
�µ�µ �Î
�Î
�Î
Circuits Protected
Circuits Protected
No. Amps. No. Amps.
Circuits Protected
Amps.
No.
Back Up, ACC
Power Seat
Heater Motor
Cooling Fan
Spare Fuse
Spare Fuse
Spare Fuse
Battery
Condenser Fan
MG Clutch
Ignition Switch (IG 1 Main)
ABS Motor
Spare Fuse
Spare Fuse
Right Headlight
ACG S
Hazard
Not Used
Stop
Lef t Headlight
ABS F/S
Power Window Motor
Power Sliding Door
Rear Defroster
1
2
3
4
5
6
7
8
9
10
11
12 20 A
30 A
15 A
15 A
15 A
20 A
15 A
20 A
40 A
30 A
30 A 13
14
15
16
17
18
19
20
21
22
23
2440 A
40 A
40 A
30 A
7.5 A 10 A
15 A
120 A 30 A
7.5 A 50 A
30 A
Rear Entertaiment System
Not Used
Seat Heaters
Driver’s Power Window
Rear A/C
Power Sliding Door
20 A
20 A
30 A
40 A
20 A
1
27 8
9
10
11 : EX and EX-L models
EX-L models
1:
EX and EX-L models
2:
1
1
2
Fuse Locations
T aking Care of t he Unexpect ed260
PRIMARY UNDER-HOOD FUSE BOX
SECONDARY UNDER-HOOD FUSE BOX
Page 264 of 296

�Î�Î
�Î �Î
�Î
�Î �Î
�Î
No. Amps. Circuits ProtectedNo. Amps. Circuits Protected
1
2
3
4
5
6
7
8
9
10
11
12
13 15 A
10 A
7.5 A
7.5 A
7.5 A 15 A
15 A
7.5 A 10 A
7.5 A 10 A
30 A
7.5 A Fuel Pump
SRS
Heater Control, A/C Clutch
Relay, Cooling Fan Relay
Power Mirror
Daytime Running Light
ECU(PCM),CruiseControl
IG Coil
ACC Relay
Back-up Lights, Instrument
Lights
Turn Signals
Rear Wiper
Front Wiper
Starter Signal 1
2
3
4
5
6
7
8
9
10
11
12
13
14
15
16 20 A
20 A
10 A
20 A
20 A
10 A
7.5 A 20 A
15 A
15 A
10 A
20 A
7.5 A
7.5 A 20 A
7.5 A Driver’s Side Automatic
Sliding Door
Power Seat Reclining
BSC
Power Seat Sliding
Passenger’s Side Automatic
Sliding Door
Daytime Running Light
Left Rear Window
Front Passenger’s Power
Window
ACC Socket
Inst. Panel Light, License
Light
Interior Light, Radio
Power Door Locks
Clock, Back Up
ABS Motor Check
Driver’s Power Window
Right Rear Window
EX and EX-L models
Canadian models
:
1:
2:
On Canadian models
1
1 1
2
Fuse Locations
T aking Care of t he Unexpect ed261
Driver’s Side INTERIOR FUSE BOX Passenger’s Side
Front Front
Page 272 of 296
, B, and C, representing the
tire’s resistance to the generation of
heat and its ability to dissipate heat
when tested under controlled
conditions on a")
�µ
The temperature grades are A (the
highest), B, and C, representing the
tire’s resistance to the generation of
heat and its ability to dissipate heat
when tested under controlled
conditions on a specif ied indoor
laboratory test wheel. Sustained high
temperature can cause the material
of the tire to degenerate and reduce
tire life, and excessive temperature
can lead to sudden tire f ailure. The
grade C corresponds to a level of
perf ormance which all passenger car
tires must meet under the Federal
Motor Vehicle Saf ety Standard No.
109. Grades B and A represent
higher levels of perf ormance on the
laboratory test wheel than the
minimum required by law. Warning: The temperature grade f or
this tire is established f or a tire that
is properly inf lated and not over-
loaded. Excessive speed, underinf la-
tion, or excessive loading, either
separately or in combination, can
cause heat buildup and possible tire
f ailure.
DOT T ire Quality Grading (U.S. Vehicles)
T echnical Inf ormation
Temperature A,B,C
269
Page 281 of 296

Honda dealership personnel are
trained prof essionals. They should
be able to answer all your questions.
If you encounter a problem that your
dealership does not solve to your
satisf action, please discuss it with
the dealership’s management. The
Service Manager or General
Manager can help. Almost all
problems are solved in this way.
If you are dissatisf ied with the
decision made by the dealership’s
management, contact your Honda
Customer Service Office.U.S. Owners:
Canadian Owners:
In Puerto Rico and the U.S. Virgin
Islands:
When you call or write, please give
us this inf ormation:
Vehicle Identif ication Number
(see page )
Name and address of the dealer
who services your vehicle
Date of purchase
Mileage on your vehicle
Your name, address, and tele-
phone number
A detailed description of the
problem
Name of the dealer who sold the
vehicle to you 264
Cust omer Service Inf ormat ion
Warrant y and Cust omer Relat ions278
CUSTOMER RELATIONS
RELATIONS AVEC LA CLIENTÉLE American Honda Motor Co., Inc.
Automobile Customer Service
Mail Stop 500-2N-7A
1919 Torrance Boulevard
Torrance, California 90501-2746
Tel: (800) 999-1009
Honda Canada Inc.
715 Milner Avenue
Toronto, ON
M1B 2K8
Tel: 1-888-9-HONDA-9
Fax: Toll-free 1-877-939-0909
Toronto (416) 287-4776 Bella International
P.O. Box 190816
San Juan, Puerto Rico 00919-0816
Tel: (787) 250-4318