Page 50 of 227

This section gives inf ormation about
the controls and displays that
contribute to the daily operation of
your Honda. All the essential
controls are within easy reach............................
Control Locations . 52
............................
Instrument Panel . 53
.............................................
Gauges . 58
...................................
Trip Meter . 58
.....................................
Odometer . 58
..................................
Fuel Gauge . 58
...................
Temperature Gauge . 59
Controls Near the Steering .......................................
Wheel . 60
......................
Wipers and Washers . 61
...........
Turn Signal and Headlights . 62
........
Instrument Panel Brightness . 63
.................
Hazard Warning Button . 63
.................
Rear Window Def ogger . 63
..........
Steering Wheel Adjustment . 64
...............................
Keys and Locks . 65
........................
Immobilizer System . 66
.......................
Remote Transmitter . 67
................................
Ignition Switch . 69
......................................
Door Locks . 70
......................
Power Door Locks . 70
..................................
Rear Doors . 70
............................................
Hatch . 71
........................................
Tailgate . 72
.................................................
Seats . 73
........................
Seat Adjustments . 73 Driver’s Seat Height
..............................
Adjustment . 74
...................
FrontSeatArmrests .74
..........................
Head Restraints . 75
........................
Rear Seat Access . 75
..........
Reclining the Front Seats . 76
...............
Folding the Rear Seats . 77
..........
Removing the Rear Seats . 79
..............................
Power Windows . 81
.............................................
Mirrors . 82
....
Adjusting the Power Mirrors . 82
.................................
Rear Windows . 83
.................................
Parking Brake . 83
............................................
Skylight . 83
...........
Interior Convenience Items . 86
.......................
Beverage Holders . 87
..........
Accessory Power Sockets . 87
....................................
Glove Box . 87
.................................
Interior Lights . 88
................................
Ceiling Light . 88
........................
Cargo Area Light . 88
.....................................
Spotlights . 88
..................
Ignition Switch Light . 88
Instruments and Controls
Inst rument s and Cont rols51
�����—�
���—�����y�
�������������y���
�(���+���
���y���������y
Page 87 of 227
The ceiling light has a three-position
switch: ON, Door Activated, and
OFF.
In the Door Activated (center)
position, the light comes on when
you:Open any door.
Remove the key from the ignition.
If you do not open a door, the light
f ades out in about 30 seconds.
Unlock the doors with the key or
remote transmitter. The cargo area light has a three-
position switch. In the center
position, the light comes on when
you open the hatch.
Turn on the spotlight by pushing the
lens. Push the lens again to turn it
of f . You can use the spotlights at all
times.
The ignition switch light comes on
when you unlock the driver’s door,
and f ades out about 30 seconds af ter
you close the door.
On EX models
Interior Lights
Ceiling L ight
Spotlights
Cargo Area Light
Ignition Switch L ight
Inst rument s and Cont rols88
ON
OFF DOOR ACTIVATED
�����—�
���—�����y�
�������������y���
�(���+���
���y���������y
Page 195 of 227
. Make sure the headlights and
all other accessories are off.
Remove the cover f rom the f use
box.
If something electrical in your
vehicle stops working, check")
Turn the ignition switch to LOCK
(0). Make sure the headlights and
all other accessories are off.
Remove the cover f rom the f use
box.
If something electrical in your
vehicle stops working, check f or a
blown f use f irst. Determine f rom the
chart on pages and or the
diagram on the f use box lid, which
f use or f uses control that device.
Check those f uses f irst, but check all
the f uses bef ore deciding that a
blown f use is the cause. Replace any
blown f uses and check if the device
works.
The vehicle’s f uses are located in
two f use boxes. The under-hood f use
box is located in the engine
compartment on the driver’s side. To
open it, push the tabs as shown.
The interior f use box is underneath
the steering column. To remove the
f use box lid, turn the knobs
counterclockwise and pull the lid out
of its hinges. 1. 2.199 200
Checking and Replacing Fuses
Fuses
T aking Care of t he Unexpect ed196
TAB
INTERIOR
UNDER-HOOD
�����—�
���—�����y�
�������������y���
�(���+���
���y�������
�y
Page 198 of 227
�µ�µ �µ �µ �µ
�Î
�Î �Î
�Î
�Î
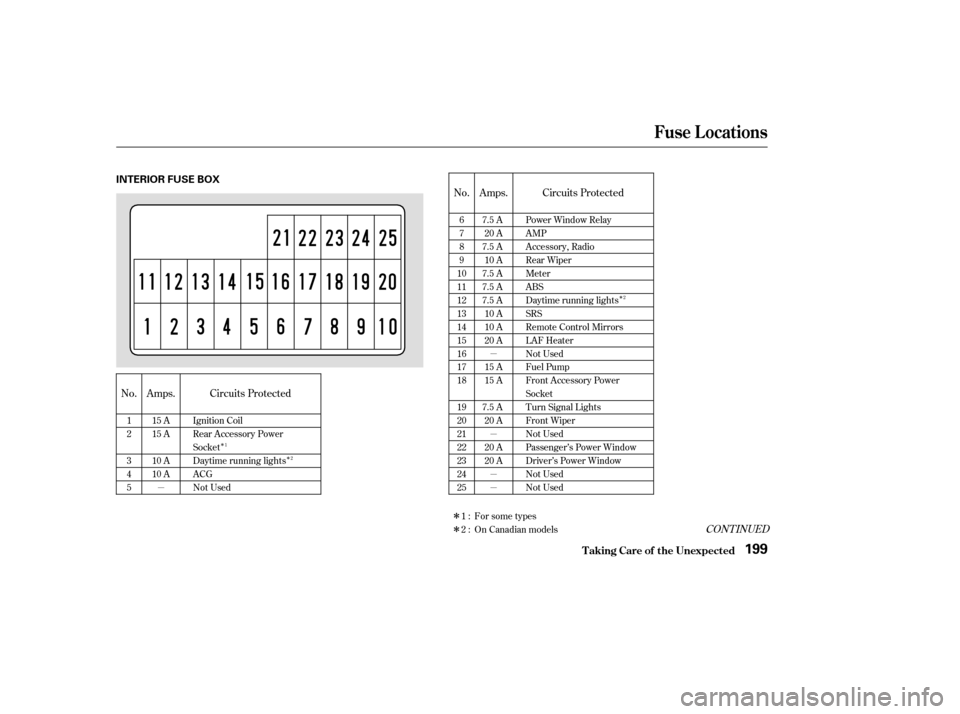
No. Amps. Circuits Protected No. Amps. Circuits Protected
CONT INUED
12 3 45
15 A
15 A
10 A
10 A
Ignition Coil
Rear Accessory Power
Socket
Daytime running lights
ACG
Not Used 6789
101112131415161718 19 202122232425 7.5 A
20 A
7.5 A 10 A
7.5 A
7.5 A
7.5 A
10 A
10 A
20 A
15 A
15 A
7.5 A 20 A
20 A
20 A Power Window Relay
AMP
Accessory, Radio
Rear Wiper
Meter
ABS
Daytime running lights
SRS
Remote Control Mirrors
LAF Heater
Not Used
Fuel Pump
Front Accessory Power
Socket
Turn Signal Lights
Front Wiper
Not Used
Passenger’s Power Window
Driver’s Power Window
Not Used
Not Used
On Canadian models
2:
1: Forsometypes
1
2 2
Fuse Locations
T aking Care of t he Unexpect ed199
INTERIOR FUSE BOX
�����—�
���—�����y�
�������������y���
�(���+���
���y���������y
Page 204 of 227

16.9 18.7 oz (480 530 g) S")
�µ�µ�µ
�µ
�µ �µ �µ �µ�µ�µ�µ�µ�µ�µ�µ �µ
T echnical Inf ormation
Specif ications
205
Air Conditioning
Lights Battery Fuses
Alignment
Tires
HFC-134a (R-134a)
16.9 18.7 oz (480 530 g) SP-10
12 V 60/55 W (H4/HB2)
12 V
12 V
12 V
12 V
12 V
12 V
12 V
8W
4CP
8W
5W
18 W (21 CP)
21/5 W
21 W
P215/70R16 99S1°50’
1°
0°13’
0.08 in (2.0 mm) 0.0in(0mm)
12 V 21/5 W
12 V 3 CP
12 V 21 W
32 psi (220 kPa , 2.2 kgf/cm
)
34 psi (235 kPa , 2.4 kgf/cm)
45 AH/20 HR
12 V
Refrigerant type
Charge quantity
Lubricant type Headlights
Front turn signal/parking
lights
Front side marker lights
Rear turn signal lights
Brake/Taillights
Back-up lights
License plate lights
Ceiling light
Spotlights
Cargo area light
High-mount brake light
Capacity Interior
Under-hood
Toe-in
CamberCaster Size
Pressure
See page 200 or the fuse box
cover.
See page 199 or the fuse label
attached to the inside of the fuse
box door under the steering
column.
FrontRear
FrontRear
Front
Front/Rear
FrontRear
�����—�
���—�����y�
�������������y���
�(���+���
���y�����
���y

position, the light comes on when
you:Open any door.
Remove the key from the ignition.
If yo")