Page 183 of 256

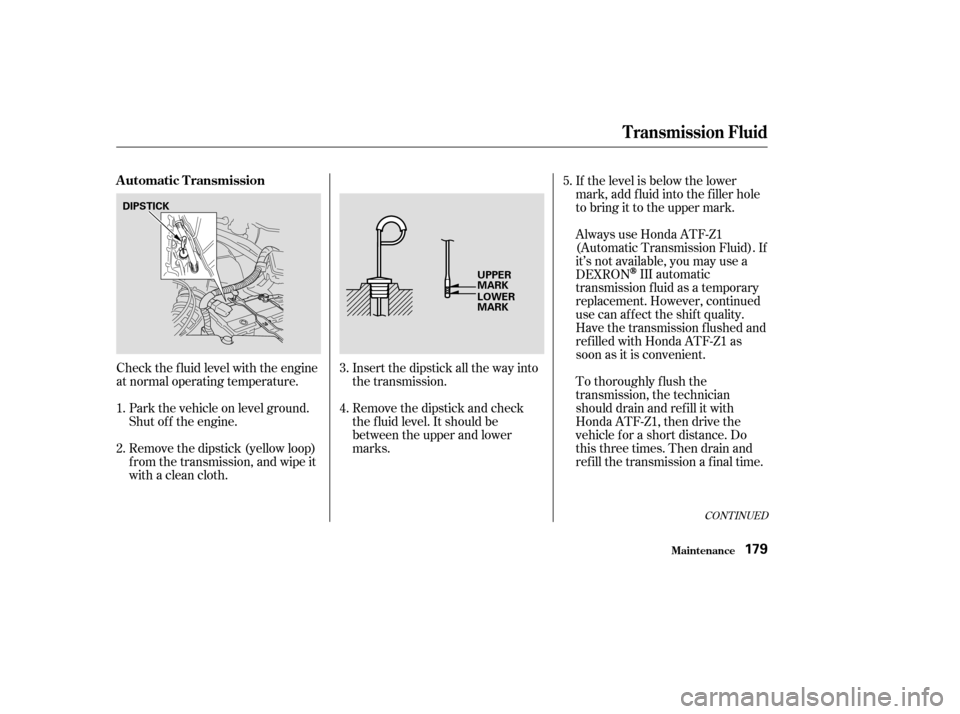
Check the f luid level with the engine
at normal operating temperature.Park the vehicle on level ground.
Shut of f the engine.
Remove the dipstick (yellow loop)
f rom the transmission, and wipe it
with a clean cloth. Insert the dipstick all the way into
the transmission.
Remove the dipstick and check
the f luid level. It should be
between the upper and lower
marks.If the level is below the lower
mark, add f luid into the f iller hole
to bring it to the upper mark.
Always use Honda ATF-Z1
(Automatic Transmission Fluid). If
it’s not available, you may use a
DEXRON
III automatic
transmission f luid as a temporary
replacement. However, continued
use can af f ect the shif t quality.
Have the transmission flushed and
ref illed with Honda ATF-Z1 as
soon as it is convenient.
To thoroughly f lush the
transmission, the technician
should drain and ref ill it with
Honda ATF-Z1, then drive the
vehicle f or a short distance. Do
this three times. Then drain and
ref ill the transmission a f inal time.
1.
2. 3.5.
4.
CONT INUED
Automatic Transmission
T ransmission Fluid
Maint enance179
DIPSTICK UPPER
MARK
LOWER
MARK
Page 189 of 256
The f ront parking light is next to
the headlight bulb.Remove the socket from the
headlight assembly by turning it
one-quarter turn counterclockwise.
Pull the bulb straight out of its
socket.
Push the new bulb straight into
the socket until it bottoms.Insert the socket back into the
headlight assembly. Turn it
clockwise to lock it in place.
Turn on the parking lights and
check that the new bulb is
working.
Reinstall the radiator support
cover. Lock the holding clips by
pushing on the center of each clip.
Tighten the bolt on the battery
hold-down.
Use a wrench to loosen the bolt on
the battery hold-down. Remove
the seven holding clips f rom the
cover by using a flat-tipped
screwdriver. Then pull the
radiator support cover away.
1.
2.
3.
4.5.
6.
7.
Replacing a Front Parking L ight
Bulb
Lights
Maint enance185
BOLT
BULB
HOLDING
CLIP
COVER
Page 190 of 256
Open the tailgate. Place a cloth on
the edge of the cover. Remove the
covers by caref ully prying on the
edge with a small f lat-tipped
screwdriver.Use a Phillips-head screwdriver to
remove the taillight assembly
mounting screw under each cover.
Pull the taillight assembly out of
the rear pillar.Determine which of the f our bulbs
is burned out: stop/taillight, back-
up light, turn signal, or side
marker.
Remove the socket by turning it
one-quarter turn counterclockwise.
1.
2.
3.4.
5.
Replacing Rear Bulbs
Lights
Maint enance186
BULBS
SCREW
COVER
Page 192 of 256
The driver’s f loor mat that came
with your vehicle hooks over the
f loor mat anchor. This keeps the
f loor mat f rom sliding f orward and
possibly interf ering with the pedals.
If you remove the driver’s f loor mat,
make sure to re-anchor it when you
putitbackinyourvehicle.This f ilter removes the dust and
pollenthatisbroughtinfromthe
outside through the heating and
cooling system/climate control
system.
Have your Honda dealer replace this
f ilter every 30,000 miles (48,000 km)
under normal conditions. It should
be replaced every 15,000 miles
(24,000 km) if you drive primarily in
urban areas that have high
concentrations of soot in the air, or if
the f low f rom the climate control
system becomes less than usual.
If you use a non-Honda f loor mat,
make sure it f its properly and that it
canbeusedwiththefloormat
anchors. Do not put additional f loor
mats on top of the anchored mats.
Maint enance
Floor Mats
Dust and Pollen Filter
Floor Mats, Dust and Pollen Filter
188
Page 195 of 256

CONT INUED
Use a gauge to measure the air
pressure at least once a month. Even
tires that are in good condition may
lose one to two psi (10 to 20 kPa, 0.1
to 0.2 kgf /cm ) per month.
Remember to check the spare tire at
thesametime.
Check the pressure in the tires when
they are cold. This means the vehicle
has been parked f or at least three
hours, or driven less than 1 mile (1.6
km).If you check the pressure when the
tires are hot [the vehicle has been
driven several miles (kilometers)],
you will see readings 4 to 6 psi (30 to
40 kPa, 0.3 to 0.4 kgf /cm ) higher
than the cold reading. This is
normal; do not release air to match
the cold pressure.
Youshouldgetyourowntire
pressure gauge and use it whenever
you check your tire pressures. This
will make it easier f or you to tell if a
pressure loss is due to a tire problem
and not due to a variation between
gauges.
For convenience, the recommended
tire sizes and cold air pressures are
on a label on the driver’s doorjamb.
For additional technical information
about your tires, see page .
Tubeless tires have some ability to
self -seal if they are punctured. You
should look closely f or punctures if a
tire starts losing pressure.
Add or release air, if needed, to
match the recommended cold tire
pressuresonthethirdcolumn.
230
Cold Tire Pressure
for Normal Driving
Tire Size
Front/Rear:
Tires
Maint enance
Recommended T ire Pressures f orNormal Driving
191
26 psi (180 kPa ,
1.8 kgf/cm
)
P205/70R15 95S
Page 196 of 256

Honda strongly recommends that
you not drive f aster than posted
speed limits and conditions allow. If
you decide it is safe to drive at high
speeds, be sure to adjust the cold tire
pressuresasshownbelow.If youdo
not adjust the tire pressure, exces-
sive heat can build up and cause
sudden tire f ailure.
When you return to normal speed
driving, be sure to readjust the tire
pressure f or normal driving. You
should wait until the tires are cold
bef ore adjusting the tire pressure.Every time you check inf lation, you
should also examine the tires f or
damage, f oreign objects, and wear.
Youshouldlookfor:
Bumps or bulges in the tread or
side of the tire. Replace the tire if
youfindeitherortheseconditions.
Cuts, splits, or cracks in the side
of the tire. Replace the tire if you
can see f abric or cord.
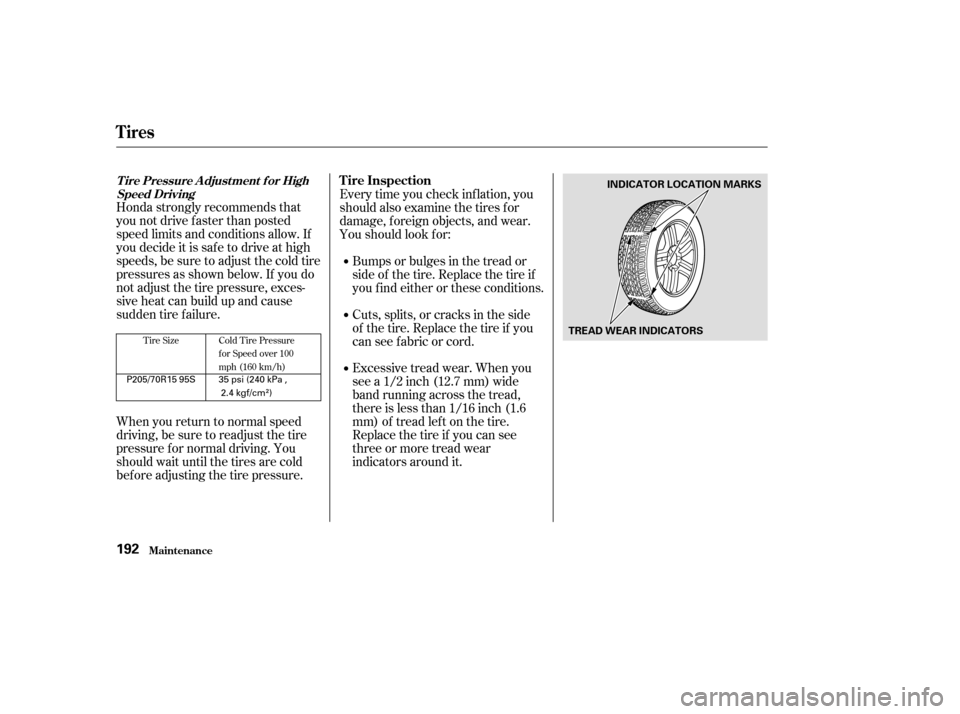
Excessive tread wear. When you
see a 1/2 inch (12.7 mm) wide
band running across the tread,
there is less than 1/16 inch (1.6
mm) of tread lef t on the tire.
Replace the tire if you can see
threeormoretreadwear
indicators around it.
Tire Size Cold Tire Pressure for Speed over 100
mph (160 km/h)
Tires
Maint enance
T ire Pressure A djust ment f or HighSpeed DrivingTire Inspection
192
INDICATOR LOCATION MARKS
TREAD WEAR INDICATORS
P205/70R15 95S 35 psi (240 kPa , 2.4 kgf/cm
)
Page 199 of 256
When installing cables, f ollow the
manuf acturer’s instructions, and
mount them as tight as you can.
Make sure they are not contacting
the brake lines or suspension. Drive
slowly with them installed. If you
hear them coming into contact with
the body or chassis, stop and
investigate. Remove them as soon as
you begin driving on cleared roads.
Tires
Maint enance195
NOTICE:Traction devices that are the
wrong size or improperly installed can
damage your vehicle’s brake lines,
suspension, body, and wheels. Stop
driving if they are hitting any part of
the vehicle.
Page 204 of 256
If you have a f lat tire while driving,
stop in a saf e place to change it.
Drive slowly along the shoulder until
you get to an exit or an area to stop
that is far away from the traffic lanes.To keep the tailgate door open,
use the stop f rom the tool kit. Put
the stop on the support strut as
shown.
Park the vehicle on f irm, level and
non-slippery ground. Put the
transmission in Park (automatic)
or Reverse (manual). Apply the
parking brake.
If you are towing a trailer, unhitch
the trailer.
Turn on the hazard warning lights,
and turn the ignition switch to
LOCK (0). Have all the
passengers get out of the vehicle
while you change the tire.
1.
2.
3.
Changing a Flat T ire
T aking Care of t he Unexpect ed200
JACK
STOP
SPARE TIRE
TOOL
The vehicle can easily roll off
the jack, seriously injuring
anyone underneath.
Follow the directions for
changing a tire exactly, and
never get under the vehicle
when it is supported only by the
jack.