Page 143 of 231

�µ�µ�µ
�µ
�µ
�µ
�Ì
Your authorized Honda dealer
knows your vehicle best and can
provide competent, ef f icient service.
However, service at a dealer is not
mandatory to keep your warranties
in effect. Maintenance may be done
by any qualif ied service f acility or
skilled person to keep your warranty
in ef f ect. Keep all the receipts as
proof of completion, and have the
person who does the work f ill out the
Maintenance Record. Check your
warranty booklet f or more
inf ormation. Engine oil level Check every
time you fill the fuel tank. See
page .
Engine coolant level Check the
radiator reserve tank every time
you f ill the f uel tank. See page .
Automatic transmission Check
the f luid level monthly. See page
.
Brakes Check the f luid level
monthly. See page .
Tires Check the tire pressure
monthly. Examine the tread f or
wear and foreign objects. See page .
Lights Check the operation of
the headlights, parking lights,
taillights, high-mount brake light,
and license plate lights monthly.
See page .
U.S. Vehicles:
According to state and federal
regulations, f ailure to perf orm
maintenance on the items marked
with will not void your emissions
warranties. However, Honda
recommends that all maintenance
services be perf ormed at the
recommended time or mileage
period to ensure long-term reliability.
Youshouldcheckthefollowing
items at the specif ied intervals. If
you are unsure of how to perf orm
any check, turn to the appropriate
page listed.
We recommend the use of Honda
parts and f luids whenever you have
maintenance done. 117
118
160 163
172
164
Maintenance Schedule
Maint enance
Maintenance, replacement, or
repair of emissions control
devices and systems may be done
by any automotive repair
establishment or individual using
parts that are ‘‘certif ied’’ to EPA
standards.
Owner’s Maintenance Checks
144
�����—�����—�����y�
������
������y���
�(���%�������y���
�����y
Page 146 of 231

�µ
�Î�Ì �Ì�Ì
�Î
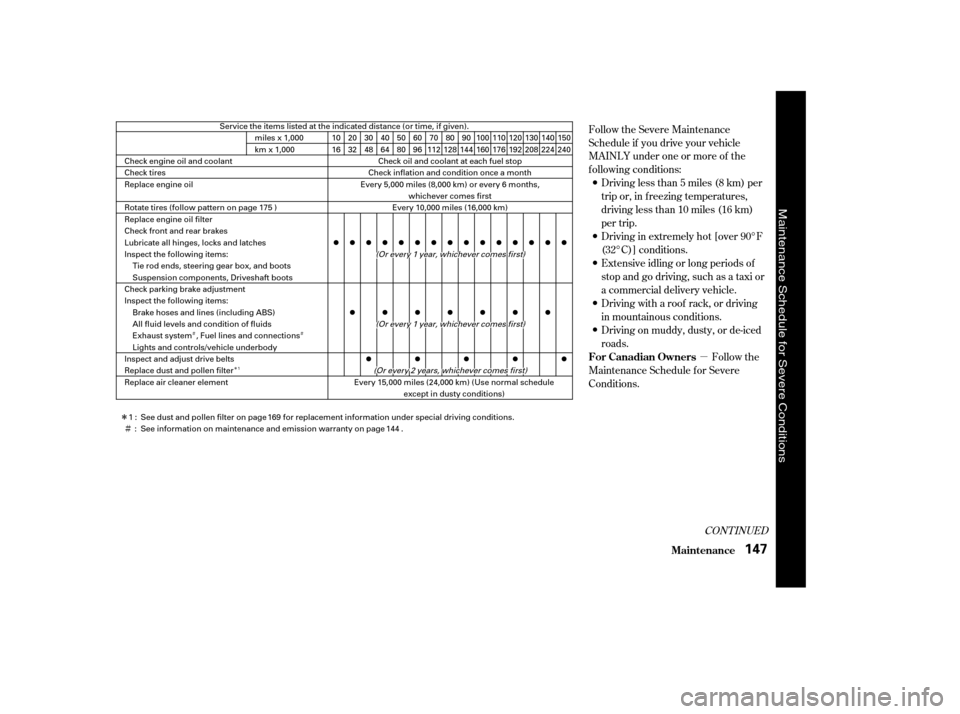
Follow the Severe Maintenance
Schedule if you drive your vehicle
MAINLY under one or more of the
f ollowing conditions:
Extensive idling or long periods of
stop and go driving, such as a taxi or
a commercial delivery vehicle.
Driving with a roof rack, or driving
in mountainous conditions.
Driving less than 5 miles (8 km) per
trip or, in f reezing temperatures,
driving less than 10 miles (16 km)
per trip.
Driving in extremely hot [over 90°F
(32°C)] conditions.
Driving on muddy, dusty, or de-iced
roads.
Follow the
Maintenance Schedule f or Severe
Conditions.
CONT INUED
For Canadian Owners
Maint enance
147
miles x 1,000
km x 1,000 Check oil and coolant at each fuel stop
Service the items listed at the indicated distance (or time, if given).
Every 10,000 miles (16,000 km)
Check inflation and condition once a month
Every 5,000 miles (8,000 km) or every 6 months,
whichever comes first
((OOrreevveerryy11yyeeaarr,,wwhhiicchheevveerrccoommeessffiirrsstt))
10 16 508070
112 110176130208
2032 4064609680
128 100160120192140224
((OOrreevveerryy11yyeeaarr,,wwhhiicchheevveerrccoommeessffiirrsstt))
((OOrreevveerryy22yyeeaarrss,,wwhhiicchheevveerrccoommeessffiirrsstt))Every 15,000 miles (24,000 km) (Use normal schedule
except in dusty conditions)
30 48
90
144 150240
See information on maintenance and emission warranty on page .
See dust and pollen filter on page for replacement information under special driving conditions.
Check engine oil and coolant
Check tires
Replace engine oil
Rotate tires (follow pattern on page 175 )
Replace engine oil filter
Check front and rear brakes
Lubricate all hinges, locks and latches
Inspect the following items:
Tie rod ends, steering gear box, and boots
Suspension components, Driveshaft boots
Check parking brake adjustment
Inspect the following items: Brake hoses and lines (including ABS)
All fluid levels and condition of fluids
Exhaust system , Fuel lines and connections
Lights and controls/vehicle underbody
Inspect and adjust drive belts
Replace dust and pollen filter
Replace air cleaner element
1: : 169
144
1
Maintenance Schedule for Severe Conditions
�����—�����—�����y�
���������
���y���
�(���%�������y���
�����y
Page 154 of 231

Put a new washer on the drain bolt,
then reinstall the drain bolt.
Tighten it to:Replace the engine oil f ill cap.
Start the engine. The oil pressure
indicator light should go out within
5 seconds. If it does not, turn of f
the engine and check your work.
Let the engine run f or several
minutes, then check the drain bolt
and oil f ilter f or leaks.
Turn of f the engine and let it sit
f or several minutes, then check
the oil level. If necessary, add
more oil.
Refill the engine with the recom-
mended oil.
Engine oil change capacity
(including f ilter):
5. 6.
7. 8. 9.
(U.S.: DX, LX, Canada: DX, LX)
(U.S.: EX, HX, Canada: Si)
(U.S.: DX, LX, Canada: DX, LX)
(U.S.: EX, HX, Canada: Si)
Changing the Oil and Filter
Maint enance155
NOTICE:
33 lbf·ft (44 N·m , 4.5 kgf·m)
29 lbf·ft (39 N·m , 4.0 kgf·m)
3.4 US qt (3.2
)
3.7 US qt (3.5
) Improper disposal of engine
oil can be harmf ul to the environment.
If you change your own oil, please
dispose of the used oil properly. Put it
in a sealed container and take it to a
recycling center. Do not discard it in a
trash bin or dump it on the ground.
�����—�����—�����y�
�������������y���
�(���%�������y���
�����y
Page 155 of 231
Check the level in the windshield
washer reservoir at least monthly
during normal usage.Fill the reservoir with a good-quality
windshield washer f luid. This
increases the cleaning capability and
prevents f reezing in cold weather.
When you ref ill the reservoir, clean
the edges of the windshield wiper
blades with windshield washer f luid
on a clean cloth. This will help to
condition the blade edges.
The low washer
level indicator will light when the
level is low.
On Canadian models:
Windshield Washers
Maint enance156
NOTICE: Do not use engine antif reeze
or a vinegar/water solution in the
windshield washer reservoir. Antif reeze
can damage your vehicle’s paint, while
a vinegar/water solution can damage
the windshield washer pump. Use only
commercially-available windshield
washer f luid.
�����—�����—�����y�
���������
���y���
�(���%�������y���
�����y
Page 163 of 231
Theheadlightswereproperlyaimed
when your vehicle was new. If you
regularly carry heavy items in the
trunk, readjustment may be required.
Adjustments should be perf ormed by
a Honda dealer or other qualif ied
mechanic.Your vehicle has halogen headlight
bulb. Handle it by its steel base and
protect the glass f rom contact with
your skin or hard objects. If you
touch the glass, clean it with
denaturedalcoholandacleancloth.
NOTE: Halogen headlight bulbs get
very hot when lit. Oil, perspiration,
or a scratch on the glass can cause
the bulb to overheat and shatter.
If you need to change the
headlight bulb on the driver’s side,
remove the power steering
reservoir tank by pulling it out of
its holder.
1.
Lights
Maint enance
Headlight A iming Replacing a Headlight Bulb
164
HOLDER
�����—�����—�����y�
�����������
�y���
�(���%�������y���
�����y
Page 164 of 231
CONT INUED
If you need to change a headlight
bulb on the passenger’s side, remove
the bolt from the stay and push the
battery toward windshield to obtain
enough working space.Remove the electrical connector
f rom the bulb by pushing on the
tab and pulling the connector
down.
Remove the bulb by turning it one-
quarter turn counterclockwise.Push the electrical connector back
onto the bulb. Make sure it is on
all the way.
Turn on the headlights to test the
new bulb.
Put the battery back to its original
position, reinstall the bolt in the
stay and tighten it securely.
Reinstall the power steering
reservoir.
(Passenger’s side)
(Driver’s side)
Insert the new bulb into the hole
and turn it one-quarter turn clock-
wise to lock it in place.
2. 3. 4. 5.6. 7.
Lights
Maint enance165
STAY
TAB
BULB
CONNECTOR
�����—�����—�����y�
�������������y���
�(���%�������y���
�����y
Page 165 of 231

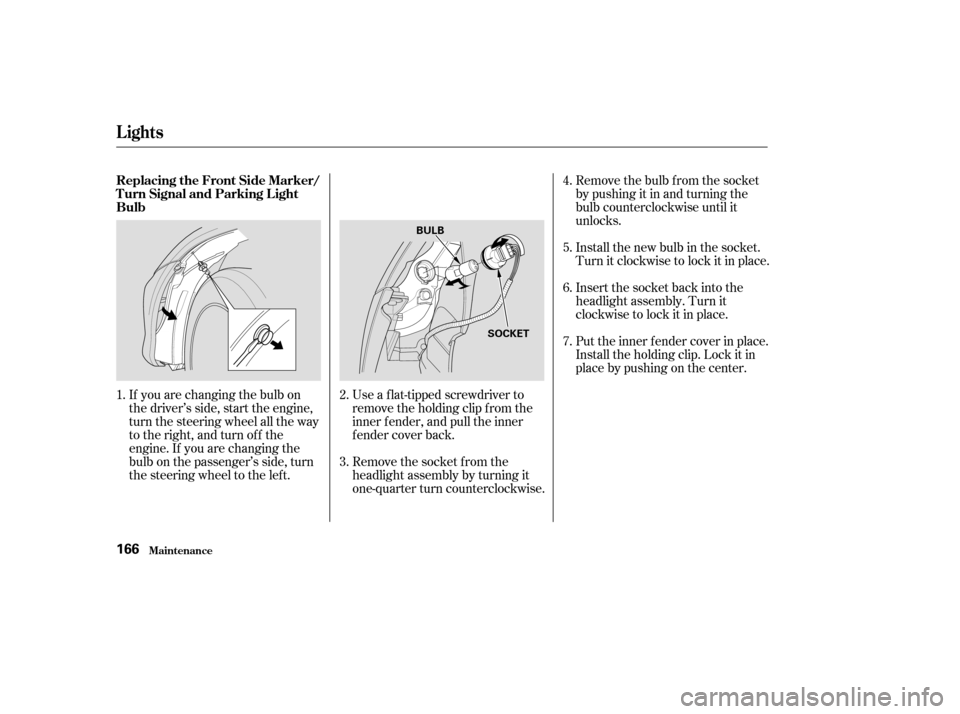
If you are changing the bulb on
the driver’s side, start the engine,
turn the steering wheel all the way
to the right, and turn off the
engine. If you are changing the
bulb on the passenger’s side, turn
the steering wheel to the left.Use a f lat-tipped screwdriver to
remove the holding clip f rom the
inner f ender, and pull the inner
f ender cover back.
Remove the socket from the
headlight assembly by turning it
one-quarter turn counterclockwise.Remove the bulb f rom the socket
bypushingitinandturningthe
bulb counterclockwise until it
unlocks.
Install the new bulb in the socket.
Turn it clockwise to lock it in place.
Insert the socket back into the
headlight assembly. Turn it
clockwise to lock it in place.
Put the inner f ender cover in place.
Install the holding clip. Lock it in
place by pushing on the center.
2.
1.
3.4. 5. 6. 7.
Lights
Maint enance
Replacing the Front Side Marker/
Turn Signal and Parking L ightBulb
166
BULB
SOCKET
�����—�����—�����y�
�������������y���
�(���%�������y���
�����y
Page 166 of 231
Open the trunk.
Remove the screw in the center of
the f astener on the side of the trunk
lining. Pull the lining back. Determine which of the three
bulbs is burned out: stop/taillight,
back-up light or turn signal light.
Remove the socket by turning it
one-quarter turn counterclockwise.Pull the bulb straight out of its
socket.
Push the new bulb straight into
the socket until it bottoms.
Testthelightstomakesurethe
new bulb is working.
Reinstall the socket into the light
assembly by turning it clockwise
until it locks.
Reinstall the trunk lining. Make
sure it is installed under the edge
of the trunk seal.
Put the f astener into the hole on
the side of the trunk lining.
Reinstall the screw.
1.
2. 3.4. 5. 6. 7. 8.
Lights
Maint enance
Replacing Rear Bulbs
167
FASTENER
BULBS
BULB SOCKET
SOCKETS
�����—�����—�����y�
���������
���y���
�(���%�������y���
�����y