Page 125 of 231
Fasten your seat belt. Check that
your passengers have f astened
their seat belts (see page ).
When you start the engine, check
the gauges and indicator lights in
the instrument panel (see page).
Make sure the doors are securely
closed and locked.
Check the steering wheel
adjustment (see page ).
Check the adjustment of the
inside and outside mirrors (see
page ).
Check that any items you may be
carrying are stored properly or
f astened down securely.
Check the seat adjustment (see
page ).
Youshoulddothefollowingchecks
and adjustments every day bef ore
you drive your vehicle.
Make sure all windows, mirrors,
and outside lights are clean and
unobstructed. Remove f rost, snow,
or ice.
Check that the hood and trunk are
f ully closed.
Visually check the tires. If a tire
looks low, use a gauge to check its
pressure.
1. 2. 3. 4.
9.
8.
7.
6.
5.
10.
76
83 68 14
53
Driving
Preparing to Drive
126
�����—�����—�����y�
�������������y���
�(���%�������y���
�����y
Page 136 of 231

Always use the parking brake when
you park your vehicle. Make sure
the parking brake is set f irmly or
your vehicle may roll if it is on an
incline.Make sure the moonroof and the
windows are closed.
Turn of f the lights.
Place any packages, valuables, etc.
in the trunk or take them with you.
Lock the doors.
If your vehicle has an automatic
transmission, set the parking brake
bef ore you put the transmission in
Park. This keeps the vehicle f rom
moving and putting pressure on the
parking mechanism in the
transmission.
Never park over dry leaves, tall
grass, or other f lammable
materials. The hot three way
catalytic converter could cause
these materials to catch on fire.If the vehicle is f acing uphill, turn
the f ront wheels away f rom the
curb. If you have a manual
transmission, put it in f irst gear.
If the vehicle is f acing downhill,
turn the front wheels toward the
curb. If you have a manual
transmission, put it in reverse gear.
Make sure the parking brake is
f ully released bef ore driving away.
Driving with the parking brake
partially set can overheat or
damage the rear brakes.
Driving
Parking T ips
Parking
137
�����—�����—�����y�
�������������y���
�(���%�������y���
�����y
Page 137 of 231

Check the brakes after driving
through deep water. Apply the
brakes moderately to see if they f eel
normal. If not, apply them gently and
f requently until they do. Be extra
cautious in your driving.
All Civics are equipped with f ront
disc brakes. The brakes on the rear
wheels are drum. A power assist
helps reduce the ef f ort needed on
thebrakepedal.TheABS(onsome
models) helps you retain steering
control when braking very hard.
Resting your f oot on the pedal keeps
the brakes applied lightly, builds up
heat, and reduces their ef f ectiveness.
It also keeps your brake lights on all
the time, conf using drivers behind
you.
Constant application of the brakes
when going down a long hill builds
up heat and reduces their ef f ective-
ness. Use the engine to assist the
brakes by taking your f oot of f the
accelerator and downshif ting to a
lower gear.
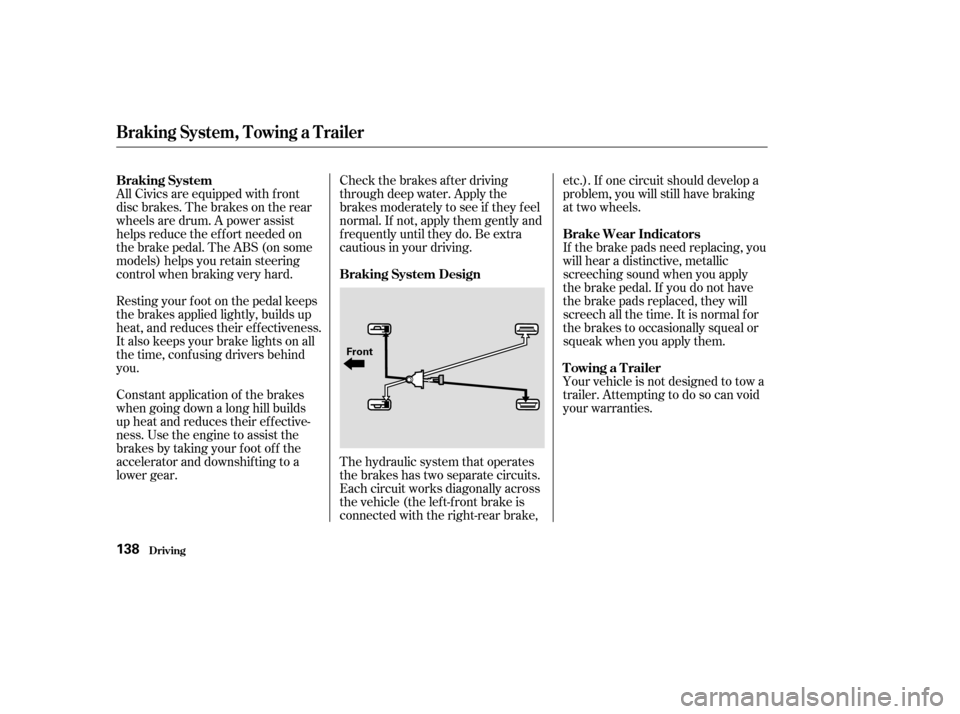
The hydraulic system that operates
the brakes has two separate circuits.
Each circuit works diagonally across
the vehicle (the lef t-f ront brake is
connected with the right-rear brake,etc.). If one circuit should develop a
problem, you will still have braking
at two wheels.
If the brake pads need replacing, you
will hear a distinctive, metallic
screeching sound when you apply
the brake pedal. If you do not have
the brake pads replaced, they will
screech all the time. It is normal f or
the brakes to occasionally squeal or
squeak when you apply them.
Your vehicle is not designed to tow a
trailer. Attempting to do so can void
your warranties.
Braking System, Towing a Trailer
Driving
Braking System Design
Braking System
Brake Wear Indicators
Towing a Trailer
138
Front
�����—�����—�����y�
�������������y���
�(���%�������y���
���
�y
Page 139 of 231
It only helps with the
steering control during braking.
such as trying to take a
corner too f ast or making a sudden
lane change. Always drive at a safe
speed f or the road and weather
conditions.
Always steer moderately
when you are braking hard. Severe
or sharp steering wheel movement
can still cause your vehicle to veer
into oncoming traffic or off the road. on loose or
uneven surf aces, such as gravel or
snow, than a vehicle without anti-
lock. Slow down and allow a greater
distance between vehicles under
those conditions.
Anti-lock Brakes (ABS)
Driving
Import ant Saf et y Reminders
A BS does not reduce the time or
distance it takes to stop the
vehicle.
A BS will not prevent a skid that
results f rom changing direction
abruptly,
A BS cannot prevent a loss of
stability. A vehicle with A BS may require a
longer distance to stop
140
�����—�����—�����y�
�������������y���
�(���%�������y���
�����y
Page 158 of 231
Check the level on the side of the
reservoir when the engine is cold.
The f luid should be between the
UPPER LEVEL and LOWER LEVEL.
If not add power steering f luid to the
UPPER LEVEL mark.Always use Honda Power Steering
Fluid. You may use another power
steering f luid as an emergency
replacement, but have the power
steering system f lushed and ref illed
with Honda PSF as soon as possible.
A low power steering f luid level can
indicate a leak in the system. Check
the f luid level f requently, and have
the system inspected as soon as
possible.
Maint enance
Power Steering Fluid
Power Steering Fluid
159
NOTICE:
UPPER LEVEL
LOWER LEVEL
T urning the steering wheel to
f ull lef t or right lock and holding it
there can damage the power steeringpump.
�����—�����—�����y�
�������������y���
�(���%�������y���
�����y
Page 165 of 231

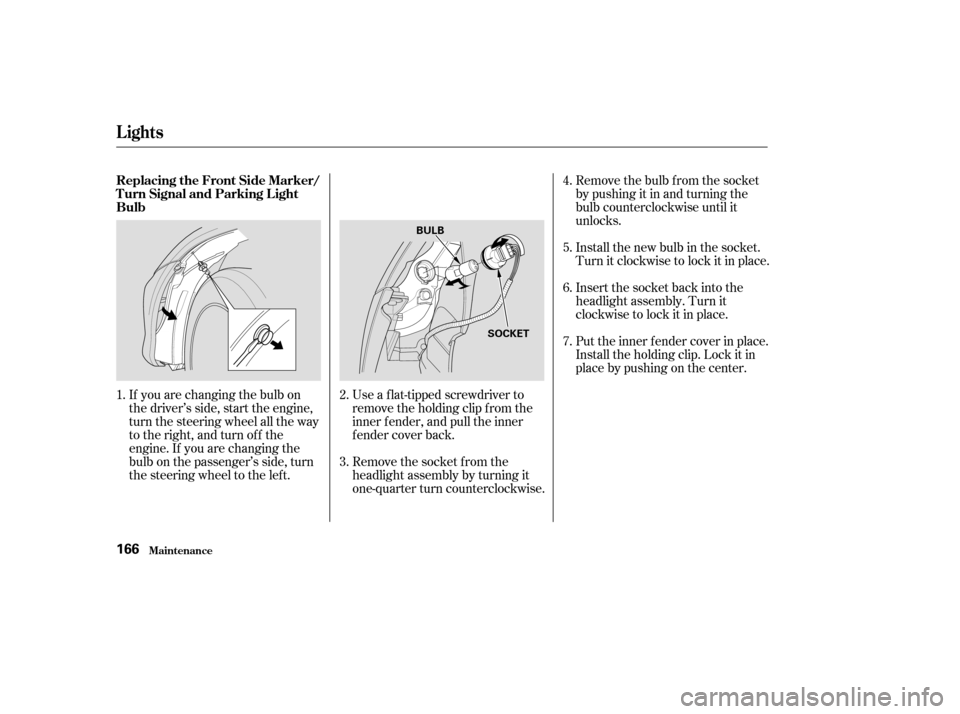
If you are changing the bulb on
the driver’s side, start the engine,
turn the steering wheel all the way
to the right, and turn off the
engine. If you are changing the
bulb on the passenger’s side, turn
the steering wheel to the left.Use a f lat-tipped screwdriver to
remove the holding clip f rom the
inner f ender, and pull the inner
f ender cover back.
Remove the socket from the
headlight assembly by turning it
one-quarter turn counterclockwise.Remove the bulb f rom the socket
bypushingitinandturningthe
bulb counterclockwise until it
unlocks.
Install the new bulb in the socket.
Turn it clockwise to lock it in place.
Insert the socket back into the
headlight assembly. Turn it
clockwise to lock it in place.
Put the inner f ender cover in place.
Install the holding clip. Lock it in
place by pushing on the center.
2.
1.
3.4. 5. 6. 7.
Lights
Maint enance
Replacing the Front Side Marker/
Turn Signal and Parking L ightBulb
166
BULB
SOCKET
�����—�����—�����y�
�������������y���
�(���%�������y���
�����y
Page 174 of 231

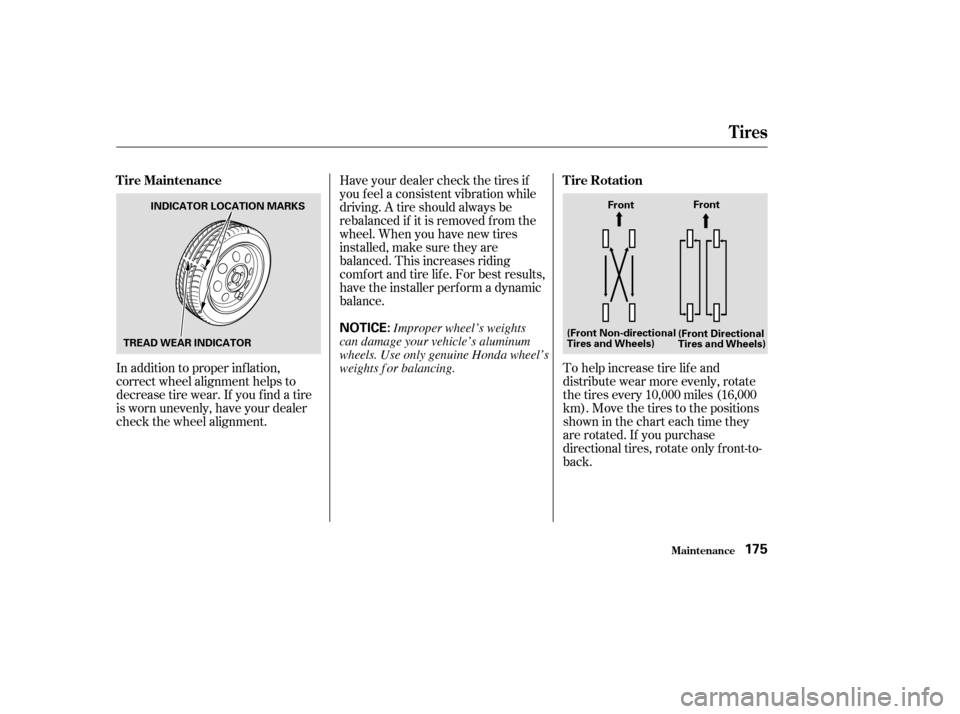
To help increase tire lif e and
distribute wear more evenly, rotate
the tires every 10,000 miles (16,000
km). Move the tires to the positions
showninthecharteachtimethey
are rotated. If you purchase
directional tires, rotate only f ront-to-
back.
In addition to proper inf lation,
correct wheel alignment helps to
decrease tire wear. If you f ind a tire
is worn unevenly, have your dealer
check the wheel alignment. Have your dealer check the tires if
you f eel a consistent vibration while
driving. A tire should always be
rebalanced if it is removed f rom the
wheel. When you have new tires
installed, make sure they are
balanced. This increases riding
comf ort and tire lif e. For best results,
have the installer perform a dynamic
balance.
Tire Rotation
T ire Maintenance
Tires
Maint enance175
NOTICE:
INDICATOR LOCATION MARKS
TREAD WEAR INDICATOR Front
Front
(Front Non-directional
Tires and Wheels) (Front Directional
Tires and Wheels)
Improper wheel’s weights
can damage your vehicle’s aluminum
wheels. Use only genuine Honda wheel’s
weights f or balancing.
�����—�����—�����y�
�������������y���
�(���%�������y���
�����y
Page 175 of 231

Replace your tires with radial tires of
the same size, load range, speed
rating, and maximum cold tire
pressure rating (as shown on the
tire’s sidewall). Mixing radial and
bias-ply tires on your vehicle can
reduce braking ability, traction, and
steering accuracy. Using tires of a
dif f erent size or construction can
cause the ABS to work inconsistently.
If you ever replace a wheel, make
sure that the wheel’s specif ications
match those of the original wheels.
It is best to replace all f our tires at
thesametime.If thatisnotpossible
or necessary, replace the two f ront
tires or two rear tires as a pair.
Replacing just one tire can seriously
af f ect your vehicle’s handling. Wheels:
Tires:
See page f or DOT tire quality
grading inf ormation, and page
f or tire size explanation.
(U.S.: HX)
(U.S.: EX, Canada: Si)
(Aluminum Wheel)
(U.S.: LX, Canada: LX)
(Aluminum Wheel)
(Canada: LX)
(U.S.: LX, EX, Canada: Si)
(U.S.: DX, Canada: DX)
(U.S.: DX, HX, Canada: DX)
210
211
Replacing T ires
Wheel and T ire Specif ications
Tires
Maint enance176
14x51/2JJ
15x6JJ
15x6JJ
14x51/2JJ
P185/70R14 87S
P185/65R15 86H
P195/60R15 87H
Installing improper tires on your
vehicle can affect handling and
stability. This can cause a crash
in which you can be seriously
hurt or killed.
Always use the size and type of
tires recommended in this
owner’s manual.
�����—�����—�����y�
�������������y���
�(���%�������y���
�����y