Page 41 of 313
Other LATCH-compatible seats have
a f lexible-type connection as shown
above.Whatever type you have, f ollow
the child seat maker’s instructions
f or adjusting or tightening the f it. Route the tether strap through the
legs of the head restraint, then
attach the hook to the anchorage
point as shown.
Make sure the strap is not twisted,
then tighten the strap according to
the child seat maker’s instructions.
Push and pull the child seat
f orward and f rom side-to-side to
verif y that it is secure.
4. 5.
6. 7.
Installing a Child Seat
Driver and Passenger Saf ety42
Flexible type
�����—�����—�����y�
�����������
�y���
�(���%���
���y���������y
Page 42 of 313

CONT INUED
When not using the LATCH system,
all child seats must be secured to the
vehicle with the lap part of a lap/
shoulder belt.
In addition, the lap/shoulder belts in
the rear seat and the f ront passenger
seat have a locking mechanism that
must be activated to secure a child
seat.With the child seat in the desired
seating position, route the belt
through the child seat according
to the seat maker’s instructions,
then insert the latch plate into the
buckle.To activate the lockable retractor,
slowly pull the shoulder part of the
belt all the way out until it stops,
then let the belt f eed back into the
retractor.
Af ter the belt has retracted, tug on
it. If the belt is locked, you will not
be able to pull it out. If you can pull
thebeltout,itisnotlocked,and
you will need to repeat these steps.
1.
2. 3.
Installing a Child Seat
Driver and Passenger Saf ety
Installing a Child Seat with a L ap/
Shoulder Belt
43
�����—�����—�����y�
�������������y���
�(���%���
���y���������y
Page 47 of 313

A child who has outgrown a forward-
f acing child seat should ride in the
back seat and use a booster seat
until the lap/shoulder belt f its them
properly without the booster.
Some states also require children to
use a booster until they reach a
given age or weight (e.g., 6 years or
60lbs).Besuretocheckcurrent
laws in the state or states where you
intend to drive.The National Highway Traffic Safety
Administration and Transport
Canada recommend that all children
ages 12 and under be properly
restrained in the back seat.
Even with advanced front airbag, the
back seat is the safest place for a
child of any age or size.
If the passenger’s f ront airbag is on,
and it inflates in a moderate to
severe f rontal collision, the airbag
can cause serious injuries to a child
who is unrestrained, improperly
restrained, sitting too close to the
airbag, or out of position.
The side airbag also poses risks. If
any part of a larger child’s body is in
the path of a deploying side airbag,
the child could receive possibly
serious injuries.
Booster seats can be high-back or
low-back. Whichever style you select,
make sure the booster meets f ederal
saf ety standards (see page ) and
that you f ollow the booster seat
maker’s instructions.
If a child who uses a booster must
ride in f ront, move the vehicle seat
as far to the rear as possible, and be
sure the child is wearing the seat
belt properly.
A child may continue using a booster
seat until the tops of their ears are
even with the top of the vehicle’s or
booster’s seat-back. A child of this
height should be tall enough to use
the lap/shoulder belt without a
booster.
40
Protecting L arger Children
Driver and Passenger Saf ety
Using a Booster Seat
When Can a L arger Child Sit in
Front
48
�����—�����—�����y�
�������������y���
�(���%���
���y�������
�y
Page 54 of 313

This section gives inf ormation about
the controls and displays that
contribute to the daily operation of
your Honda. All the essential
controls are within easy reach............................
Control Locations . 56
..............................
Instument Panel . 57
...........
Instument Panel Indicators . 58
..
Maintenance Required Indicator . 63
.............................................
Gauges . 65
.....................................
Odometer . 65
Outside Temperature
...................................
Indicator . 66
...................................
Trip Meter . 66
...................
Temperature Gauge . 67
..................................
Fuel Gauge . 67
Controls Near the Steering ...........................................
Wheel . 68
.
Windshield Wipers and Washers . 69
...........
Turn Signal and Headlights . 70
........
Instrument Panel Brightness . 72
..............................
Hazard Warning . 72
.................
Rear Window Def ogger . 73
..........
Steering Wheel Adjustment . 74
...............................
Keys and Locks . 75
........................
Immobilizer System . 76
................................
Ignition Switch . 77
..........................
Power Door Locks . 78
.......................
Remote Transmitter . 79
................................................
Trunk . 82
........
Emergency Trunk Opener . 82 .................................................
Seats . 83
....................................
Seat Heaters . 90
..............................
Power Windows . 91
.........................................
Moonroof . 94
.............................................
Mirrors . 95
.................................
Parking Brake . 97
...........
Interior Convenience Items . 98
....................................
Glove Box . 99
.......................
Beverage Holders . 99
.............
Console Compartment . 100
....................
Center CD Pocket . 100
...............................
Coin Pocket . 101
...................................
Sun Visor . 101
............................
Vanity Mirror . 102
..................................
Coat Hook . 102
....................
Sunglasses Holder . 103
........
Accessory Power Sockets . 103
...............................
Interior Lights . 103
Instruments and Controls
Inst rument s and Cont rols55
�����—�����—�����y�
����
��������y���
�(���%���
���y���������y
Page 82 of 313
�µ
AllV6models,the4-cylinderEX-L
model, and all Canadian EX models
have a power adjustable driver’s seat.
The 4-cylinder EX model has a
power seat bottom height
adjustment. All other driver’s seat
adjustmentsinthismodelare
manual.
The 4-cylinder LX model has manual
driver’s seat adjustments (see next
column).
The f ront passenger’s seat in all
models adjusts manually.To change the seat-back angle, pull
up on the lever on the outside of the
seat bottom.
To adjust the seat forward and
backward, pull up on the bar under
the seat cushion’s f ront edge. Move
the seat to the desired position and
releasethebar.Trytomovetheseat
to make sure it is locked in position.
Make all seat adjustments bef ore
you start driving.
See pages f or important saf ety
inf ormation and warnings about how toproperly position the seats and seat-backs. 11 13
Seats
Inst rument s and Cont rols
Manual Seat Adjustments
83
�����—�����—�����y�
����
��������y���
�(���%���
���y���������y
Page 83 of 313
The height of your driver’s seat is
adjustable. To raise the seat bottom,
repeatedly pull up the lever on the
outside of the seat cushion. To lower
the seat, push down the lever
repeatedly.
Make all seat adjustments bef ore
you start driving.Make sure to pull the lever upward
or downward to its f ull range.
The height of your driver’s seat is
power adjustable. Pull up on the
switch to raise the seat. Push it down
to lower the seat.
Make all seat adjustments bef ore
you start driving.
On 4-cylinder EX model
On 4-cylinder LX model
Seats
Inst rument s and Cont rols
Driver’s Seat Manual Height
Adjustment Driver’s Seat Power Height
Adjustment
84
�����—�����—�����y�
����
��������y���
�(���%���
���y���������y
Page 84 of 313
�µ
See pages f or important saf ety
inf ormation and warnings about how toproperly position the seats and seat-backs.
On all V6 models, and the 4-cylinder
EX-L model 11 13
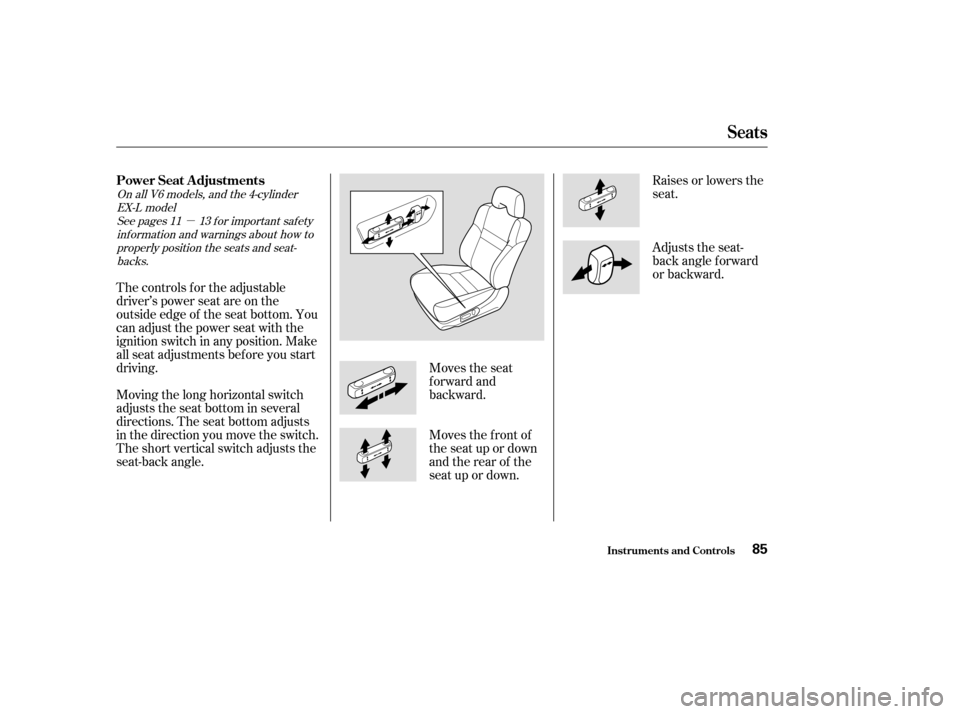
The controls f or the adjustable
driver’s power seat are on the
outside edge of the seat bottom. You
can adjust the power seat with the
ignition switch in any position. Make
all seat adjustments bef ore you start
driving.
Moving the long horizontal switch
adjusts the seat bottom in several
directions. The seat bottom adjusts
in the direction you move the switch.
The short vertical switch adjusts the
seat-back angle. Raises or lowers the
seat.
Adjusts the seat-
back angle f orward
or backward.
Moves the f ront of
the seat up or down
and the rear of the
seat up or down.
Moves the seat
forward and
backward.
Seats
Inst rument s and Cont rols
Power Seat A djustments
85
�����—�����—�����y�
����
��������y���
�(���%���
���y���������y
Page 85 of 313
To change the lumbar support, move
the lever on the right side of the
seat-back forward or backward.
Keep moving the lever f orward or
backward until you f ind a suitable
position.To use the console lid as an armrest,
slide it to the desired position.
Make sure the passenger’s hands or
fingersareawayfromthearmrest
bef ore moving it.
To get into the rear seat on the
driver’s side, open the door and pull
the release lever up on the side of
the seat-back. The seat-back will tilt
f orward to allow easier entry to the
rear seat.
On all EX and EX-V6 models
On all V6 models and 4-cylinder EX-L
model
Seats
Inst rument s and Cont rols
Driver’s L umbar Support A rmrest Rear Seat A ccess
Driver’s Side
86
RELEASE LEVER
�����—�����—�����y�
����
��������y���
�(���%���
���y���������y