2004 GMC YUKON XL DENALI flat tire
[x] Cancel search: flat tirePage 390 of 468
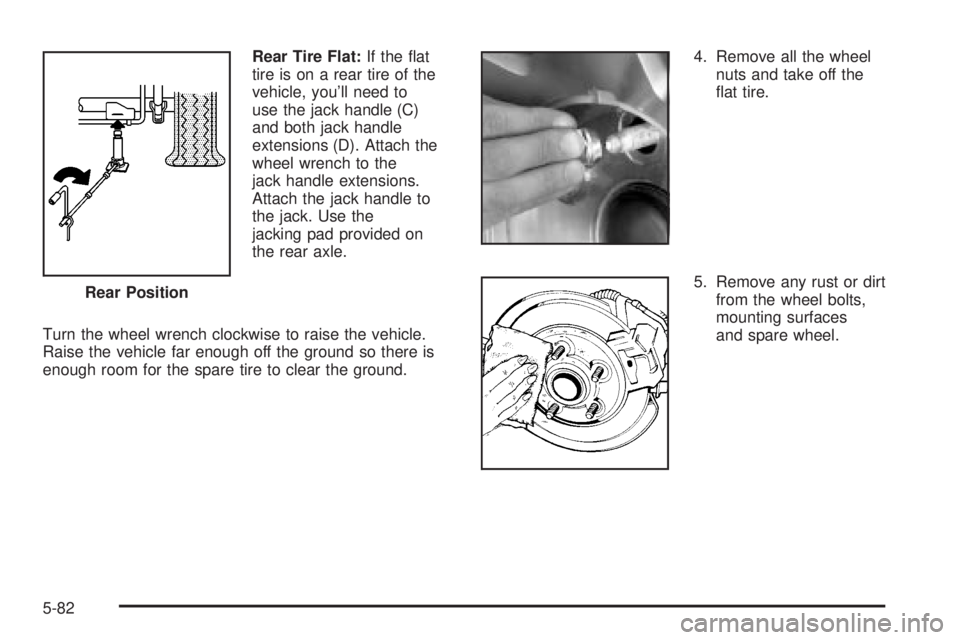
Rear Tire Flat:If the ¯at
tire is on a rear tire of the
vehicle, you'll need to
use the jack handle (C)
and both jack handle
extensions (D). Attach the
wheel wrench to the
jack handle extensions.
Attach the jack handle to
the jack. Use the
jacking pad provided on
the rear axle.
Turn the wheel wrench clockwise to raise the vehicle.
Raise the vehicle far enough off the ground so there is
enough room for the spare tire to clear the ground.4. Remove all the wheel
nuts and take off the
¯at tire.
5. Remove any rust or dirt
from the wheel bolts,
mounting surfaces
and spare wheel. Rear Position
5-82
Page 392 of 468
{CAUTION:
Incorrect wheel nuts or improperly tightened
wheel nuts can cause the wheel to come loose
and even come off. This could lead to an
accident. Be sure to use the correct wheel
nuts. If you have to replace them, be sure to
get new GM original equipment wheel nuts.
Stop somewhere as soon as you can and have
the nuts tightened with a torque wrench to the
proper torque speci®cation. See ªCapacities
and Speci®cationsº in the Index for wheel nut
torque speci®cation.
Notice:Improperly tightened wheel nuts can lead
to brake pulsation and rotor damage. To avoid
expensive brake repairs, evenly tighten the wheel
nuts in the proper sequence and to the proper
torque speci®cation. See ªCapacities and
Speci®cationsº in the index for the wheel nut torque
speci®cation.When you reinstall the regular wheel and tire, you must
also reinstall the center cap. Place the cap on the
wheel and tap it into place until it seats ¯ush with the
wheel. The cap only goes on one way. Be sure to line up
the tab on the center cap with the indentation on the
wheel.
Storing a Flat or Spare Tire, Jack and
Tools
{CAUTION:
Storing a jack, a tire, or other equipment in the
passenger compartment of the vehicle could
cause injury. In a sudden stop or collision,
loose equipment could strike someone. Store
all these in the proper place.
Notice:Storing an aluminum wheel with a ¯at tire
under your vehicle for an extended period of time or
with the valve stem pointing up may damage the
wheel. Always stow the wheel with the valve
stem pointing down and have the wheel/tire repaired
as soon as possible.
5-84
Page 396 of 468
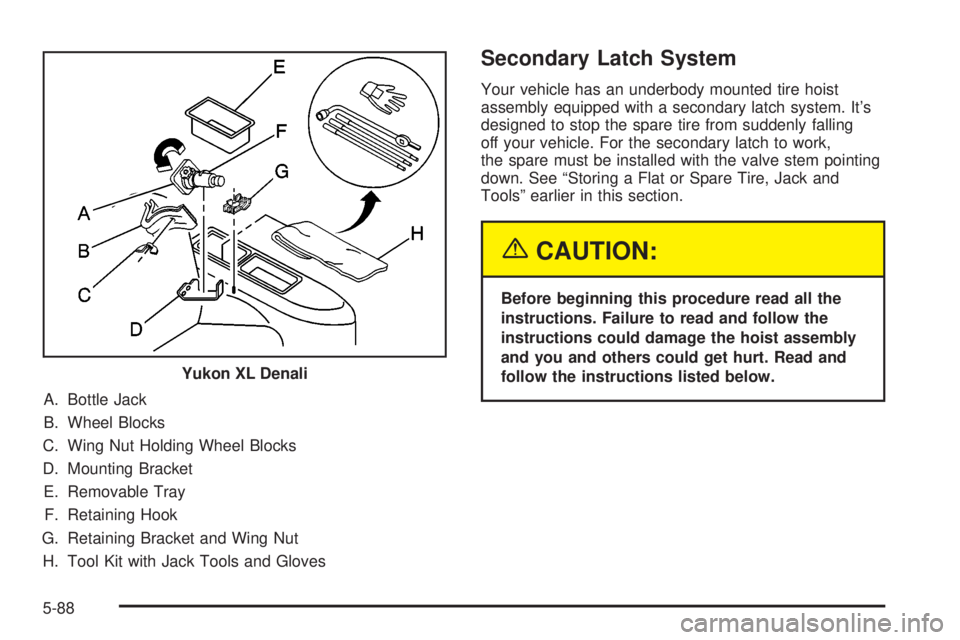
A. Bottle Jack
B. Wheel Blocks
C. Wing Nut Holding Wheel Blocks
D. Mounting Bracket
E. Removable Tray
F. Retaining Hook
G. Retaining Bracket and Wing Nut
H. Tool Kit with Jack Tools and Gloves
Secondary Latch System
Your vehicle has an underbody mounted tire hoist
assembly equipped with a secondary latch system. It's
designed to stop the spare tire from suddenly falling
off your vehicle. For the secondary latch to work,
the spare must be installed with the valve stem pointing
down. See ªStoring a Flat or Spare Tire, Jack and
Toolsº earlier in this section.
{CAUTION:
Before beginning this procedure read all the
instructions. Failure to read and follow the
instructions could damage the hoist assembly
and you and others could get hurt. Read and
follow the instructions listed below. Yukon XL Denali
5-88
Page 399 of 468
11. Lower the jack by turning the wheel wrench
counterclockwise. Keep lowering the jack until the
spare tire slides off the jack or is hanging by
the cable.
{CAUTION:
Someone standing too close during the
procedure could be injured by the jack. If the
spare tire does not slide off the jack
completely, make sure no one is behind you or
on either side of you as you pull the jack out
from the spare.
12. Disconnect the jack handle from the jack and
carefully remove the jack. Use one hand to
push against the spare while ®rmly pulling
the jack out from under the spare tire with the
other hand.
If the spare tire is hanging from the cable, insert the
hoist handle, extension and wheel wrench into
the hoist shaft hole in the bumper and turn
the wheel wrench counterclockwise to lower the
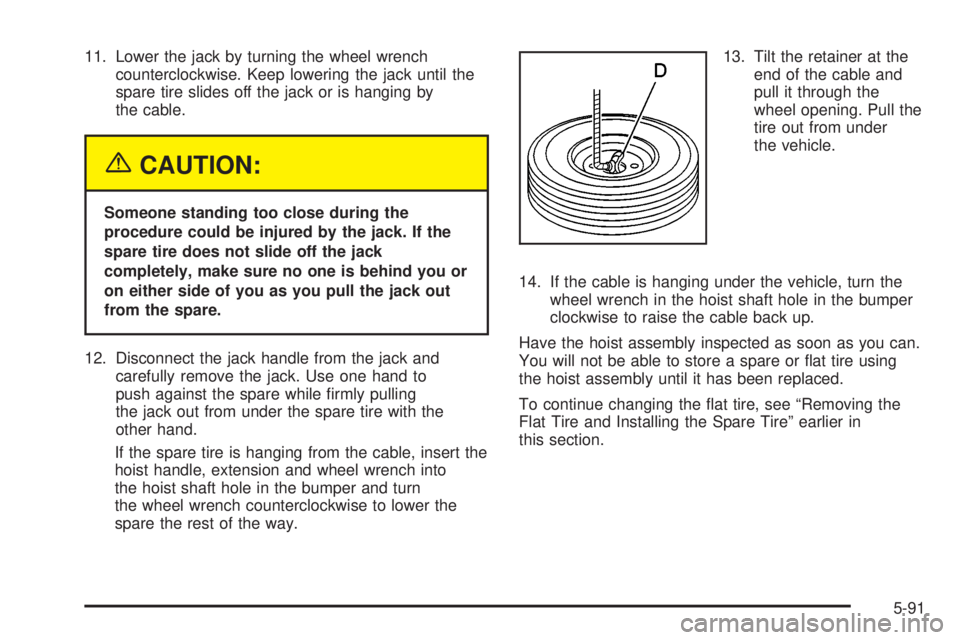
spare the rest of the way.13. Tilt the retainer at the
end of the cable and
pull it through the
wheel opening. Pull the
tire out from under
the vehicle.
14. If the cable is hanging under the vehicle, turn the
wheel wrench in the hoist shaft hole in the bumper
clockwise to raise the cable back up.
Have the hoist assembly inspected as soon as you can.
You will not be able to store a spare or ¯at tire using
the hoist assembly until it has been replaced.
To continue changing the ¯at tire, see ªRemoving the
Flat Tire and Installing the Spare Tireº earlier in
this section.
5-91
Page 400 of 468
Spare Tire
Your vehicle, when new, had a fully in¯ated spare tire.
A spare tire may lose air over time, so check its
in¯ation pressure regularly. See
Tires on page 5-54andLoading Your Vehicle on page 4-44for more information
regarding proper tire in¯ation and loading your vehicle.
For instruction on how to remove or store a spare
tire, see
Changing a Flat Tire on page 5-74.
After installing the spare tire on your vehicle, you should
stop as soon as possible and make sure the spare is
correctly in¯ated. Have the damaged or ¯at road
tire repaired or replaced as soon as you can and
installed back onto your vehicle. This way, a spare tire
will be available in case you need it again.
Your vehicle may have a different size spare tire than
the road tires, those originally installed on your vehicle.
This spare tire was developed for use on your vehicle,
so it is all right to drive on it.
Appearance Care
Remember, cleaning products can be hazardous. Some
are toxic. Others can burst into ¯ames if you strike a
match or get them on a hot part of the vehicle. Some are
dangerous if you breathe their fumes in a closed
space. When you use anything from a container to clean
your vehicle, be sure to follow the manufacturer's
warnings and instructions. And always open your doors
or windows when you are cleaning the inside.
Never use these to clean your vehicle:
·Gasoline
·Benzene
·Naphtha
·Carbon Tetrachloride
·Acetone
·Paint Thinner
·Turpentine
·Lacquer Thinner
·Nail Polish Remover
They can all be hazardous Ð some more than
others Ð and they can all damage your vehicle, too.
5-92
Page 432 of 468

Engine Coolant Level Check
Check the engine coolant level and add
DEX-COOLžcoolant mixture if necessary. SeeEngine
Coolant on page 5-23for further details.
Windshield Washer Fluid Level Check
Check the windshield washer ¯uid level in the windshield
washer tank and add the proper ¯uid if necessary.
At Least Once a Month
Tire In¯ation Check
Visually inspect your tires and make sure tires are
in¯ated to the correct pressures. Do not forget to check
your spare tire. See
Tires on page 5-54for further
details. Check to make sure the spare tire is stored
securely. Push, pull and then try to rotate or turn
the spare tire. If it moves, tighten it. See
Changing a
Flat Tire on page 5-74.
At Least Once a Year
Starter Switch Check
{CAUTION:
When you are doing this inspection, the
vehicle could move suddenly. If the vehicle
moves, you or others could be injured.
1. Before you start, be sure you have enough room
around the vehicle.
2. Firmly apply both the parking brake and the regular
brake. See
Parking Brake on page 2-26if
necessary.
Do not use the accelerator pedal, and be ready to
turn off the engine immediately if it starts.
3. Try to start the engine in each gear. The starter
should work only in PARK (P) or NEUTRAL (N).
If the starter works in any other position, contact
your GM Goodwrench dealer for service.
6-10
Page 446 of 468
·Emergency Tow:Tow to the nearest dealership for
warranty service or in the event of a
vehicle-disabling accident. Assistance when the
vehicle is mired in sand, mud or snow.
·Flat Tire Change:Installation of a spare tire will be
covered at no charge. (The customer is responsible
for the repair or replacement of the tire if not
covered by a warrantable failure.)
·Jump Start:No-start occurrences which require a
battery jump start will be covered at no charge.
·Dealer Locator Service
·Trip Routing:Your Roadside Assistance
Representative can provide you with speci®c
information regarding this feature.
·Trip Interruption Expense Bene®ts:Your
Roadside Assistance Representative can provide
you with speci®c information regarding this feature.
In many instances, mechanical failures are covered
under GMC's Bumper-to-Bumper warranty. However,
when other services are utilized, our Roadside
Assistance Representatives will explain any payment
obligations you might incur.For prompt and efficient assistance when calling, please
provide the following to the Roadside Assistance
Representative:
·Your name, home address, and home telephone
number
·Telephone number of your location
·Location of the vehicle
·Model, year, color, and license plate number
·Mileage, Vehicle Identi®cation Number, and delivery
date of the vehicle
·Description of the problem
While we hope you never have the occasion to use our
service, it is added security while traveling for you
and your family. Remember, we are only a phone call
away. GMC Roadside Assistance: 1-800-462-8782, text
telephone (TTY) users, call 1-888-889-2438.
GMC reserves the right to limit services or
reimbursement to an owner or driver when, in GMC's
judgement, the claims become excessive in frequency or
type of occurrence.
Roadside Assistance is not part of or included in the
coverage provided by the New Vehicle Limited Warranty.
GMC reserves the right to make any changes or
discontinue the Roadside Assistance program at any
time without noti®cation.
7-6
Page 458 of 468

ENGINE COOLANT HOT.................................3-59
Engine Oil Additives........................................5-16
ENGINE OVERHEATED..................................3-59
Entering or Exiting the Third Row Seats.............. 1-7
Entertainment System
Cleaning the Video Screen...........................3-99
DVD Distortion............................................3-97
Entry Lighting.................................................3-17
Environmental Concerns..................................4-17
Erasing HomeLink
žButtons..............................2-42
Event Data Records (EDR)................................ 7-9
Exit Lighting...................................................3-17
Express-Down Windows...................................2-15
Extender, Safety Belt.......................................1-47
Exterior Lamps...............................................3-14
F
Filter
Engine Air Cleaner......................................5-18
Finding a Program Type (PTY) Station
(RDS and XMŸ).........................................3-70
Finding a Station............................................3-67
Finish Care....................................................5-96
Finish Damage...............................................5-99
Fixed Mast Antenna........................................3-99
Flash-to-Pass................................................... 3-9
Flat Tire........................................................5-73
Flat Tire, Changing.........................................5-74Fluid
Automatic Transmission................................5-20
Power Steering...........................................5-34
Windshield Washer......................................5-35
FM Stereo.....................................................3-97
Fog Lamps....................................................3-16
Folding the Seatback.......................................1-17
Folding the Seatbacks.............................1-12, 1-22
Folding the Seatbacks (60/40 Split Bench Seat)....... 1-9
Following Distance..........................................4-59
Front Axle......................................................5-47
Frontal Air Bags.............................................1-77
Fuel............................................................... 5-4
Additives...................................................... 5-6
California Fuel.............................................. 5-5
Filling a Portable Fuel Container..................... 5-9
Filling Your Tank........................................... 5-7
Fuels in Foreign Countries.............................. 5-7
Gage.........................................................3-45
Gasoline Octane........................................... 5-4
Gasoline Speci®cations.................................. 5-5
Low Warning Light.......................................3-45
Fuel Information Button....................................3-49
FUEL LEVEL LOW.........................................3-59
Fuses
Fuses and Circuit Breakers.........................5-103
Windshield Wiper.......................................5-103
6