2004 GMC YUKON XL DENALI spare wheel
[x] Cancel search: spare wheelPage 1 of 468

Seats and Restraint Systems........................... 1-1
Front Seats
............................................... 1-3
Rear Seats
............................................... 1-7
Safety Belts
.............................................1-25
Child Restraints
.......................................1-48
Air Bag Systems
......................................1-72
Restraint System Check
............................1-86
Features and Controls..................................... 2-1
Keys
........................................................ 2-3
Doors and Locks
....................................... 2-8
Windows
.................................................2-14
Theft-Deterrent Systems
............................2-16
Starting and Operating Your Vehicle
...........2-18
Mirrors
....................................................2-32
OnStar
žSystem
......................................2-37
HomeLinkžTransmitter
.............................2-39
Storage Areas
.........................................2-43
Sunroof
..................................................2-47
Vehicle Personalization
.............................2-48
Instrument Panel............................................. 3-1
Instrument Panel Overview
.......................... 3-4
Climate Controls
......................................3-20
Warning Lights, Gages and Indicators
.........3-30
Driver Information Center (DIC)
..................3-46
Audio System(s)
.......................................3-64Driving Your Vehicle....................................... 4-1
Your Driving, the Road, and Your Vehicle
..... 4-2
Towing
...................................................4-44
Service and Appearance Care.......................... 5-1
Service
..................................................... 5-3
Fuel
......................................................... 5-4
Checking Things Under
the Hood
.............................................5-10
All-Wheel Drive
........................................5-45
Rear Axle
...............................................5-46
Front Axle
...............................................5-47
Bulb Replacement
....................................5-48
Windshield Wiper Blade Replacement
.........5-53
Tires
......................................................5-54
Spare Tire
...............................................5-92
Appearance Care
.....................................5-92
Vehicle Identi®cation
...............................5-102
Electrical System
....................................5-103
Capacities and Speci®cations
...................5-112
Maintenance Schedule..................................... 6-1
Maintenance Schedule
................................ 6-2
Customer Assistance and Information.............. 7-1
Customer Assistance and Information
........... 7-2
Reporting Safety Defects
...........................7-10
Index................................................................ 1
2004 GMC Yukon Denali/Yukon XL Denali Owner ManualM
Page 260 of 468

Operating Your All-Wheel-Drive
Vehicle Off Paved Roads
Many of the same design features that help make your
vehicle responsive on paved roads during poor weather
conditions Ð features like all-wheel drive Ð help make it
much better suited for off-road use than a conventional
passenger car. Its higher ground clearance also helps
your vehicle step over some off-road obstacles. But your
vehicle does not have features like special underbody
shielding and a transfer case low gear range, things that
are usually thought necessary for extended or severe
off-road service. This guide is for operating your vehicle
off paved roads.
Also, see
Braking on page 4-6.
Off-road driving can be great fun. But it does have
some de®nite hazards. The greatest of these is
the terrain itself.
ªOff-roadingº means you have left the great North
American road system behind. Traffic lanes are not
marked. Curves are not banked. There are no
road signs. Surfaces can be slippery, rough, uphill or
downhill. In short, you have gone right back to nature.
Off-road driving involves some new skills. And that
is why it is very important that you read this guide.
You will ®nd many driving tips and suggestions. These
will help make your off-road driving safer and more
enjoyable.
Before You Go Off-Roading
There are some things to do before you go out. For
example, be sure to have all necessary maintenance
and service work done. Check to make sure all
underbody shields (if so equipped) are properly
attached. Is there enough fuel? Is the spare tire fully
in¯ated? Are the ¯uid levels up where they should be?
What are the local laws that apply to off-roading
where you will be driving? If you do not know, you
should check with law enforcement people in the area.
Will you be on someone's private land? If so, be
sure to get the necessary permission.
Loading Your Vehicle for Off-Road
Driving
There are some important things to remember about
how to load your vehicle.
·The heaviest things should be on the load ¯oor and
forward of your rear axle. Put heavier items as far
forward as you can.
·Be sure the load is secured properly, so driving on
the off-road terrain does not toss things around.
4-16
Page 310 of 468

Windshield Wiper Blade Replacement..............5-53
Tires..............................................................5-54
In¯ation - Tire Pressure.................................5-62
Tire Pressure Monitor System.........................5-64
Tire Inspection and Rotation...........................5-66
When It Is Time for New Tires.......................5-68
Buying New Tires.........................................5-68
Uniform Tire Quality Grading..........................5-69
Wheel Alignment and Tire Balance..................5-71
Wheel Replacement......................................5-71
Tire Chains..................................................5-72
If a Tire Goes Flat........................................5-73
Changing a Flat Tire.....................................5-74
Spare Tire......................................................5-92
Appearance Care............................................5-92
Cleaning the Inside of Your Vehicle.................5-93
Care of Safety Belts......................................5-95
Weatherstrips...............................................5-95Cleaning the Outside of Your Vehicle..............5-96
Sheet Metal Damage.....................................5-99
Finish Damage.............................................5-99
Underbody Maintenance................................5-99
Chemical Paint Spotting...............................5-100
Vehicle Care/Appearance Materials................5-100
Vehicle Identi®cation.....................................5-102
Vehicle Identi®cation Number (VIN)................5-102
Service Parts Identi®cation Label...................5-102
Electrical System..........................................5-103
Add-On Electrical Equipment.........................5-103
Windshield Wiper Fuses...............................5-103
Power Windows and Other Power Options......5-103
Fuses and Circuit Breakers..........................5-103
Capacities and Speci®cations........................5-112
Section 5 Service and Appearance Care
5-2
Page 372 of 468

Tire Pressure Monitor System
The Tire Pressure Monitor (TPM) system uses radio
and sensor technology to check tire pressure levels.
If your vehicle has this feature, sensors are mounted on
each tire and wheel assembly, except the spare tire.
The TPM sensors transmit tire pressure readings
to a receiver located in the vehicle.
When a low tire pressure condition is detected, the TPM
system will display the CHECK TIRE PRESSURE
warning message on the Driver Information Center
(DIC); and at the same time illuminate the low tire
pressure warning symbol. For additional information and
details about the DIC operation and displays see DIC
Operation and Displays on page 3-46andDIC Warnings
and Messages on page 3-57.
When the tire pressure
monitoring system warning
light is lit, one or more
of your tires is signi®cantly
under-in¯ated.
You should stop and check your tires as soon as
possible, and in¯ate them to the proper pressure as
indicated on the vehicle's tire information placard.Driving on a signi®cantly under-in¯ated tire causes the
tire to overheat and can lead to tire failure.
Under-in¯ation also reduces fuel efficiency and tire tread
life, and may affect the vehicle's handling and stopping
ability. Each tire, including the spare, should be
checked monthly when cold and set to the
recommended in¯ation pressure as speci®ed in the
vehicle placard and owner's manual.
The Certi®cation/Tire label or the Tire and Loading
Information label (tire information placard) shows the
size of your vehicle's original tires and the correct
in¯ation pressure for your vehicle's tires when they are
cold. See
In¯ation - Tire Pressure on page 5-62. For
the location of the tire and loading information label, see
Loading Your Vehicle on page 4-44.
Your vehicle's TPM system can alert you about a low
tire pressure condition but it does not replace normal tire
maintenance. See
Tire Inspection and Rotation on
page 5-66andTires on page 5-54.
Notice:Do not use a tire sealant if your vehicle is
equipped with Tire Pressure Monitors. The liquid
sealant can damage the tire pressure monitor
sensors.
5-64
Page 374 of 468

9. After hearing the con®rming horn chirp for the left
rear tire, check to see if the TPM warning light is
still ¯ashing. If yes, turn the ignition switch to OFF.
10. Set all four tires to the recommended air pressure
level as indicated on the Certi®cation/Tire label or
the Tire and Loading Information label.
11. Put the valve caps back on the valve stems
The spare tire does not have a TPM sensor. If you
replace one of the road tires with the spare, the CHECK
TIRE PRESSURE message will be displayed on the DIC
screen. This message should go off once you re-install
the road tire containing the TPM sensor. The SERVICE
TIRE MONITOR message is displayed when the TPM
system is malfunctioning. One or more missing or
inoperable TPM sensors will cause the service tire
monitor message to be displayed. See your dealer for
service.
Federal Communications Commission and
Industry and Science Canada
The TPM system operates on a radio frequency subject
to Federal Communications Commission (FCC) Rules
and with Industry and Science Canada.
This device complies with Part 15 of the FCC Rules and
with RSS-210 of Industry and Science Canada.
Operation is subject to the following two conditions:
(1) This device may not cause harmful interference, and(2) this device must accept any interference received
including interference that may cause undesired
operation of the device.
Changes or modi®cations to this system by other than
an authorized service facility could void authorization to
use this equipment.
Tire Inspection and Rotation
Tires should be rotated every 5,000 to 8,000 miles
(8 000 to 13 000 km).
Any time you notice unusual wear, rotate your tires as
soon as possible and check wheel alignment. Also
check for damaged tires or wheels. See
When It Is Time
for New Tires on page 5-68andWheel Replacement
on page 5-71for more information.
Make sure the spare tire is stored securely. Push, pull,
and then try to rotate or turn the tire. If it moves,
use the ratchet/wheel wrench to tighten the cable.
See
Changing a Flat Tire on page 5-74.
The purpose of regular rotation is to achieve more
uniform wear for all tires on the vehicle. The ®rst rotation
is the most important. See
Scheduled Maintenance
on page 6-4.
5-66
Page 375 of 468

When rotating your tires, always use the correct rotation
pattern shown here.
Do not include the spare tire in your tire rotation.
After the tires have been rotated, adjust the front and
rear in¯ation pressures as shown on the tire and loading
information label. See
Loading Your Vehicle on
page 4-44andIn¯ation - Tire Pressure on page 5-62,
for more information. Make certain that all wheel
nuts are properly tightened. See ªWheel Nut Torqueº
under
Capacities and Speci®cations on page 5-112.
If your vehicle has the Tire Pressure Monitor (TPM)
system, the sensors will need to be reset after a
tire rotation is performed. See ªTPM Sensor
Identi®cation Codesº under
Tire Pressure Monitor
System on page 5-64.
{CAUTION:
Rust or dirt on a wheel, or on the parts to
which it is fastened, can make wheel nuts
become loose after a time. The wheel could
come off and cause an accident. When you
change a wheel, remove any rust or dirt from
places where the wheel attaches to the vehicle.
In an emergency, you can use a cloth or a
paper towel to do this; but be sure to use a
scraper or wire brush later, if you need to, to
get all the rust or dirt off. See ªChanging a Flat
Tireº in the Index.
5-67
Page 377 of 468

{CAUTION:
Mixing tires could cause you to lose control
while driving. If you mix tires of different sizes
or types (radial and bias-belted tires), the
vehicle may not handle properly, and you
could have a crash. Using tires of different
sizes may also cause damage to your vehicle.
Be sure to use the same size and type tires on
all wheels.
Your vehicle may be equipped with a different
size spare than the road tires (those originally
installed on your vehicle). When new, your
vehicle included a spare tire and wheel
assembly with a similar overall diameter as
your vehicle's road tires and wheels, so it is all
right to drive on it. Because this spare was
developed for use on your vehicle, it will not
affect vehicle handling.
{CAUTION:
If you use bias-ply tires on your vehicle, the
wheel rim ¯anges could develop cracks after
many miles of driving. A tire and/or wheel
could fail suddenly, causing a crash. Use only
radial-ply tires with the wheels on your vehicle.
Uniform Tire Quality Grading
Quality grades can be found where applicable on the
tire sidewall between tread shoulder and maximum
section width. For example:
Treadwear 200 Traction AA Temperature A
The following information relates to the system
developed by the United States National Highway
Traffic Safety Administration, which grades tires by
treadwear, traction and temperature performance.
(This applies only to vehicles sold in the United States.)
The grades are molded on the sidewalls of most
passenger car tires. The Uniform Tire Quality Grading
system does not apply to deep tread, winter-type
snow tires, space-saver or temporary use spare tires,
tires with nominal rim diameters of 10 to 12 inches
(25 to 30 cm), or to some limited-production tires.
5-69
Page 383 of 468

The following steps will tell you how to use the jack and
change a tire.
Removing the Spare Tire and Tools
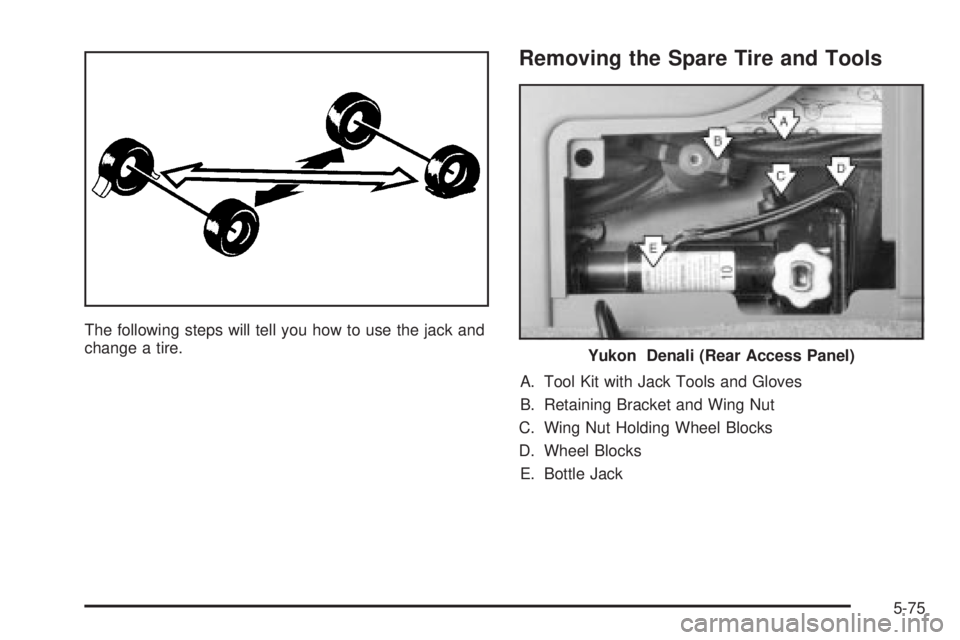
A. Tool Kit with Jack Tools and Gloves
B. Retaining Bracket and Wing Nut
C. Wing Nut Holding Wheel Blocks
D. Wheel Blocks
E. Bottle Jack
Yukon Denali (Rear Access Panel)
5-75