2004 GMC YUKON DENALI light
[x] Cancel search: lightPage 297 of 468

Tow/Haul Mode
The Tow/Haul feature assists when pulling a heavy
trailer or a large or heavy load. The purpose of
the Tow/Haul mode is to:
·Reduce the frequency and improve the predictability
of transmission shifts when pulling a heavy trailer or
a large or heavy load.
·Provide the same solid shift feel when pulling a
heavy trailer or a large or heavy load as when
the vehicle is unloaded.
·Improve control of vehicle speed while requiring
less throttle pedal activity when pulling a heavy
trailer or a large or heavy load.
Your vehicle is provided with a button at the end of the
shift lever which when pressed enables Tow/Haul.
When the button is pressed, a light on the instrument
panel will illuminate to indicate that Tow/Haul has been
selected. Tow/Haul may be turned off by pressing
the button again, at which time the indicator light on the
instrument panel will turn off. The vehicle will
automatically turn off tow/haul every time it is started.Tow/Haul is designed to be most effective when the
vehicle and trailer combined weight is at least 75 percent
of the vehicle's Gross Combination Weight Rating
(GCWR). See ªWeight of the Trailerº later in this section.
Tow/Haul is most useful under the following driving
conditions:
·When pulling a heavy trailer or a large or heavy
load through rolling terrain.
·When pulling a heavy trailer or a large or heavy
load in stop and go traffic.
·When pulling a heavy trailer or a large or heavy
load in busy parking lots where improved low
speed control of the vehicle is desired.
Operating the vehicle in Tow/Haul when lightly loaded
or with no trailer at all will not cause damage. However,
there is no bene®t to the selection of Tow/Haul when
the vehicle is unloaded. Such a selection when unloaded
may result in unpleasant engine and transmission
driving characteristics and reduced fuel economy.
Tow/Haul is recommended only when pulling a heavy
trailer or a large or heavy load.
4-53
Page 306 of 468
Trailer Wiring Harness
Heavy-Duty Trailer Wiring Package
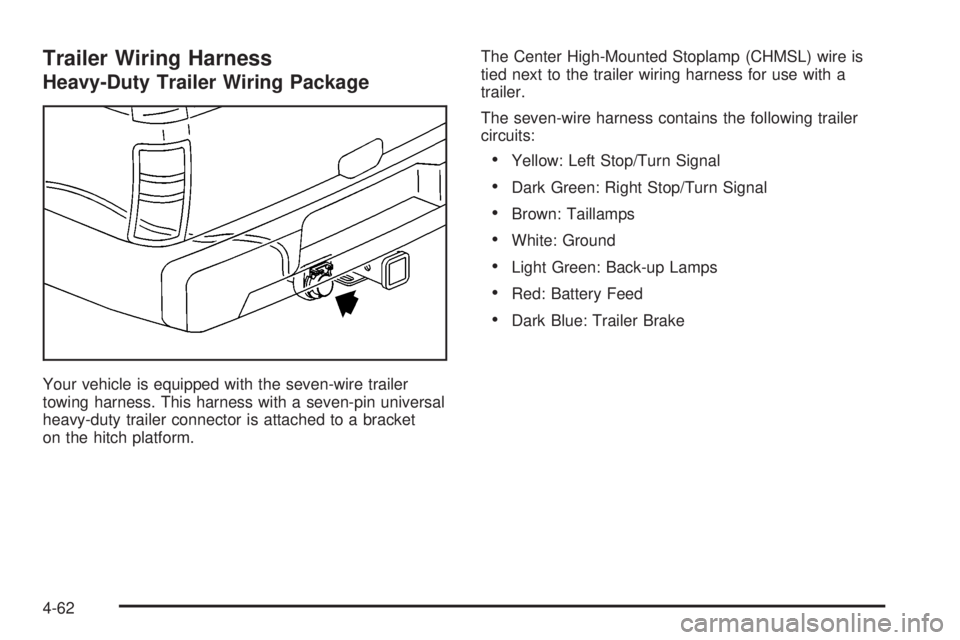
Your vehicle is equipped with the seven-wire trailer
towing harness. This harness with a seven-pin universal
heavy-duty trailer connector is attached to a bracket
on the hitch platform.The Center High-Mounted Stoplamp (CHMSL) wire is
tied next to the trailer wiring harness for use with a
trailer.
The seven-wire harness contains the following trailer
circuits:
·Yellow: Left Stop/Turn Signal
·Dark Green: Right Stop/Turn Signal
·Brown: Taillamps
·White: Ground
·Light Green: Back-up Lamps
·Red: Battery Feed
·Dark Blue: Trailer Brake
4-62
Page 317 of 468
{CAUTION:
If a ®re starts while you are refueling, do not
remove the nozzle. Shut off the ¯ow of fuel by
shutting off the pump or by notifying the
station attendant. Leave the area immediately.
Notice:If you need a new fuel cap, be sure to get
the right type. Your dealer can get one for you.
If you get the wrong type, it may not ®t properly.
This may cause your malfunction indicator lamp to
light and may damage your fuel tank and emissions
system. See
Malfunction Indicator Lamp on
page 3-40.
Filling a Portable Fuel Container
{CAUTION:
Never ®ll a portable fuel container while it is in
your vehicle. Static electricity discharge from
the container can ignite the gasoline vapor.
You can be badly burned and your vehicle
damaged if this occurs. To help avoid injury to
you and others:
·Dispense gasoline only into approved
containers.
·Do not ®ll a container while it is inside a
vehicle, in a vehicle's trunk, pickup bed or
on any surface other than the ground.
·Bring the ®ll nozzle in contact with the
inside of the ®ll opening before operating
the nozzle. Contact should be maintained
until the ®lling is complete.
·Do not smoke while pumping gasoline.
5-9
Page 326 of 468
Engine Air Cleaner/Filter
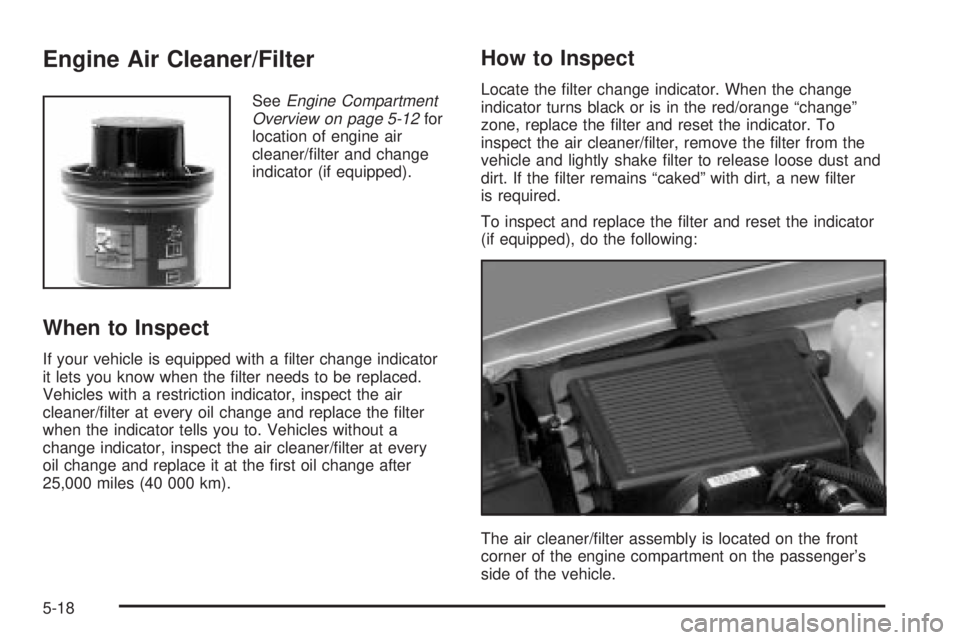
SeeEngine Compartment
Overview on page 5-12for
location of engine air
cleaner/®lter and change
indicator (if equipped).
When to Inspect
If your vehicle is equipped with a ®lter change indicator
it lets you know when the ®lter needs to be replaced.
Vehicles with a restriction indicator, inspect the air
cleaner/®lter at every oil change and replace the ®lter
when the indicator tells you to. Vehicles without a
change indicator, inspect the air cleaner/®lter at every
oil change and replace it at the ®rst oil change after
25,000 miles (40 000 km).
How to Inspect
Locate the ®lter change indicator. When the change
indicator turns black or is in the red/orange ªchangeº
zone, replace the ®lter and reset the indicator. To
inspect the air cleaner/®lter, remove the ®lter from the
vehicle and lightly shake ®lter to release loose dust and
dirt. If the ®lter remains ªcakedº with dirt, a new ®lter
is required.
To inspect and replace the ®lter and reset the indicator
(if equipped), do the following:
The air cleaner/®lter assembly is located on the front
corner of the engine compartment on the passenger's
side of the vehicle.
5-18
Page 331 of 468
Engine Coolant
The cooling system in your vehicle is ®lled with
DEX-COOLžengine coolant. This coolant is designed
to remain in your vehicle for 5 years or 150,000 miles
(240 000 km), whichever occurs ®rst, if you add
only DEX-COOL
žextended life coolant.
The following explains your cooling system and how to
add coolant when it is low. If you have a problem
with engine overheating, see
Engine Overheating on
page 5-25.
A 50/50 mixture of clean, drinkable water and
DEX-COOL
žcoolant will:
·Give freezing protection down to-34ÉF (-37ÉC).
·Give boiling protection up to 265ÉF (129ÉC).
·Protect against rust and corrosion.
·Help keep the proper engine temperature.
·Let the warning lights and gages work as they
should.
Notice:Using coolant other than DEX-COOLžmay
cause premature engine, heater core or radiator
corrosion. In addition, the engine coolant may
require changing sooner, at 30,000 miles (50 000 km)
or 24 months, whichever occurs ®rst. Any repairs
would not be covered by your warranty. Always use
DEX-COOL
ž(silicate-free) coolant in your vehicle.
What to Use
Use a mixture of one-halfclean, drinkable waterand
one-half DEX-COOLžcoolant which won't damage
aluminum parts. If you use this coolant mixture,
you don't need to add anything else.
{CAUTION:
Adding only plain water to your cooling
system can be dangerous. Plain water, or
some other liquid such as alcohol, can boil
before the proper coolant mixture will. Your
vehicle's coolant warning system is set for the
proper coolant mixture. With plain water or the
wrong mixture, your engine could get too hot
but you would not get the overheat warning.
Your engine could catch ®re and you or others
could be burned. Use a 50/50 mixture of clean,
drinkable water and DEX-COOL
žcoolant.
Notice:If you use an improper coolant mixture,
your engine could overheat and be badly damaged.
The repair cost would not be covered by your
warranty. Too much water in the mixture can freeze
and crack the engine, radiator, heater core and
other parts.
5-23
Page 346 of 468

Notice:
·Using the wrong ¯uid can badly damage brake
system parts. For example, just a few drops of
mineral-based oil, such as engine oil, in your
brake system can damage brake system
parts so badly that they will have to be replaced.
Do not let someone put in the wrong kind of
¯uid.
·If you spill brake ¯uid on your vehicle's painted
surfaces, the paint ®nish can be damaged. Be
careful not to spill brake ¯uid on your vehicle. If
you do, wash it off immediately. See
Appearance
Care on page 5-92.
Brake Wear
Your vehicle has four-wheel disc brakes.
Disc brake pads have built-in wear indicators that make
a high-pitched warning sound when the brake pads
are worn and new pads are needed. The sound
may come and go or be heard all the time your vehicle
is moving (except when you are pushing on the
brake pedal ®rmly).
{CAUTION:
The brake wear warning sound means that
soon your brakes will not work well. That
could lead to an accident. When you hear the
brake wear warning sound, have your vehicle
serviced.
Notice:Continuing to drive with worn-out brake
pads could result in costly brake repair.
Some driving conditions or climates may cause a brake
squeal when the brakes are ®rst applied or lightly
applied. This does not mean something is wrong with
your brakes.
Properly torqued wheel nuts are necessary to help
prevent brake pulsation. When tires are rotated, inspect
brake pads for wear and evenly tighten wheel nuts in
the proper sequence to GM torque speci®cations.
Brake linings should always be replaced as complete
axle sets.
5-38
Page 349 of 468
Notice:If you leave your radio or other accessories
on during the jump starting procedure, they could
be damaged. The repairs would not be covered
by your warranty. Always turn off your radio and
other accessories when jump starting your vehicle.
3. Turn off the ignition on both vehicles. Unplug
unnecessary accessories plugged into the cigarette
lighter or accessory power outlets. Turn off the
radio and all lamps that aren't needed. This
will avoid sparks and help save both batteries. And
it could save your radio!
4. Open the hoods and locate the positive (+) and
negative (-) terminal locations of the other vehicle.
Your vehicle has a remote positive (+) jump
starting terminal and a remote negative (-) jump
starting terminal. You should always use these
remote terminals instead of the terminals on the
battery.
The remote positive (+) terminal is located under a
red plastic cover, if equipped, near the engine
accessory drive bracket. To access the remote
positive (+) terminal, open the red plastic cover, if
equipped.
The remote negative (-) terminal is located on the
engine accessory drive bracket and is marked GND.
See
Engine Compartment Overview on page 5-12for more information on location.
{CAUTION:
Using a match near a battery can cause battery
gas to explode. People have been hurt doing
this, and some have been blinded. Use a
¯ashlight if you need more light.
Be sure the battery has enough water. You do
not need to add water to the ACDelco
žbattery
installed in your new vehicle. But if a battery
has ®ller caps, be sure the right amount of
¯uid is there. If it is low, add water to take care
of that ®rst. If you do not, explosive gas could
be present.
Battery ¯uid contains acid that can burn you.
Do not get it on you. If you accidentally get it
in your eyes or on your skin, ¯ush the place
with water and get medical help immediately.
5-41
Page 367 of 468
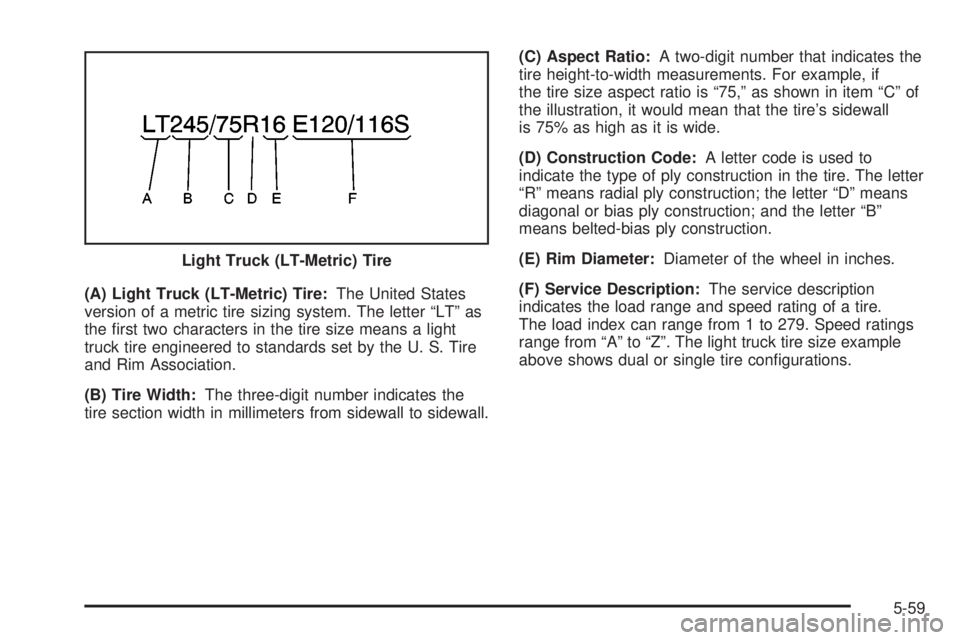
(A) Light Truck (LT-Metric) Tire:The United States
version of a metric tire sizing system. The letter ªLTº as
the ®rst two characters in the tire size means a light
truck tire engineered to standards set by the U. S. Tire
and Rim Association.
(B) Tire Width:The three-digit number indicates the
tire section width in millimeters from sidewall to sidewall.(C) Aspect Ratio:A two-digit number that indicates the
tire height-to-width measurements. For example, if
the tire size aspect ratio is ª75,º as shown in item ªCº of
the illustration, it would mean that the tire's sidewall
is 75% as high as it is wide.
(D) Construction Code:A letter code is used to
indicate the type of ply construction in the tire. The letter
ªRº means radial ply construction; the letter ªDº means
diagonal or bias ply construction; and the letter ªBº
means belted-bias ply construction.
(E) Rim Diameter:Diameter of the wheel in inches.
(F) Service Description:The service description
indicates the load range and speed rating of a tire.
The load index can range from 1 to 279. Speed ratings
range from ªAº to ªZº. The light truck tire size example
above shows dual or single tire con®gurations. Light Truck (LT-Metric) Tire
5-59