2004 GMC SIERRA window
[x] Cancel search: windowPage 481 of 588
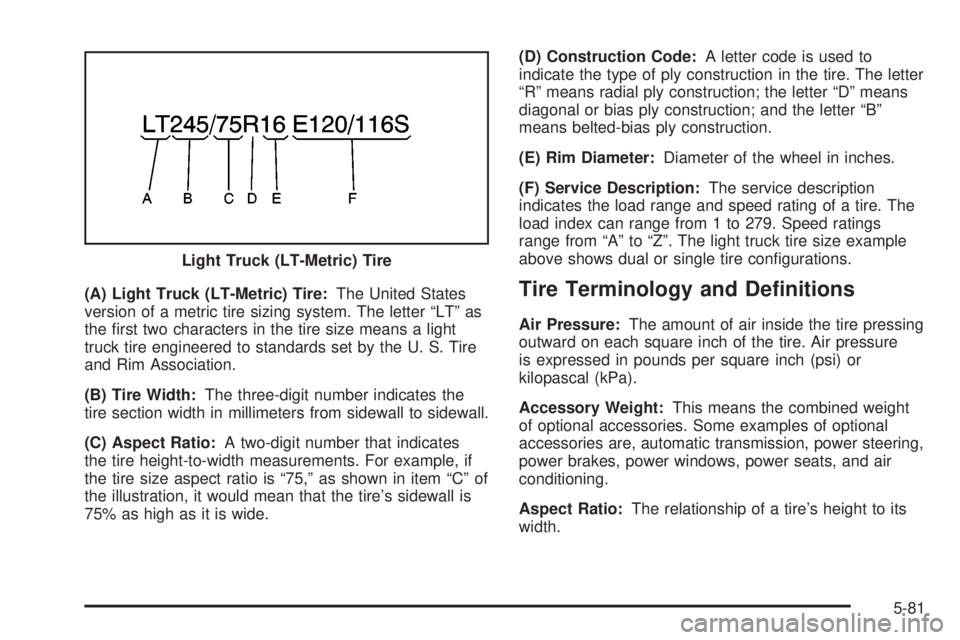
(A) Light Truck (LT-Metric) Tire:The United States
version of a metric tire sizing system. The letter ªLTº as
the ®rst two characters in the tire size means a light
truck tire engineered to standards set by the U. S. Tire
and Rim Association.
(B) Tire Width:The three-digit number indicates the
tire section width in millimeters from sidewall to sidewall.
(C) Aspect Ratio:A two-digit number that indicates
the tire height-to-width measurements. For example, if
the tire size aspect ratio is ª75,º as shown in item ªCº of
the illustration, it would mean that the tire's sidewall is
75% as high as it is wide.(D) Construction Code:A letter code is used to
indicate the type of ply construction in the tire. The letter
ªRº means radial ply construction; the letter ªDº means
diagonal or bias ply construction; and the letter ªBº
means belted-bias ply construction.
(E) Rim Diameter:Diameter of the wheel in inches.
(F) Service Description:The service description
indicates the load range and speed rating of a tire. The
load index can range from 1 to 279. Speed ratings
range from ªAº to ªZº. The light truck tire size example
above shows dual or single tire con®gurations.Tire Terminology and De®nitions
Air Pressure:The amount of air inside the tire pressing
outward on each square inch of the tire. Air pressure
is expressed in pounds per square inch (psi) or
kilopascal (kPa).
Accessory Weight:This means the combined weight
of optional accessories. Some examples of optional
accessories are, automatic transmission, power steering,
power brakes, power windows, power seats, and air
conditioning.
Aspect Ratio:The relationship of a tire's height to its
width. Light Truck (LT-Metric) Tire
5-81
Page 516 of 588
Spare Tire
Your vehicle, when new, had a fully in¯ated spare tire.
A spare tire may lose air over time, so check its
in¯ation pressure regularly. See
In¯ation - Tire Pressure
on page 5-84andLoading Your Vehicle on page 4-57for information regarding proper tire in¯ation and loading
your vehicle. For instruction on how to remove, install
or store a spare tire, see
Changing a Flat Tire on
page 5-96.
After installing the spare tire on your vehicle, you should
stop as soon as possible and make sure the spare is
correctly in¯ated. Have the damaged or ¯at road
tire repaired or replaced as soon as you can and
installed back onto your vehicle. This way, a spare tire
will be available in case you need it again.
Your vehicle may have a different size spare tire than
the road tires, those originally installed on your vehicle.
This spare tire was developed for use on your vehicle,
so it is all right to drive on it. If your vehicle has
four-wheel-drive and the smaller spare is installed, keep
the vehicle in two-wheel-drive mode as much as
possible.
Appearance Care
Remember, cleaning products can be hazardous. Some
are toxic. Others can burst into ¯ames if you strike a
match or get them on a hot part of the vehicle. Some are
dangerous if you breathe their fumes in a closed
space. When you use anything from a container to clean
your vehicle, be sure to follow the manufacturer's
warnings and instructions. And always open your doors
or windows when you are cleaning the inside.
Never use these to clean your vehicle:
·Gasoline
·Benzene
·Naphtha
·Carbon Tetrachloride
·Acetone
·Paint Thinner
·Turpentine
·Lacquer Thinner
·Nail Polish Remover
They can all be hazardous Ð some more than
others Ð and they can all damage your vehicle, too.
5-116
Page 519 of 588
Cleaning the Top of the Instrument
Panel
Use only mild soap and water to clean the top surfaces
of the instrument panel. Sprays containing silicones
or waxes may cause annoying re¯ections in the
windshield and even make it difficult to see through the
windshield under certain conditions.
Cleaning Interior Plastic Components
Use only a mild soap and water solution on a soft cloth
or sponge. Commercial cleaners may affect the
surface ®nish.
Cleaning Glass Surfaces
Glass should be cleaned often. GM Glass Cleaner or a
liquid household glass cleaner will remove normal
tobacco smoke and dust ®lms on interior glass. See
Vehicle Care/Appearance Materials on page 5-123.
Notice:If you use abrasive cleaners when cleaning
glass surfaces on your vehicle, you could scratch
the glass and/or cause damage to the rear window
defogger and the integrated radio antenna. When
cleaning the glass on your vehicle, use only a soft
cloth and glass cleaner.
Care of Safety Belts
Keep belts clean and dry.
{CAUTION:
Do not bleach or dye safety belts. If you do, it
may severely weaken them. In a crash, they
might not be able to provide adequate
protection. Clean safety belts only with mild
soap and lukewarm water.
Weatherstrips
Silicone grease on weatherstrips will make them last
longer, seal better, and not stick or squeak. Apply
silicone grease with a clean cloth at least every six
months. During very cold, damp weather more frequent
application may be required. See
Recommended
Fluids and Lubricants on page 6-14.
5-119
Page 526 of 588
Windshield Wiper Fuses
The windshield wiper motor is protected by an internal
circuit breaker and a fuse. If the motor overheats due to
heavy snow, etc., the wiper will stop until the motor
cools. If the overload is caused by some electrical
problem and not snow, etc., be sure to get it ®xed.
Power Windows and Other Power
Options
Circuit breakers protect the power windows and other
power accessories. When the current load is too heavy,
the circuit breaker opens and closes, protecting the
circuit until the problem is ®xed or goes away.
Fuses and Circuit Breakers
The wiring circuits in your vehicle are protected from
short circuits by a combination of fuses, circuit breakers
and fusible thermal links. This greatly reduces the
chance of ®res caused by electrical problems.
Look at the silver-colored band inside the fuse. If the
band is broken or melted, replace the fuse. Be sure you
replace a bad fuse with a new one of the identical
size and rating.If you ever have a problem on the road and don't have
a spare fuse, you can borrow one that has the same
amperage. Just pick some feature of your vehicle
that you can get along without ± like the radio or
cigarette lighter ± and use its fuse, if it is the correct
amperage. Replace it as soon as you can.
Instrument Panel Fuse Block
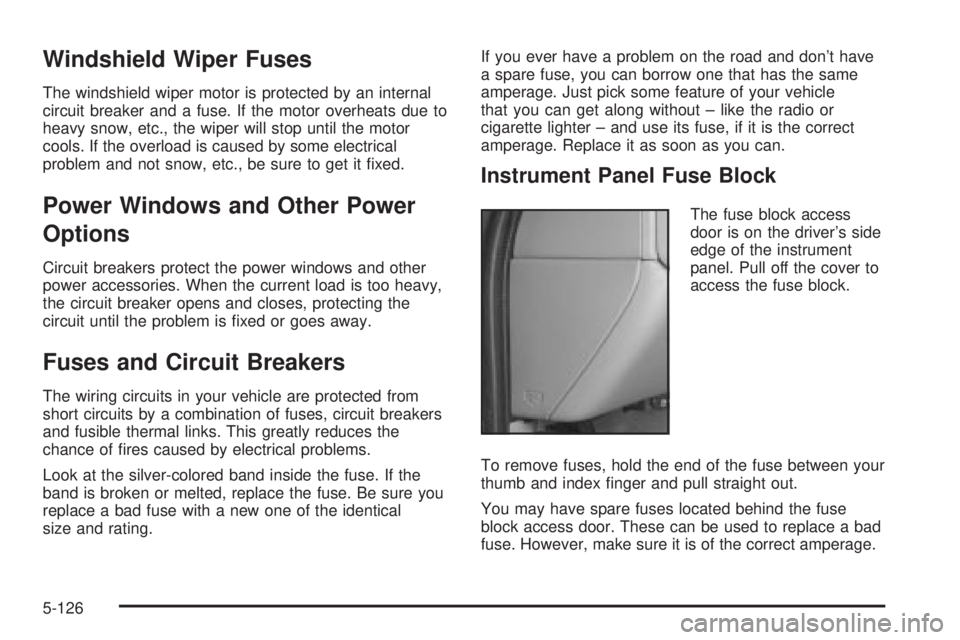
The fuse block access
door is on the driver's side
edge of the instrument
panel. Pull off the cover to
access the fuse block.
To remove fuses, hold the end of the fuse between your
thumb and index ®nger and pull straight out.
You may have spare fuses located behind the fuse
block access door. These can be used to replace a bad
fuse. However, make sure it is of the correct amperage.
5-126
Page 528 of 588
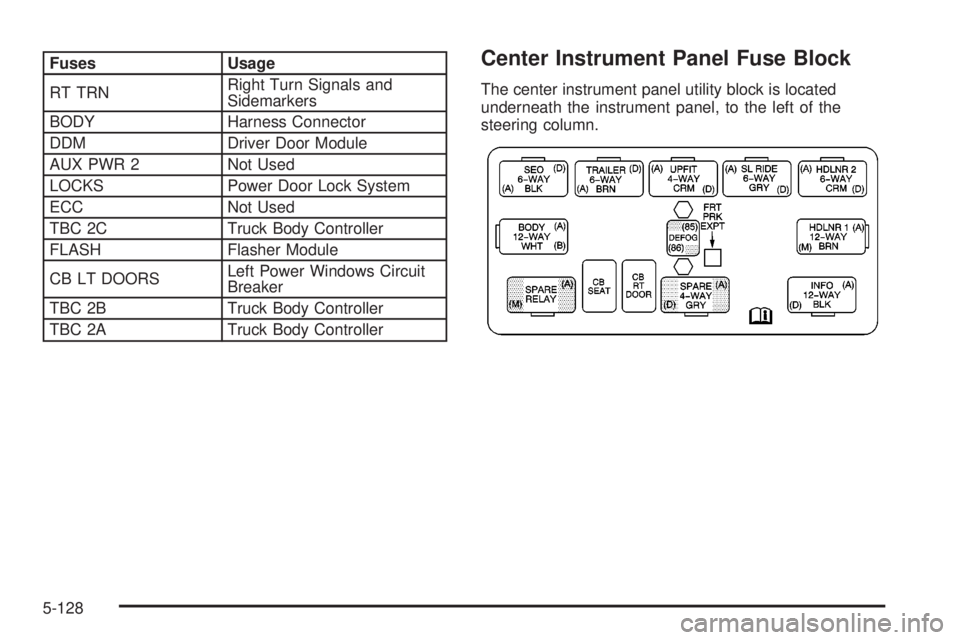
Fuses Usage
RT TRNRight Turn Signals and
Sidemarkers
BODY Harness Connector
DDM Driver Door Module
AUX PWR 2 Not Used
LOCKS Power Door Lock System
ECC Not Used
TBC 2C Truck Body Controller
FLASH Flasher Module
CB LT DOORSLeft Power Windows Circuit
Breaker
TBC 2B Truck Body Controller
TBC 2A Truck Body ControllerCenter Instrument Panel Fuse Block
The center instrument panel utility block is located
underneath the instrument panel, to the left of the
steering column.
5-128
Page 529 of 588
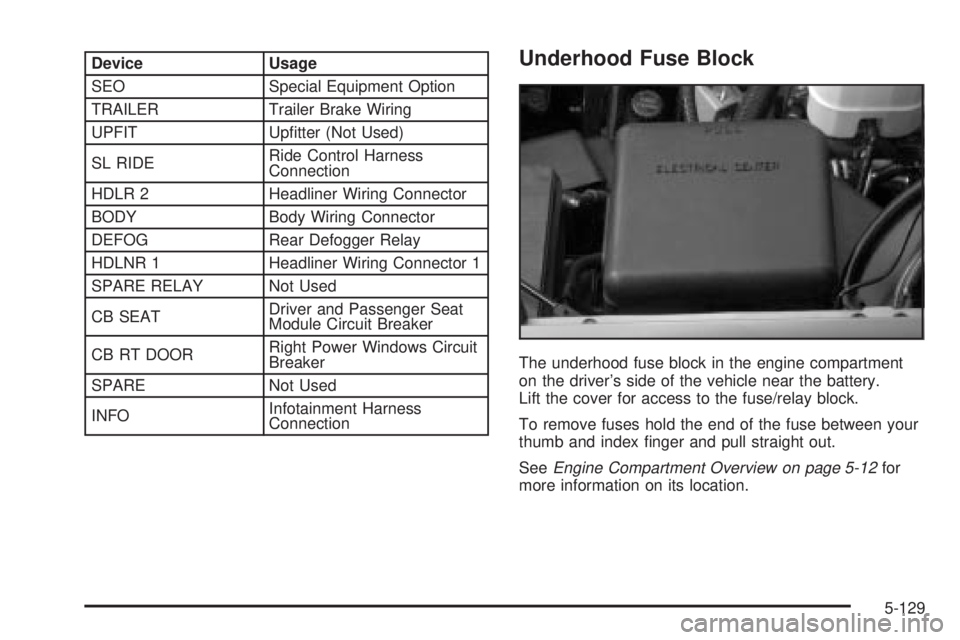
Device Usage
SEO Special Equipment Option
TRAILER Trailer Brake Wiring
UPFIT Up®tter (Not Used)
SL RIDERide Control Harness
Connection
HDLR 2 Headliner Wiring Connector
BODY Body Wiring Connector
DEFOG Rear Defogger Relay
HDLNR 1 Headliner Wiring Connector 1
SPARE RELAY Not Used
CB SEATDriver and Passenger Seat
Module Circuit Breaker
CB RT DOORRight Power Windows Circuit
Breaker
SPARE Not Used
INFOInfotainment Harness
ConnectionUnderhood Fuse Block
The underhood fuse block in the engine compartment
on the driver's side of the vehicle near the battery.
Lift the cover for access to the fuse/relay block.
To remove fuses hold the end of the fuse between your
thumb and index ®nger and pull straight out.
See
Engine Compartment Overview on page 5-12for
more information on its location.
5-129
Page 532 of 588

Fuses Usage
SUNROOF Sunroof
SEO B2 Off-Road Lamps
4WSVent Solenoid
Canister/Quadrasteer Module
Power
RR HVAC Not Used
AUX PWRAuxiliary Power Outlet Ð
Console
IGN 1 Ignition Relay
PCM 1 Powertrain Control Module
ETC/ECMElectronic Throttle Control,
Electronic Brake Controller
IGN EInstrument Panel Cluster, Air
Conditioning Relay, Turn
Signal/Hazard Switch, Starter
Relay
RTD Ride Control
TRL B/U Backup Lamps Trailer Wiring
PCM BPowertrain Control Module,
Fuel Pump
F/PMP Fuel Pump (Relay)Fuses Usage
B/U LPBack-up Lamps, Automatic
Transmission Shift Lock
Control System
RR DEFOG Rear Window Defogger
HDLP-HI Headlamp High Beam Relay
PRIME Not Used
02B Oxygen Sensors
SIRSupplemental In¯atable
Restraint System
FRT PARKFront Parking Lamps,
Sidemarker Lamps
DRLDaytime Running Lamps
(Relay)
SEO IGN Rear Defog Relay
TBC IGN1 Truck Body Controller Ignition
HI HDLP-LT High Beam Headlamp-Left
LH HID Not Used
DRL Daytime Running Lamps
IPC/DICInstrument Panel
Cluster/Driver Information
Center
5-132
Page 576 of 588

Electrical System (cont.)
Fuses and Circuit Breakers.........................5-126
Power Windows and Other Power Options....5-126
Windshield Wiper Fuses.............................5-126
Electronic Transfer Case..................................2-44
Emissions Inspection and Maintenance
Programs...................................................3-51
Engine
Air Cleaner/Filter.........................................5-23
Battery.......................................................5-52
Check and Service Engine Soon Light............3-49
Coolant......................................................5-33
Coolant Heater............................................2-25
Coolant Temperature Gage...........................3-46
Engine Compartment Overview......................5-12
Exhaust.....................................................2-53
Fan Noise..................................................5-44
Oil .............................................................5-18
Overheating................................................5-36
Starting......................................................2-23
ENGINE COOLANT HOT.................................3-68
Engine Hour Meter Display...............................3-35
Engine Oil Additives........................................5-21
ENGINE OVERHEATED..................................3-68
Entertainment System
Cleaning the Video Screen..........................3-131
DVD Distortion..........................................3-129
Entry Lighting.................................................3-19
Environmental Concerns..................................4-24
Event Data Records (EDR)..............................7-10Exit Lighting...................................................3-19
Express Down Windows..................................2-17
Extended Cab................................................1-58
Extended Cab and Crew Cab...........................1-55
Extender, Safety Belt.......................................1-32
Exterior Lamps...............................................3-14
F
Fifth Wheel and Gooseneck Trailering................4-90
Filter
Engine Air Cleaner......................................5-23
Finding a Program Type (PTY) Station
(RDS and XMŸ).......................3-80, 3-92, 3-105
Finding a Station..................3-75, 3-78, 3-90, 3-103
Finish Care..................................................5-120
Finish Damage.............................................5-122
Five-Speed (VORTECŸ 4300 V6 and
4800 V8 Engines)........................................2-31
Five-Speed (VORTECŸ 6000 V8 Engine)...........2-30
Fixed Mast Antenna.......................................3-131
Flash-to-Pass................................................... 3-9
Flat Tire........................................................5-95
Flat Tire, Changing.........................................5-96
Fluid
Automatic Transmission........................5-25, 5-28
Manual Transmission....................................5-31
Power Steering...........................................5-45
6