Page 470 of 588
4. If a CHMSL bulb is replaced, put the new bulb into
the socket and press it in until it is tight.
If a cargo lamp is replaced, put a new cargo lamp
bulb into the socket and press it in until it is
tight before turning the socket counterclockwise.
5. Put the bulb holder back plate into the lamp
housing.
6. Reinstall the lamp assembly and tighten the screws.
Pickup Box Identi®cation and
Fender Marker Lamps
1. Remove the screws and lamp assembly.
2. Unplug the lamp assembly harness.
3. Gently pry the individual lamp from the lamp
housing.
4. Unplug the lamp.
5. Plug in a new lamp and snap it into the housing.
6. Reinstall the lamp housing.
5-70
Page 472 of 588
A. Stoplamp
B. Turn Signal Lamp
C. Back-up Lamp
D. Side Marker Lamp
3. Press the release tab,
if equipped, and turn
the bulb socket
counterclockwise to
remove it from
the taillamp housing.
5-72
Page 473 of 588
4. Pull the old bulb straight out from the socket.
5. Press a new bulb into the socket and turn the socket
clockwise into the taillamp housing.
6. Reinstall the rear lamp assembly.
7. Close the tailgate.
Taillamps (Chassis Cab Models)
A. Turn Signal Lamp
B. Stoplamp
C. Back-up Lamp1. Using your hands, peel the rubber seal away from
the lens.
2. Lift the lens off the lamp assembly.
3. Pull the old bulb straight out from the socket.
4. Put a new bulb into the socket and press it in until it
is tight.
5. Reinstall the lens and the lens seal.
5-73
Page 498 of 588
For regular cab models, the equipment you'll need is
behind the passenger's seat. For Extended and
crew cab models, the equipment is on the shelf behind
the passenger's side second row seat.
1. If there is a cover, move the seats forward and turn
the wing nut on the cover counterclockwise to
remove it. For crew cab models, pull up the second
row seat with the loop at the base of the seat
cushion to access the tools.
2. To release the bottle jack from its holder, turn the
knob on the bottle jack counterclockwise to lower
the jack head.
3. The wheel blocks and the wheel block retainer can
be removed by turning the wing nut
counterclockwise.
4. There is also a wing nut used to retain the storage
bag and tools. To remove it, turn the wing nut
counterclockwise.
You'll use the jack handle extensions and the wheel
wrench to remove the underbody-mounted spare tire. 1500 Crew Cab
5-98
Page 500 of 588
3. Insert the hoist end
(open end) (F) of the
extension through
the hole (G) in the rear
bumper.
Be sure the hoist end of the extension connects to
the hoist shaft (E). The ribbed square end of the
extension is used to lower the spare tire.
4. Turn the wheel wrench (H) counterclockwise to
lower the spare tire to the ground. Continue to
turn the wheel wrench until the spare tire can be
pulled out from under the vehicle.
If the spare tire does not lower to the ground, the
secondary latch is engaged causing the tire
not to lower. See ªSecondary Latch Systemº later in
this section.5. The wheel wrench has
a hook that allows you
to pull the hoist
cable towards you to
assist in reaching
the spare tire.
6. When the tire has been
lowered, tilt the
retainer (D) at the end
of the cable so it
can be pulled up
through the wheel
opening.
7. Put the spare tire near the ¯at tire.
5-100
Page 502 of 588

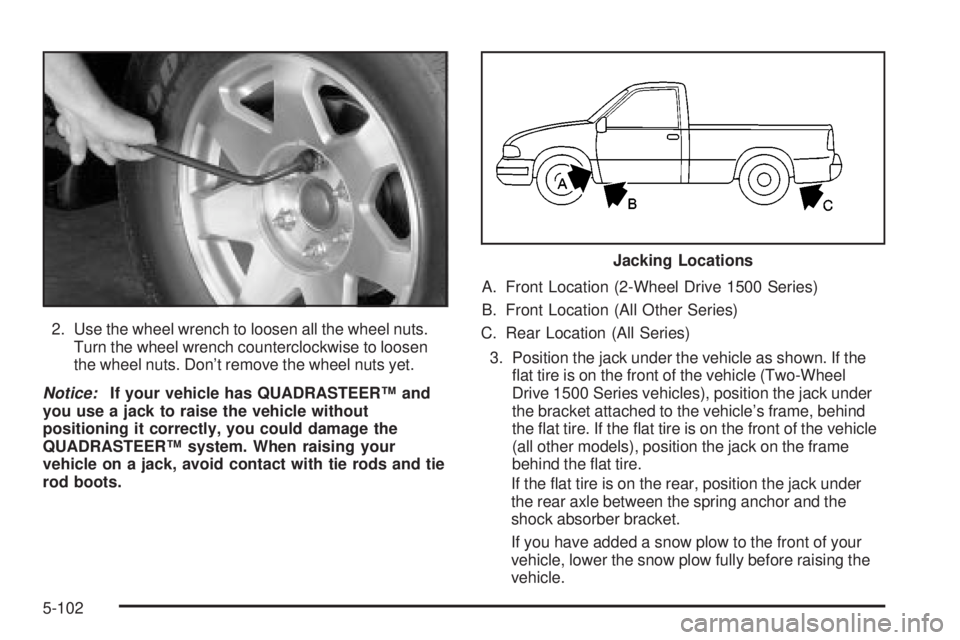
2. Use the wheel wrench to loosen all the wheel nuts.
Turn the wheel wrench counterclockwise to loosen
the wheel nuts. Don't remove the wheel nuts yet.
Notice:If your vehicle has QUADRASTEERŸ and
you use a jack to raise the vehicle without
positioning it correctly, you could damage the
QUADRASTEERŸ system. When raising your
vehicle on a jack, avoid contact with tie rods and tie
rod boots.A. Front Location (2-Wheel Drive 1500 Series)
B. Front Location (All Other Series)
C. Rear Location (All Series)
3. Position the jack under the vehicle as shown. If the
¯at tire is on the front of the vehicle (Two-Wheel
Drive 1500 Series vehicles), position the jack under
the bracket attached to the vehicle's frame, behind
the ¯at tire. If the ¯at tire is on the front of the vehicle
(all other models), position the jack on the frame
behind the ¯at tire.
If the ¯at tire is on the rear, position the jack under
the rear axle between the spring anchor and the
shock absorber bracket.
If you have added a snow plow to the front of your
vehicle, lower the snow plow fully before raising the
vehicle.
Jacking Locations
5-102
Page 504 of 588
4. Make sure the jack head is positioned so that the
rear axle is resting securely between the grooves
that are on the jack head. Turn the wheel
wrench clockwise to raise the vehicle. Raise the
vehicle far enough off the ground so there is enough
room for the spare tire to ®t under the wheel well. Front Position All Other Models
Rear Position
5-104
Page 508 of 588

8. Turn the wheel wrench counterclockwise to lower
the vehicle. Lower the jack completely.
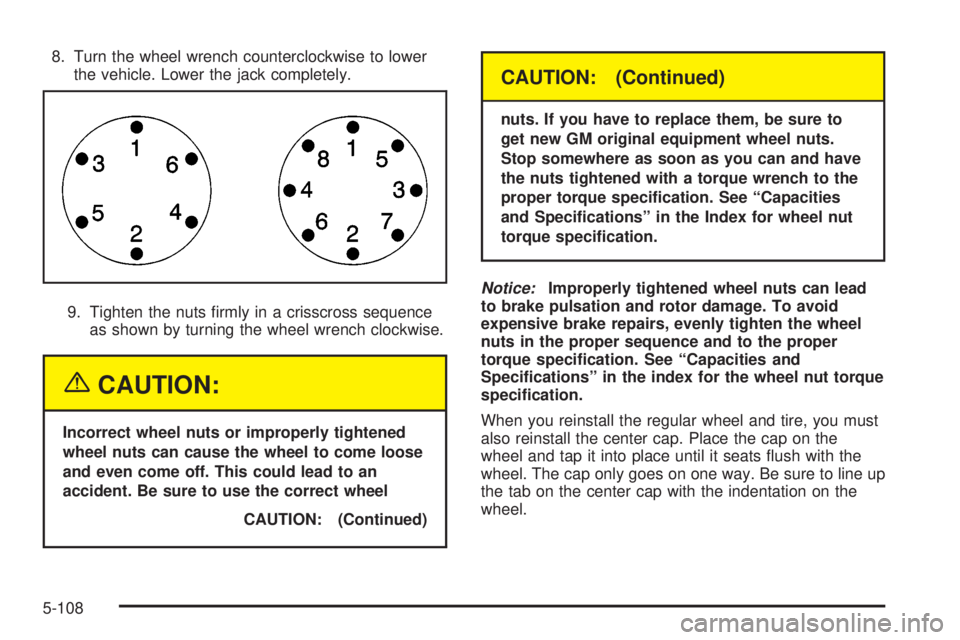
9. Tighten the nuts ®rmly in a crisscross sequence
as shown by turning the wheel wrench clockwise.
{CAUTION:
Incorrect wheel nuts or improperly tightened
wheel nuts can cause the wheel to come loose
and even come off. This could lead to an
accident. Be sure to use the correct wheel
CAUTION: (Continued)
CAUTION: (Continued)
nuts. If you have to replace them, be sure to
get new GM original equipment wheel nuts.
Stop somewhere as soon as you can and have
the nuts tightened with a torque wrench to the
proper torque speci®cation. See ªCapacities
and Speci®cationsº in the Index for wheel nut
torque speci®cation.
Notice:Improperly tightened wheel nuts can lead
to brake pulsation and rotor damage. To avoid
expensive brake repairs, evenly tighten the wheel
nuts in the proper sequence and to the proper
torque speci®cation. See ªCapacities and
Speci®cationsº in the index for the wheel nut torque
speci®cation.
When you reinstall the regular wheel and tire, you must
also reinstall the center cap. Place the cap on the
wheel and tap it into place until it seats ¯ush with the
wheel. The cap only goes on one way. Be sure to line up
the tab on the center cap with the indentation on the
wheel.
5-108