2004 GMC SIERRA ECO mode
[x] Cancel search: ECO modePage 136 of 588
Shifting into 4LO
To shift to 4LO, the ignition must be in RUN and the
vehicle must be stopped or moving less than 3 mph
(4.8 km/h) with the transmission in NEUTRAL (N). The
preferred method for shifting into 4LO is to have
your vehicle moving 1 to 2 mph (1.6 to 3.2 km/h). Press
and release the 4LO switch. You must wait for the
4LO indicator light to stop ¯ashing and remain
illuminated before shifting your transmission in gear.
Notice:Shifting the transmission into gear before
the 4LO indicator light has stopped ¯ashing
could damage the transfer case. To help avoid
damaging your vehicle, always wait for the
4LO indicator light to stop ¯ashing before shifting
the transmission into gear.
It is typical for your vehicle to exhibit signi®cant
engagement noise and bump when shifting between
4LO and 4HI ranges or from NEUTRAL with the engine
running.
If the 4LO switch is pressed when your vehicle is in
gear and/or moving, the 4LO indicator light will ¯ash for
30 seconds and not complete the shift unless your
vehicle is moving less than 3 mph (4.8 km/h) and the
transmission is in NEUTRAL (N). After 30 seconds
the transfer case will shift to 4HI mode.
Shifting Out of 4LO
To shift from 4LO to 4HI, AUTO 4WD or 2HI your vehicle
must be stopped or moving less than 3 mph (4.8 km/h)
with the transmission in NEUTRAL (N) and the ignition in
RUN. The preferred method for shifting out of 4LO is to
have your vehicle moving 1 to 2 mph
(1.6 to 3.2 km/h). Press and release the 4HI, AUTO 4WD
or 2HI switch. You must wait for the 4HI, AUTO 4WD or
2HI indicator light to stop ¯ashing and remain illuminated
before shifting your transmission into gear.
Notice:Shifting the transmission into gear before
the 4LO indicator light has stopped ¯ashing
could damage the transfer case. To help avoid
damaging your vehicle, always wait for the
4LO indicator light to stop ¯ashing before shifting
the transmission into gear.
It is typical for your vehicle to exhibit signi®cant
engagement noise and bump when shifting between
4LO and 4HI ranges or from NEUTRAL with the engine
running.
If the 4HI, AUTO 4WD or 2HI switch is pressed when
your vehicle is in gear and/or moving, the 4HI,
AUTO 4WD or 2HI indicator light will ¯ash for
30 seconds but will not complete the shift unless your
vehicle is moving less than 3 mph (4.8 km/h) and
the transmission is in NEUTRAL (N).
2-42
Page 137 of 588
Shifting into NEUTRAL
To shift the transfer case to NEUTRAL do the following:
1. Make sure the vehicle is parked so that it will
not roll.
2. Set the parking brake.
3. Start the vehicle or turn the ignition to RUN.
4. Connect the vehicle to the towing vehicle.
5. Put the transmission in NEUTRAL (N).
6. Shift the transfer case to 2HI.
7. Simultaneously press and hold the 2HI and
4LO buttons for 10 seconds. The red NEUTRAL
light will come on when the transfer case shift
to NEUTRAL is complete.
8. Shift the transmission to REVERSE (R) for one
second, then shift the transmission to DRIVE (D)
for one second.
9. Turn the ignition to OFF.
10. Place the transmission shift lever in PARK (P).
11. Release the parking brake prior to towing.
Shifting Out of NEUTRAL
To shift out of NEUTRAL:
1. Set the parking brake and apply the regular brake
pedal.
2. Shift the transmission to NEUTRAL (N) and turn the
ignition to RUN with the engine off.
3. Press the button for the desired transfer case shift
position (2HI, 4HI, AUTO 4WD or 4LO).
4. After the transfer case has shifted out of NEUTRAL
the red light will go out.
5. Release the parking brake.
6. You may start the engine and shift the transmission
to the desired position.
Excessively shifting the transfer case into or out of the
different modes may cause the transfer case to enter the
shift protection mode. This will protect the transfer case
from possible damage and will only allow the transfer
case to respond to one shift per 10 seconds. The transfer
case may stay in this mode for up to three minutes.
2-43
Page 141 of 588
6. Simultaneously press and hold the 2HI and 4LO
buttons for 10 seconds. The red NEUTRAL light
will come on when the transfer case shift to
NEUTRAL is complete.
7. Shift the transmission to REVERSE (R) for one
second, then shift the transmission to DRIVE (D)
for one second.
8. Turn the ignition to OFF.
9. Place the transmission shift lever in PARK (P).
10. Release the parking brake prior to towing.
Shifting Out of NEUTRAL
To shift out of NEUTRAL:
1. Set the parking brake and apply the regular brake
pedal.
2. Shift the transmission to NEUTRAL (N) and turn the
ignition to RUN with the engine off.
3. Press the button for the desired transfer case shift
position (2HI, 4HI, or 4LO).4. After the transfer case has shifted out of NEUTRAL
the red light will go out.
5. Release the parking brake.
6. You may start the engine and shift the transmission
to the desired position.
Excessively shifting the transfer case into or out of the
different modes may cause the transfer case to enter the
shift protection mode. This will protect the transfer case
from possible damage and will only allow the transfer
case to respond to one shift per 10 seconds. The transfer
case may stay in this mode for up to three minutes.
2-47
Page 150 of 588
Automatic Dimming Mirror Operation
The automatic dimming mirror function is turned
on automatically each time the ignition is started. To
operate the automatic dimming mirror, do the following:
1. Make sure the green indicator light, located to the left
of the on/off button, is lit. If it's not, press and hold the
on/off button for approximately six seconds until the
green light comes on, indicating that the mirror is in
automatic dimming mode.
2. Turn off the automatic dimming mirror function by
pressing and holding the on/off button for
approximately six seconds, until the green indicator
light turns off.
Compass Variance
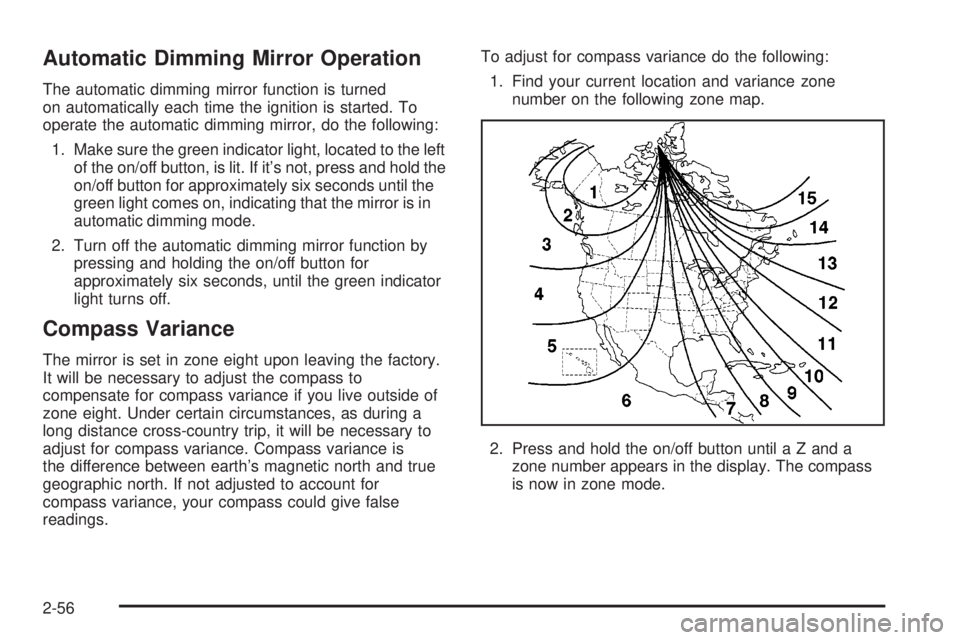
The mirror is set in zone eight upon leaving the factory.
It will be necessary to adjust the compass to
compensate for compass variance if you live outside of
zone eight. Under certain circumstances, as during a
long distance cross-country trip, it will be necessary to
adjust for compass variance. Compass variance is
the difference between earth's magnetic north and true
geographic north. If not adjusted to account for
compass variance, your compass could give false
readings.To adjust for compass variance do the following:
1. Find your current location and variance zone
number on the following zone map.
2. Press and hold the on/off button until a Z and a
zone number appears in the display. The compass
is now in zone mode.
2-56
Page 178 of 588

Ending Cruise Control
There are four ways to turn off the cruise control:
·Step lightly on the brake pedal,
·move the cruise control switch to off, or
·shift the transmission to NEUTRAL (N).
·If your vehicle has the Stabilitrakžfeature, cruise
control will turn off if road conditions cause
Stabilitrak
žto activate.
·If the accelerator pedal is held for 60 seconds or
longer, cruise control will turn off.
Erasing Speed Memory
When you turn off the cruise control or the ignition, your
cruise control set speed memory is erased.
Exterior Lamps
The switch on the driver's side of your instrument panel
operates the exterior lamps.
Turn the control clockwise to operate the lamps.
The exterior lamp switch has four positions:
9(OFF):Turning the switch to this position turns off
the Daytime Running Lamps (DRL) and the automatic
headlamps.
AUTO (Automatic):Turning the control to this position
puts the system into automatic headlamp mode.
3-14
Page 191 of 588

The passenger's temperature setting can be set to
match the driver's temperature setting by pressing and
holding the AUTO button for four seconds. Both the
driver and passenger arrows will be displayed.
Automatic Operation
AUTO (Automatic):When automatic operation is
active the system will control the inside temperature, the
air delivery, and the fan speed.
Use the steps below to place the entire system in
automatic mode:
1. Press the AUTO button.
When AUTO is selected, the display will change to
show the current driver's set temperature, delivery
mode and fan speed. Press the AUTO button again
within ®ve seconds to display the passenger's set
temperature.
If the driver and passenger's temperature settings
are not the same, the opposite side temperature
setting will be displayed for an additional
®ve seconds. To make the passenger's temperature
the same as the driver's press and hold the
AUTO button for about four seconds.When AUTO is selected, the air conditioning
operation and air inlet will be automatically
controlled. The air conditioning compressor will run
when the outside temperature is over about
40ÉF (4ÉC). The air inlet will normally be set to
outside air. If it's hot outside, the air inlet may
automatically switch to recirculate inside air to help
quickly cool down your vehicle. The light on the
button will illuminate in recirculation.
2. Set the driver's and passenger's temperature.
To ®nd your comfort setting, start with a 74ÉF (23ÉC)
temperature setting and allow about 20 minutes
for the system to regulate. Turn the driver's or
passenger's side temperature knob to adjust the
temperature setting as necessary. If you choose the
temperature setting of 60ÉF (15ÉC) the system
will remain at the maximum cooling setting. If you
choose the temperature setting of 90ÉF (32ÉC)
the system will remain at the maximum heat setting.
Choosing either maximum setting will not cause
the vehicle to heat or cool any faster.
Be careful not to cover the sensor located on the
top of the instrument panel near the windshield. This
sensor regulates air temperature based on sun
load, and also turns on your headlamps.
3-27
Page 193 of 588
@(Recirculation):Press this button to limit the
amount of outside air entering your vehicle. The light on
the recirculation button will glow. This is helpful when you
are trying to limit odors entering your vehicle and for
maximum air conditioning performance in hot weather.
Press this button again to allow outside air to enter the
vehicle. The light on the recirculation button will go off.
Pressing this button also cancels the auto recirculation
feature. To resume the auto recirculation function, press
the AUTO button. Each time the vehicle is started, the
system will revert to the auto recirculation function.
If you select recirculation while in defrost, defog or ¯oor,
the light in the button will ¯ash and then go out to let you
know that this is not allowed. This is normal and helps to
prevent fogging.
When the weather is cool or damp, operating the system
in recirculation for extended periods of time may cause
fogging of the vehicle's windows. To clear the fog, select
either defog or front defrost.
You may also notice that the A/C compressor will run
while in recirculation mode. This is normal and helps to
prevent fogging.9(Off):Press this button to turn off the entire climate
control system. Outside air will still enter the vehicle, and
will be directed to the ¯oor. This direction can be changed
by pressing the mode button. The temperature can also
be adjusted using either temperature knob. Press the up
or down arrows on the fan switch, the defrost button, the
AUTO button, or the air conditioning button to turn the
system on when it is off.
Display
If you press the MODE button to select an air delivery
mode, the display will change to show you the selected
air delivery mode. After ten seconds, the display will
change to show the driver temperature setting and the
selected mode.
If you press the up or down arrows on the fan switch,
the display will change to show the selected fan speed.
After ten seconds, the display will change to show
the driver temperature setting and the selected mode.
3-29
Page 194 of 588
Whenever you press AUTO, the display will change to
show the following:
·The current driver's set temperature and an arrow
for ®ve seconds
·The current passenger's set temperature setting
and an arrow for ®ve seconds
·The automatic air delivery mode and fan speed
If the driver's and passenger's temperature settings are
the same when AUTO is pressed, the temperature
setting and both arrows will be displayed for
®ve seconds along with the automatic air delivery
mode and fan speed. After the ®ve second update, the
display will change to show the temperature setting,
both arrows and AUTO.
Air Conditioning
#
(Air Conditioning):Press this button to turn the air
conditioning (A/C) compressor on and off. The
snow¯ake symbol will appear on the display when the
A/C is on.
Pressing this button when the outside temperature is
too cool for air conditioning will make the snow¯ake
symbol ¯ash three times and then turn off to let
you know the air conditioning mode is not available. If
the air conditioning is on and the outside temperature
drops below a temperature which is too cool for air
conditioning to be effective, the snow¯ake symbol will
turn off to let you know the air conditioning mode
has been canceled.
^(Air Conditioning Off):On some vehicles, when
you turn the air conditioning off, this symbol will appear
on the display. If your vehicle does not have this
symbol, the snow¯ake symbol will turn off to let you
know the air conditioning is off.
When air conditioning is selected or in AUTO mode, the
system will run the air conditioning automatically to cool
and dehumidify the air entering the vehicle. If you select
A/C off while in front defrost, defog or recirculation, the
A/C snow¯ake symbol will turn off, but the A/C
compressor will still run to help prevent fogging.
3-30