Page 353 of 588
6. Shift the transfer case to NEUTRAL. SeeFour-Wheel Drive on page 2-35for the proper
procedure to select the neutral position for
your vehicle.
7. Release the parking brake only after the vehicle
being towed is ®rmly attached to the towing
vehicle.
8. Turn the ignition off and lock the steering column.
Loading Your Vehicle
It is very important to know how much weight your
vehicle can carry. This weight is called the vehicle
capacity weight and includes the weight of all occupants,
cargo and all nonfactory-installed options. Two labels
on your vehicle show how much weight it may properly
carry, the Tire and Loading Information label and the
Certi®cation/Tire label.
{CAUTION:
Do not load your vehicle any heavier than the
GVWR, or either the maximum front or rear
GAWR. If you do, parts on your vehicle can
break, and it can change the way your vehicle
handles. These could cause you to lose
control and crash. Also, overloading can
shorten the life of your vehicle.
4-57
Page 396 of 588

Connect the adapter with the tab pointing up (see
arrow). The ¯ip cap on the vehicle's seven-wire harness
will lock onto the tab and help hold the adapter in
place. Plug the four-way round pin connector onto the
adapter.
Auxiliary Battery
The auxiliary battery provision can be used to supply
electrical power to additional equipment that you
may choose to add, such as a slide-in camper.If your vehicle has this
provision, this relay will be
located on the passenger's
side of the vehicle, next
to the auxiliary battery.
When using this provision, connection should only be
made to the upper stud (A) of the relay. Do not
make connections to the lower stud (B) of the relay.
The auxiliary battery circuit is protected by a megafuse
located behind the auxiliary battery.
Be sure to follow the proper installation instructions that
are included with any electrical equipment that you
install.Notice:Leaving electrical equipment on for
extended periods will drain the battery. Always turn
off electrical equipment when not in use and do
not use equipment that exceeds the maximum
amperage rating for the auxiliary battery provision.
4-100
Page 399 of 588
All engine speed values listed above are factory preset
values. With the exception of the TCC lockup speed
(1,100 rpm) and the ªtap²increment (100 rpm), all
of these values are programmable and can be adjusted
by your dealer or body up®tter. If the PTO software
settings do not match the settings shown here, then they
may have already been altered in order to satisfy the
requirements of the installed PTO system and body
equipment.
When the PTO switch is turned on, the engine is limited
to 2200 rpms. If there are no accessories installed on
the vehicle, make sure the PTO switch is turned off.Step-Bumper Pad
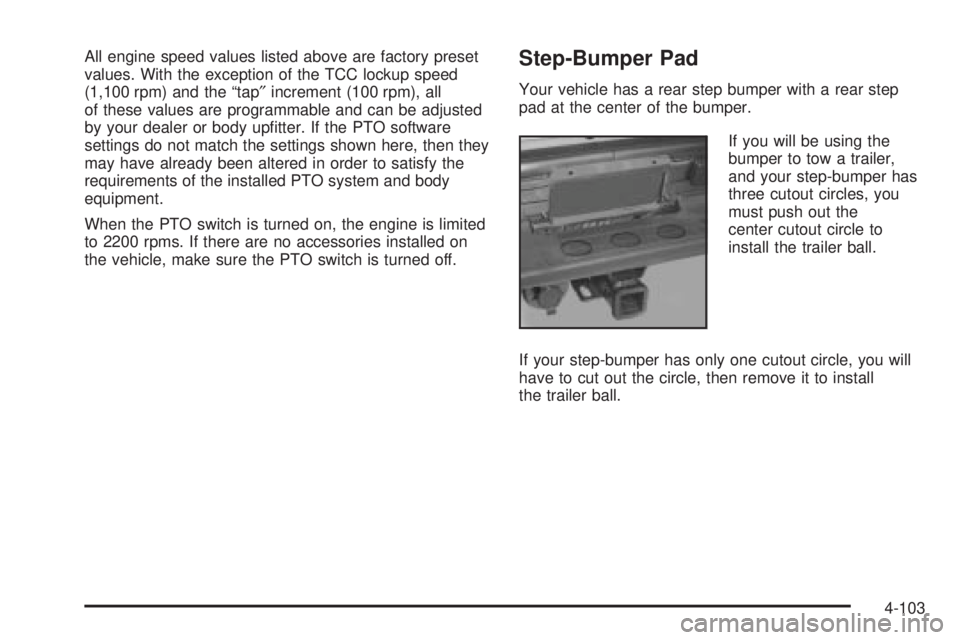
Your vehicle has a rear step bumper with a rear step
pad at the center of the bumper.
If you will be using the
bumper to tow a trailer,
and your step-bumper has
three cutout circles, you
must push out the
center cutout circle to
install the trailer ball.
If your step-bumper has only one cutout circle, you will
have to cut out the circle, then remove it to install
the trailer ball.
4-103
Page 408 of 588
To remove the fuel cap, turn it slowly to the left
(counterclockwise). It will require more effort to turn the
fuel cap on the last turn as you loosen it.
{CAUTION:
If you spill fuel and then something ignites it,
you could be badly burned. Fuel can spray out
on you if you open the fuel cap too quickly. This
spray can happen if your tank is nearly full, and
is more likely in hot weather. Open the fuel cap
slowly and wait for any ªhissº noise to stop.
Then unscrew the cap all the way.Be careful not to spill fuel. Don't top off or over®ll your
tank and wait a few seconds after you've ®nished
pumping before you remove the nozzle. Clean any
spilled fuel from painted surfaces as soon as possible.
See
Cleaning the Outside of Your Vehicle on
page 5-120.
When you put the fuel cap back on, turn it to the right
(clockwise) until you hear a clicking sound. It will require
more effort to turn the fuel cap on the last turn as you
tighten it. Make sure you fully install the cap. The
diagnostic system can determine if the fuel cap has
been left off or improperly installed. this would allow fuel
to evaporate into the atmosphere. See
Malfunction
Indicator Lamp on page 3-49.
5-8
Page 413 of 588
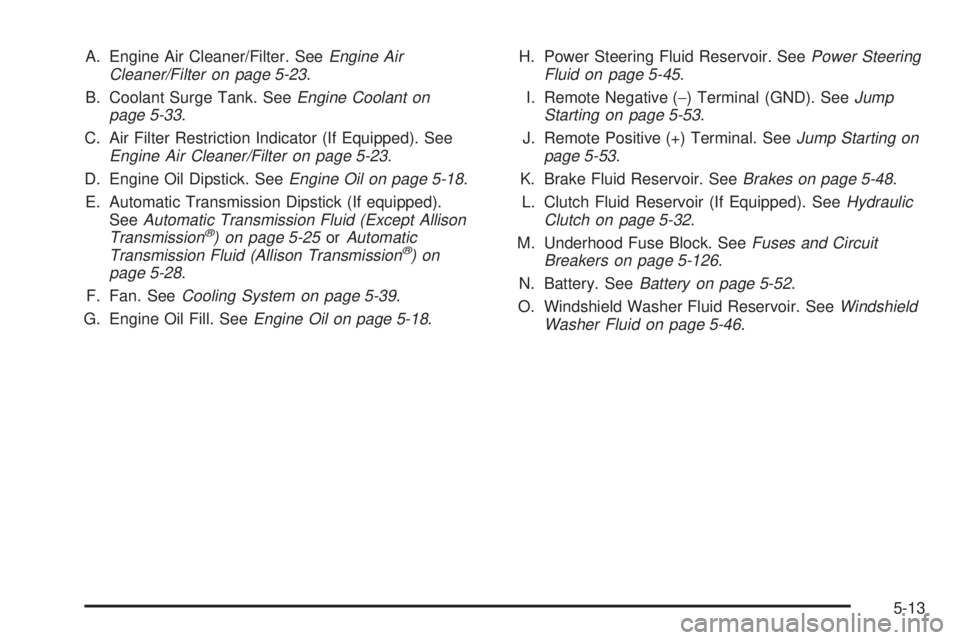
A. Engine Air Cleaner/Filter. SeeEngine Air
Cleaner/Filter on page 5-23.
B. Coolant Surge Tank. See
Engine Coolant on
page 5-33.
C. Air Filter Restriction Indicator (If Equipped). See
Engine Air Cleaner/Filter on page 5-23.
D. Engine Oil Dipstick. See
Engine Oil on page 5-18.
E. Automatic Transmission Dipstick (If equipped).
See
Automatic Transmission Fluid (Except Allison
Transmissionž) on page 5-25orAutomatic
Transmission Fluid (Allison Transmissionž)on
page 5-28.
F. Fan. See
Cooling System on page 5-39.
G. Engine Oil Fill. See
Engine Oil on page 5-18.H. Power Steering Fluid Reservoir. See
Power Steering
Fluid on page 5-45.
I. Remote Negative (-) Terminal (GND). See
Jump
Starting on page 5-53.
J. Remote Positive (+) Terminal. See
Jump Starting on
page 5-53.
K. Brake Fluid Reservoir. See
Brakes on page 5-48.
L. Clutch Fluid Reservoir (If Equipped). See
Hydraulic
Clutch on page 5-32.
M. Underhood Fuse Block. See
Fuses and Circuit
Breakers on page 5-126.
N. Battery. See
Battery on page 5-52.
O. Windshield Washer Fluid Reservoir. See
Windshield
Washer Fluid on page 5-46.
5-13
Page 415 of 588
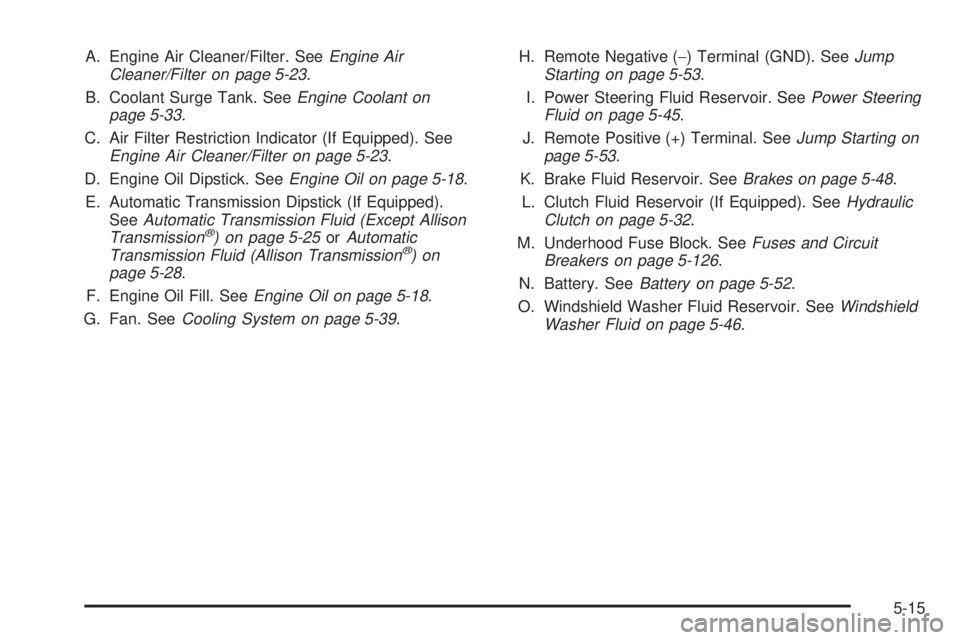
A. Engine Air Cleaner/Filter. SeeEngine Air
Cleaner/Filter on page 5-23.
B. Coolant Surge Tank. See
Engine Coolant on
page 5-33.
C. Air Filter Restriction Indicator (If Equipped). See
Engine Air Cleaner/Filter on page 5-23.
D. Engine Oil Dipstick. See
Engine Oil on page 5-18.
E. Automatic Transmission Dipstick (If Equipped).
See
Automatic Transmission Fluid (Except Allison
Transmissionž) on page 5-25orAutomatic
Transmission Fluid (Allison Transmissionž)on
page 5-28.
F. Engine Oil Fill. See
Engine Oil on page 5-18.
G. Fan. See
Cooling System on page 5-39.H. Remote Negative (-) Terminal (GND). See
Jump
Starting on page 5-53.
I. Power Steering Fluid Reservoir. See
Power Steering
Fluid on page 5-45.
J. Remote Positive (+) Terminal. See
Jump Starting on
page 5-53.
K. Brake Fluid Reservoir. See
Brakes on page 5-48.
L. Clutch Fluid Reservoir (If Equipped). See
Hydraulic
Clutch on page 5-32.
M. Underhood Fuse Block. See
Fuses and Circuit
Breakers on page 5-126.
N. Battery. See
Battery on page 5-52.
O. Windshield Washer Fluid Reservoir. See
Windshield
Washer Fluid on page 5-46.
5-15
Page 417 of 588
A. Engine Air Cleaner/Filter. SeeEngine Air
Cleaner/Filter on page 5-23.
B. Coolant Surge Tank. See
Engine Coolant on
page 5-33.
C. Air Filter Restriction Indicator (If Equipped). See
Engine Air Cleaner/Filter on page 5-23.
D. Engine Oil Dipstick. See
Engine Oil on page 5-18.
E. Automatic Transmission Dipstick (If Equipped).
See
Automatic Transmission Fluid (Except Allison
Transmissionž) on page 5-25orAutomatic
Transmission Fluid (Allison Transmissionž)on
page 5-28.
F. Engine Oil Fill. See
Engine Oil on page 5-18.
G. Fan. See
Cooling System on page 5-39.H. Remote Negative (-) Terminal (GND). See
Jump
Starting on page 5-53.
I. Remote Positive (+) Terminal. See
Jump Starting on
page 5-53.
J. Power Steering Fluid Reservoir. See
Power Steering
Fluid on page 5-45.
K. Brake Fluid Reservoir. See
Brakes on page 5-48.
L. Clutch Fluid Reservoir (If Equipped). See
Hydraulic
Clutch on page 5-32.
M. Underhood Fuse Block. See
Fuses and Circuit
Breakers on page 5-126.
N. Battery. See
Battery on page 5-52.
O. Windshield Washer Fluid Reservoir. See
Windshield
Washer Fluid on page 5-46.
5-17
Page 422 of 588
How to Reset the CHANGE ENGINE OIL
Message
The GM Oil Life System calculates when to change
your engine oil and ®lter based on vehicle use. Anytime
your oil is changed, reset the system so it can
calculate when the next oil change is required. If a
situation occurs where you change your oil prior to a
CHANGE ENGINE OIL message being turned on, reset
the system.
To reset the CHANGE ENGINE OIL message, see ªGM
Oil Life Systemº under
DIC Operation and Displays
on page 3-55for vehicles equipped with the DIC, or do
the following:
1. Turn the ignition key to RUN with the engine off.
2. Fully press and release the accelerator pedal three
times within ®ve seconds.
If the OIL LIFE RESET message ¯ashes for 10
seconds, the system is resetting.
3. Turn the key to LOCK.
If the CHANGE ENGINE OIL message comes back on
when you start your vehicle, the engine oil life system
has not reset. Repeat the procedure. If it still does
not reset, see your dealer for service.
What to Do with Used Oil
Used engine oil contains certain elements that may be
unhealthy for your skin and could even cause cancer.
Do not let used oil stay on your skin for very long. Clean
your skin and nails with soap and water, or a good
hand cleaner. Wash or properly dispose of clothing or
rags containing used engine oil. See the manufacturer's
warnings about the use and disposal of oil products.
Used oil can be a threat to the environment. If you
change your own oil, be sure to drain all the oil from the
®lter before disposal. Never dispose of oil by putting it in
the trash, pouring it on the ground, into sewers, or into
streams or bodies of water. Instead, recycle it by taking it
to a place that collects used oil. If you have a problem
properly disposing of your used oil, ask your dealer, a
service station or a local recycling center for help.
5-22