Page 171 of 460
Trip Information
Use the trip information button to scroll through the
odometer, TRIP A, TRIP B and TIMER.
Odometer
The trip odometer can tell you how far your vehicle has
been driven since you last set the trip odometer to
zero. Press and release the trip stem located on the
instrument panel cluster to display the trip odometer.
Press and hold the trip stem to reset the trip odometer
once it is displayed. Press and hold the trip stem for
a few seconds to reset the trip odometer to the mileage
since the vehicle was last started.
Trip A and Trip B
Press the trip information button until TRIP A or TRIP B
is displayed. This shows the current distance traveled
since the last reset for each trip odometer in either miles
or kilometers. Both odometers can be used at the
same time.
Each trip odometer can be reset to zero separately by
pressing select while the desired trip odometer is
displayed. You can also reset the trip odometers with
the reset stem on the cluster. If you press and hold the
reset stem for four seconds, the display will show the
distance traveled since the last ignition cycle.
Timer
The DIC can be used as a stopwatch. Press the select
button while TIMER is displayed to start the timer.
The display will show the amount of time that has
passed since the timer was last reset (not including time
the ignition is off). Time will continue to be counted as
long as the ignition is on, even if another display is being
shown on the DIC. The timer will record up to 99 hours,
59 minutes and 59 seconds (99:59:59) after which
the display will roll back to zero.
To stop the counting of time, press the select button
brie¯y while TIMER is displayed.
To reset the timer to zero, press and hold the select
button while TIMER is displayed.
3-47
Page 309 of 460

Following Distance
Stay at least twice as far behind the vehicle ahead as
you would when driving your vehicle without a trailer.
This can help you avoid situations that require
heavy braking and sudden turns.
Passing
You'll need more passing distance up ahead when
you're towing a trailer. And, because you're a good deal
longer, you'll need to go much farther beyond the
passed vehicle before you can return to your lane.
Backing Up
Hold the bottom of the steering wheel with one hand.
Then, to move the trailer to the left, just move that hand
to the left. To move the trailer to the right, move your
hand to the right. Always back up slowly and, if possible,
have someone guide you.
Making Turns
Notice:Making very sharp turns while trailering
could cause the trailer to come in contact with the
vehicle. Your vehicle could be damaged. Avoid
making very sharp turns while trailering.
When you're turning with a trailer, make wider turns
than normal. Do this so your trailer won't strike
soft shoulders, curbs, road signs, trees or other objects.
Avoid jerky or sudden maneuvers. Signal well in
advance.
Turn Signals When Towing a Trailer
The arrows on your instrument panel will ¯ash whenever
you signal a turn or lane change. Properly hooked up,
the trailer lamps will also ¯ash, telling other drivers
you're about to turn, change lanes or stop.
When towing a trailer, the arrows on your instrument
panel will ¯ash for turns even if the bulbs on the trailer
are burned out. Thus, you may think drivers behind
you are seeing your signal when they are not. It's
important to check occasionally to be sure the trailer
bulbs are still working.
4-63
Page 312 of 460
Trailer Wiring Harness
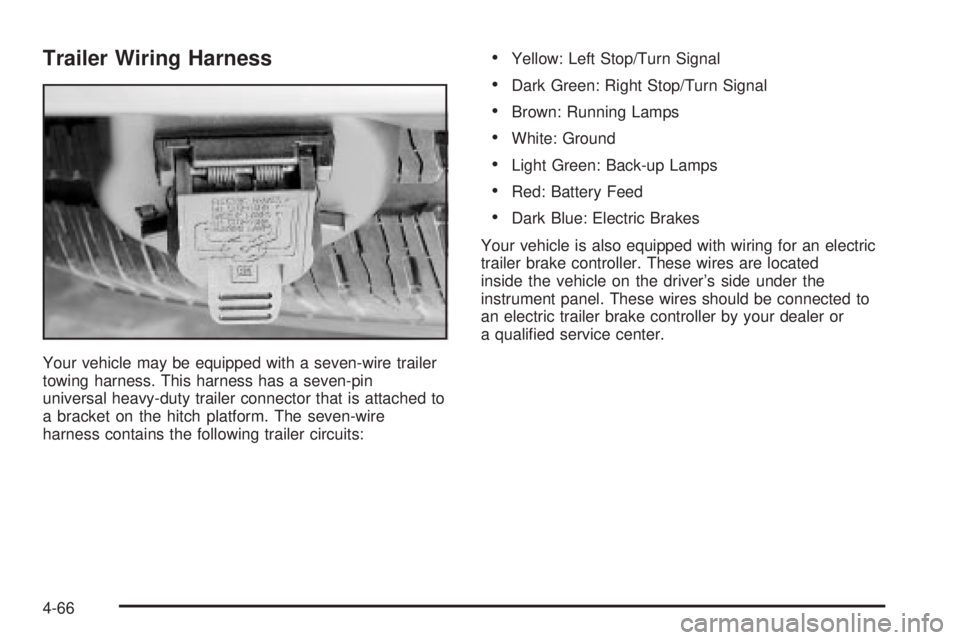
Your vehicle may be equipped with a seven-wire trailer
towing harness. This harness has a seven-pin
universal heavy-duty trailer connector that is attached to
a bracket on the hitch platform. The seven-wire
harness contains the following trailer circuits:
·Yellow: Left Stop/Turn Signal
·Dark Green: Right Stop/Turn Signal
·Brown: Running Lamps
·White: Ground
·Light Green: Back-up Lamps
·Red: Battery Feed
·Dark Blue: Electric Brakes
Your vehicle is also equipped with wiring for an electric
trailer brake controller. These wires are located
inside the vehicle on the driver's side under the
instrument panel. These wires should be connected to
an electric trailer brake controller by your dealer or
a quali®ed service center.
4-66
Page 323 of 460
Hood Release
1. To open the hood,
®rst pull the handle
located inside the
vehicle on the lower
driver's side of
the instrument panel.
2. Then go to the front of the vehicle and release the
secondary hood release.
3. Lift the hood; release the hood prop from its
retainer and put the hood prop into the slot in
the hood.
Before closing the hood, be sure all ®ller caps are on
properly. Then lift the hood to relieve pressure on
the hood prop. Remove the hood prop from its slot in
the hood and return the prop to its retainer. Then pull the
hood down ®rmly to close. It will latch when dropped
from 6 to 8 inches (15 to 20 cm) without pressing on
the hood.
5-11
Page 338 of 460
Radiator Pressure Cap
Notice:If the pressure cap is not tightly installed,
coolant loss and possible engine damage may
occur. Be sure the cap is properly and tightly
secured.
See
Engine Compartment Overview on page 5-12for
information on location.
Engine Overheating
You will ®nd a coolant temperature gage on your
vehicle's instrument panel. If your vehicle has a DIC,
the display will show an Engine Coolant Hot or Engine
Overheated message.
If Steam Is Coming From Your Engine
{CAUTION:
Steam from an overheated engine can burn
you badly, even if you just open the hood. Stay
away from the engine if you see or hear steam
coming from it. Just turn it off and get
everyone away from the vehicle until it cools
CAUTION: (Continued)
5-26
Page 398 of 460
Cleaning Leather
Use a soft cloth with lukewarm water and a mild soap or
saddle soap and wipe dry with a soft cloth. Then, let
the leather dry naturally. Do not use heat to dry.
·For stubborn stains, use a leather cleaner.
·Neveruse oils, varnishes, solvent-based or abrasive
cleaners, furniture polish or shoe polish on leather.
·Soiled or stained leather should be cleaned
immediately. If dirt is allowed to work into the ®nish,
it can harm the leather.
Cleaning the Top of the
Instrument Panel
Use only mild soap and water to clean the top surfaces
of the instrument panel. Sprays containing silicones
or waxes may cause annoying re¯ections in the
windshield and even make it difficult to see through the
windshield under certain conditions.
Cleaning Interior Plastic Components
Use only a mild soap and water solution on a soft cloth
or sponge. Commercial cleaners may affect the
surface ®nish.
Cleaning Glass Surfaces
Glass should be cleaned often. GM Glass Cleaner or a
liquid household glass cleaner will remove normal
tobacco smoke and dust ®lms on interior glass. See
Vehicle Care/Appearance Materials on page 5-90.
Notice:If you use abrasive cleaners when cleaning
glass surfaces on your vehicle, you could scratch
the glass and/or cause damage to the rear window
defogger and the integrated radio antenna. When
cleaning the glass on your vehicle, use only a soft
cloth and glass cleaner.
5-86
Page 403 of 460

Description Usage
Swirl Remover PolishRemoves swirl marks, ®ne
scratches and other light
surface contamination.
Cleaner WaxRemoves light scratches
and protects ®nish.
Foaming Tire Shine Low
GlossCleans, shines and
protects in one easy step,
no wiping necessary.
Wash Wax ConcentrateMedium foaming
shampoo. Cleans and
lightly waxes.
Biodegradable and
phosphate free.
Spot LifterQuickly and easily
removes spots and stains
from carpets, vinyl and
cloth upholstery.
Odor EliminatorOdorless spray odor
eliminator used on fabrics,
vinyl, leather and carpet.
See your General Motors parts department for these
products. See
Recommended Fluids and Lubricants
on page 6-13.
Vehicle Identi®cation
Vehicle Identi®cation Number (VIN)
This is the legal identi®er for your vehicle. It appears on
a plate in the front corner of the instrument panel, on
the driver's side. You can see it if you look through the
windshield from outside your vehicle. The VIN also
appears on the Vehicle Certi®cation and Service Parts
labels and the certi®cates of title and registration.
Engine Identi®cation
The 8th character in your VIN is the engine code. This
code will help you identify your engine, speci®cations
and replacement parts.
5-91
Page 407 of 460

Fuses Usage
8 Automatic Transfer Case
9 Windshield Wipers
10 Powertrain Control Module B
11 Fog Lamps
12 Stop Lamp
13 Cigarette Lighter
14 Ignition Coils
15 Blank
16 TBD-Ignition 1
17 Crank
18 Air Bag
19 Electric Brake
20 Cooling Fan
21 Horn
22 Ignition E
23 Electronic Throttle Control
24Instrument Panel Cluster, Driver
Information Center
25 Automatic Shift Lock Control System
26 Engine 1
27 Back-Up
28 Powertrain Control Module 1
29 Oxygen Sensor
30 Air Conditioning
31 Truck Body Controller
32 Trailer
33 Anti-Lock Brakes (ABS)Fuses Usage
34 Ignition A
35 Blower Motor
36 Ignition B
50 Passenger's Side Trailer Turn
51 Driver's Side Trailer Turn
52 Hazard Flashers
53 Electric Adjustable Pedal
54 A.I.R. Solenoid
56 A.I.R. Pump
Relays Usage
37 Blank
38 Rear Window Washer
39 Fog Lamps
40 Horn
41 Fuel Pump
42 Windshield Wipers/Washer
43 High-Beam Headlamp
44 Air Conditioning
45 Cooling Fan
46 Headlamp Driver Module
47 Starter
49 Electric Adjustable Pedal
55 A.I.R. Solenoid
Miscellaneous Usage
48 Instrument Panel Battery
49 Blank
5-95