2004 GMC ENVOY XUV oil
[x] Cancel search: oilPage 340 of 460

Cooling System
When you decide it's safe to lift the hood, here's what
you'll see:
A. Coolant Recovery Tank
B. Radiator Pressure Cap
C. Engine Fan
If the coolant inside the coolant recovery tank is boiling,
don't do anything else until it cools down. The vehicle
should be parked on a level surface. L6 Engine
V8 Engine
5-28
Page 342 of 460

How to Add Coolant to the Coolant
Recovery Tank
If you haven't found a problem yet, but the coolant level
isn't at the FULL COLD mark, add a 50/50 mixture of
clean, drinkable waterand DEX-COOLžengine coolant
at the coolant recovery tank. SeeEngine Coolant on
page 5-23for more information.
{CAUTION:
Adding only plain water to your cooling
system can be dangerous. Plain water, or
some other liquid such as alcohol, can boil
before the proper coolant mixture will. Your
vehicle's coolant warning system is set for the
proper coolant mixture. With plain water or the
wrong mixture, your engine could get too hot
but you would not get the overheat warning.
Your engine could catch ®re and you or others
could be burned. Use a 50/50 mixture of clean,
drinkable water and DEX-COOL
žcoolant.
Notice:In cold weather, water can freeze and crack
the engine, radiator, heater core and other parts.
Use the recommended coolant and the proper
coolant mixture.
{CAUTION:
You can be burned if you spill coolant on hot
engine parts. Coolant contains ethylene glycol
and it will burn if the engine parts are hot
enough. Do not spill coolant on a hot engine.
When the coolant in the coolant recovery tank is at the
FULL COLD mark, start your vehicle.
5-30
Page 350 of 460

Checking Brake Fluid
You can check the brake ¯uid without taking off the cap.
Just look at the brake ¯uid
reservoir. The ¯uid level
should be above MIN. If it
is not, have your brake
system checked to
see if there is a leak.
After work is done on the brake hydraulic system,
make sure the level is above the MIN but not over the
MAX mark.
What to Add
When you do need brake ¯uid, use only DOT-3 brake
¯uid. Use new brake ¯uid from a sealed container
only. See
Recommended Fluids and Lubricants on
page 6-13.Always clean the brake ¯uid reservoir cap and the area
around the cap before removing it. This will help
keep dirt from entering the reservoir.
{CAUTION:
With the wrong kind of ¯uid in your brake
system, your brakes may not work well, or
they may not even work at all. This could
cause a crash. Always use the proper
brake ¯uid.
Notice:
·Using the wrong ¯uid can badly damage brake
system parts. For example, just a few drops of
mineral-based oil, such as engine oil, in your
brake system can damage brake system
parts so badly that they will have to be replaced.
Do not let someone put in the wrong kind
of ¯uid.
·If you spill brake ¯uid on your vehicle's painted
surfaces, the paint ®nish can be damaged. Be
careful not to spill brake ¯uid on your vehicle. If
you do, wash it off immediately. See
Appearance
Care on page 5-83.
5-38
Page 370 of 460

Belt:A rubber coated layer of cords that is located
between the plies and the tread. Cords may be made
from steel or other reinforcing materials.
Bead:The tire bead contains steel wires wrapped by
steel cords that hold the tire onto the rim.
Bias Ply Tire:A pneumatic tire in which the plies are
laid at alternate angles less than 90 degrees to the
centerline of the tread.
Cold In¯ation Pressure:The amount of air pressure in
a tire, measured in pounds per square inch (psi) or
kilopascals (kPa) before a tire has built up heat
from driving. See
In¯ation - Tire Pressure on page 5-60.
Curb Weight:This means the weight of a motor
vehicle with standard and optional equipment including
the maximum capacity of fuel, oil and coolant, but
without passengers and cargo.
DOT Markings:A code molded into the sidewall of a
tire signifying that the tire is in compliance with the U.S.
Department of Transportation motor vehicle safety
standards. The DOT code includes the Tire Identi®cation
Number (TIN), an alphanumeric designator which can
also identify the tire manufacturer, production plant,
brand and date of production.
GVWR:Gross Vehicle Weight Rating, see
Loading
Your Vehicle on page 4-49.
GAWR FRT:Gross Axle Weight Rating for the front
axle, see
Loading Your Vehicle on page 4-49.GAWR RR:Gross Axle Weight Rating for the rear axle,
see
Loading Your Vehicle on page 4-49.
Intended Outboard Sidewall:The side of an
asymmetrical tire, that must always face outward when
mounted on a vehicle.
Kilopascal (kPa):The metric unit for air pressure.
There are 6.9 kPa's to one psi.
Light Truck (LT-Metric) Tire:A tire used on light duty
trucks and some multipurpose passenger vehicles.
Load Index:An assigned number ranging from
1 to 279 that corresponds to the load carrying capacity
of a tire.
Maximum In¯ation Pressure:The maximum air
pressure to which a cold tire may be in¯ated. The
maximum air pressure is molded onto the sidewall.
Maximum Load Rating:The load rating for a tire at the
maximum permissible in¯ation pressure for that tire.
Maximum Loaded Vehicle Weight:The sum of curb
weight; accessory weight; vehicle capacity weight;
and production options weight.
Normal Occupant Weight:The number of occupants a
vehicle is designed to seat multiplied by 150 pounds
(68 kg). See
Loading Your Vehicle on page 4-49.
Occupant Distribution:Designated seating positions.
5-58
Page 391 of 460
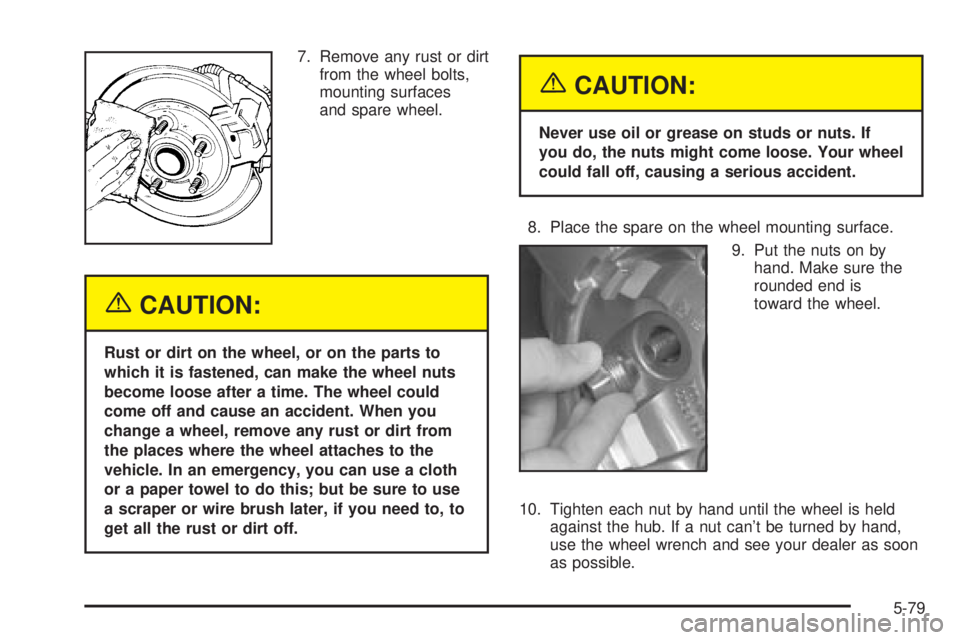
7. Remove any rust or dirt
from the wheel bolts,
mounting surfaces
and spare wheel.
{CAUTION:
Rust or dirt on the wheel, or on the parts to
which it is fastened, can make the wheel nuts
become loose after a time. The wheel could
come off and cause an accident. When you
change a wheel, remove any rust or dirt from
the places where the wheel attaches to the
vehicle. In an emergency, you can use a cloth
or a paper towel to do this; but be sure to use
a scraper or wire brush later, if you need to, to
get all the rust or dirt off.
{CAUTION:
Never use oil or grease on studs or nuts. If
you do, the nuts might come loose. Your wheel
could fall off, causing a serious accident.
8. Place the spare on the wheel mounting surface.
9. Put the nuts on by
hand. Make sure the
rounded end is
toward the wheel.
10. Tighten each nut by hand until the wheel is held
against the hub. If a nut can't be turned by hand,
use the wheel wrench and see your dealer as soon
as possible.
5-79
Page 397 of 460
Using Cleaner on Fabric
1. Vacuum and brush the area to remove any
loose dirt.
2. Always clean a whole trim panel or section. Mask
surrounding trim along stitch or welt lines.
3. Follow the directions on the container label.
4. Apply cleaner with a clean sponge. Do not saturate
the material and do not rub it roughly.
5. As soon as you have cleaned the section, use a
sponge to remove any excess cleaner.
6. Wipe cleaned area with a clean, water-dampened
towel or cloth.
7. Wipe with a clean cloth and let dry.
Special Fabric Cleaning Problems
Stains caused by such things as catsup, coffee (black),
egg, fruit, fruit juice, milk, soft drinks, vomit, urine
and blood can be removed as follows:
1. Carefully scrape off excess stain, then sponge the
soiled area with cool water.
2. If a stain remains, follow the cleaning instructions
described earlier.3. If an odor lingers after cleaning vomit or urine, treat
the area with a water and baking soda solution:
1 teaspoon (5 ml) of baking soda to 1 cup (250 ml)
of lukewarm water.
4. Let dry.
Stains caused by candy, ice cream, mayonnaise, chili
sauce and unknown stains can be removed as follows:
1. Carefully scrape off excess stain.
2. Clean with cool water and allow to dry completely.
3. If a stain remains, follow the cleaner instructions
described earlier.
Cleaning Vinyl
Use warm water and a clean cloth.
·Rub with a clean, damp cloth to remove dirt. You
may have to do this more than once.
·Things like tar, asphalt and shoe polish will stain if
you do not get them off quickly. Use a clean cloth
and vinyl cleaner. See your dealer for this product.
5-85
Page 398 of 460
Cleaning Leather
Use a soft cloth with lukewarm water and a mild soap or
saddle soap and wipe dry with a soft cloth. Then, let
the leather dry naturally. Do not use heat to dry.
·For stubborn stains, use a leather cleaner.
·Neveruse oils, varnishes, solvent-based or abrasive
cleaners, furniture polish or shoe polish on leather.
·Soiled or stained leather should be cleaned
immediately. If dirt is allowed to work into the ®nish,
it can harm the leather.
Cleaning the Top of the
Instrument Panel
Use only mild soap and water to clean the top surfaces
of the instrument panel. Sprays containing silicones
or waxes may cause annoying re¯ections in the
windshield and even make it difficult to see through the
windshield under certain conditions.
Cleaning Interior Plastic Components
Use only a mild soap and water solution on a soft cloth
or sponge. Commercial cleaners may affect the
surface ®nish.
Cleaning Glass Surfaces
Glass should be cleaned often. GM Glass Cleaner or a
liquid household glass cleaner will remove normal
tobacco smoke and dust ®lms on interior glass. See
Vehicle Care/Appearance Materials on page 5-90.
Notice:If you use abrasive cleaners when cleaning
glass surfaces on your vehicle, you could scratch
the glass and/or cause damage to the rear window
defogger and the integrated radio antenna. When
cleaning the glass on your vehicle, use only a soft
cloth and glass cleaner.
5-86
Page 400 of 460
Cleaning Exterior Lamps/Lenses
Use only lukewarm or cold water, a soft cloth and a car
washing soap to clean exterior lamps and lenses.
Follow instructions under ªWashing Your Vehicle.º
Finish Care
Occasional waxing or mild polishing of your vehicle by
hand may be necessary to remove residue from the
paint ®nish. You can get GM-approved cleaning products
from your dealer. See
Vehicle Care/Appearance
Materials on page 5-90.
If your vehicle has a ªbasecoat/clearcoatº paint ®nish.
The clearcoat gives more depth and gloss to the colored
basecoat. Always use waxes and polishes that are
non-abrasive and made for a basecoat/clearcoat
paint ®nish.
Notice:Machine compounding or aggressive
polishing on a basecoat/clearcoat paint ®nish may
damage it. Use only non-abrasive waxes and
polishes that are made for a basecoat/clearcoat
paint ®nish on your vehicle.
Foreign materials such as calcium chloride and other
salts, ice melting agents, road oil and tar, tree sap, bird
droppings, chemicals from industrial chimneys, etc.,
can damage your vehicle's ®nish if they remain
on painted surfaces. Wash the vehicle as soon aspossible. If necessary, use non-abrasive cleaners that
are marked safe for painted surfaces to remove
foreign matter.
Exterior painted surfaces are subject to aging, weather
and chemical fallout that can take their toll over a
period of years. You can help to keep the paint ®nish
looking new by keeping your vehicle garaged or covered
whenever possible.
Protecting Exterior Bright Metal Parts
Bright metal parts should be cleaned regularly to keep
their luster. Washing with water is all that is usually
needed. However, you may use chrome polish on
chrome or stainless steel trim, if necessary.
Use special care with aluminum trim. To avoid damaging
protective trim, never use auto or chrome polish,
steam or caustic soap to clean aluminum. A coating of
wax, rubbed to high polish, is recommended for all
bright metal parts.
Cleaning the Windshield, Backglass
and Wiper Blades
If the windshield is not clear after using the windshield
washer, or if the wiper blade chatters when running,
wax, sap or other material may be on the blade or
windshield.
5-88