2004 GMC ENVOY XUV ECU
[x] Cancel search: ECUPage 116 of 460

Keep the original transmitter for use in other vehicles as
well as for future HomeLinkžprogramming. It is also
recommended that upon the sale of the vehicle,
the programmed HomeLink
žbuttons should be erased
for security purposes. Refer to ªErasing HomeLinkž
Buttonsº or, for assistance, contact HomeLinkžon the
internet at: www.homelink.com or by calling
1-800-355-3515.
Be sure that people and objects are clear of the garage
door or gate operator you are programming. When
programming a garage door, it is advised to park outside
of the garage.
It is recommended that a new battery be installed in
your hand-held transmitter for quicker and more
accurate transmission of the radio frequency.
Your vehicle's engine should be turned off while
programming the transmitter. Follow these steps to
program up to three channels:
1. Press and hold down the two outside buttons,
releasing only when the indicator light begins to
¯ash, after 20 seconds. Do not hold down the
buttons for longer than 30 seconds and do not
repeat this step to program a second and/or third
transmitter to the remaining two HomeLink
žbuttons.
2. Position the end of your hand-held transmitter about
1 to 3 inches (3 to 8 cm) away from the HomeLink
ž
buttons while keeping the indicator light in view.3. Simultaneously press and hold both the desired
button on HomeLink
žand the hand-held transmitter
button. Do not release the buttons until Step 4
has been completed.
Some entry gates and garage door openers may
require you to substitute Step 3 with the procedure
noted in ªGate Operator and Canadian
Programmingº later in this section.
4. The indicator light will ¯ash slowly at ®rst and then
rapidly after HomeLink
žsuccessfully receives the
frequency signal from the hand-held transmitter.
Release both buttons.
5. Press and hold the newly-trained HomeLink
žbutton
and observe the indicator light.
If the indicator light stays on constantly,
programming is complete and your device should
activate when the HomeLink
žbutton is pressed and
released.
To program the remaining two HomeLink
žbuttons,
begin with Step 2 under ªProgramming HomeLinkž.º
Do not repeat Step 1 as this will erase all of the
programmed channels.
If the indicator light blinks rapidly for two seconds
and then turns to a constant light, continue with
Steps 6 through 8 following to complete the
programming of a rolling-code equipped device
(most commonly, a garage door opener).
2-48
Page 125 of 460

Instrument Panel Overview...............................3-4
Other Warning Devices...................................3-5
Horn.............................................................3-5
Tilt Wheel.....................................................3-6
Turn Signal/Multifunction Lever.........................3-6
Exterior Lamps.............................................3-14
Interior Lamps..............................................3-16
Accessory Power Outlets...............................3-19
Ashtrays and Cigarette Lighter........................3-19
Climate Controls............................................3-20
Dual Climate Control System..........................3-20
Dual Automatic Climate Control System...........3-23
Rear Climate Control System.........................3-28
Climate Controls Personalization.....................3-29
Warning Lights, Gages, and Indicators............3-30
Instrument Panel Cluster................................3-31
Speedometer and Odometer...........................3-32
Tachometer.................................................3-33
Safety Belt Reminder Light.............................3-33Air Bag Readiness Light................................3-34
Charging System Light..................................3-35
Voltmeter Gage............................................3-35
Brake System Warning Light..........................3-36
Anti-Lock Brake System Warning Light.............3-37
Engine Coolant Temperature Gage..................3-37
Malfunction Indicator Lamp.............................3-38
Oil Pressure Gage........................................3-41
Change Engine Oil Light................................3-42
Security Light...............................................3-42
Cruise Control Light......................................3-43
Reduced Engine Power Light.........................3-43
Service Four-Wheel Drive Warning Light..........3-44
Check Gages Warning Light...........................3-44
Fuel Gage...................................................3-45
Low Fuel Warning Light.................................3-45
Driver Information Center (DIC).......................3-46
DIC Operation and Displays...........................3-46
DIC Warnings and Messages.........................3-56
Section 3 Instrument Panel
3-1
Page 166 of 460

Change Engine Oil Light
When the CHANGE ENG OIL light comes on, it means
that service is required for your vehicle. SeeScheduled
Maintenance on page 6-4andEngine Oil on page 5-15for more information.
Once the engine oil has been changed, the CHANGE
ENG OIL light must be reset. Until it is reset, the light will
be displayed when the engine is on.
Security Light
This light will come on brie¯y when you turn the key
toward START. The light will stay on until the engine
starts.
If the light ¯ashes, the Passlock
žsystem has entered a
tamper mode. If the vehicle fails to start, seePasslockž
on page 2-23.
If the light comes on continuously while driving and
stays on, there may be a problem with the Passlock
ž
system. Your vehicle will not be protected by Passlockž,
and you should see your dealer.
Also, see
Content Theft-Deterrent on page 2-22for
additional information regarding the SECURITY light. United States
CanadaUnited StatesCanada
3-42
Page 194 of 460
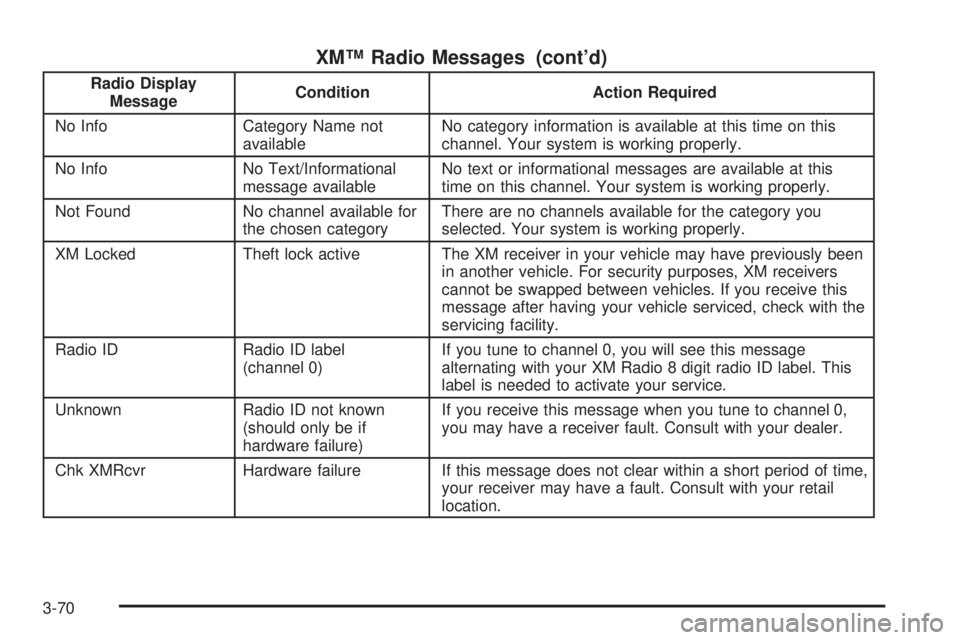
XMŸ Radio Messages (cont'd)
Radio Display
MessageCondition Action Required
No Info Category Name not
availableNo category information is available at this time on this
channel. Your system is working properly.
No Info No Text/Informational
message availableNo text or informational messages are available at this
time on this channel. Your system is working properly.
Not Found No channel available for
the chosen categoryThere are no channels available for the category you
selected. Your system is working properly.
XM Locked Theft lock active The XM receiver in your vehicle may have previously been
in another vehicle. For security purposes, XM receivers
cannot be swapped between vehicles. If you receive this
message after having your vehicle serviced, check with the
servicing facility.
Radio ID Radio ID label
(channel 0)If you tune to channel 0, you will see this message
alternating with your XM Radio 8 digit radio ID label. This
label is needed to activate your service.
Unknown Radio ID not known
(should only be if
hardware failure)If you receive this message when you tune to channel 0,
you may have a receiver fault. Consult with your dealer.
Chk XMRcvr Hardware failure If this message does not clear within a short period of time,
your receiver may have a fault. Consult with your retail
location.
3-70
Page 206 of 460
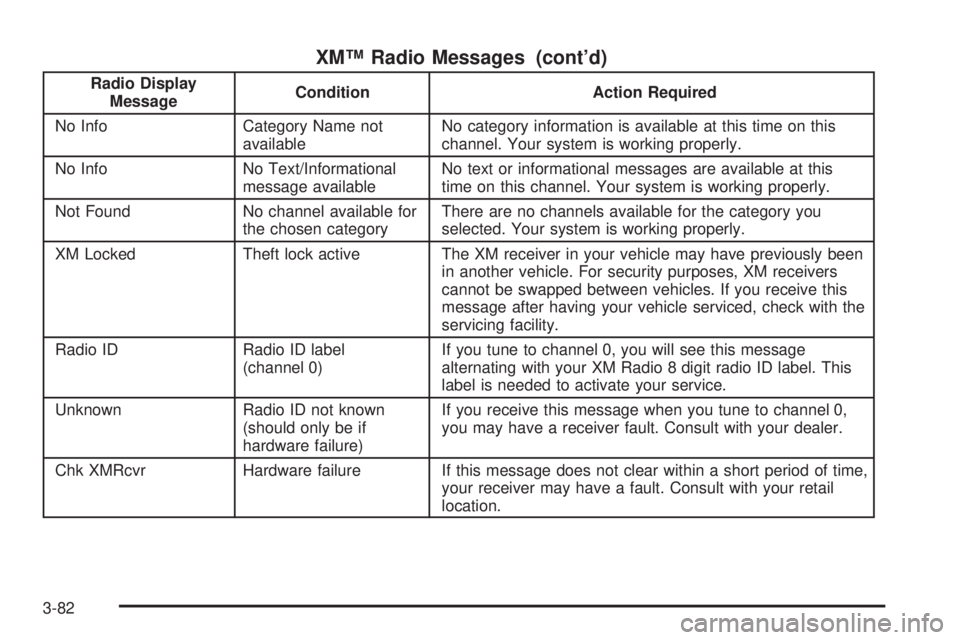
XMŸ Radio Messages (cont'd)
Radio Display
MessageCondition Action Required
No Info Category Name not
availableNo category information is available at this time on this
channel. Your system is working properly.
No Info No Text/Informational
message availableNo text or informational messages are available at this
time on this channel. Your system is working properly.
Not Found No channel available for
the chosen categoryThere are no channels available for the category you
selected. Your system is working properly.
XM Locked Theft lock active The XM receiver in your vehicle may have previously been
in another vehicle. For security purposes, XM receivers
cannot be swapped between vehicles. If you receive this
message after having your vehicle serviced, check with the
servicing facility.
Radio ID Radio ID label
(channel 0)If you tune to channel 0, you will see this message
alternating with your XM Radio 8 digit radio ID label. This
label is needed to activate your service.
Unknown Radio ID not known
(should only be if
hardware failure)If you receive this message when you tune to channel 0,
you may have a receiver fault. Consult with your dealer.
Chk XMRcvr Hardware failure If this message does not clear within a short period of time,
your receiver may have a fault. Consult with your retail
location.
3-82
Page 221 of 460
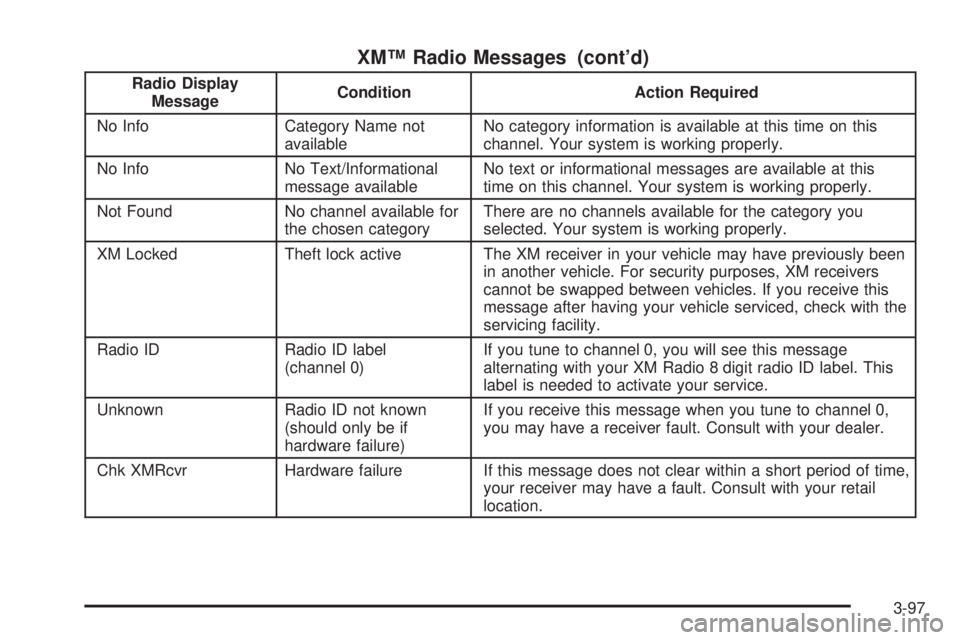
XMŸ Radio Messages (cont'd)
Radio Display
MessageCondition Action Required
No Info Category Name not
availableNo category information is available at this time on this
channel. Your system is working properly.
No Info No Text/Informational
message availableNo text or informational messages are available at this
time on this channel. Your system is working properly.
Not Found No channel available for
the chosen categoryThere are no channels available for the category you
selected. Your system is working properly.
XM Locked Theft lock active The XM receiver in your vehicle may have previously been
in another vehicle. For security purposes, XM receivers
cannot be swapped between vehicles. If you receive this
message after having your vehicle serviced, check with the
servicing facility.
Radio ID Radio ID label
(channel 0)If you tune to channel 0, you will see this message
alternating with your XM Radio 8 digit radio ID label. This
label is needed to activate your service.
Unknown Radio ID not known
(should only be if
hardware failure)If you receive this message when you tune to channel 0,
you may have a receiver fault. Consult with your dealer.
Chk XMRcvr Hardware failure If this message does not clear within a short period of time,
your receiver may have a fault. Consult with your retail
location.
3-97
Page 234 of 460
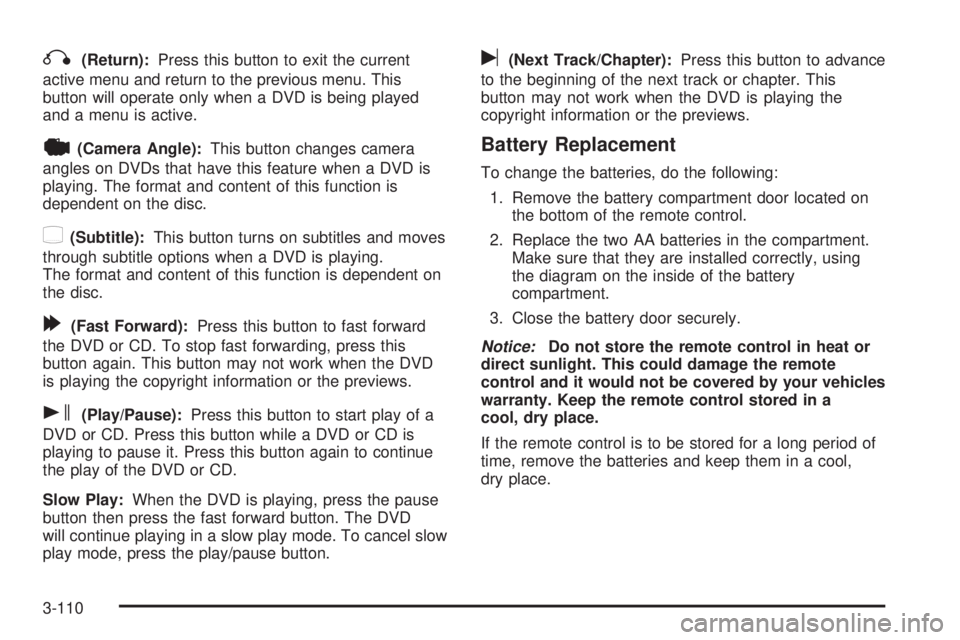
q(Return):Press this button to exit the current
active menu and return to the previous menu. This
button will operate only when a DVD is being played
and a menu is active.
|(Camera Angle):This button changes camera
angles on DVDs that have this feature when a DVD is
playing. The format and content of this function is
dependent on the disc.
{(Subtitle):This button turns on subtitles and moves
through subtitle options when a DVD is playing.
The format and content of this function is dependent on
the disc.
[(Fast Forward):Press this button to fast forward
the DVD or CD. To stop fast forwarding, press this
button again. This button may not work when the DVD
is playing the copyright information or the previews.
s(Play/Pause):Press this button to start play of a
DVD or CD. Press this button while a DVD or CD is
playing to pause it. Press this button again to continue
the play of the DVD or CD.
Slow Play:When the DVD is playing, press the pause
button then press the fast forward button. The DVD
will continue playing in a slow play mode. To cancel slow
play mode, press the play/pause button.
u(Next Track/Chapter):Press this button to advance
to the beginning of the next track or chapter. This
button may not work when the DVD is playing the
copyright information or the previews.
Battery Replacement
To change the batteries, do the following:
1. Remove the battery compartment door located on
the bottom of the remote control.
2. Replace the two AA batteries in the compartment.
Make sure that they are installed correctly, using
the diagram on the inside of the battery
compartment.
3. Close the battery door securely.
Notice:Do not store the remote control in heat or
direct sunlight. This could damage the remote
control and it would not be covered by your vehicles
warranty. Keep the remote control stored in a
cool, dry place.
If the remote control is to be stored for a long period of
time, remove the batteries and keep them in a cool,
dry place.
3-110
Page 262 of 460
Loading Your Vehicle for Off-Road
Driving
There are some important things to remember about
how to load your vehicle.
·The heaviest things should be on the load ¯oor and
forward of your rear axle. Put heavier items as far
forward as you can.
·Be sure the load is secured properly, so driving on
the off-road terrain does not toss things around.
{CAUTION:
·Cargo on the load ¯oor piled higher than
the seatbacks can be thrown forward
during a sudden stop. You or your
passengers could be injured. Keep cargo
below the top of the seatbacks.
·Unsecured cargo on the load ¯oor can be
tossed about when driving over rough
terrain. You or your passengers can be
struck by ¯ying objects. Secure the cargo
properly.
CAUTION: (Continued)
CAUTION: (Continued)
·
Heavy loads on the roof raise the vehicle's
center of gravity, making it more likely to
roll over. You can be seriously or fatally
injured if the vehicle rolls over. Put heavy
loads inside the cargo area, not on the
roof. Keep cargo in the cargo area as far
forward and low as possible.
You will ®nd other important information in this manual.
See
Loading Your Vehicle on page 4-49andTires
on page 5-52.
4-16