2004 GMC ENVOY XUV reset
[x] Cancel search: resetPage 156 of 460

Speedometer and Odometer
Your speedometer lets you see your speed in both
miles per hour (mph) and kilometers per hour (km/h).
Your odometer shows how far your vehicle has
been driven, in either miles (used in the United States)
or kilometers (used in Canada).
The odometer mileage can be checked without the
vehicle running. Simply press the trip stem located on
the instrument panel cluster.
You may wonder what happens if your vehicle needs a
new odometer installed. The new one will be set to
the correct mileage total of the old odometer.
Trip Odometer
The trip odometer can tell you how far your vehicle has
been driven since you last set the trip odometer to zero.
The trip odometer is part of the Driver Information
Center (DIC). Press and release the trip stem located
on the instrument panel cluster to display the trip
odometer. Press and hold the trip stem to reset the trip
odometer once it is displayed. Press and hold the
trip stem for a few seconds to reset the trip odometer to
the mileage since the vehicle was last started.
3-32
Page 166 of 460

Change Engine Oil Light
When the CHANGE ENG OIL light comes on, it means
that service is required for your vehicle. SeeScheduled
Maintenance on page 6-4andEngine Oil on page 5-15for more information.
Once the engine oil has been changed, the CHANGE
ENG OIL light must be reset. Until it is reset, the light will
be displayed when the engine is on.
Security Light
This light will come on brie¯y when you turn the key
toward START. The light will stay on until the engine
starts.
If the light ¯ashes, the Passlock
žsystem has entered a
tamper mode. If the vehicle fails to start, seePasslockž
on page 2-23.
If the light comes on continuously while driving and
stays on, there may be a problem with the Passlock
ž
system. Your vehicle will not be protected by Passlockž,
and you should see your dealer.
Also, see
Content Theft-Deterrent on page 2-22for
additional information regarding the SECURITY light. United States
CanadaUnited StatesCanada
3-42
Page 170 of 460

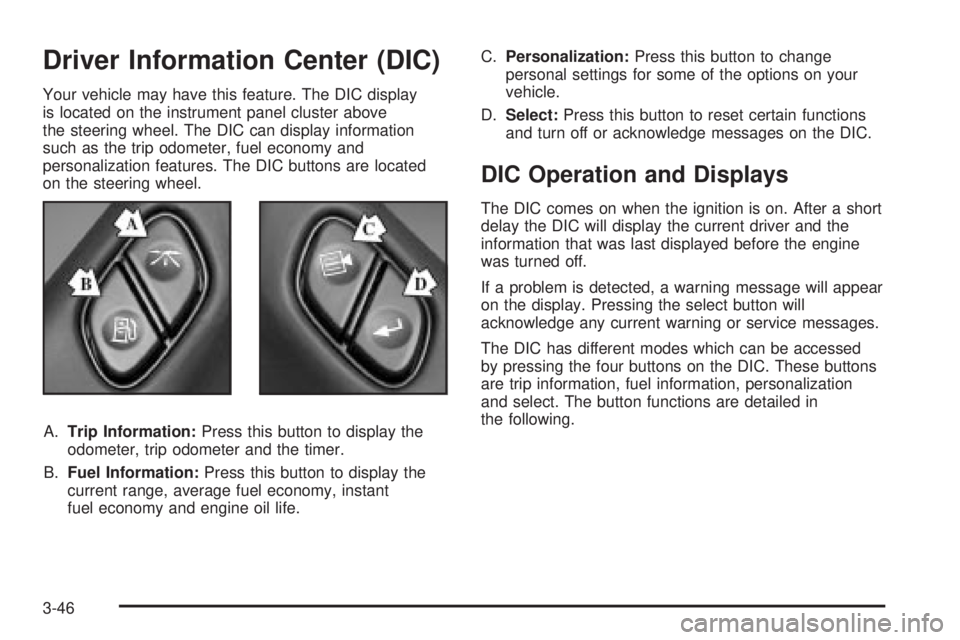
Driver Information Center (DIC)
Your vehicle may have this feature. The DIC display
is located on the instrument panel cluster above
the steering wheel. The DIC can display information
such as the trip odometer, fuel economy and
personalization features. The DIC buttons are located
on the steering wheel.
A.Trip Information:Press this button to display the
odometer, trip odometer and the timer.
B.Fuel Information:Press this button to display the
current range, average fuel economy, instant
fuel economy and engine oil life.C.Personalization:Press this button to change
personal settings for some of the options on your
vehicle.
D.Select:Press this button to reset certain functions
and turn off or acknowledge messages on the DIC.
DIC Operation and Displays
The DIC comes on when the ignition is on. After a short
delay the DIC will display the current driver and the
information that was last displayed before the engine
was turned off.
If a problem is detected, a warning message will appear
on the display. Pressing the select button will
acknowledge any current warning or service messages.
The DIC has different modes which can be accessed
by pressing the four buttons on the DIC. These buttons
are trip information, fuel information, personalization
and select. The button functions are detailed in
the following.
3-46
Page 171 of 460

Trip Information
Use the trip information button to scroll through the
odometer, TRIP A, TRIP B and TIMER.
Odometer
The trip odometer can tell you how far your vehicle has
been driven since you last set the trip odometer to
zero. Press and release the trip stem located on the
instrument panel cluster to display the trip odometer.
Press and hold the trip stem to reset the trip odometer
once it is displayed. Press and hold the trip stem for
a few seconds to reset the trip odometer to the mileage
since the vehicle was last started.
Trip A and Trip B
Press the trip information button until TRIP A or TRIP B
is displayed. This shows the current distance traveled
since the last reset for each trip odometer in either miles
or kilometers. Both odometers can be used at the
same time.
Each trip odometer can be reset to zero separately by
pressing select while the desired trip odometer is
displayed. You can also reset the trip odometers with
the reset stem on the cluster. If you press and hold the
reset stem for four seconds, the display will show the
distance traveled since the last ignition cycle.
Timer
The DIC can be used as a stopwatch. Press the select
button while TIMER is displayed to start the timer.
The display will show the amount of time that has
passed since the timer was last reset (not including time
the ignition is off). Time will continue to be counted as
long as the ignition is on, even if another display is being
shown on the DIC. The timer will record up to 99 hours,
59 minutes and 59 seconds (99:59:59) after which
the display will roll back to zero.
To stop the counting of time, press the select button
brie¯y while TIMER is displayed.
To reset the timer to zero, press and hold the select
button while TIMER is displayed.
3-47
Page 172 of 460

Fuel Information
Use the fuel information button to scroll through the
range, average fuel economy and instant fuel economy
Fuel Range
Press the fuel information button until RANGE appears
to display the remaining distance you can drive
without refueling. It's based on fuel economy and the
fuel remaining in the tank. The display will show LOW if
the fuel level is low.
The fuel economy data used to determine fuel range is
an average of recent driving conditions. As your
driving conditions change, this data is gradually updated.
Fuel range cannot be reset.
Average Fuel Economy
Press the fuel information button until AVG ECON
appears in the display. Average fuel economy is how
many miles per gallon your vehicle is getting based on
current and past driving conditions.
Press and hold the select button while AVG. ECON is
displayed to reset the average fuel economy. Average
fuel economy will then be calculated starting from
that point. If the average fuel economy is not reset, it
will be continually updated each time you drive.
Instant Fuel Economy
Press the fuel information button until INST ECON
appears in the display. Instant fuel economy is how
many miles per gallon your vehicle is at the particular
moment in time. The instant fuel economy cannot
be reset.
Oil Life System
Press the fuel information button until ENGINE OIL LIFE
appears in the display. The oil life system shows an
estimate of the oil's remaining useful life. It will
show 100% when the system is reset after an oil
change. It will alert you to change your oil on a schedule
consistent with your driving conditions.
Always reset the engine oil life after an oil change.
To reset the Oil Life System press and hold the select
button while ENGINE OIL LIFE is displayed.
The oil change reminder does not measure how much
oil you have in your engine. So, be sure to check your oil
often. For more information, see
Engine Oil on
page 5-15.
3-48
Page 179 of 460

Display Language
To select your personalization for display language,
press the select button while DISPLAY LANGUAGE is
displayed on the DIC. Pressing the select button
will scroll through the available languages:
Choosing a language will display all of the information
on the DIC in the desired language.
If your vehicle is equipped with an Information Center,
press and hold the trip stem while the odometer is
displayed. While holding down the trip stem button, the
Information Center will begin to list the available
languages. The name of each language will be
displayed in its native language (ENGLISH for English,
FRANCAIS for French and ESPANOL for Spanish).
When you see the language that you would like, release
the trip stem. The Information Center will then display
the information in the language you chose.If you accidentally choose a language you do not want
or understand, press and hold the trip information
button and the personalization button at the same time.
After a short time, the display will begin cycling
through the available languages. Release the buttons
when you see a language you would like. This will also
reset all of the current driver's personalization features
to their factory default settings.
For vehicles with redundant steering wheel controls, see
ªPersonalizationº under the DIC.
Select
The select button is used to reset certain functions and
turn off or acknowledge messages on the DIC display.
The select button also toggles through the options
available in each personalization menu. For example, this
button will reset the trip odometers, turn off the FUEL
LEVEL LOW message, and toggle through the languages
you can select the DIC to display information in.
3-55
Page 184 of 460

REAR WIPER OBSTRUCTION
Check the rear wiper. An object is preventing it from
moving to the off position. Tailgate glass operations
cannot be performed if the rear wiper is not in the off
position.
CLOSE THE TAILGATE
The tailgate must be closed to operate the
tailgate glass.
TAILGATE GLASS DOWN
The rear wiper/defog request cannot be performed
because the tailgate glass is down.
TAILGATE OPEN
The tailgate is in drop mode. Operate the vehicle with
caution.
TAILGATE AJAR
The tailgate is ajar and should be closed before moving
the vehicle.
SEE MANUAL ±TAILGATE
Window position needs to be reset. Activate the tailgate
window up switch and continue to hold it for two
seconds after the window is fully closed. Then activate
the tailgate window down switch and continue to
hold it for two seconds after the window is fully open.
If this process does not restore tailgate function,
see your dealer for service.
TIGHTEN FUEL CAP
If the vehicle's fuel cap is not tightened properly, this
message may appear on the DIC and a chime will
sound. Fully reinstall the fuel cap. The diagnostic system
can determine if the fuel cap has been left off or
improperly installed. A loose or missing fuel cap will
allow fuel to evaporate into the atmosphere. The
DIC message will remain on until the message is
cancelled with the return button on the steering wheel.
The DIC message will also be cancelled if the ignition
is turned off.
The DIC message and the Service Engine Soon light
may come on again during a second trip if the fuel cap is
still not tightened properly. See
Malfunction Indicator
Lamp on page 3-38for more information.
3-60
Page 188 of 460

Finding a Station
BAND:Press this button to switch between FM1, FM2,
AM, or XM1 or XM2 (48 contiguous US states, if
equipped). The display will show your selection.
TUNE:Turn this knob to select radio stations.
qSEEKr:Press the right or the left arrow to go to
the next or to the previous station and stay there.
The radio will seek only to stations that are in the
selected band and only to those with a strong signal.
qSCANr:Press and hold either arrow for
more than two seconds. SCAN will appear on the
display and you will hear a beep. The radio will go to a
station, play for a few seconds, then go on to the
next station. Press either arrow again to stop scanning.
To scan preset stations, press and hold either arrow
for more than four seconds. PSCN will appear on
the display and you will hear two beeps. The radio will
go to the ®rst preset station, play for a few seconds,
then go on to the next preset station. Press either arrow
again or one of the pushbuttons to stop scanning.
The radio will scan only to stations that are in the
selected band and only to those with a strong signal.
Setting Preset Stations
The six numbered pushbuttons let you return to your
favorite stations. You can set up to 30 stations
(six FM1, six FM2, and six AM, six XM1 and six XM2
(48 contiguous US states, if equipped), by performing
the following steps:
1. Turn the radio on.
2. Press BAND to select FM1, FM2, AM, or XM1
or XM2.
3. Tune in the desired station.
4. Press AUTO EQ to select the equalization.
5. Press and hold one of the six numbered
pushbuttons. The radio will produce one beep.
Whenever you press that numbered pushbutton, the
station you set will return and the equalization
that you selected will be automatically stored for
that pushbutton.
6. Repeat the steps for each pushbutton.
3-64