2004 FORD SUPER DUTY light
[x] Cancel search: lightPage 253 of 304
•Adding certain accessories to your vehicle (for example bug
deflectors, rollbars/light bars, running boards, ski/luggage racks) may
reduce fuel economy.
•Using fuel blended with alcohol may lower fuel economy.
•Fuel economy may decrease with lower temperatures during the first
12–16 km (8–10 miles) of driving.
•Driving on flat terrain offers improved fuel economy as compared to
driving on hilly terrain.
•Transmissions give their best fuel economy when operated in the top
cruise gear and with steady pressure on the gas pedal.
•Four-wheel-drive operation (if equipped) is less fuel efficient than
two-wheel-drive operation.
•Close windows for high speed driving.
EPA window sticker
Every new vehicle should have the EPA window sticker. Contact your
dealer if the window sticker is not supplied with your vehicle. The EPA
window sticker should be your guide for the fuel economy comparisons
with other vehicles.
It is important to note the box in the lower left corner of the window
sticker. These numbers represent the Range of L/100 km (MPG)
expected on the vehicle under optimum conditions. Your fuel economy
may vary depending upon the method of operation and conditions.
EMISSION CONTROL SYSTEM
Your vehicle is equipped with various emission control components and a
catalytic converter which will enable your vehicle to comply with
applicable exhaust emission standards. To make sure that the catalytic
converter and other emission control components continue to work
properly:
•Use only the specified fuel listed.
•Avoid running out of fuel.
•Do not turn off the ignition while your vehicle is moving, especially at
high speeds.
•Have the items listed in your scheduled maintenance guide performed
according to the specified schedule.
The scheduled maintenance items listed in the scheduled maintenance
guide are essential to the life and performance of your vehicle and to its
emissions system.
2004 F250/350/450/550(f23)
Owners Guide (post-2002-fmt)
USA English(fus)
Maintenance and Specifications
253
Page 254 of 304
If other than Ford, Motorcraft or Ford-authorized parts are used for
maintenance replacements or for service of components affecting
emission control, such non-Ford parts should be equivalent to genuine
Ford Motor Company parts in performance and durability.
Do not park, idle, or drive your vehicle in dry grass or other dry
ground cover. The emission system heats up the engine
compartment and exhaust system, which can start a fire.
Illumination of the“Service Engine Soon”light, charging system warning
light or the temperature warning light, fluid leaks, strange odors, smoke
or loss of engine power, could indicate that the emission control system
is not working properly.
Exhaust leaks may result in entry of harmful and potentially
lethal fumes into the passenger compartment.
Do not make any unauthorized changes to your vehicle or engine. By
law, vehicle owners and anyone who manufactures, repairs, services,
sells, leases, trades vehicles, or supervises a fleet of vehicles are not
permitted to intentionally remove an emission control device or prevent
it from working. Information about your vehicle’s emission system is on
the Vehicle Emission Control Information Decal located on or near the
engine. This decal identifies engine displacement and gives some tune up
specifications.
Please consult yourWarranty Guidefor complete emission warranty
information.
On board diagnostics (OBD-II)
Your vehicle is equipped with a computer that monitors the engine’s
emission control system. This system is commonly known as the On
Board Diagnostics System (OBD-II). This OBD-II system protects the
environment by ensuring that your vehicle continues to meet
government emission standards. The OBD-II system also assists the
service technician in properly servicing your vehicle. When theCheck
Engine/Service Engine Soonlight illuminates, the OBD-II system has
detected a malfunction. Temporary malfunctions may cause yourCheck
Engine/Service Engine Soonlight to illuminate. Examples are:
1. The vehicle has run out of fuel. (The engine may misfire or run
poorly.)
2. Poor fuel quality or water in the fuel.
2004 F250/350/450/550(f23)
Owners Guide (post-2002-fmt)
USA English(fus)
Maintenance and Specifications
254
Page 255 of 304
3. The fuel cap may not have been securely tightened.
These temporary malfunctions can be corrected by filling the fuel tank
with good quality fuel and/or properly tightening the fuel cap. After three
driving cycles without these or any other temporary malfunctions
present, theCheck Engine/Service Engine Soonlight should turn off.
(A driving cycle consists of a cold engine startup followed by mixed
city/highway driving.) No additional vehicle service is required.
If theCheck Engine/Service Engine Soonlight remains on, have your
vehicle serviced at the first available opportunity.
Readiness for Inspection/Maintenance (I/M) testing
In some localities, it may be a legal requirement to pass an I/M test of
the on-board diagnostics system. If your“Check Engine/Service Engine
Soon”light is on, refer to the description in theWarning lights and
chimessection of theInstrument clusterchapter. Your vehicle may not
pass the I/M test with the“Check Engine/Service Engine Soon”light on.
If the vehicle’s powertrain system or its battery has just been serviced,
the on-board diagnostics system is reset to a“not ready for I/M test”
condition. To ready the on-board diagnostics system for I/M testing, a
minimum of 30 minutes of city and highway driving is necessary as
described below:
•First, at least 10 minutes of driving on an expressway or highway.
•Next, at least 20 minutes driving in stop-and-go, city-type traffic with
at least four idle periods.
Allow the vehicle to sit for at least eight hours without starting the
engine. Then, start the engine and complete the above driving cycle. The
engine must warm up to its normal operating temperature. Once started,
do not turn off the engine until the above driving cycle is complete.
2004 F250/350/450/550(f23)
Owners Guide (post-2002-fmt)
USA English(fus)
Maintenance and Specifications
255
Page 257 of 304
CLUTCH FLUID (IF EQUIPPED)
Check the clutch fluid level. Refer to the scheduled maintenance guide
for the service interval schedules.
Use only a DOT 3 brake fluid designed to meet Ford specification
ESA-M6C25–A. Refer toLubricant Specificationsin this chapter.
Brake fluid is toxic. If brake fluid contacts the eyes, flush eyes
with running water for 15 minutes. Seek medical attention if
irritation persists. If taken internally, drink water and induce vomiting.
Seek medical attention immediately.
During normal operation, the fluid level in the clutch reservoir should
remain constant or rise slightly. If the fluid level drops, refill the fluid
level to the step in the reservoir.
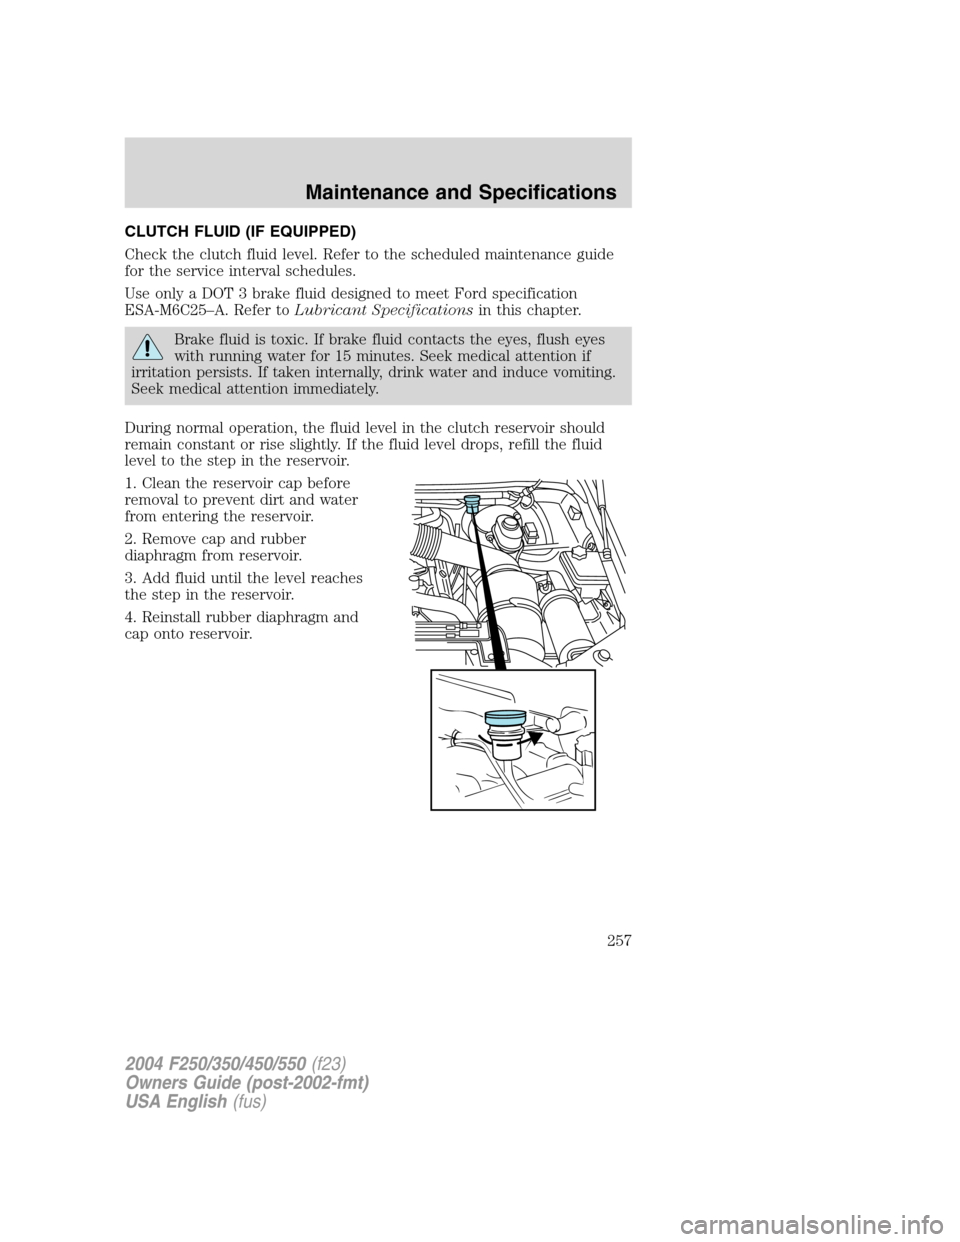
1. Clean the reservoir cap before
removal to prevent dirt and water
from entering the reservoir.
2. Remove cap and rubber
diaphragm from reservoir.
3. Add fluid until the level reaches
the step in the reservoir.
4. Reinstall rubber diaphragm and
cap onto reservoir.
2004 F250/350/450/550(f23)
Owners Guide (post-2002-fmt)
USA English(fus)
Maintenance and Specifications
257
Page 266 of 304

•B-pillar:The structural member at the side of the vehicle behind the
front door.
•Bead area of the tire:Area of the tire next to the rim.
•Sidewall of the tire:Area between the bead area and the tread.
•Tread area of the tire:Area of the perimeter of the tire that
contacts the road when mounted on the vehicle.
•Rim:The metal support (wheel) for a tire or a tire and tube assembly
upon which the tire beads are seated.
INFORMATION CONTAINED ON THE TIRE SIDEWALL
Federal law requires tire manufacturers to place standardized
information on the sidewall of all tires. This information identifies and
describes the fundamental characteristics of the tire and also provides a
tire identification number for safety standard certification and in case of
a recall.
Information on“P”type tires
P215/65R15 95H is an example of a
tire size, load index and speed
rating. The definitions of these
items are listed below. (Note that
the tire size, load index and speed
rating for your vehicle may be
different than this example.)
1.P:Indicates a tire, designated by
the Tire and Rim Association
(T&RA), that maybe used for
service on cars, SUVs, minivans and
light trucks.
Note:If your tire size does not
begin with a letter this may mean it
is designated by either ETRTO
(European Tire and Rim Technical
Organization) or JATMA (Japan Tire Manufacturing Association).
2.215:Indicates the nominal width of the tire in millimeters from
sidewall edge to sidewall edge. In general, the larger the number, the
wider the tire.
3.65:Indicates the aspect ratio which gives the tire’s ratio of height to
width.
2004 F250/350/450/550(f23)
Owners Guide (post-2002-fmt)
USA English(fus)
Maintenance and Specifications
266
Page 269 of 304
13.Maximum Permissible Inflation Pressure:Tire manufactures
maximum permissible pressure and/or the pressure at which the
maximum load can be carried by the tire. This pressure is normally
higher than the manufacturer’s recommended cold inflation pressure
which can be found on either the tire label or certification label which is
located on the structure by the trailing edge of the driver’s door or the
edge of the driver’s door. The cold inflation pressure should never be set
lower than the recommended pressure on the label.
Note:You may not find this information on all tires because it is not
required by federal law.
The tire suppliers may have additional markings, notes or warnings such
as standard load, radial tubeless, etc.
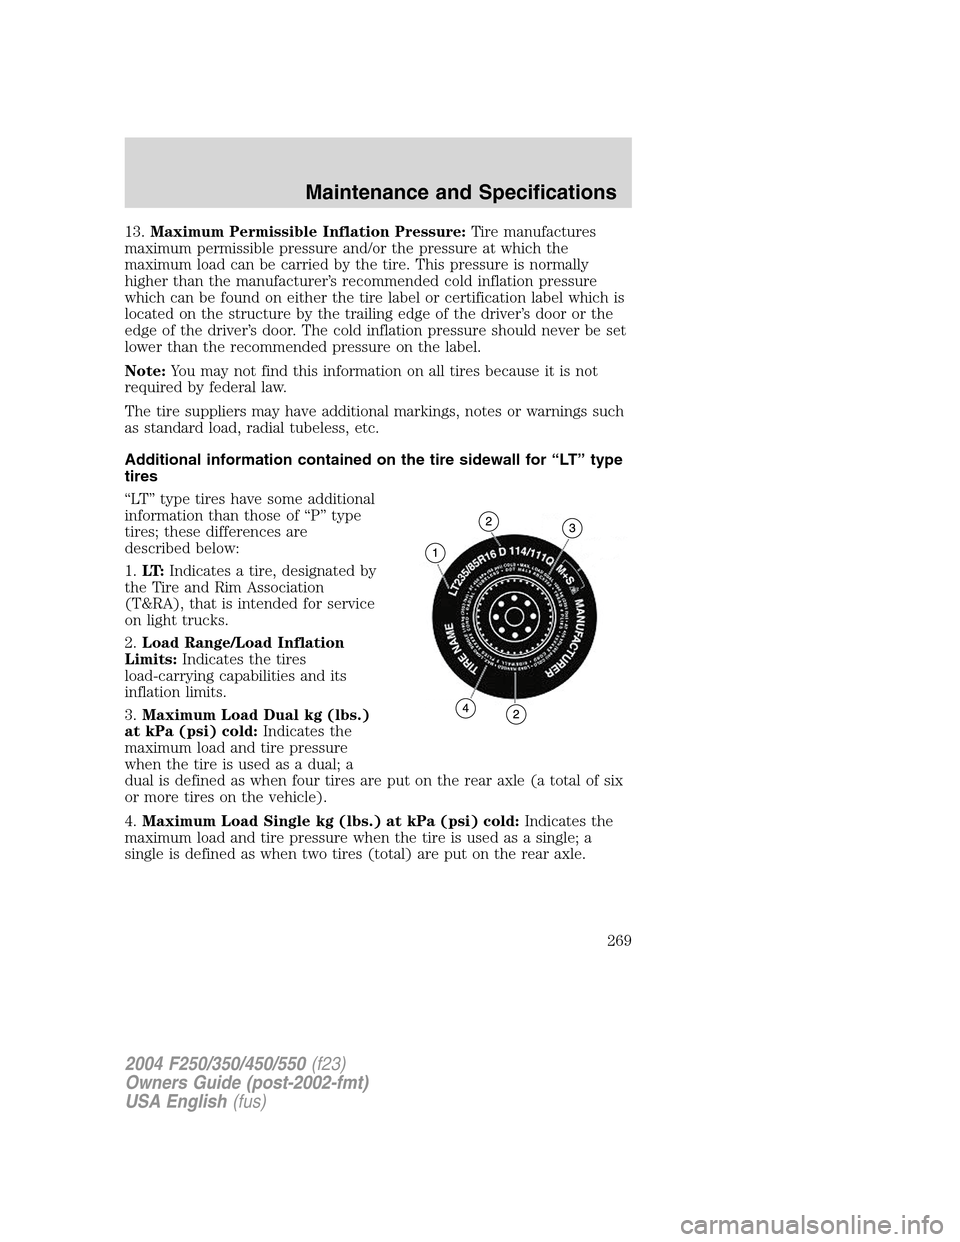
Additional information contained on the tire sidewall for“LT”type
tires
“LT”type tires have some additional
information than those of“P”type
tires; these differences are
described below:
1.LT:Indicates a tire, designated by
the Tire and Rim Association
(T&RA), that is intended for service
on light trucks.
2.Load Range/Load Inflation
Limits:Indicates the tires
load-carrying capabilities and its
inflation limits.
3.Maximum Load Dual kg (lbs.)
at kPa (psi) cold:Indicates the
maximum load and tire pressure
when the tire is used as a dual; a
dual is defined as when four tires are put on the rear axle (a total of six
or more tires on the vehicle).
4.Maximum Load Single kg (lbs.) at kPa (psi) cold:Indicates the
maximum load and tire pressure when the tire is used as a single; a
single is defined as when two tires (total) are put on the rear axle.
2004 F250/350/450/550(f23)
Owners Guide (post-2002-fmt)
USA English(fus)
Maintenance and Specifications
269
Page 270 of 304

Information on“T”type tires
T145/80D16 is an example of a tire
size.
Note:The temporary tire size for
your vehicle may be different than
this example.
1.T:Indicates a type of tire,
designated by the Tire and Rim
Association (T&RA), that is
intended for temporary service on
cars, SUVs, minivans and light
trucks.
2.145:Indicates the nominal width
of the tire in millimeters from
sidewall edge to sidewall edge. In
general, the larger the number, the
wider the tire.
3.80:Indicates the aspect ratio
which gives the tires ratio of height to width. Numbers of 70 or lower
indicate a short sidewall.
4.D:Indicates a“diagonal”type tire.
R:Indicates a“radial”type tire.
5.16:Indicates the wheel or rim diameter in inches. If you change your
wheel size, you will have to purchase new tires to match the new wheel
diameter.
Location of the tire label
You will find a tire label containing tire inflation pressure by tire size and
other important information located on the B-Pillar or the driver’s door.
TIRE CARE
Improper or inadequate vehicle maintenance can also cause tires to wear
abnormally. Here are some of the important maintenance items
Tire inflation pressure
Use a tire gauge to check the tire inflation pressure, including the spare,
at least monthly and before long trips. You are strongly urged to buy a
reliable tire pressure gauge, as automatic service station gauges may be
inaccurate.
SPARETIRE
TEMPORARYUSEONLY
INFLATETO60P.S.I.T
T145/80D16105M
2004 F250/350/450/550(f23)
Owners Guide (post-2002-fmt)
USA English(fus)
Maintenance and Specifications
270
Page 272 of 304
6. Visually inspect the tires to make sure there are no nails or other
objects embedded that could poke a hole in the tire and cause an air
leak.
7. Check the sidewalls to make sure there are no gouges, cuts, bulges or
other irregularities.
Tire inflation information
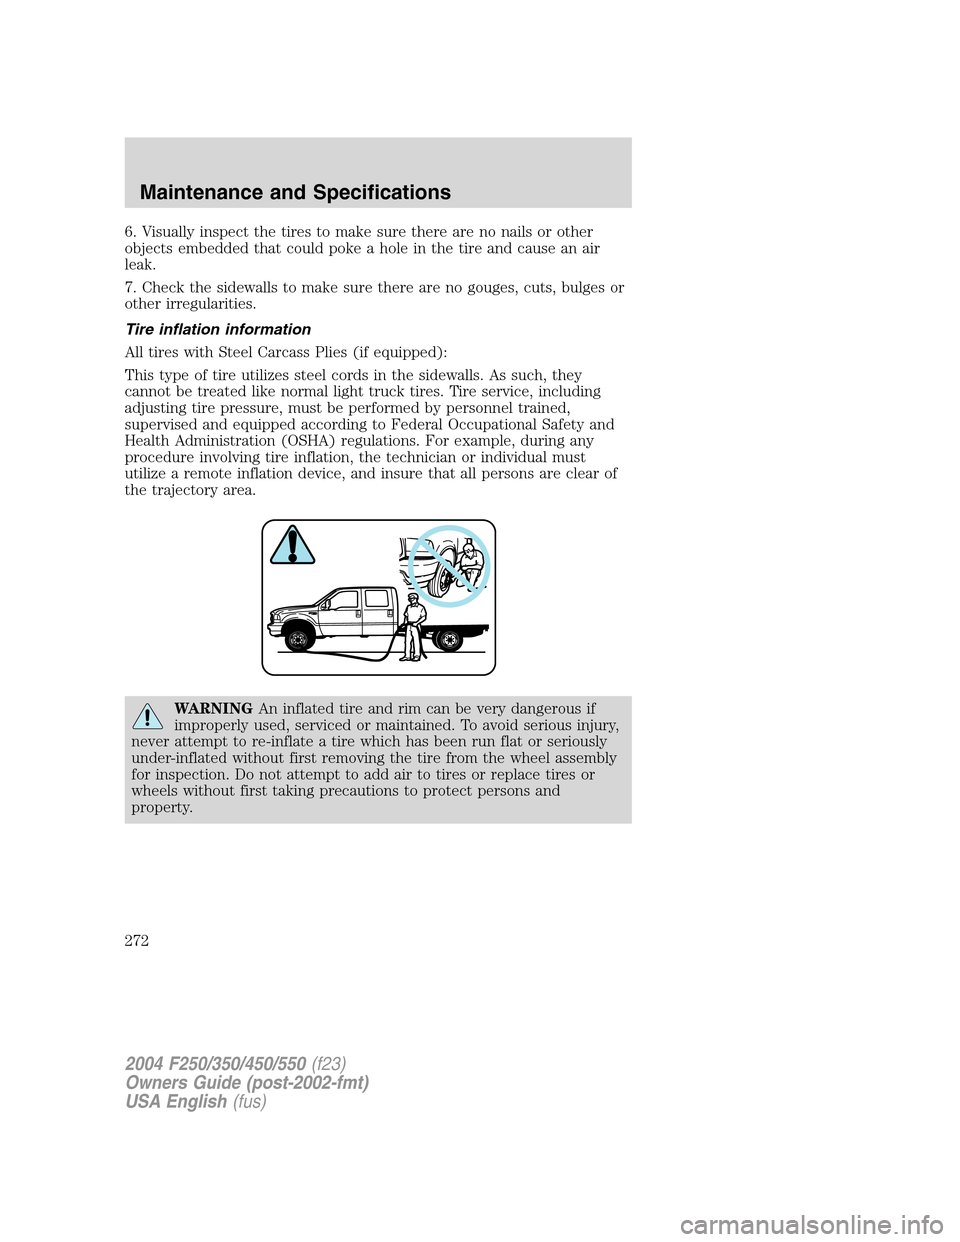
All tires with Steel Carcass Plies (if equipped):
This type of tire utilizes steel cords in the sidewalls. As such, they
cannot be treated like normal light truck tires. Tire service, including
adjusting tire pressure, must be performed by personnel trained,
supervised and equipped according to Federal Occupational Safety and
Health Administration (OSHA) regulations. For example, during any
procedure involving tire inflation, the technician or individual must
utilize a remote inflation device, and insure that all persons are clear of
the trajectory area.
WARNINGAn inflated tire and rim can be very dangerous if
improperly used, serviced or maintained. To avoid serious injury,
never attempt to re-inflate a tire which has been run flat or seriously
under-inflated without first removing the tire from the wheel assembly
for inspection. Do not attempt to add air to tires or replace tires or
wheels without first taking precautions to protect persons and
property.
2004 F250/350/450/550(f23)
Owners Guide (post-2002-fmt)
USA English(fus)
Maintenance and Specifications
272