2004 FORD FREESTAR wheel
[x] Cancel search: wheelPage 202 of 280

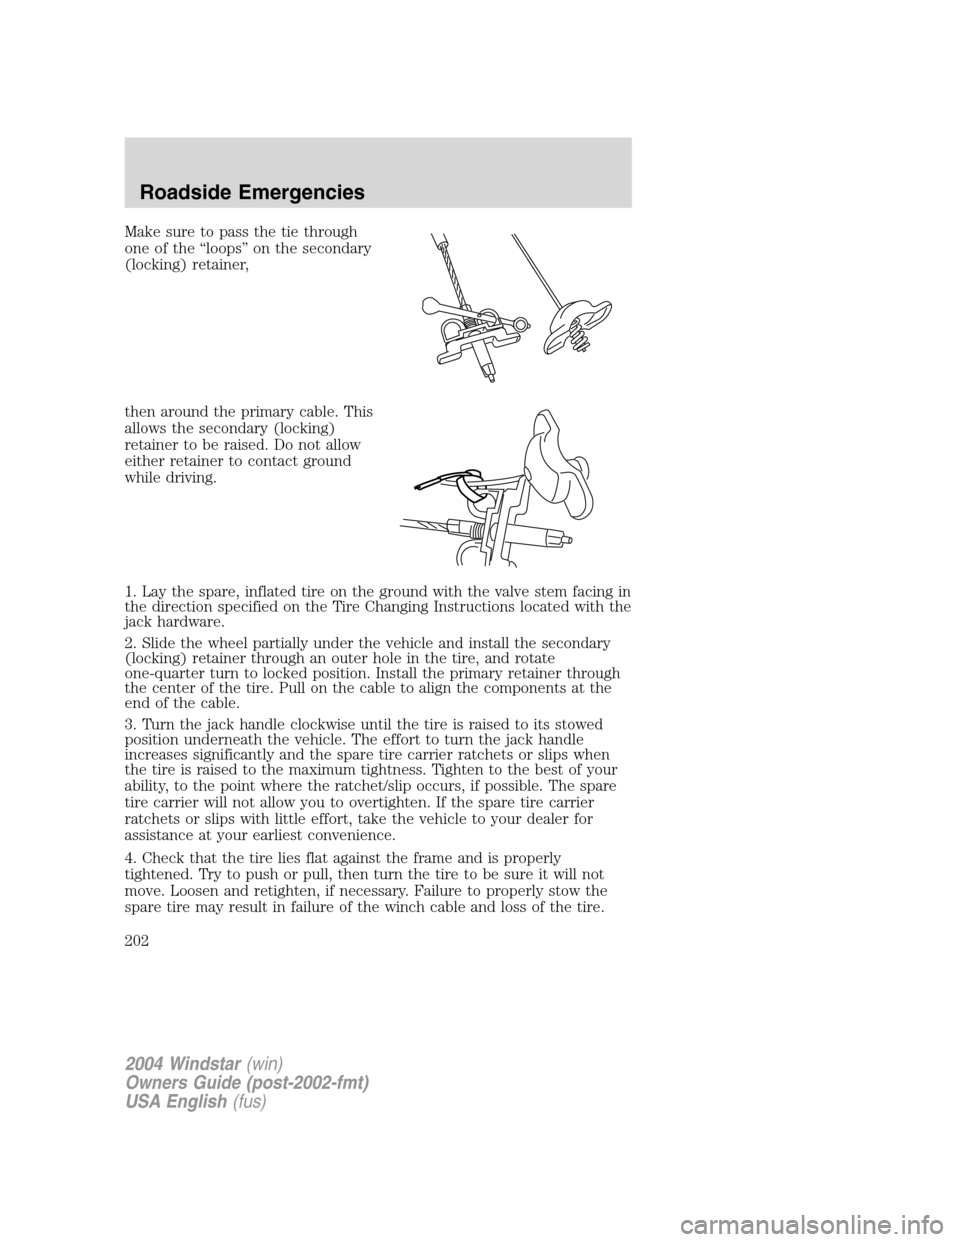
Make sure to pass the tie through
one of the “loops” on the secondary
(locking) retainer,
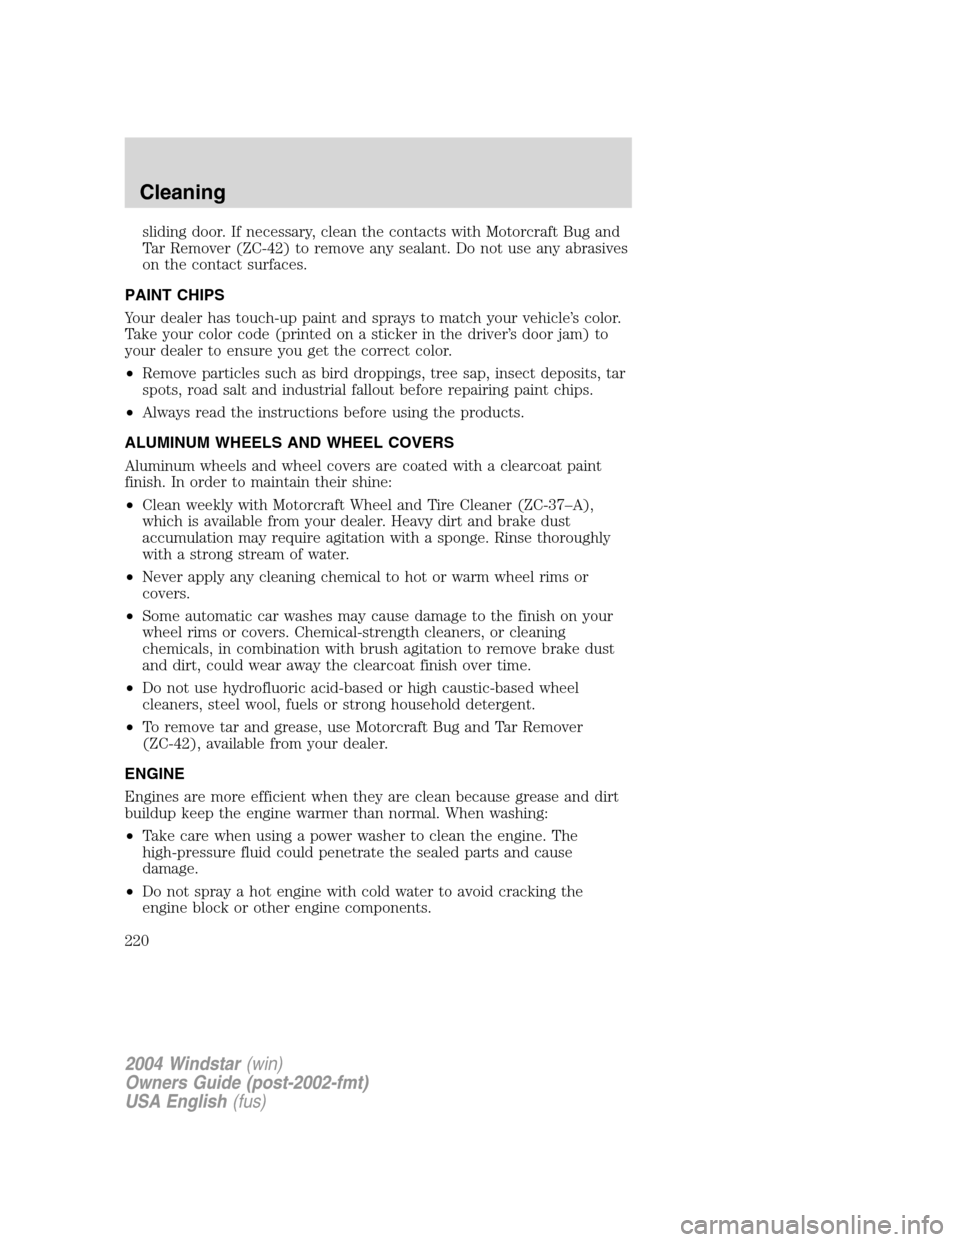
then around the primary cable. This
allows the secondary (locking)
retainer to be raised. Do not allow
either retainer to contact ground
while driving.
1. Lay the spare, inflated tire on the ground with the valve stem facing in
the direction specified on the Tire Changing Instructions located with the
jack hardware.
2. Slide the wheel partially under the vehicle and install the secondary
(locking) retainer through an outer hole in the tire, and rotate
one-quarter turn to locked position. Install the primary retainer through
the center of the tire. Pull on the cable to align the components at the
end of the cable.
3. Turn the jack handle clockwise until the tire is raised to its stowed
position underneath the vehicle. The effort to turn the jack handle
increases significantly and the spare tire carrier ratchets or slips when
the tire is raised to the maximum tightness. Tighten to the best of your
ability, to the point where the ratchet/slip occurs, if possible. The spare
tire carrier will not allow you to overtighten. If the spare tire carrier
ratchets or slips with little effort, take the vehicle to your dealer for
assistance at your earliest convenience.
4. Check that the tire lies flat against the frame and is properly
tightened. Try to push or pull, then turn the tire to be sure it will not
move. Loosen and retighten, if necessary. Failure to properly stow the
spare tire may result in failure of the winch cable and loss of the tire.
2004 Windstar(win)
Owners Guide (post-2002-fmt)
USA English(fus)
Roadside Emergencies
202
Page 203 of 280

5. Repeat this tightness check procedure when servicing the spare tire
pressure (every six months, per scheduled maintenance guide), or at any
time that the spare tire is disturbed through service of other
components.
6. If removed, install the spare tire lock (if equipped) into the bumper
drive tube with the spare tire lock key (if equipped) and jack handle.
Wheel lug nut torque specifications
Retighten the lug nuts to the specified torque at 800 km (500 miles)
after any wheel disturbance (rotation, flat tire, wheel removal, etc.).
Bolt size Wheel lug nut torque*
Nm Lb-ft
1�2x 20 113-153 85-115
* Torque specifications are for nut and bolt threads free of dirt and
rust. Use only Ford recommended replacement fasteners.
When a wheel is installed, always remove any corrosion, dirt or
foreign materials present on the mounting surfaces of the wheel
or the surface of the front disc brake hub and rotor that contacts the
wheel. Installing wheels without correct metal-to-metal contact at the
wheel mounting surfaces can cause the wheel nuts to loosen and the
wheel to come off while the vehicle is in motion, resulting in loss of
control.
JUMP STARTING YOUR VEHICLE
The gases around the battery can explode if exposed to flames,
sparks, or lit cigarettes. An explosion could result in injury or
vehicle damage.
Batteries contain sulfuric acid which can burn skin, eyes and
clothing, if contacted.
Do not attempt to push-start your vehicle. Automatic
transmissions do not have push-start capability; doing so may
damage the catalytic converter.
2004 Windstar(win)
Owners Guide (post-2002-fmt)
USA English(fus)
Roadside Emergencies
203
Page 209 of 280

WRECKER TOWING
If you need to have your vehicle towed, contact a professional towing
service or, if you are a member of a roadside assistance program, your
roadside assistance service provider.
It is recommended that your vehicle be towed by wheel lift or flatbed
equipment. Do not tow with a slingbelt. Ford Motor Company has not
approved a slingbelt towing procedure.
If your vehicle is to be towed from the rear using wheel lift, the front
wheels must be placed on a dolly to prevent damage to the transaxle.
If your vehicle must be towed with the drive wheels on the ground:
•Place the transaxle in N (Neutral).
•Do not exceed the distance of 80 km (50 miles).
•Do not exceed the speed of 56 km/h (35 mph).
If the vehicle is towed by other means or incorrectly, vehicle
damage may occur.
Ford Motor Company produces a towing manual for all authorized tow
truck operators. Have your tow truck operator refer to this manual for
proper hook-up and towing procedures for your vehicle.
2004 Windstar(win)
Owners Guide (post-2002-fmt)
USA English(fus)
Roadside Emergencies
209
Page 220 of 280

sliding door. If necessary, clean the contacts with Motorcraft Bug and
Tar Remover (ZC-42) to remove any sealant. Do not use any abrasives
on the contact surfaces.
PAINT CHIPS
Your dealer has touch-up paint and sprays to match your vehicle’s color.
Take your color code (printed on a sticker in the driver’s door jam) to
your dealer to ensure you get the correct color.
•Remove particles such as bird droppings, tree sap, insect deposits, tar
spots, road salt and industrial fallout before repairing paint chips.
•Always read the instructions before using the products.
ALUMINUM WHEELS AND WHEEL COVERS
Aluminum wheels and wheel covers are coated with a clearcoat paint
finish. In order to maintain their shine:
•Clean weekly with Motorcraft Wheel and Tire Cleaner (ZC-37–A),
which is available from your dealer. Heavy dirt and brake dust
accumulation may require agitation with a sponge. Rinse thoroughly
with a strong stream of water.
•Never apply any cleaning chemical to hot or warm wheel rims or
covers.
•Some automatic car washes may cause damage to the finish on your
wheel rims or covers. Chemical-strength cleaners, or cleaning
chemicals, in combination with brush agitation to remove brake dust
and dirt, could wear away the clearcoat finish over time.
•Do not use hydrofluoric acid-based or high caustic-based wheel
cleaners, steel wool, fuels or strong household detergent.
•To remove tar and grease, use Motorcraft Bug and Tar Remover
(ZC-42), available from your dealer.
ENGINE
Engines are more efficient when they are clean because grease and dirt
buildup keep the engine warmer than normal. When washing:
•Take care when using a power washer to clean the engine. The
high-pressure fluid could penetrate the sealed parts and cause
damage.
•Do not spray a hot engine with cold water to avoid cracking the
engine block or other engine components.
2004 Windstar(win)
Owners Guide (post-2002-fmt)
USA English(fus)
Cleaning
220
Page 222 of 280

•Do not use fuel, kerosene, or paint thinner to clean any parts.
•Wiper blades can be cleaned with isopropyl (rubbing) alcohol or
windshield washer solution. Be sure to replace wiper blades when they
appear worn or do not function properly.
Do not use sharp objects, such as a razor blade, to clean the
inside of the rear window or to remove decals, as it may cause
damage to the rear window defroster’s heated grid lines.
INSTRUMENT PANEL AND CLUSTER LENS
Clean the instrument panel with a damp cloth, then dry with a dry cloth.
•Avoid cleaners or polish that increase the gloss of the upper portion of
the instrument panel. The dull finish in this area helps protect the
driver from undesirable windshield reflection.
Do not use chemical solvents or strong detergents when cleaning
the steering wheel or instrument panel to avoid contamination of
the air bag system.
•
Be certain to wash or wipe your hands clean if you have been in contact
with certain products such as insect repellent and suntan lotion in order
to avoid possible damage to the interior painted surfaces.
INTERIOR TRIM
•Clean the interior trim areas with a damp cloth, then dry by wiping
with a dry, soft, clean cloth.
•
Do not use household or glass cleaners as these may damage the finish.
INTERIOR
For fabric, carpets, cloth seats, safety belts and seats equipped with side
air bags:
•Remove dust and loose dirt with a vacuum cleaner.
•Remove light stains and soil with Motorcraft Extra Strength
Upholstery Cleaner (ZC-41).
•If grease or tar is present on the material, spot-clean the area first
with Motorcraft Spot and Stain Remover (ZC-14).
•Never saturate the seat covers with cleaning solution.
•Do not use household cleaning products or glass cleaners, which can
stain and discolor the fabric and affect the flame retardant abilities of
the seat materials.
2004 Windstar(win)
Owners Guide (post-2002-fmt)
USA English(fus)
Cleaning
222
Page 224 of 280

Motorcraft Vinyl Cleaner (Canada only) (CXC-93)
Motorcraft Vinyl Conditioner (Canada only) (CXC-94)
Motorcraft Deluxe Leather and Vinyl Cleaner (not available in Canada)
(ZC-11–A)
Motorcraft Bug and Tar Remover (ZC-42)
Motorcraft Extra Strength Upholstery Cleaner (not available in Canada)
(ZC-41)
Motorcraft Custom Bright Metal Cleaner (ZC-15)
Motorcraft Wheel and Tire Cleaner (ZC-37–A)
Motorcraft Dash and Vinyl Cleaner (ZC-38–A)
Motorcraft Car Care Kit (ZC-26)
Ford Premium Car Wash Concentrate (F2SZ-19523–WC)
Motorcraft Carlite Glass Cleaner (Canada only) (CXC-100)
Motorcraft Spot and Stain Remover (ZC-14)
Motorcraft Detail Wash (ZC-3–A)
Motorcraft Tire Clean and Shine (ZC-28)
Motorcraft Triple Clean (ZC-13)
Motorcraft Ultra-Clear Spray Glass Cleaner (not available in Canada)
(ZC-23)
Motorcraft Engine Shampoo and Degreaser (ZC-20)
2004 Windstar(win)
Owners Guide (post-2002-fmt)
USA English(fus)
Cleaning
224
Page 225 of 280

SERVICE RECOMMENDATIONS
To help you service your vehicle:
•We highlight do-it-yourself items in the engine compartment for easy
location.
•We provide a scheduled maintenance guide which makes tracking
routine service easy.
If your vehicle requires professional service, your dealership can provide
the necessary parts and service. Check yourWarranty Guide/Owner
Information Guideto find out which parts and services are covered.
Use only recommended fuels, lubricants, fluids and service parts
conforming to specifications. Motorcraft parts are designed and built to
provide the best performance in your vehicle.
PRECAUTIONS WHEN SERVICING YOUR VEHICLE
•Do not work on a hot engine.
•Make sure that nothing gets caught in moving parts.
•Do not work on a vehicle with the engine running in an enclosed
space, unless you are sure you have enough ventilation.
•Keep all open flames and other lit material away from the battery and
all fuel related parts.
Working with the engine off
1. Set the parking brake and shift to P (Park).
2. Turn off the engine and remove the key.
3. Block the wheels.
Working with the engine on
1. Set the parking brake and shift to P (Park).
2. Block the wheels.
Note:Do not start your engine with the air cleaner removed and do not
remove it while the engine is running.
2004 Windstar(win)
Owners Guide (post-2002-fmt)
USA English(fus)
Maintenance and Specifications
Maintenance and Specifications
225
Page 244 of 280

Habits
•Smooth, moderate operation can yield up to 10% savings in fuel.
•Steady speeds without stopping will usually give the best fuel
economy.
•Idling for long periods of time (greater than one minute) may waste
fuel.
•Anticipate stopping; slowing down may eliminate the need to stop.
•Sudden or hard accelerations may reduce fuel economy.
•Slow down gradually.
•Driving at reasonable speeds (traveling at 88 km/h [55 mph] uses 15%
less fuel than traveling at 105 km/h [65 mph]).
•Revving the engine before turning it off may reduce fuel economy.
•Using the air conditioner or defroster may reduce fuel economy.
•You may want to turn off the speed control in hilly terrain if
unnecessary shifting between third and fourth gear occurs.
Unnecessary shifting of this type could result in reduced fuel
economy.
•Warming up a vehicle on cold mornings is not required and may
reduce fuel economy.
•Resting your foot on the brake pedal while driving may reduce fuel
economy.
•Combine errands and minimize stop-and-go driving.
Maintenance
•Keep tires properly inflated and use only recommended size.
•Operating a vehicle with the wheels out of alignment will reduce fuel
economy.
•Use recommended engine oil. Refer toLubricant specificationsin
this chapter.
•Perform all regularly scheduled maintenance items. Follow the
recommended maintenance schedule and owner maintenance checks
found in your vehicle scheduled maintenance guide.
Conditions
•Heavily loading a vehicle or towing a trailer may reduce fuel economy
at any speed.
•Carrying unnecessary weight may reduce fuel economy (approximately
0.4 km/L [1 mpg] is lost for every 180 kg [400 lb] of weight carried).
2004 Windstar(win)
Owners Guide (post-2002-fmt)
USA English(fus)
Maintenance and Specifications
244